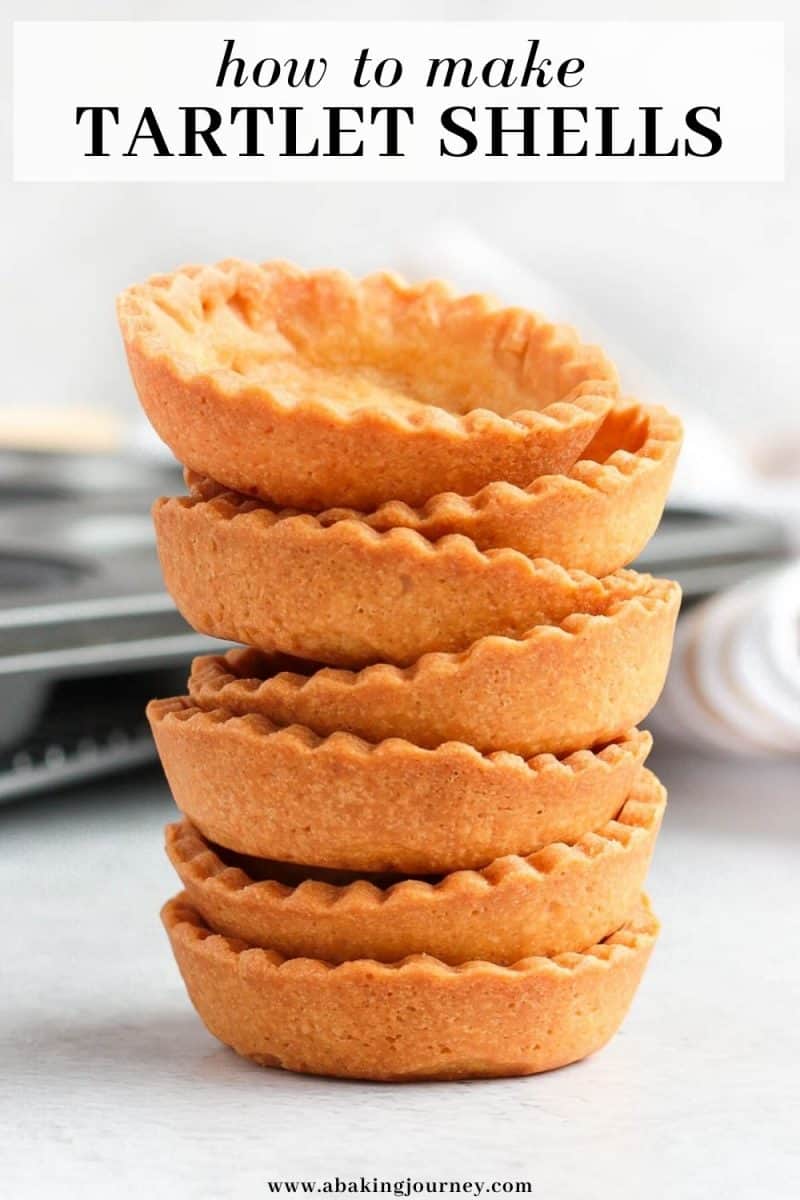
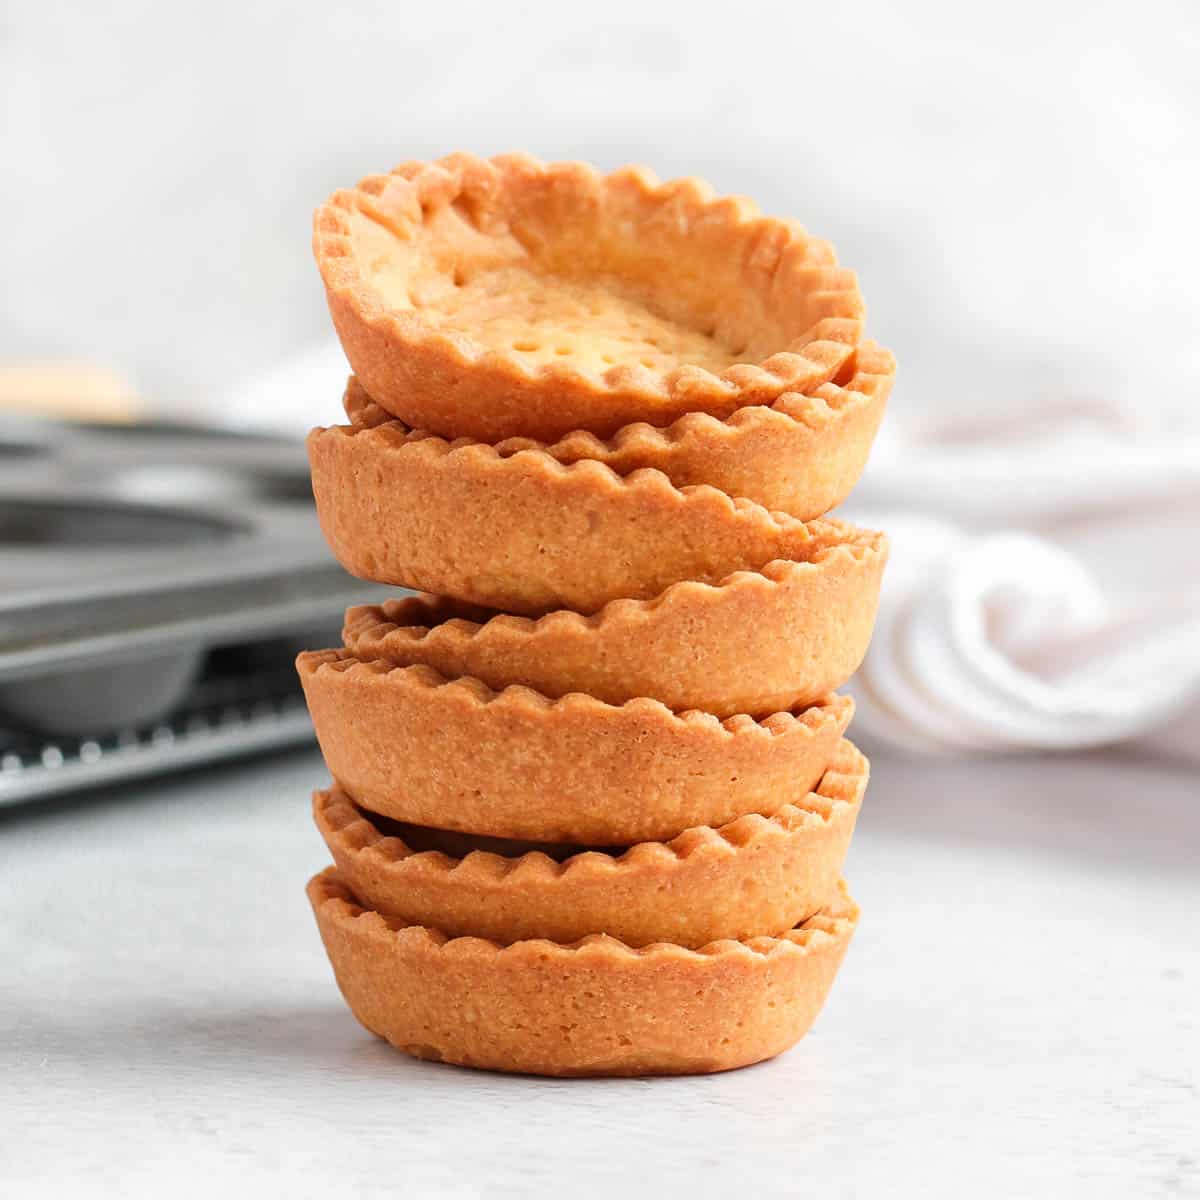
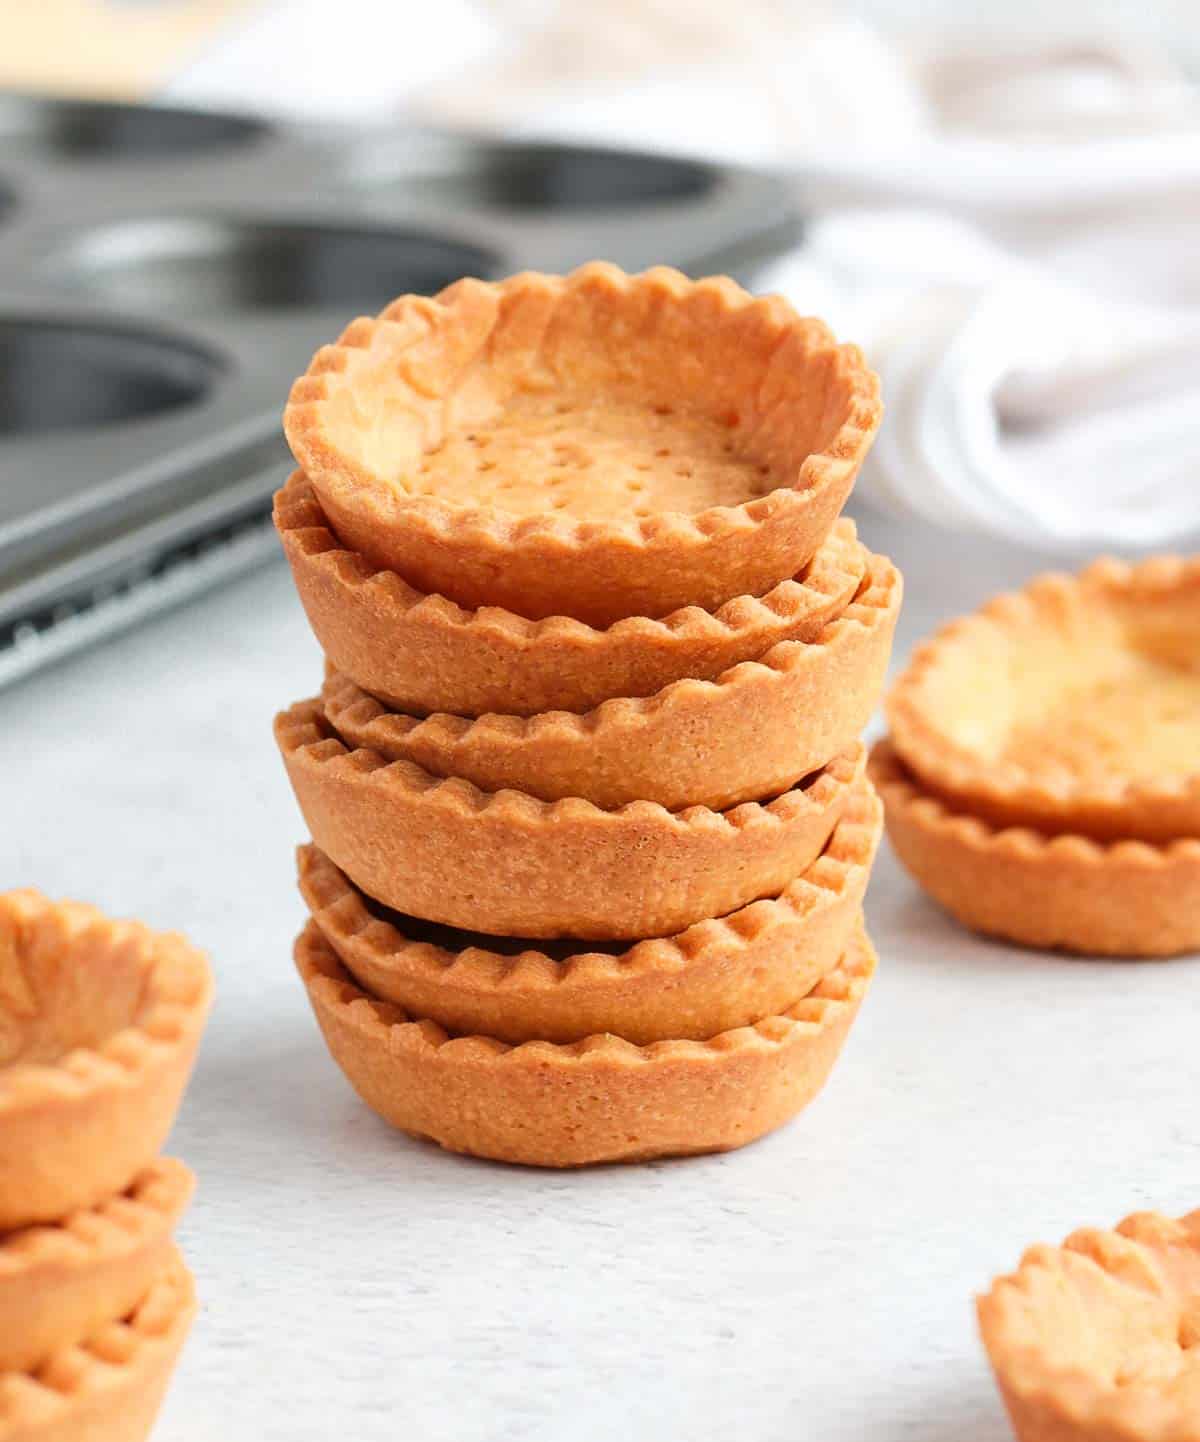
No Tartlet Tin? No problem! This easy recipe will show you how to make Tartlet Shells in a Muffin Pan. These deliciously buttery and crunchy mini pastry crusts can be garnished with any of your favourite fillings and are great for parties!
Jump to:
Why we love this recipe
There is nothing I love to bake more for parties than Mini Tarts. Not only they are so fun to make, they can also be filled with so many different creams, fruits like these Lemon Curd Tartlets, Orange Tartlets or even Chocolate Orange Tartlets. They are a great way to create a beautiful sweet buffet!
I love this recipe because you don't need any special equipment like mini tart tins or the tartlet rings I used to make these Pear Frangipane Tartlets. A simple Muffin or Cupcake Pan (or Mini Muffin Tin like for these Lemon Meringue Bites) and a Cookie Cutter are all you need to make these Mini Tart Shells!
Prepare your favourite pastry dough (I used a Pâte Sablée here but you could also make them with a Chocolate Pastry like I did with these Mini Chocolate Tarts) - or even use frozen / pre-made pastry and get baking!
Ingredients
These Mini Tart Shells are made with my basic Pâte Sablée (French Shortcrust Pastry) recipe - but you can really use any pie or tart pastry recipe you want (*).
A Pâte Sucrée (Sweet Shortcrust Pastry) and Chocolate Pie Crust will work just as well - and you could even use a Savoury Shortcrust Pastry to make a savoury version of those tartlets too like mini quiches!
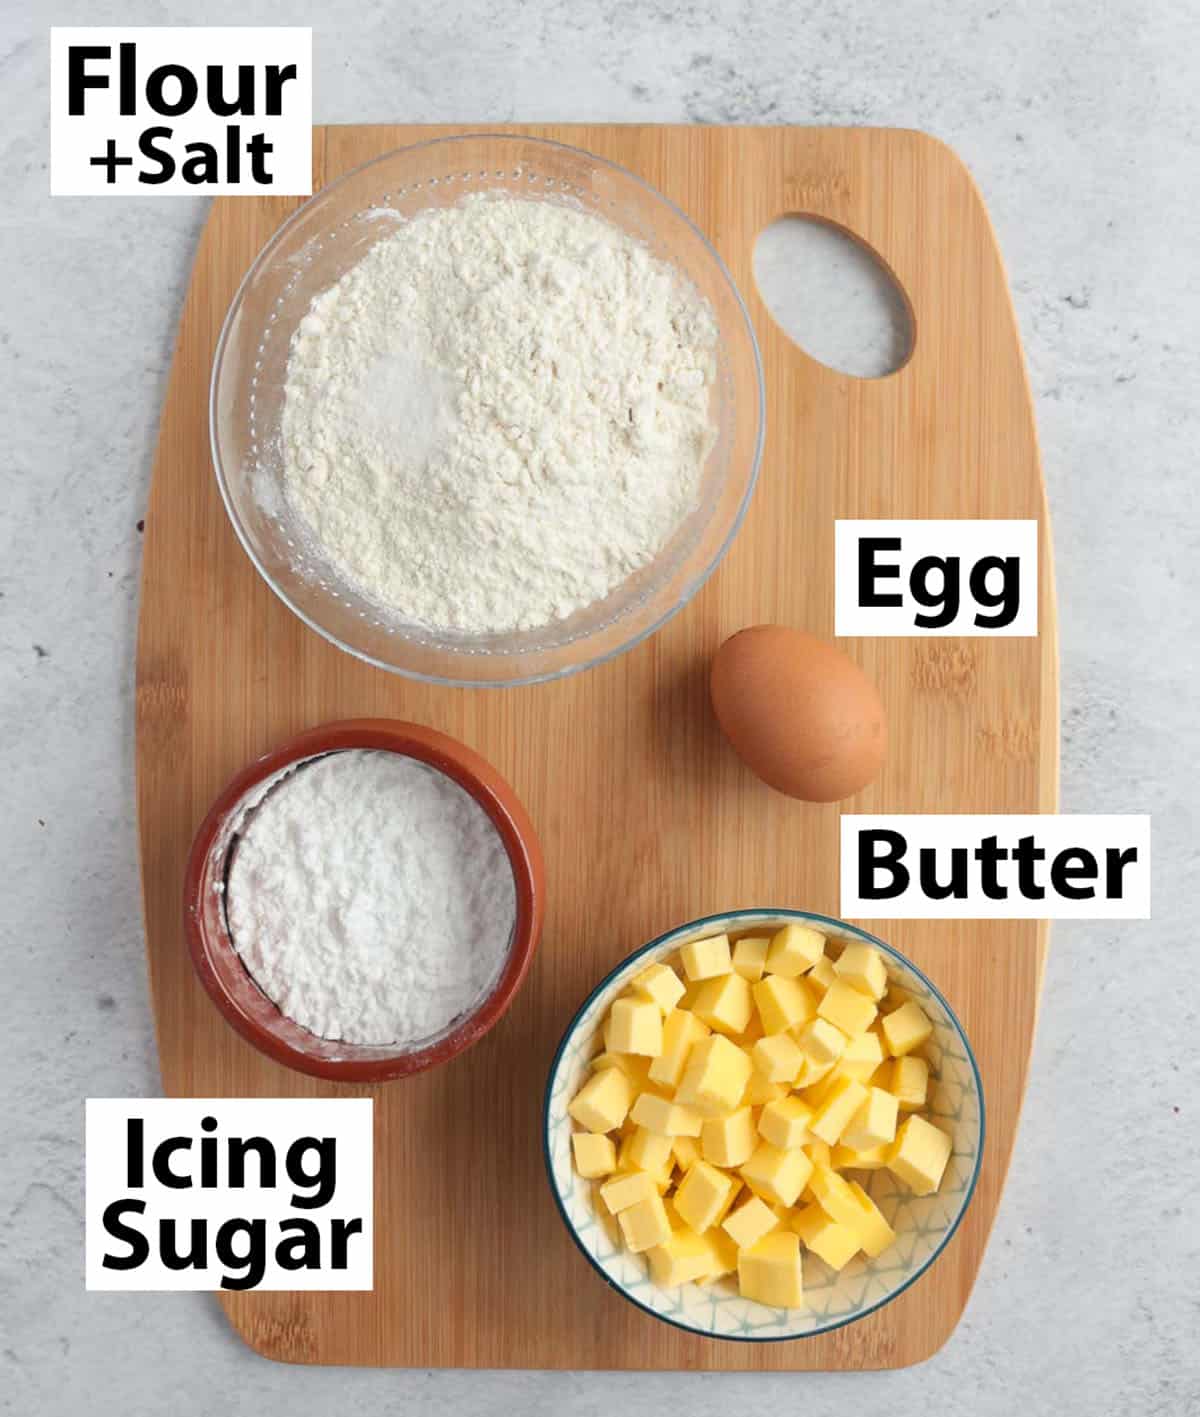
To make this recipe, you will need (scroll down to recipe card for all quantities):
- Dry Ingredients: Flour, Salt and Icing Sugar (or Confectioner's / Powdered Sugar)
- Wet Ingredients: Egg (at room temperature) and Unsalted Butter (very cold).
You can also add any of your favourite flavouring ingredients like Vanilla Extract, some Lemon Zest or even spices like Cinnamon.
(*) Note that if you are using Puff Pastry, you need to be careful with the size of the muffin pan and how wide you cut out the pastry as it will expand a lot in the oven.
How to make Mini Tart Shells in a Muffin Pan
There are two main steps to make these mini pie crusts: prepare the pastry, then line your muffin pan with it.
1. Making the Pastry
I like to make the Pastry in the Food Processor, but you can absolutely make it by hands as well (see all instructions to make by hands in the Pâte Sablée recipe).
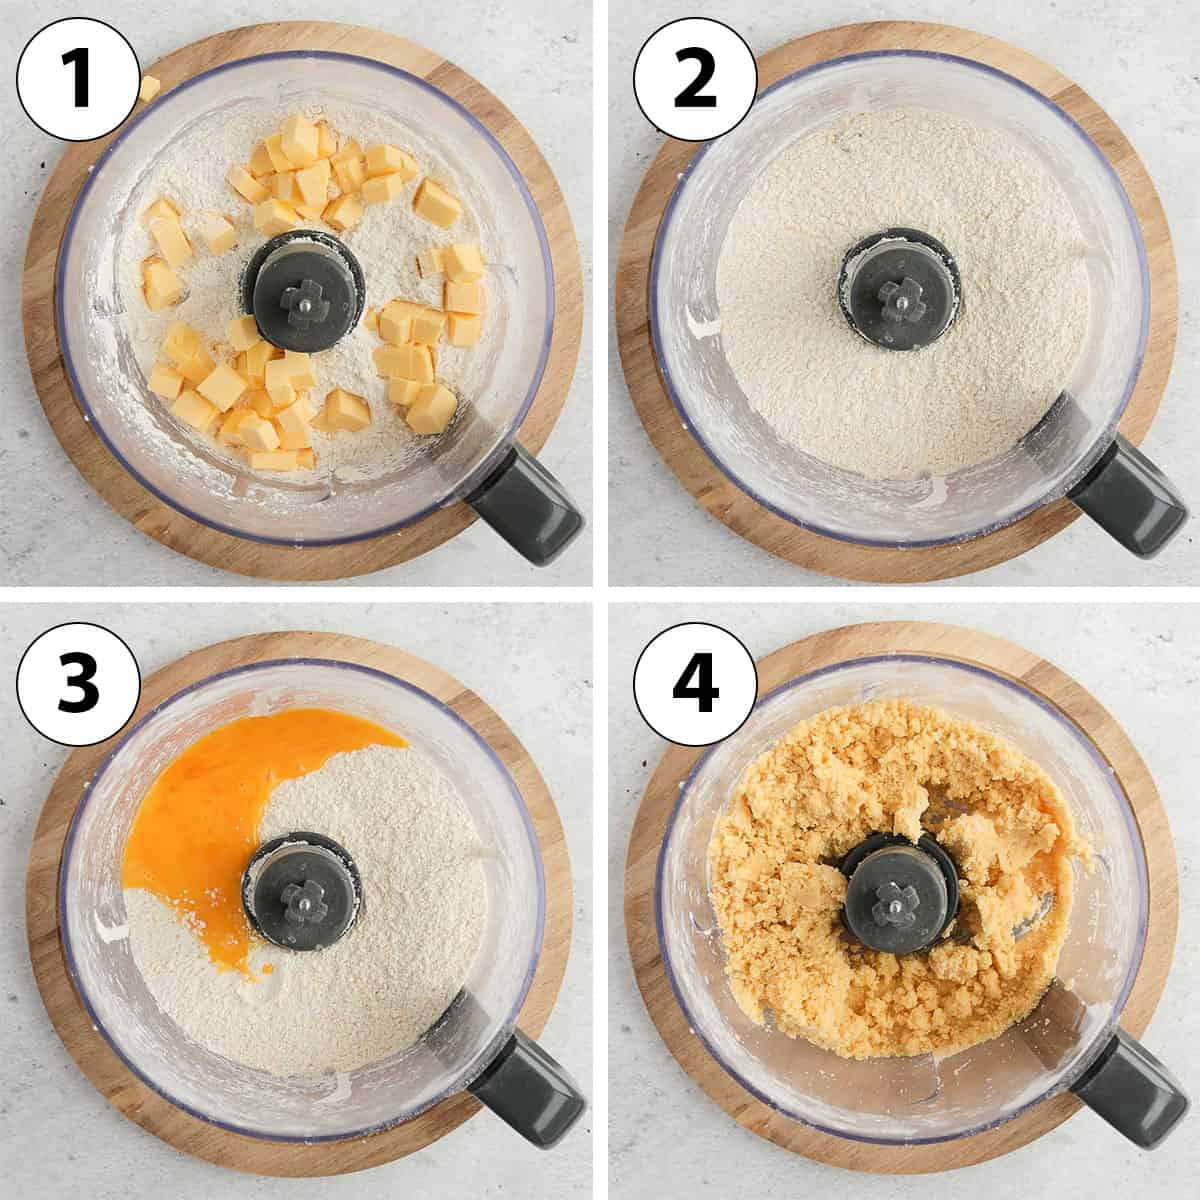
- Place all the dry ingredients in the bowl of your food processor and pulse to combine.
- Photo 1: Add the very cold Butter cut into small cubes.
- Photo 2: Mix until you get very small crumbs. The large the crumbs, the flakier the pastry will be. Because the tartlet shells are so small, I don't recommend using an ultra flaky pastry that might expand too much in the oven, leaving no room for the filling.
- Photo 3: Add the Egg
- Photo 4: Mix until a thick dough starts to come together.
Try not to over-mix the pastry here which would create a lot of gluten and make it stretchy and rubbery. To know the pastry is mixed enough, gather some large crumbs/lumps and press them together in your hands. If they stick together, the pastry is ready.
2. Lining the Muffin Pan
Once the mini tart pastry is ready, you will want to roll it straight away and rest it before lining the muffin pan.
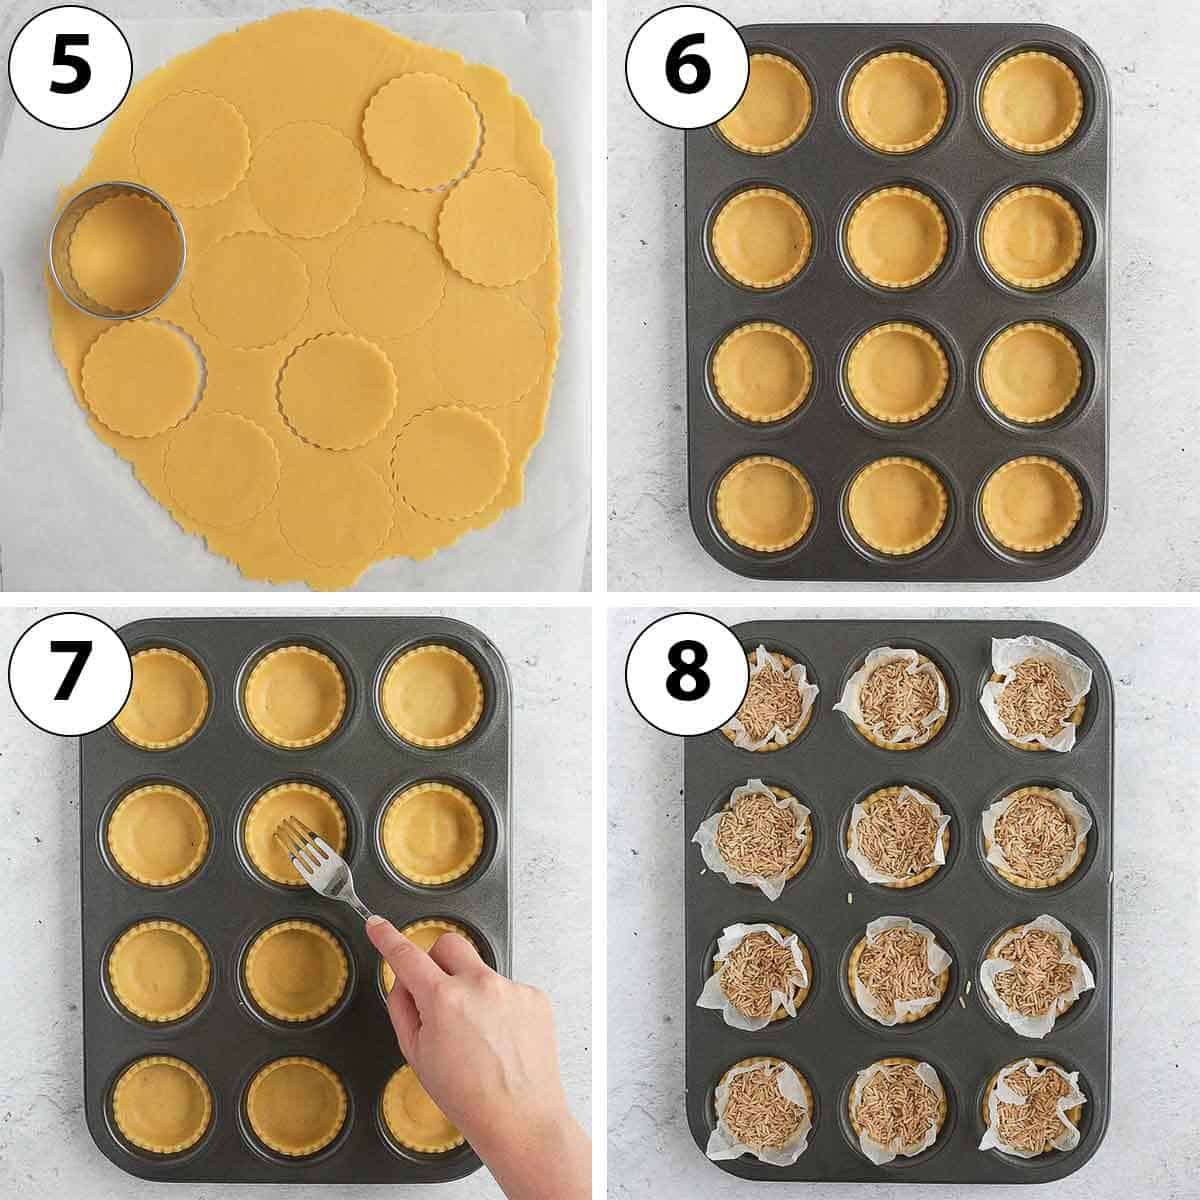
- Bring together the pastry into a large ball and place it between two sheets of baking paper. Roll into a large, thin disk about 3mm (1/8 inch) thick (*). Place it on a flat tray and leave in the fridge to chill and rest for at least an hour, or up to 24 hours in advance.
- Photo 5: Take out of the fridge and remove the baking paper. Using a round or fluted Cookie Cutter that is about 2 cm wider than the muffin pan openings, cut out disks of pastry.
- Photo 6: gently slide each circle of pastry in the muffin pan. Carefully press on the edge between the bottom and the sides to make sure there are no air bubbles stuck between the pastry and the pan.
- Photo 7: dock the pastry (prick the bottom of each shell with a fork) then place back in the fridge to chill and rest for at least 2 hour, preferably overnight or up to 24 hours in advance.
- Preheat your oven on 160'C / 325'F and place the muffin pan in the freezer while the oven is preheating so that the pastry are very cold.
- Photo 8: line each tartlet shell with a small piece of baking paper (scrunch it up first so that they fit in the shell more easily) and fill them with baking beads, beans or even rice like I did.
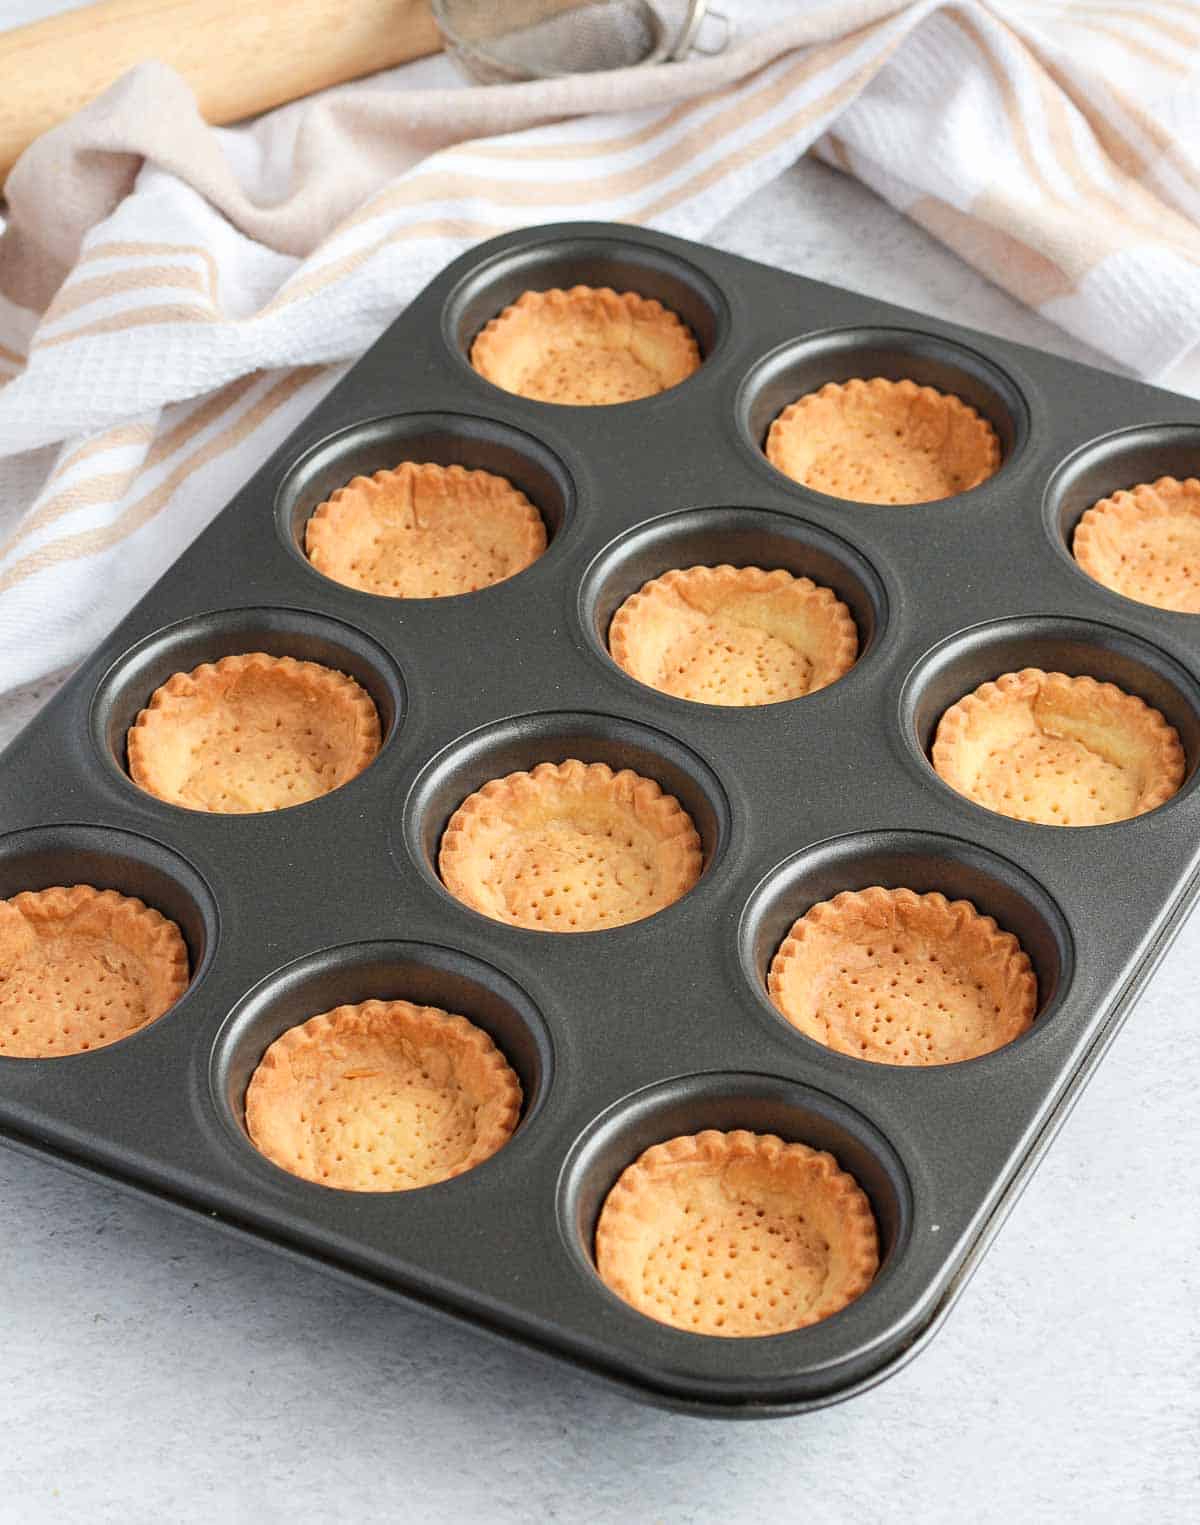
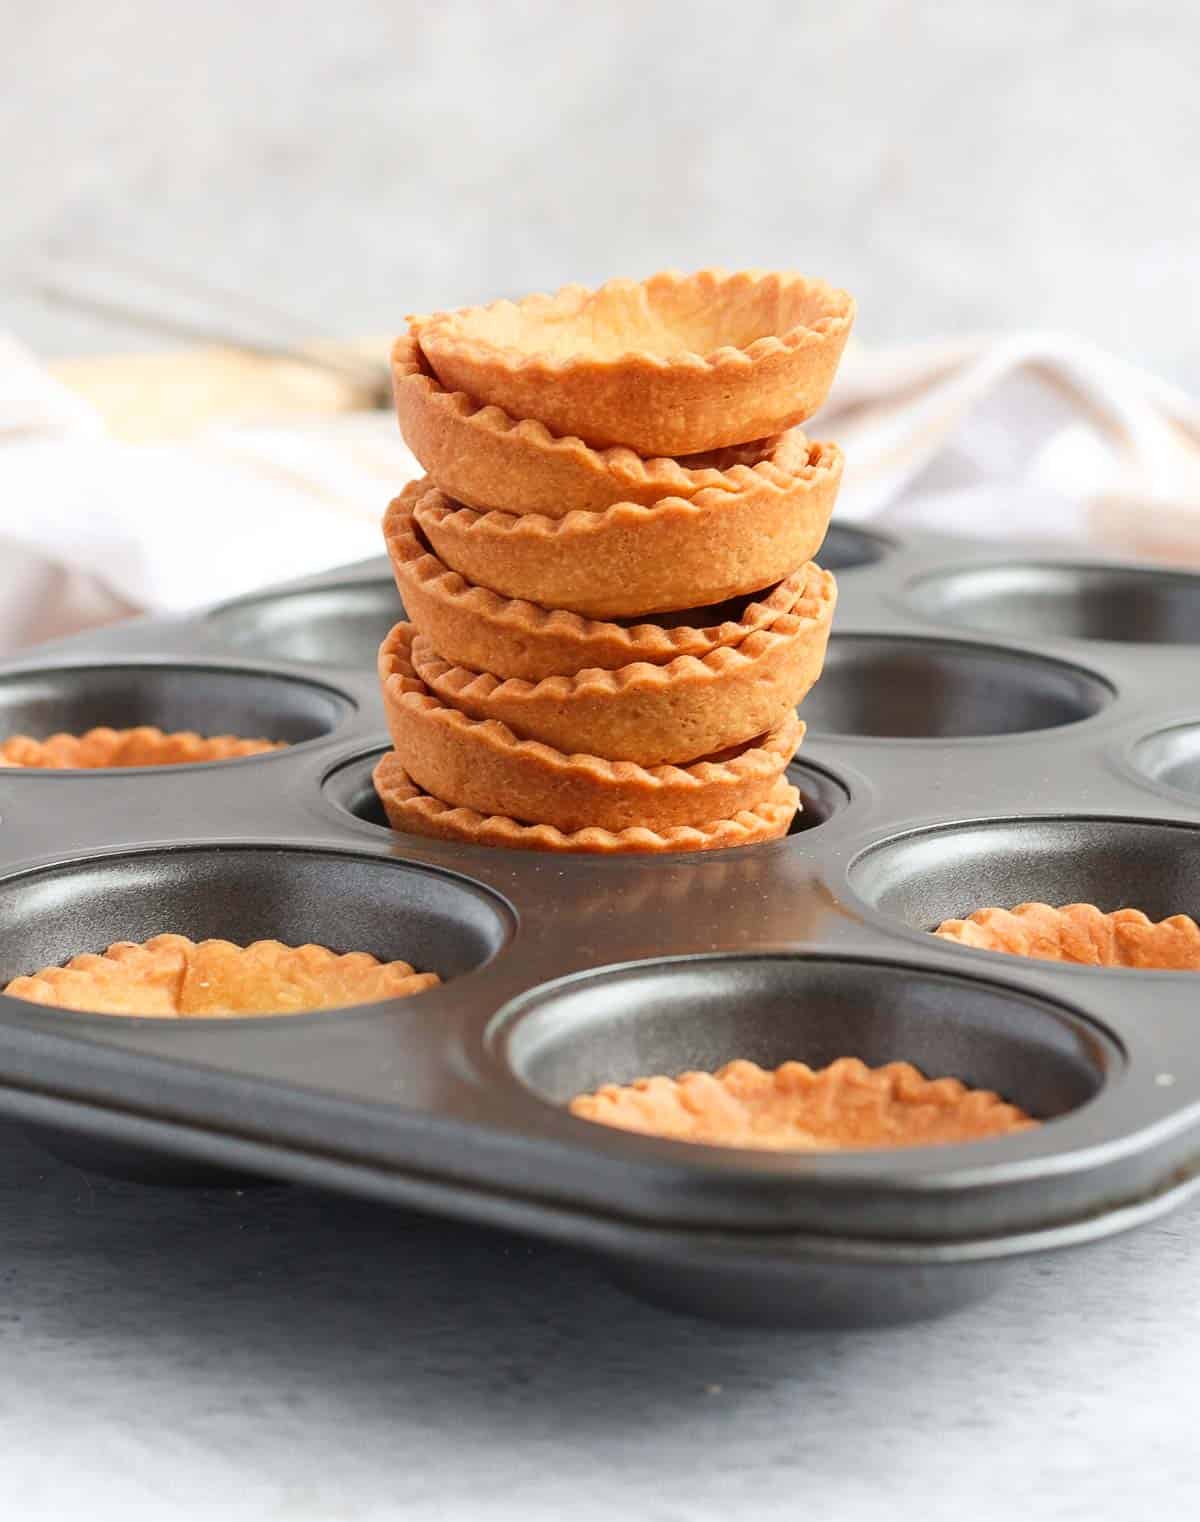
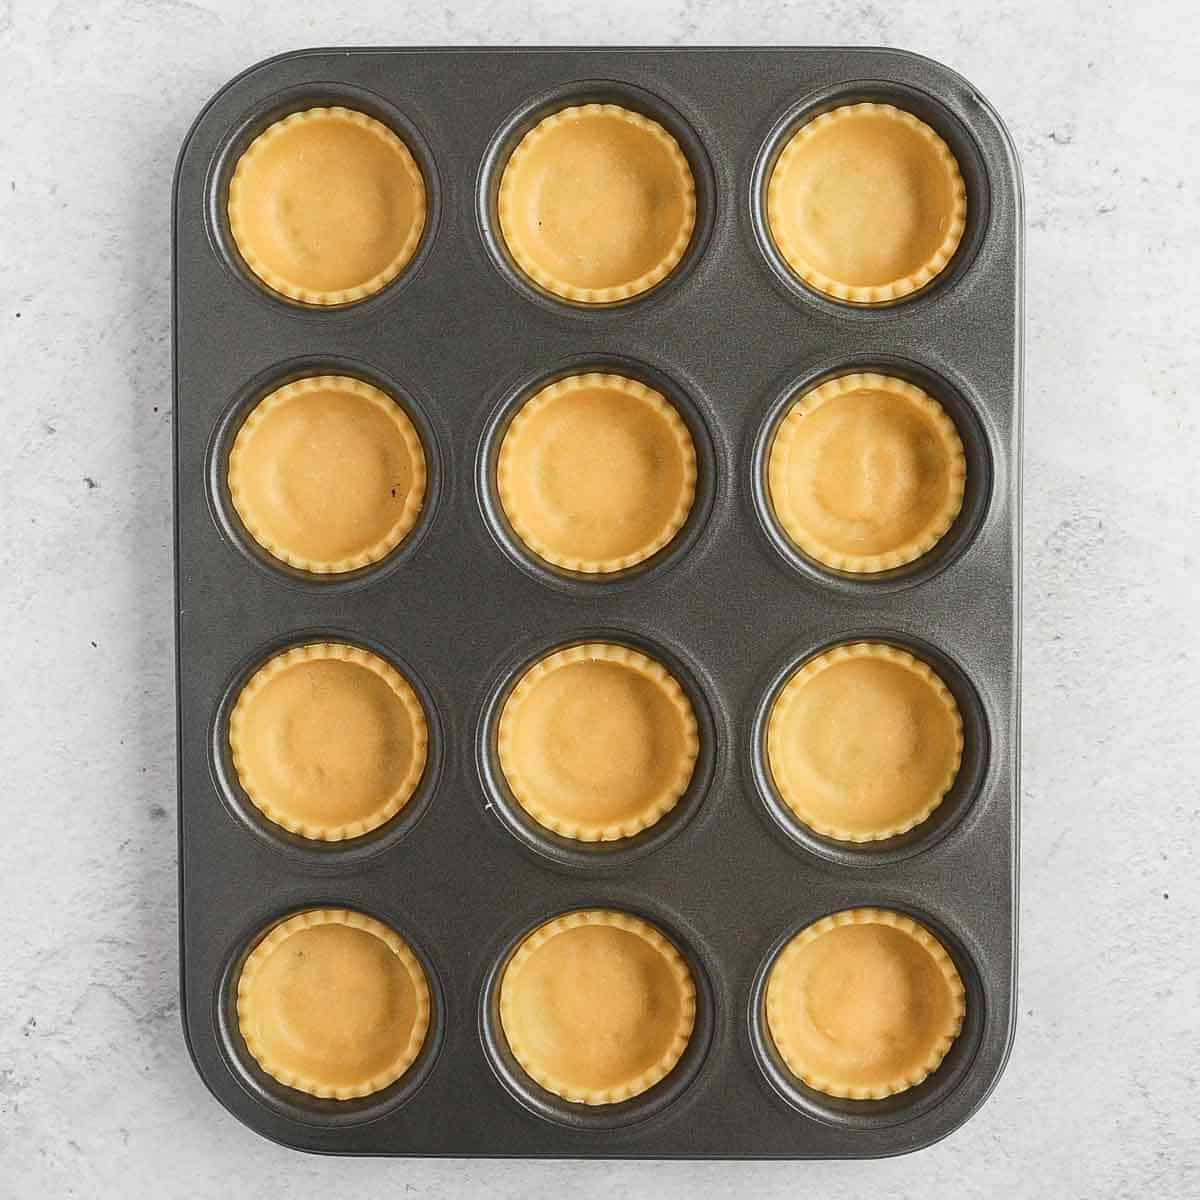
- Bake for 15 minutes, remove the baking weights then bake for an additional 15 minutes, or until the tartlet shells are fully baked. Leave to cool down completely before filling with your choice of garnish.
Would you like to save this recipe?
Note that depending on your choice of filling, you might not need to fully blind bake the pastries like here, but only partially pre-bake them or not blind bake them at all.
(*) Because the tart shells will be so small, try not to roll the pastry too thick or the ratio of pastry to filling will be off. They will also be rather delicate so they might break it you roll it too thinly. I have found that 3 mm (1/8 inch) is the perfect thickness for these tartlet crusts!
Tips to make this recipe
- Rest the pastry for at least an hour after rolling it then another one after lining the pan to insure the gluten is fully relaxed. They also need to be very cold (up to frozen!) to insure they don't shrink, move or collapse in the oven. Never skip the resting & chilling steps when making pastry!
- Use a simple Round Cookie Cutter for a classic tartlet look, or a Fluted Cookie Cutter like I did for cute scalloped edge effect.
- The width you cut out each pastry will determine how deep the mini pie crust will be. The wider they are, the deeper the pastries will be. As a general rule, try not to go smaller than the opening of the muffin pan or you will get a very shallow crust.
- Don't roll the pastry too thick or you will get an odd ratio of pastry to filling. Try not to roll it too thinly either or they might break after baking. I find that 3 mm (1/8 inch) is the perfect thickness for these tartlet crusts. You can use a Rolling Pin with Thickness Rings.
Troubleshooting
- The pastry is too hard to line the muffin pan: leave it at room temperature for a few minutes to help soften the butter.
- The pastry is too flexible and breaking: place it back in the fridge for a few minutes to allow for the butter to harden again. It could also be due to the pastry being rolled too thinly.
- The tart shells collapsed or shrank in the oven: usually due to not resting for long enough in the fridge, or being too warm when it gets in the oven.
Recipe FAQs
Absolutely, I have made this recipe with both a Regular Muffin Pan and a Mini Muffin Pan! It will be slightly harder to line a mini muffin pan (because the openings are so small), but it does create great bite-size mini tart shells.
I have found that I get the best results by using a muffin pan with perforated bottom, which allows for an even air flow while baking.
Make sure to use a non-stick pan so that the pastry does not stick to the pan. I have only made these with a metal muffin pan; I do not recommend using a silicone muffin pan for this recipe.
Yes, if you don't want to make your own pastry, you can use frozen one instead. Simply leave it at room temperature until soft enough to line the muffin pan.
You can use any type of pastry you want, but be aware that puff pastry will expand a lot in the oven and might leave only a small opening for the filling.
It depends if the filling you choose needs to be baked as well or not. If it does, I recommend partially blind-baking the shells so that the bottom does not get soggy before filling them and continue baking.
For any filling that does not require to be baked or heated, you can go ahead and fully blind bake the pastry until dry to the touch.
Yes! These tartlet shells can be kept unbaked in the fridge (either just rolled or lined in the muffin pan) for 24 hours, and will last for up to 3 days when baked and unfilled.
Storing & Freezing
The Pastry needs to be stored in the fridge (or freezer) until it is baked. It will last for 24 hours, unbaked, in the fridge.
Once baked, the mini tart shells can be kept at room temperature either covered with a tea towel or in an air-tight container. They will last for up to 3 days unfilled. Once filled, they might need to be kept in the fridge depending on the filling.
These mini pie crusts can also be frozen, either baked or unbaked. I personally prefer to freeze them unbaked so that they are super fresh when served!
To do so, freeze in the muffin pan. When fully frozen, transfer into a container until ready to use. Place back in the muffin pan when ready to bake (you might need to add a couple more minutes to the recommended baking time).
Filling Ideas
The possibilities are basically endless when it comes to the tartlet shells filling, but here are a few ideas!
- Vanilla Pastry Cream filling with Fresh Fruits like for my Strawberry Custard Tartlets and Mini Fruit Tarts.
- Cannoli Filling made from Ricotta and Mascarpone Cheese.
- Chocolate Pastry Cream or Chocolate Cremeux with some Chocolate Curls or Shavings.
- Almond Cream Filling, baked with fruits like Pear or Apples.
- the Chocolate Ganache I used to make these Mini Chocolate Tarts or Raspberry Chocolate Tartlets, or this Chocolate Crémeux.
- some classic Lemon Curd, Orange Curd, Salted Caramel or Passion Fruit Curd.
- fruit compotes like this Mixed Berry Compote or Blueberry Compote
More Tart Recipes
Made this recipe?
Let us know if you liked it by leaving a comment below, and tag us on Instagram @a.baking.journey with a photo of your creation!
Recipe
How to make Tartlet Shells
Ingredients
- 250 gr (1 2/3 cup) Plain / All-Purpose Flour
- 50 gr (1/2 cup) Icing Sugar, or Powdered Sugar, sifted
- 1 pinch Table Salt
- 120 gr (1/2 cup) Unsalted Butter, very cold
- 1 large Egg
Instructions
- Place the Flour, Icing Sugar and Salt in the bowl of your Food Processor and pulse to mix. Add the cold Butter cut into small cubes, then mix to get very small crumbs (see note 1).
- Add the whisked Egg and mix until a dough starts to come together (see note 2).
- Bring together into a ball then roll between two sheets of baking paper, about 4 mm (1/6 inch) thick (see note 3). Place on a flat tray and leave to rest in the fridge for at least 1 hour - or overnight.
- Take out of the fridge and remove the baking paper. With a round or fluted cookie cutter that is about 2 cm (0,8 inch) wider than the opening of the muffin pan, cut out disks of pastry (see note 4). Gently slide the pastries into the muffin pan until it touches the bottom. With a finger, lightly press on the bottom corners to insure the pastry is flush with the pan and no air pockets remain under the pastry.Pro tip: for the best results, use a muffin pan with perforated bottom. It will insure an ideal air flow and provide the best, evenly baked shells.
- Place the muffin pan in the fridge for at least 2 hour - preferably overnight for the best results.
- Preheat your oven on 160'C/325'F. Dock the bottom of the pastry (prick with a small fork) and place the muffin pan in the freezer while the oven is preheating.
- Line each tartlet shell with a small piece of crunched up baking paper, and cover with baking beads, beans or rice.
- Bake for 15 minutes, remove the baking weights and baking paper, then bake for an additional 12 to 15 minutes or until lightly golden and dry to the touch. Leave to cool down completely before removing from the muffin pan and adding the filling (see note 5).If your choice of filling needs to be baked, add it to the cooled down par-baked shells after removing the baking weights and use the recommended baking time for your filling.
Video
Would you like to save this recipe?
Notes
- You shouldn't see any large lumps of butter anymore. Because the crusts are so small, I don't recommend making a very flaky pastry (usually pastries that have large lumps of butter in them) because they might puff up too much in the oven.
- Stop as soon as the pastry comes together to avoid overworking the dough. If you press the lumps between your hand, they should stick together. If too dry, add a little bit of very cold water. If too sticky, add a little bit more flour.
- If rolled too thinly, the crust might break because too fragile. If too thick, the ratio of pastry to filling might be off. I have found that 3 to 4 mm (1/6 to 1/8 inch) is the perfect thickness for these mini tart shells.
- The wider you cut out the circles of pastry, the deeper the tartlet shells will be. It is up to you how wide you cut them out, but I recommend having the width of the muffin pan openings as a minimum. Otherwise, the crusts will be quite flat and not deep enough for a filling.
- This baking technique is to be used if your filling does not require any baking. If the filling needs to be baked as well, consider partially blind-baking the shells before adding the filling to avoid getting a soggy crust bottom.