
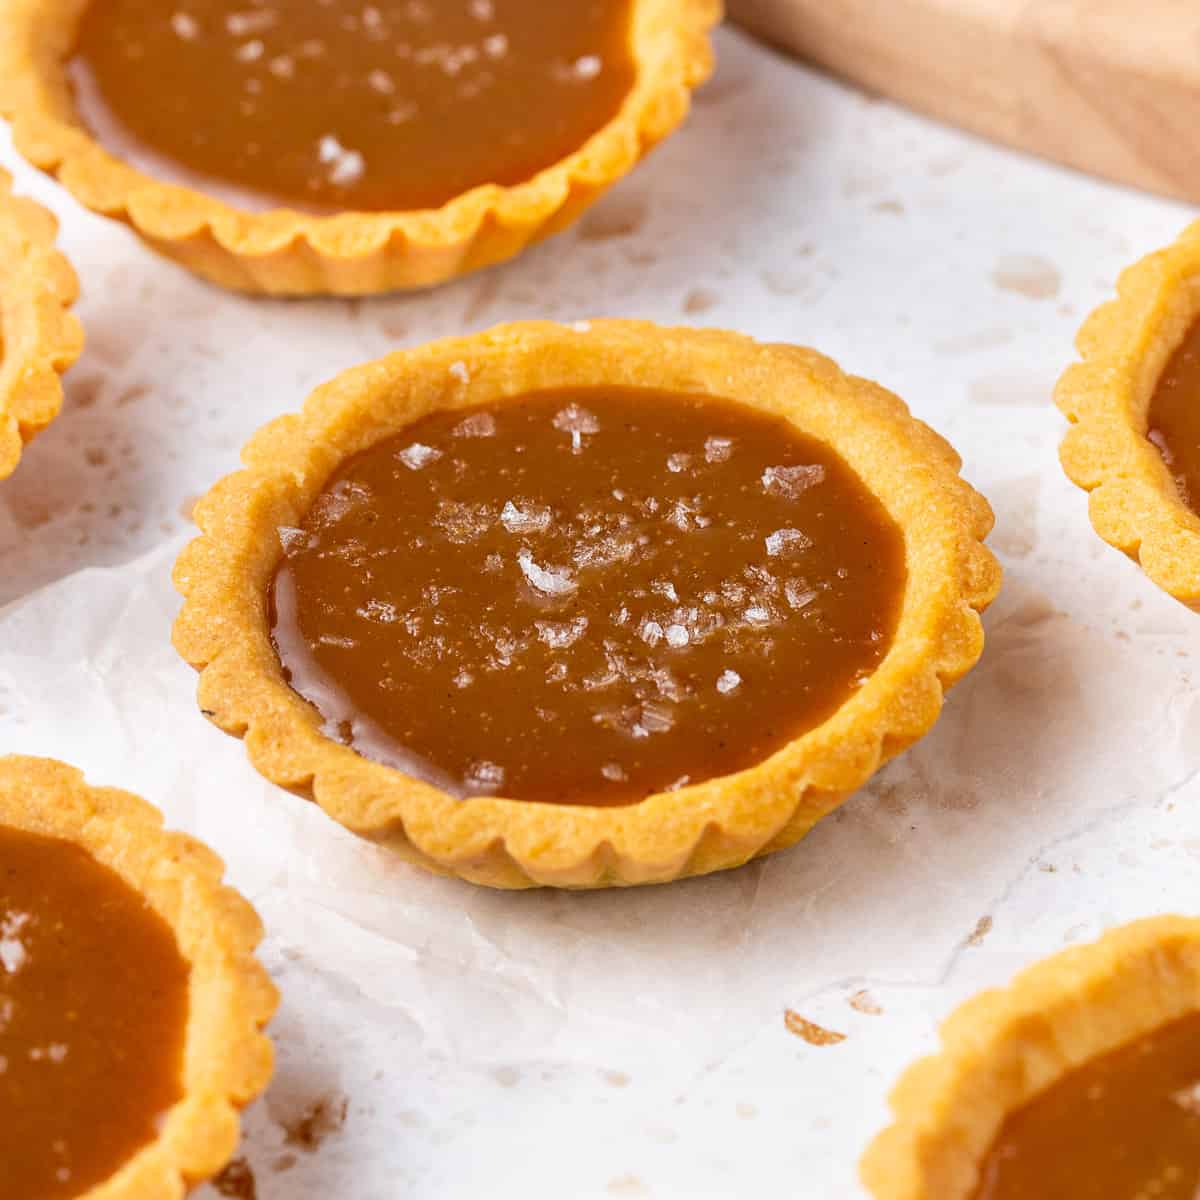
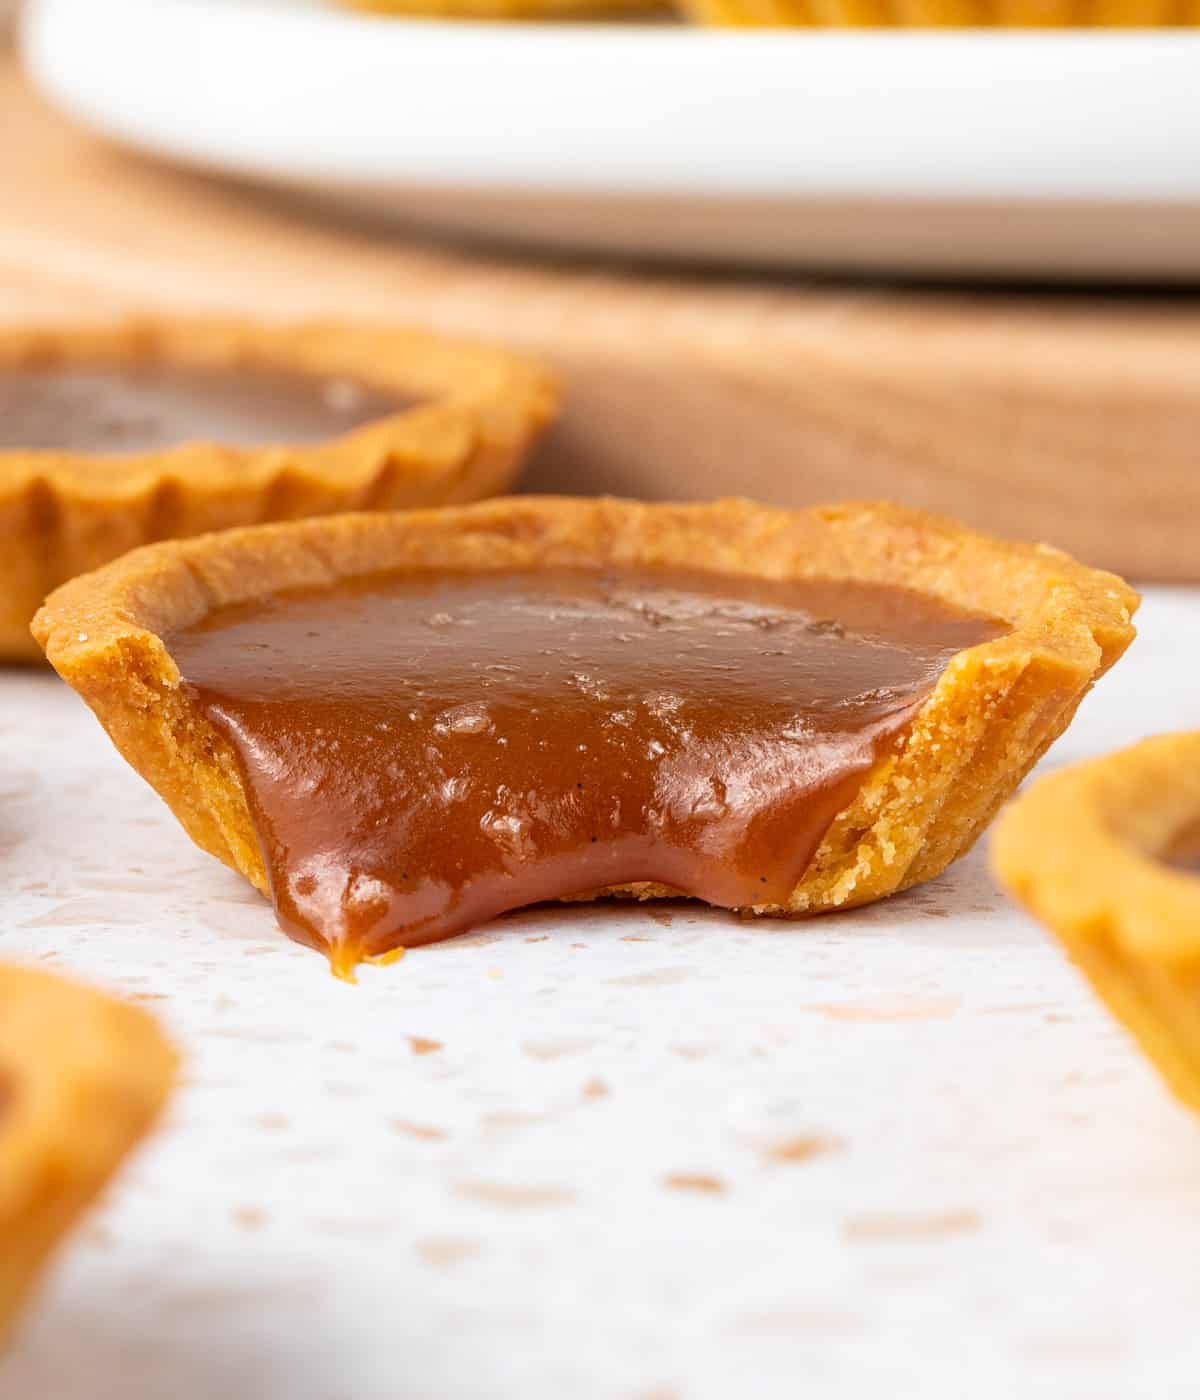
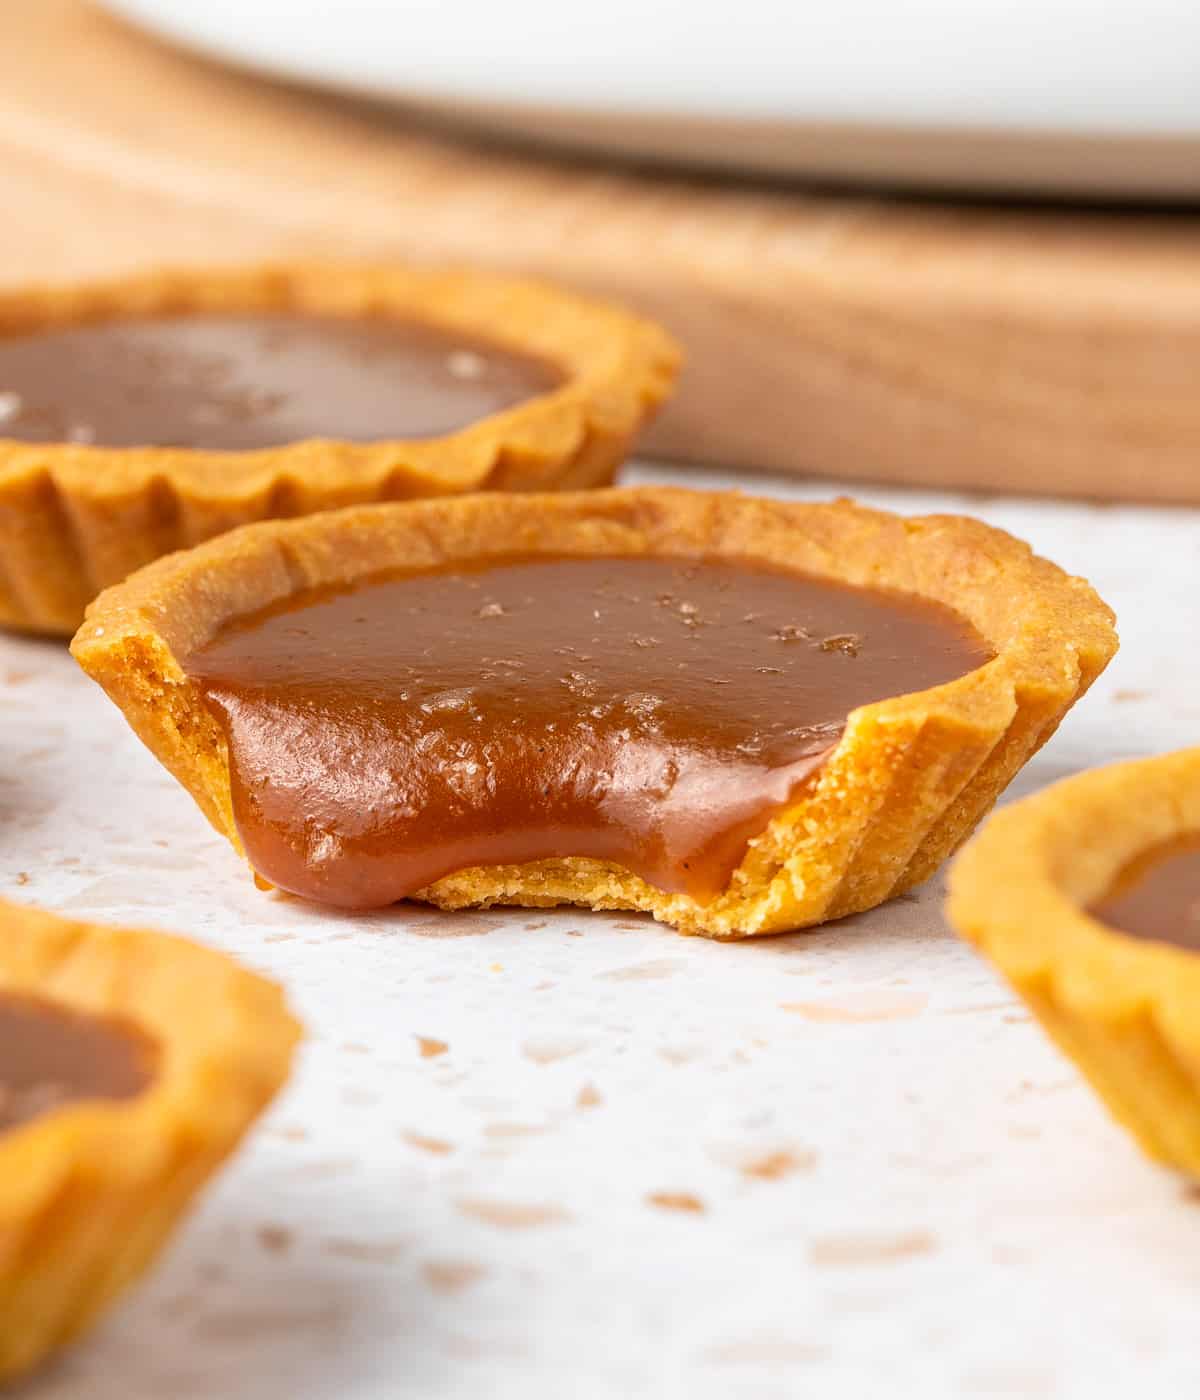
These Mini Salted Caramel Tartlets are the perfect sweet treat for a party, a special occasion or to make for the Holidays. They combine some Shortcrust Pastry Tartlet Shells with a homemade Salted Caramel sauce filling and flaky Sea Salt for topping.
Jump to:
Why we love this recipe
Nothing says "party time" like these mini caramel tarts - although you do not need a special occasion to make and enjoy them. If you love a good sweet and salty caramel, this recipe is for you!
These bite-size tart shells are made from a simple buttery and crunchy French Shortcrust Pastry (Pâte Sablée) and baked inside mini tart pans. The salted caramel filling is deliciously gooey, slightly sticky and sweet with a great balance of flavour thanks to the generous amount of sea salt.
These salted caramel tartlets are a great make-ahead treat the whole family will love!
After something even more decadent? Top these caramel tarts with chocolate and try my Mini Chocolate Caramel Tarts. And if you love salted caramel tarts, you might also want to try these Mini Butterscotch Tartlets!
Ingredients
Scroll down to recipe card below for all quantities
For the Tartlet Crust:
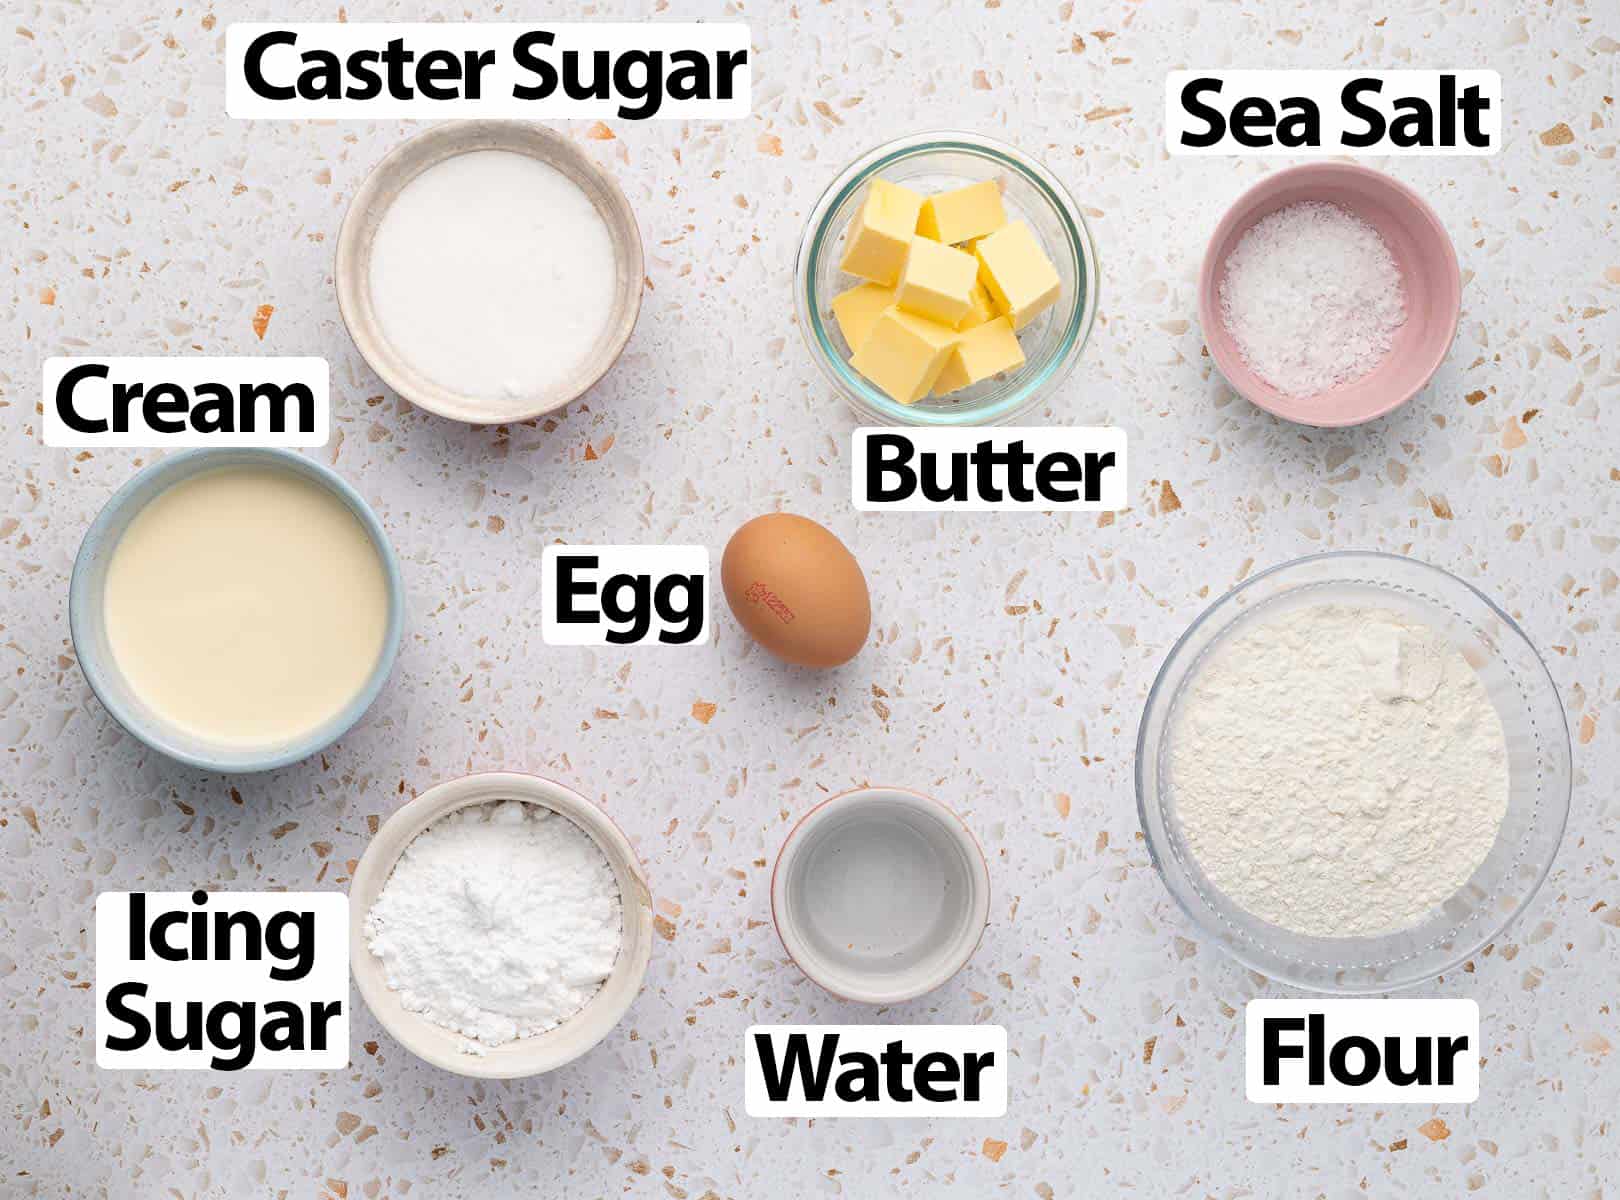
- Dry Ingredients: a mix of Plain / All-Purpose Flour, Icing Sugar (or powdered sugar) and a pinch of Salt. Sift the three ingredients together first for the best results.
- Butter: unsalted and very cold, cut into cubes. Make sure it comes straight from the fridge.
- Egg: medium to large size egg. You can whisk it separately in a bowl before adding it to the pastry dough.
For the Salted Caramel Filling:
- Sugar: use Caster Sugar (or very fine white granulated sugar) for the best results. Brown Sugar or other types of sugar do not melt the same way and I can't recommend a substitution for the sugar here.
- Water: optional here if you prefer to start with a dry caramel, but I find that adding a little bit of water to the sugar helps it manage the way it melts without burning.
- Cream: Heavy / Thickened Cream, at room temperature. Make sure it is not too cold or the sugar might solidify when you add the cream. You can also heat up the cream first, which will help it mix with the melted sugar evenly.
- Butter: Unsalted - although you could use salted butter to make a more traditional French-style salted butter caramel. It should also be at room temperature - but not too soft.
- Sea Salt: you can add as much or as little as you want, depending on your own taste and how sweet you want the caramel to taste. I used flaky sea salt both inside the caramel and as a topping.
Optional: add some Vanilla Paste (or vanilla extract) for more depth of flavour. Additional ingredients such as orange zest will also make a delicious addition!
How to make Mini Caramel Tarts
Tartlet Shells
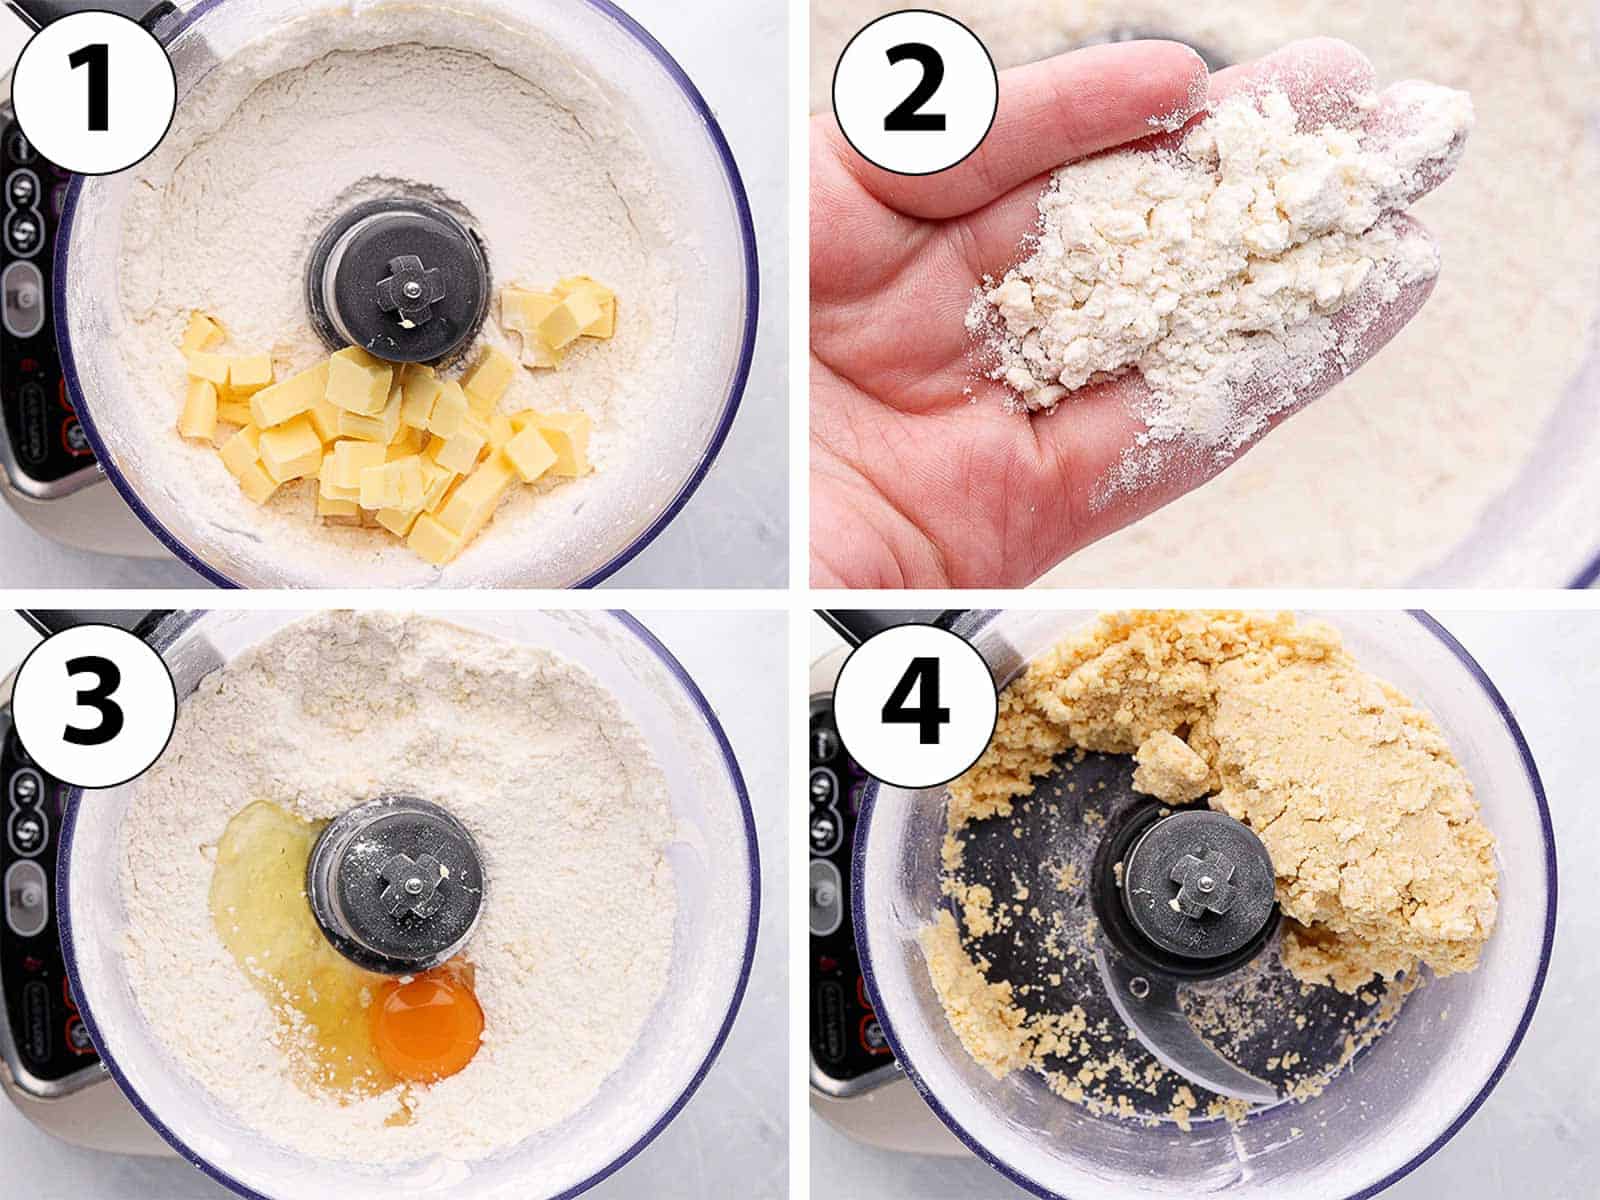
The first step is to prepare the pastry for the tartlet shells. I make mine in the food processor, but it can also be made by hands (see instructions to make by hands in my Pâte Sablée recipe).
- Photo 1: Place the sifted Plain Flour, Icing Sugar and Salt in the bowl of your food processor. Pulse for a few seconds to mix, then add the very cold Butter cut into small cubes.
- Photo 2: Mix until you get small crumbs of butter. The bigger the crumbs, the flakier the pastry will be. For this recipe, we do not want too much flakiness so make sure the crumbs are very small and the mixture almost looks like sand.
- Photo 3: Add the Egg to the flour mixture.
- Photo 4: Mix until a rough dough starts to come together.
Don't worry if it seems crumbly. To know the pastry has been mixed enough, press together some of the crumbs in your hand. If they stick together, the pastry is ready.
If the crumbs don't stick together or the pastry seems to be quite dry, add a few drops of very cold water and mix until you get the desired consistency.
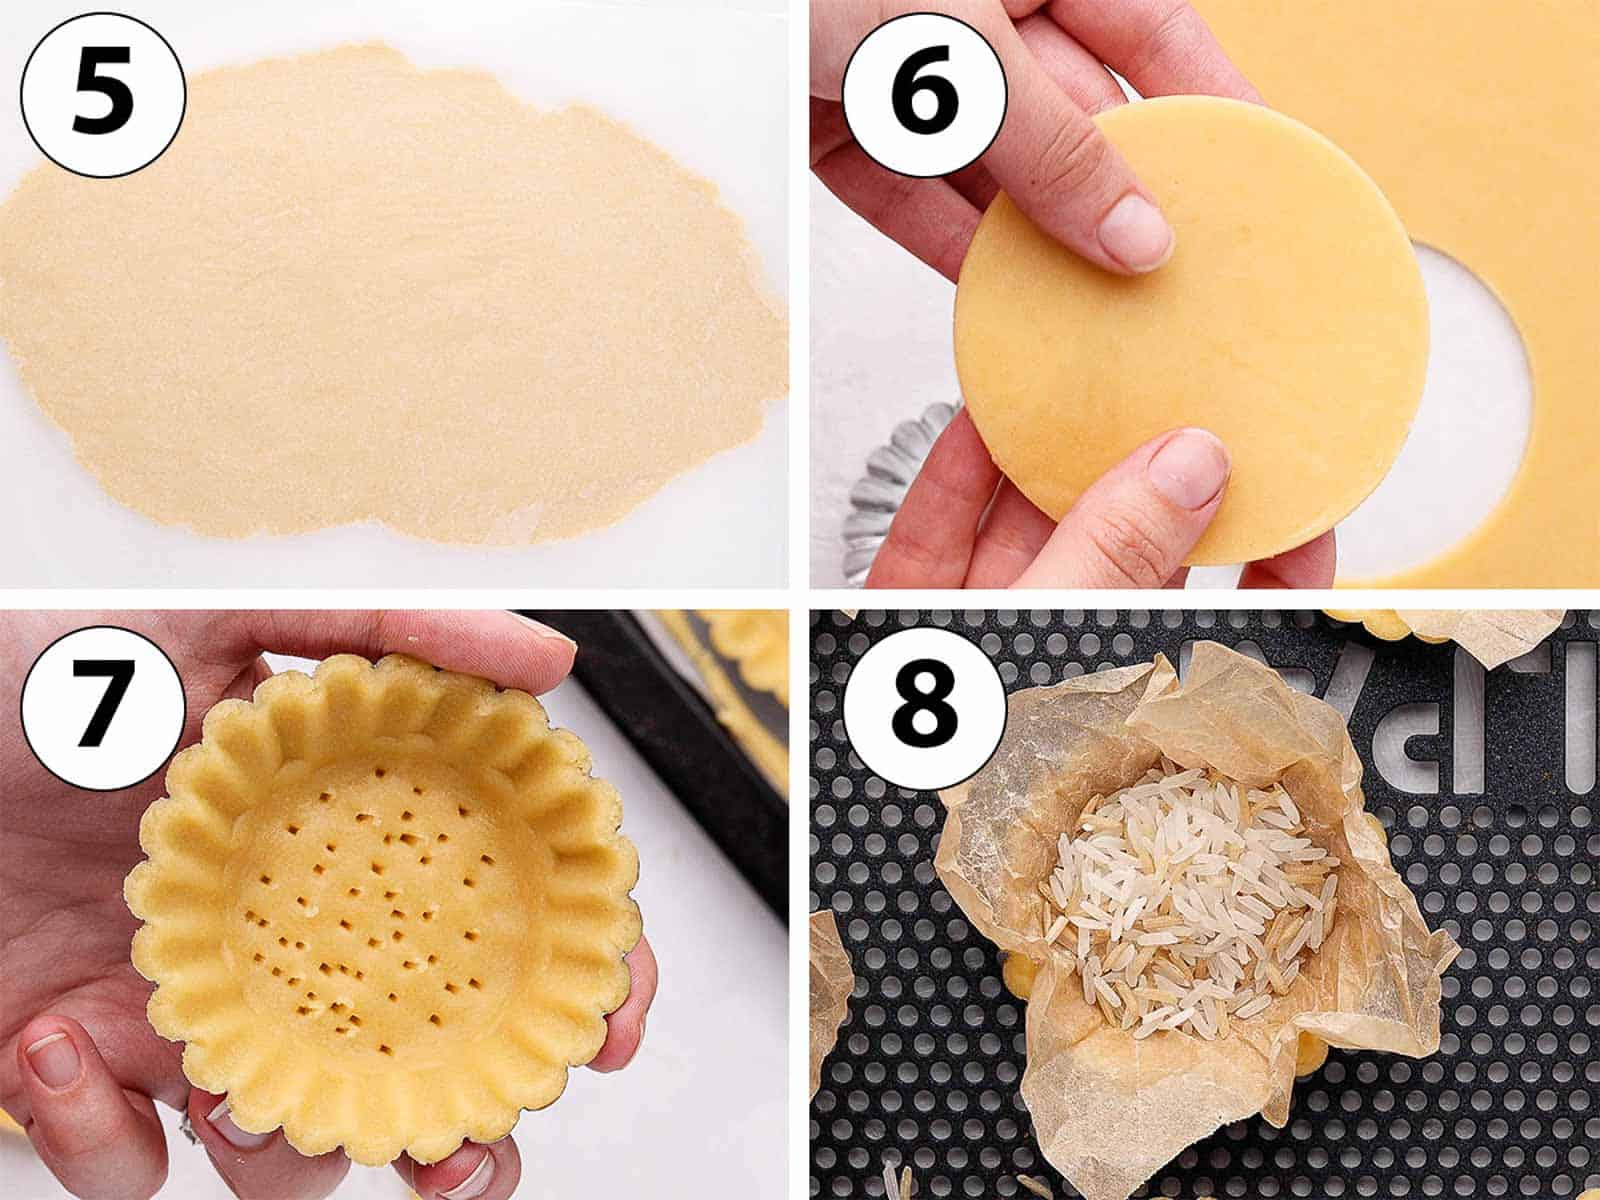
- Photo 5: Assemble the mixture into a ball and place between two large sheets of baking paper / parchment paper. Lightly flatten it with your hands then use a rolling pin to roll to a thickness of about 4mm (1/8 inch).
- Place on a flat tray in the fridge to chill and rest for at least one hour, or overnight.
- Photo 6: Take the dough out of the fridge and remove the baking paper. With a round cookie cutter, cut out disks of pastry that are a bit larger than the tartlet pans you are using.
I used these Mini Tart Pans that are 7 cm (1/4 inch) wide and cut out the disks of pastry to be about 10 to 12 cm (3/8 to 1/2 inch) wide.
- Photo 7: Line the tartlet pans with the pastry, gently sliding it down the sides of the pan. Press on the edge between the side and bottom to make sure the pastry is flush with the pan.
If the pastry dough seems a bit stiff, let it come back to room temperature first. The butter will soften and it will be easier to line the tins. If the pastry become too soft and starts to break, put it back in the fridge for a few minutes.
Excess dough can be re-assembled, rolled and chilled for at least 2 hours to make more tartlet crusts.
- Place in the fridge to chill again for at least 1 hour, preferably overnight.
- Preheat your oven on 160 degree Celsius / 325 degree Fahrenheit. Poke the bottom of the pastry with a small fork. Optionally, place the tartlet shells in the freezer for 10 to 15 minutes while the oven is preheating.
- Photo 8: Cover each crust with a little bit of baking paper then fill with baking weights, dried beans or rice.
Would you like to save this recipe?
- Bake for 15 minutes, then remove the weights/baking paper and bake for an additional 12 to 15 minutes. The bottom should be dry to the touch and the edges lightly golden. Take out of the oven and leave to cool down completely.
Salted Caramel Filling
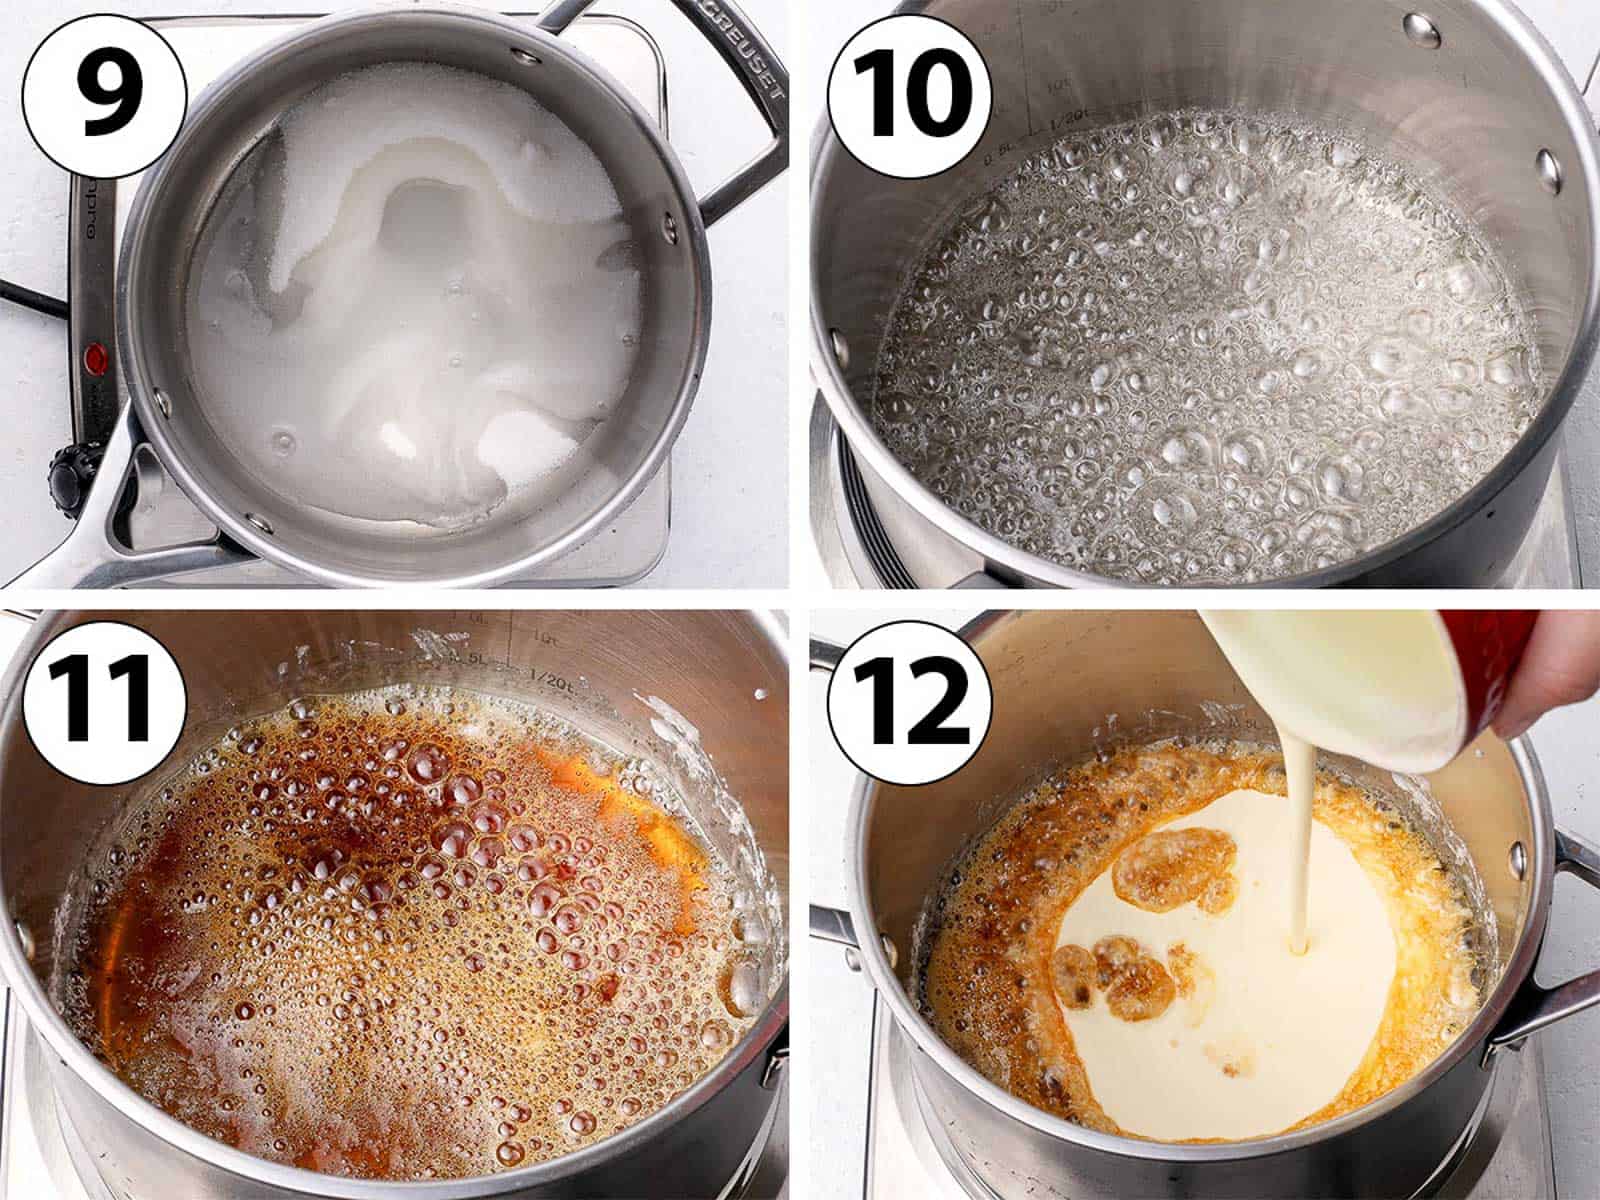
- Photo 9: Place the Caster Sugar and Water in a medium to large size heavy-bottom saucepan. Quickly stir to evenly distribute the water then turn on low heat. Don't go over a medium heat or the sugar might melt too quickly and burn.
- Photo 10: Leave the sugar to slowly melt without touching it. It will start to boil and turn into large, clear bubbles. Don't worry if it first appears to clump or crystallise, it should start melting.
- Photo 11: Continue to cook the sugar until its colour starts turning orange to light brown, almost amber. Depending on the temperature of your stove, it should take 5 to 10 minutes.
Be careful with how much you cook the sugar, and use a candy thermometer if needed. The caramel will start to burn at around 180 degree Celsius (350 degree Fahrenheit) so you don't want to go any higher.
Pro Tip: if you stop cooking the caramel when the sugar just started changing colour, it will make a caramel that is rather sweet. If you push the sugar too far to a very dark brown, it will taste bitter and burned. You might need to play around to find the right ratio of sweetness and bitterness to suit your taste!
- Photo 12: Pour the Cream over the melted sugar. It will start bubbling a lot and rise quickly in the saucepan, so be careful not to get burned at this point! Make sure the stove is at a very low temperature.
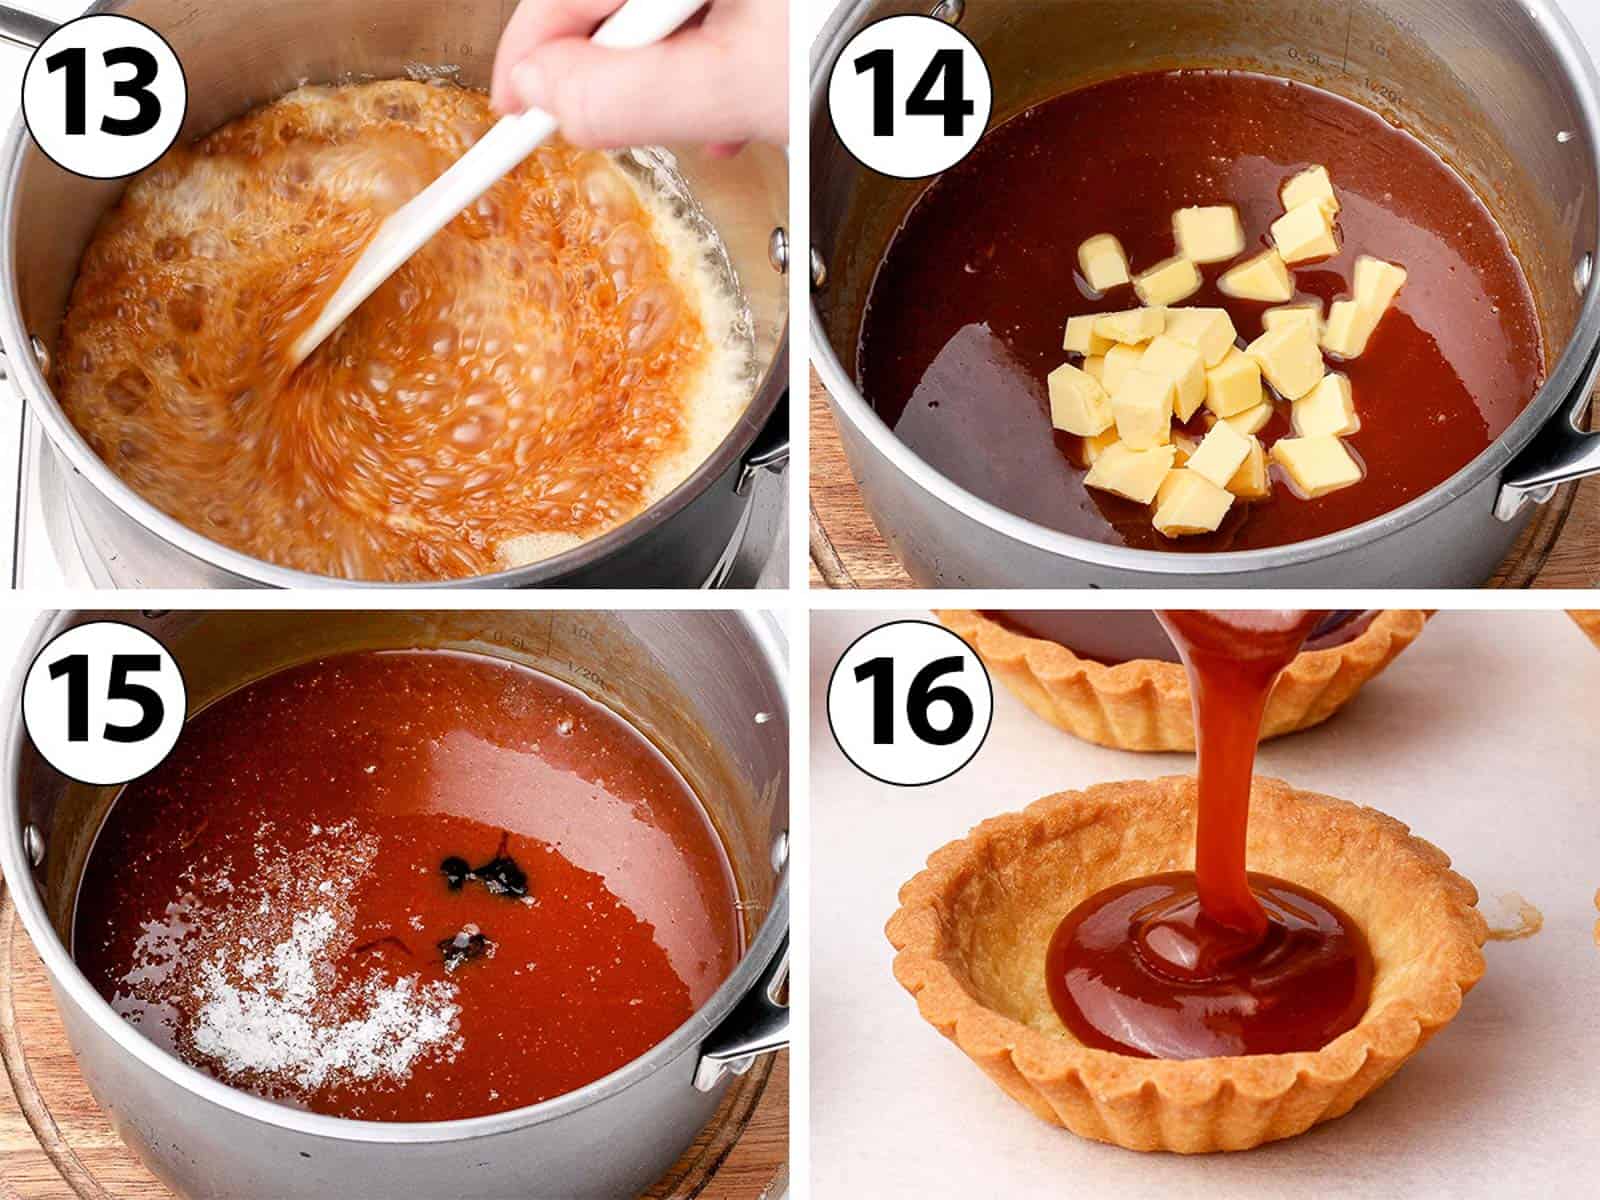
- Photo 13: Using a heat-proof spatula, vigorously stir until all the cream has been incorporated and you get a smooth and shiny sauce. Again, be very careful at this point as some of the caramel could splash and burn you.
If the cream was too cold, the sugar might crystallise or clump up at this point. If this happens, to put it back on low heat and try to melt again. To avoid this issue, make sure the cream is at room temperature. You could also heat-up the cream separately first.
- Photo 14: Remove from the heat and let the sauce cool down for 5 minutes. Stir in the butter a little bit at the time until fully melted and incorporated.
- Photo 15: Add the Sea Salt and optionally, the Vanilla Paste.
- Photo 16: Transfer the salted caramel filling into a clean jug (or a pastry bag) and pour it into the prepared tartlet crusts.
You will want to add the caramel filling to the shells straight away when still warm and fluid. The caramel will start to thicken and get sticky as it cools down.
- Gently tap the tarts on a hard surface to pop any air bubble and help the salted caramel spread around.
- Place in the fridge to chill for at least 1 to 2 hours, preferably overnight. The longer you leave the tarts in the fridge, the thicker the caramel filling will be.
- Optionally, sprinkle some Flaky Sea Salt on top of the salted caramel tartlets once set, just before serving.
Recipe FAQs
If you don't want to make your own tartlet shells, you can absolutely use pre-made ones.
You can use my recipe for Tartlet Shells in a Muffin Pan instead! It will give you a larger yield than this recipe as the shells will be slightly smaller that the ones made here.
Yes! The tartlet pastry can be prepared in advance and kept in the fridge un-baked for 24 hours, and at room temperature in an air-tight container for another 24 hours once baked.
The salted caramel needs to be poured into the tart crusts when still warm, but the finished tarts can be store in the fridge until ready to be served. I recommend serving them within 24 hours of making the filling for the best textures.
Absolutely, the pastry recipe for the mini tart crusts is the same than the one I use to make large tarts (my Pâte Sablée recipe). Simply line the pastry in a 22 to 24 cm (9 to 10-inch) tart pan to make a salted caramel tart.

Tips & Troubleshooting
- The Pastry is dry or cracking: this can happen depending on the brand of flour you use, and the size of the egg. Simply add a few drops of very cold water and keep mixing until you get the desired consistency in the pastry.
- The pastry is too hard or too soft to handle: if too hard, let it come back to room temperature for a few minutes before lining the tartlet pans. If it becomes too soft and starts ripping, place it back in the fridge for 5 to 10 minutes.
- The crust shrank or collapsed when baked: this usually happens if the pastry was not rested or chilled for long enough. Chilling the pastry twice and for a long time is the best tip I can give when it comes to pastry. I personally let the pastry chill overnight in the fridge once the tartlet pans are lined before baking them in the morning.
- The sugar isn't melting: because we are adding a little bit of water to the sugar, it will take longer to start melting than if we were to make a dry caramel (sugar only). Give it more time as the water needs to evaporate before the sugar starts turning into caramel.
- The salted caramel is grainy, lumpy or has crystallised: caramel can be tricky as any disturbance to the sugar melting can cause it to crystallise. Make sure to leave the sugar completely undisturbed while it is melting. A good way to make sure the sugar does not crystallise is to add some type of inverted sugar (such as glucose syrup, corn syrup or honey) to it.
Storing & Freezing
The tartlet shells can be prepared in advance and kept in the fridge unbaked for up to 24 hours. Once baked, let them cool down completely and store at room temperature in an air-tight container for up to 24 hours.
The caramel filling needs to be poured into the shells when still warm. The finished salted caramel tartlets will last for up to 3 days in the fridge but are best served within 24 hours.
I don't recommend freezing the finished tart, but the tartlet shells can be frozen either baked or unbaked.
Made this recipe?
Let us know if you liked it by leaving a comment below, and tag us on Instagram @a.baking.journey with a photo of your creation!
Recipe

Salted Caramel Tartlets
Ingredients
Tartlet Shells
- 250 gr Plain / All-Purpose Flour
- 50 gr Icing Sugar
- 1 pinch Fine Table Salt
- 120 gr Unsalted Butter, very cold, cubed
- 1 Egg, medium to large size
Salted Caramel Filling
- 250 gr Caster Sugar, or fine white granulated sugar
- 30 ml Water
- 150 ml Heavy / Thickened Cream, at room temperature or lukewarm
- 60 gr Unsalted Butter, at room temperature
- 1 teaspoon Flaky Sea Salt, plus extra for topping, optional
- 1/2 teaspoon Vanilla Paste, optional
Instructions
Tartlet Shells
- Place the sifted Plain Flour, Icing Sugar and Salt in the bowl of your food processor. Pulse for a few seconds to mix.
- Add the very cold cubed Butter. Mix until you get very small crumbs of butter (see note 1).
- Add the Egg and mix until a rough dough starts to come together (see note 2).
- Bring the dough into a ball and place between two large sheets of baking paper. Lightly flatten it with your hands then use a rolling pin to roll to a thickness of about 3 to 4mm (1/6 to 1/8 inch). Place on a flat tray in the fridge to chill and rest for at least one hour, or overnight.
- Take the dough out of the fridge and remove the baking paper. With a round cookie cutter, cut out disks of pastry that are a bit larger than the tartlet pans you are using (see note 3).
- Line the tartlet pans with the pastry, gently sliding it down the sides of the pan. Press on the edge between the side and bottom to make sure the pastry is flush with the pan. Place in the fridge to chill again for at least 1 hour, preferably overnight. Excess dough can be re-rolled and chilled for at least 2 hours to make more tartlet crusts.
- Preheat your oven on 160 degree Celsius / 325 degree Fahrenheit. Dock the bottom of the pastry (poke the pastry with a small fork). Cover each crust with a little bit of crunched baking paper then fill with baking weights, dried beans or rice.
- Bake for 15 minutes. Remove the weights and baking paper and bake for an additional 12 to 15 minutes, or until the bottom should be dry to the touch and the edges are lightly golden. Leave to cool down completely.
Salted Caramel
- Place the Caster Sugar and Water in a medium to large size heavy-bottom saucepan. Quickly stir to evenly distribute the water then turn on low heat (see note 4).
- Leave the sugar to slowly melt without touching it. It will start to boil and turn into large, clear bubbles. Continue to cook the sugar until its colour starts turning orange to light brown, almost amber - about 5 to 10 minute (see note 5).
- Carefully pour in the room temperature or lukewarm Cream; it will start bubbling a lot and rise quickly in the saucepan so be very careful not to get burnt. Using a heat-proof spatula, vigorously stir until all the cream has been incorporated and you get a smooth and shiny sauce (see note 6).
- Remove from the heat and let the sauce cool down for 5 minutes. Stir in the Butter a little bit at the time until fully melted and incorporated.
- Mix in the Sea Salt and Vanilla Paste (optional).
- Transfer the salted caramel filling into a clean jug (or a pastry bag) and pour it into the prepared tartlet crusts. Gently tap the tarts on a hard surface to pop any air bubble and help the salted caramel spread around.
- Place in the fridge to chill for at least 1 to 2 hours, preferably overnight.
- Sprinkle some Flaky Sea Salt on top to finish the salted caramel tartlets.
Video
Would you like to save this recipe?
Notes
- The bigger the crumbs, the flakier the pastry will be. For this recipe, we do not want too much flakiness so make sure the crumbs are very small and the mixture almost looks like sand.
- To know the pastry has been mixed enough, press together some of the crumbs in your hand. If they stick together, the pastry is ready. If the crumbs don't stick together or the pastry seems to be quite dry, add a few drops of very cold water and mix until you get the desired consistency.
- I used Mini Tart Pans that are 7 cm (1/4 inch) wide and cut out the disks of pastry that are about 10 to 12 cm (3/8 to 1/2 inch) wide.
- Don't go over a medium heat or the sugar might melt too quickly and burn.
- Be careful with how much you cook the sugar, and use a candy thermometer if needed. The caramel will start to burn at around 180 degree Celsius (350 degree Fahrenheit) so you don't want to go any higher. Make sure to leave the sugar completely undisturbed while it is melting as any disturbance might cause the caramel to seize or crystallise.
- Caramel will be very hot at this point and if the cream is too cold, it could start splashing around. Be very careful not to get burn (and I don't recommend making caramel with children around). A good tip is to heat up the cream separately first so that the sugar does not crystallise when it comes in contact with it.