
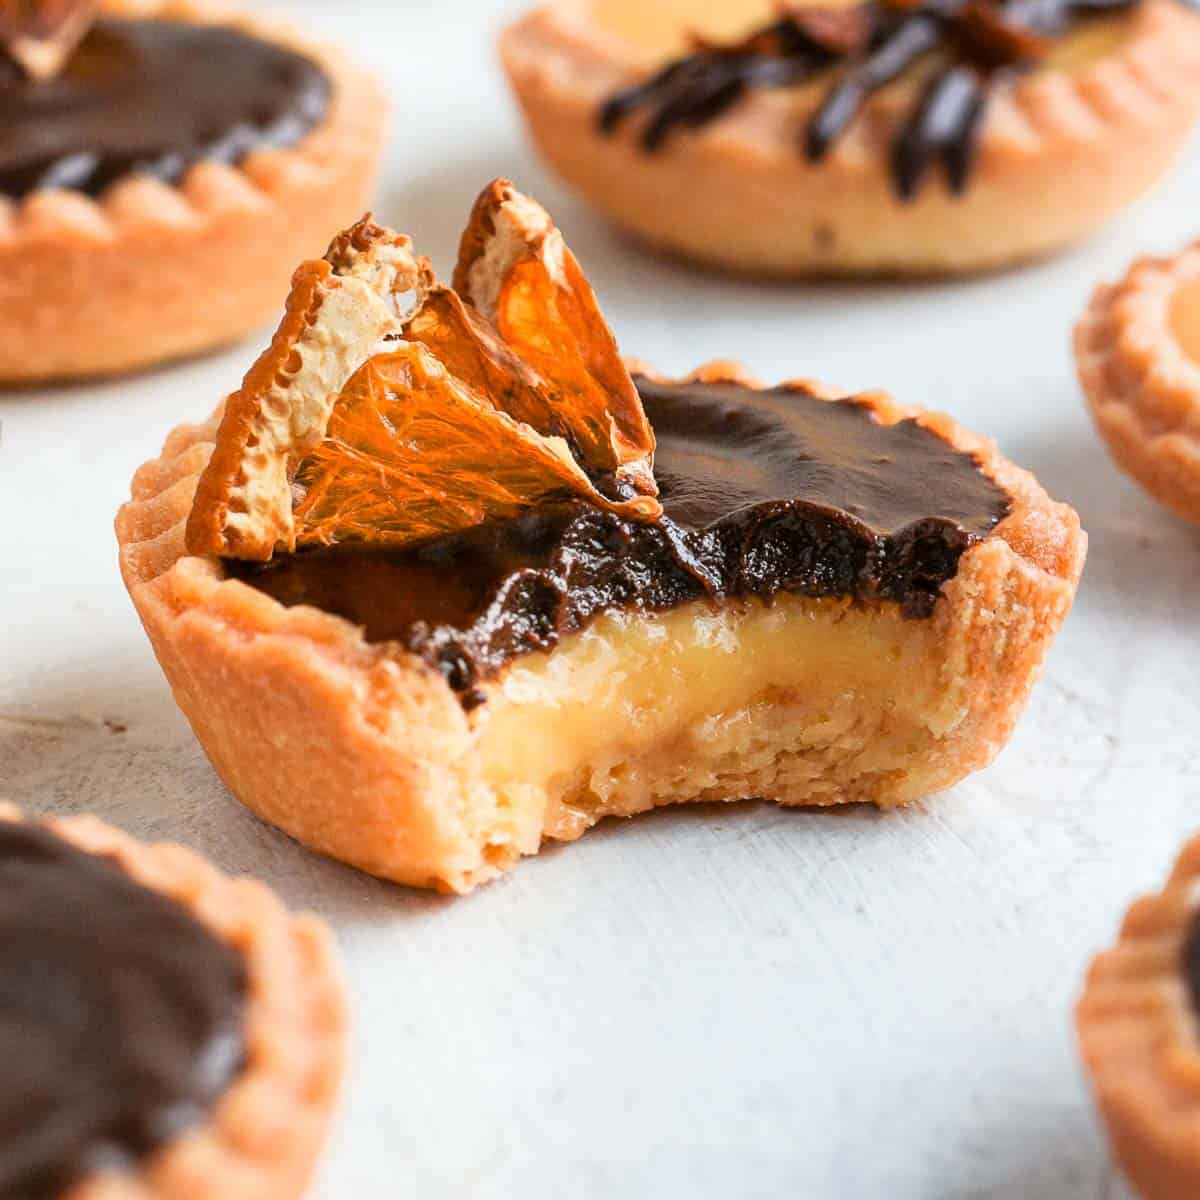
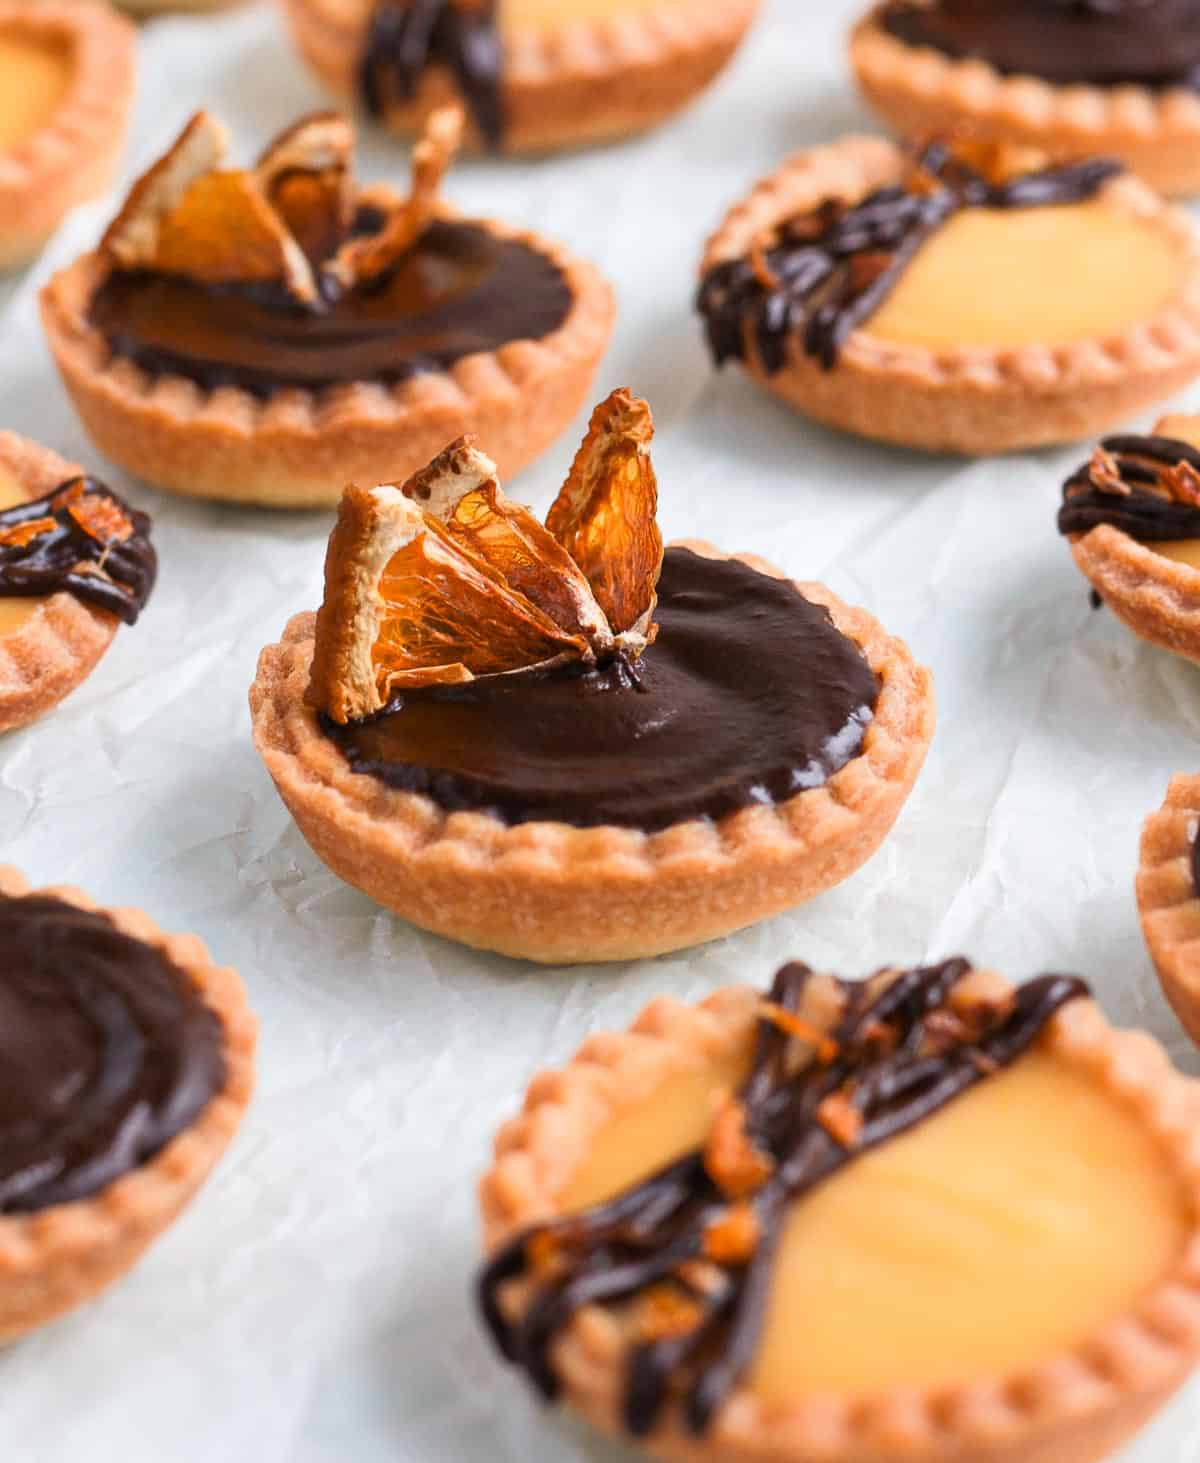
These delicious Chocolate Orange Tartlets are the perfect little sweet treat for a party or afternoon tea. They combine some homemade tartlet shells, an orange curd filling and a luscious dark chocolate ganache topping.
Jump to:
Why we love this recipe
These mini chocolate orange tarts are the ultimate decadent party dessert! Perfect for the Holidays, a fancy afternoon tea party or all kind of gathering, they will look great on any dessert table.
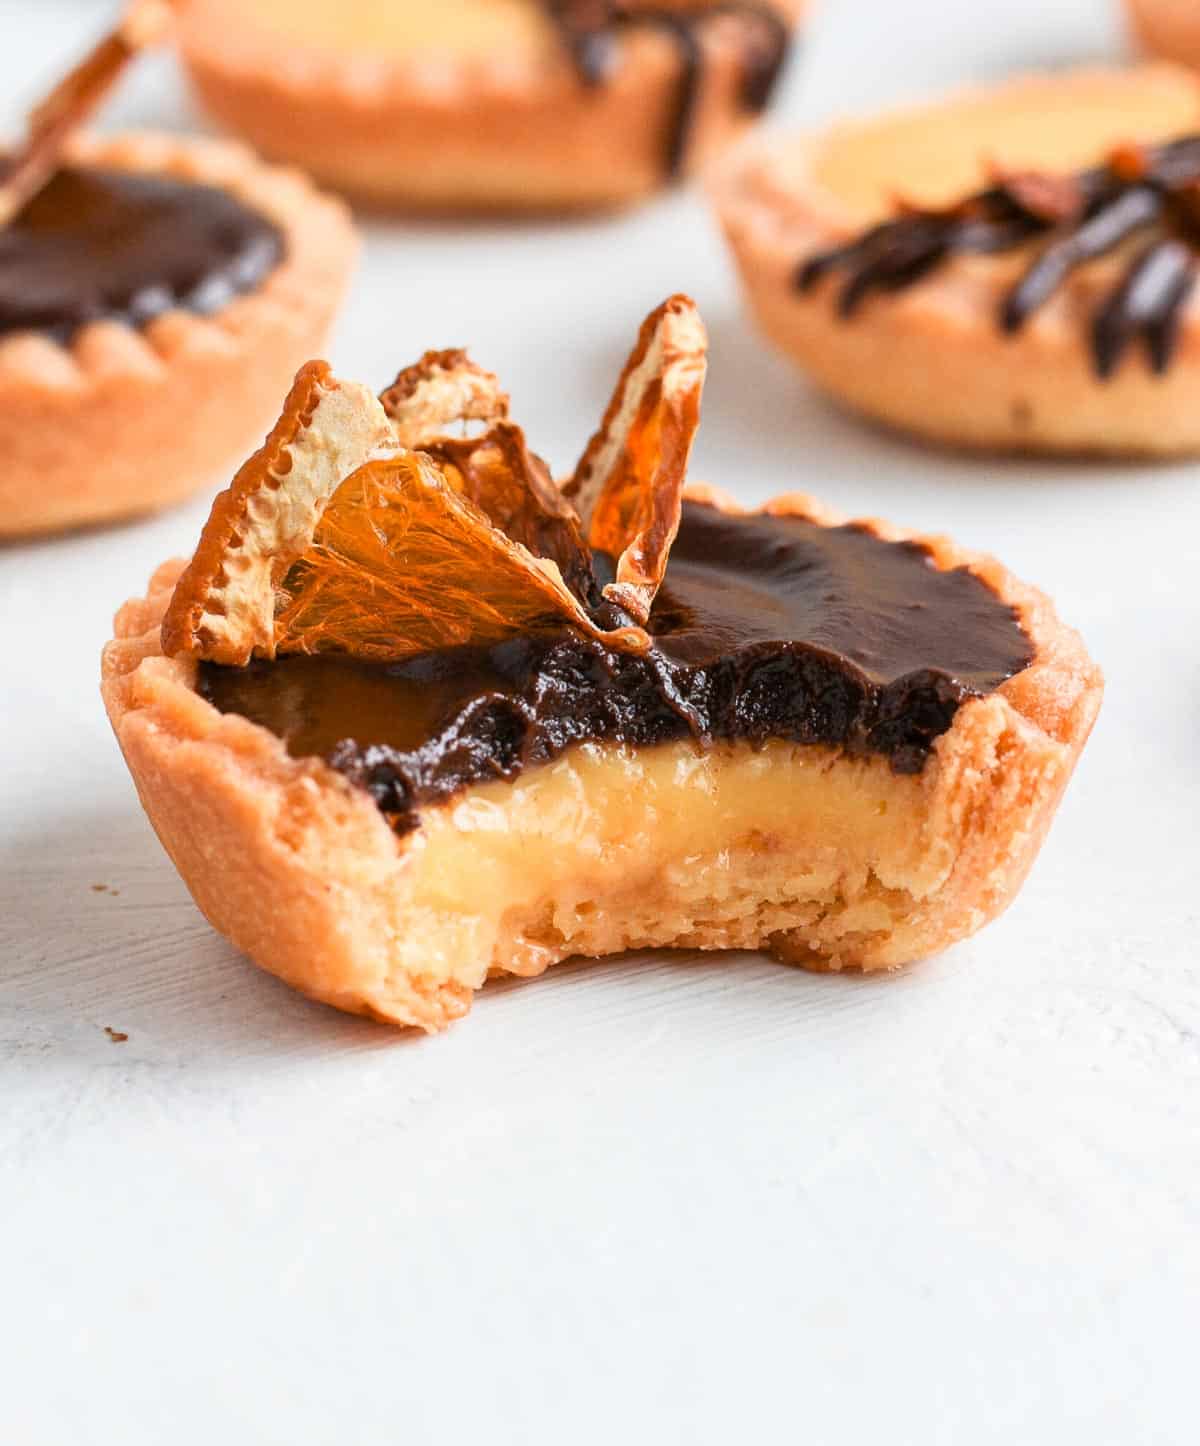
Combining some buttery homemade Mini Tartlet Shells, a simple Orange Curd filling and an intense chocolate ganache layer, they are a dessert for you if you love the taste of Jaffa Cake.
These orange chocolate pastries are a delicious and fun mix between these Orange Tartlets and Mini Chocolate Tarts. They've got the same delicious flavours combination than my Chocolate Orange Cheesecake, Chocolate Orange Mousse and Chocolate Orange Brownies!
Ingredients
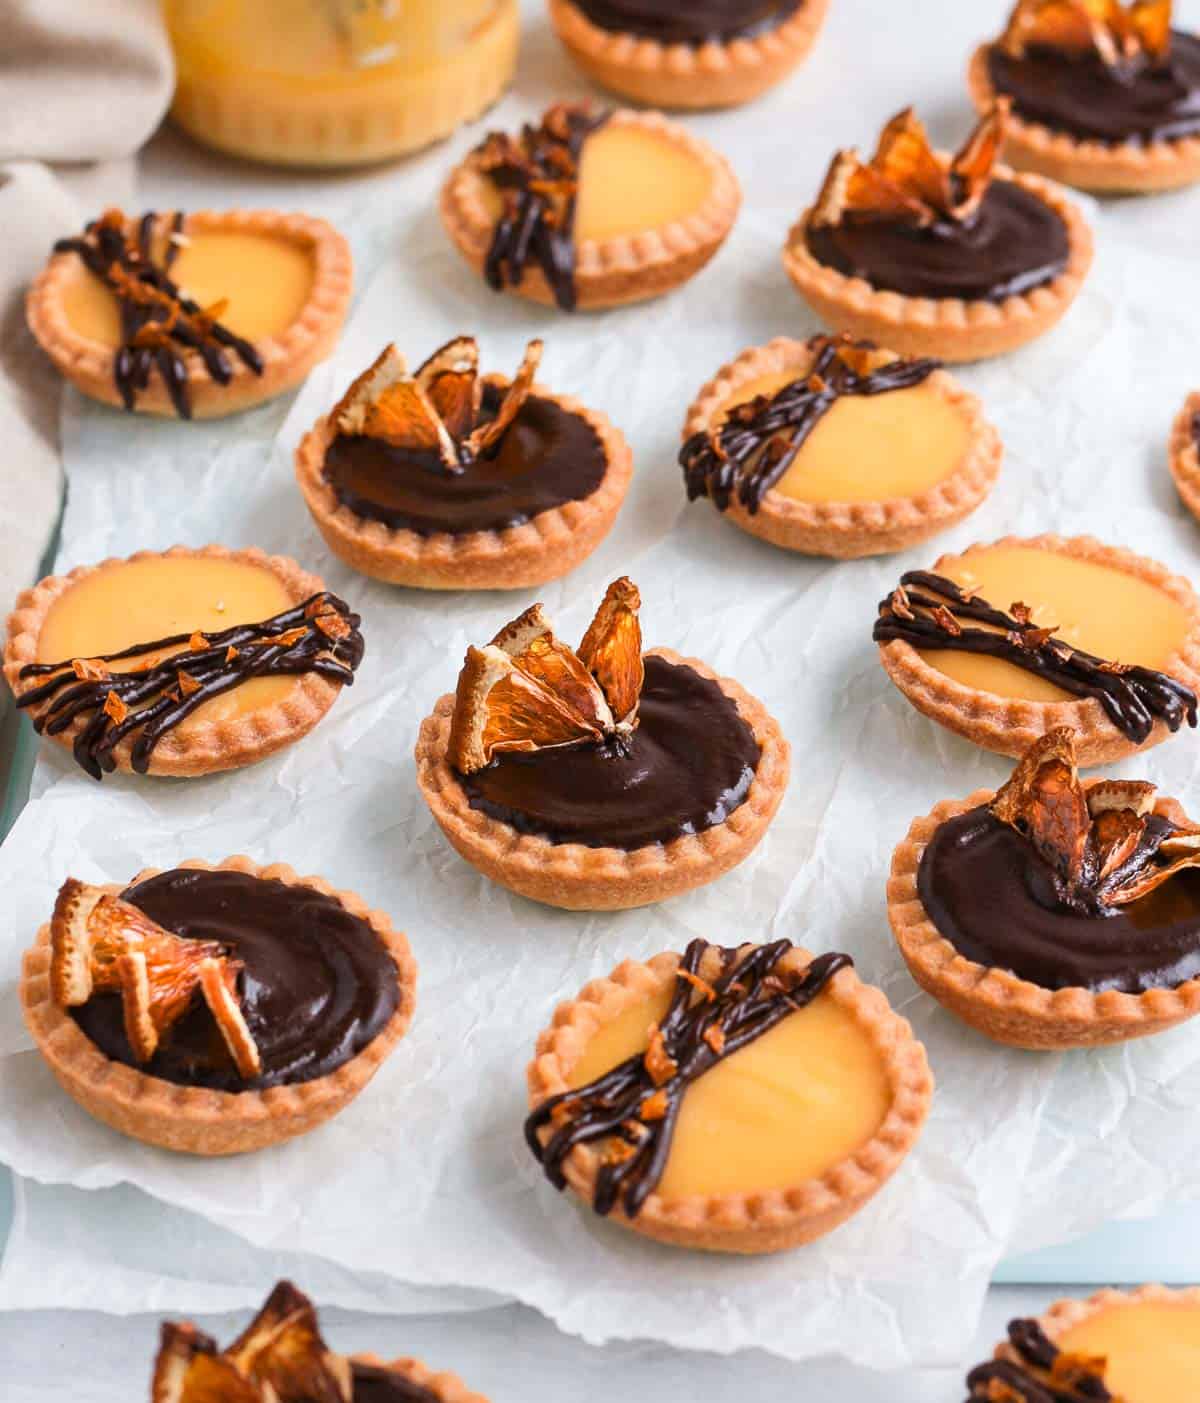
These chocolate orange ganache tarts combine three separate elements (scroll down to recipe card below for all quantities):
- Tartlet Shells: I used my classic Pâte Sablée (French Shortcrust Pastry) recipe for the crust. They are made from Flour, Icing Sugar (or powdered/confectioner's sugar), Salt, unsalted Butter (cold) and an Egg.
- Orange Filling: a creamy Orange Curd made with fresh Oranges (Juice+ Zest), Egg Yolk, Caster Sugar, unsalted Butter and Cornstarch.
- Chocolate Topping: a super simple Chocolate Ganache made with Heavy (or thickened) Cream and Dark Cooking Chocolate.
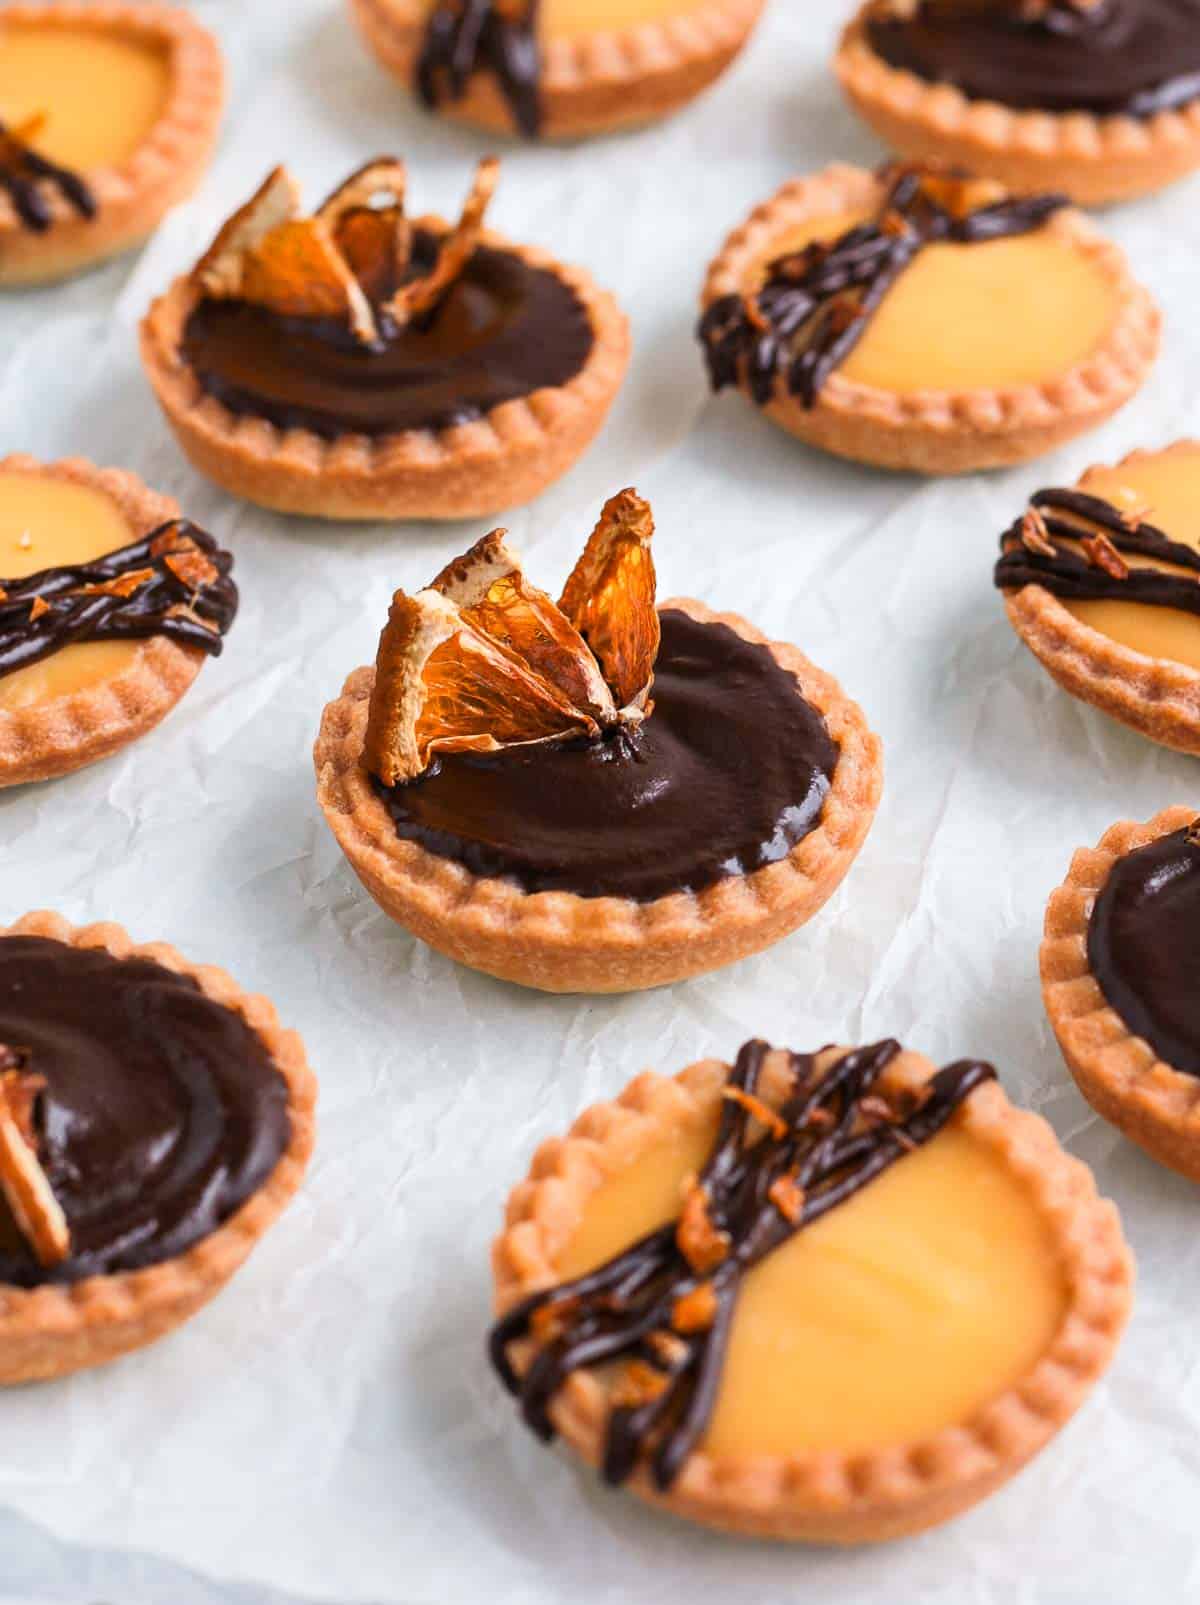
To finish the tartlets, I used some dehydrated oranges (simply dried in the oven) but you could also simply use some Orange Zest or Chocolate Curls for example.
How to make Chocolate Orange Tartlets
There are three steps in making these tartlets: preparing the shell, filling them with orange curd then topping them with a chocolate ganache.
Making the Tartlet Shells
These Tartlet Shells are made in a food processor and shaped in a muffin pan. So easy! If you want to make the pastry by hands, read my Pâte Sâblée recipe (it's the same ingredient list and process).
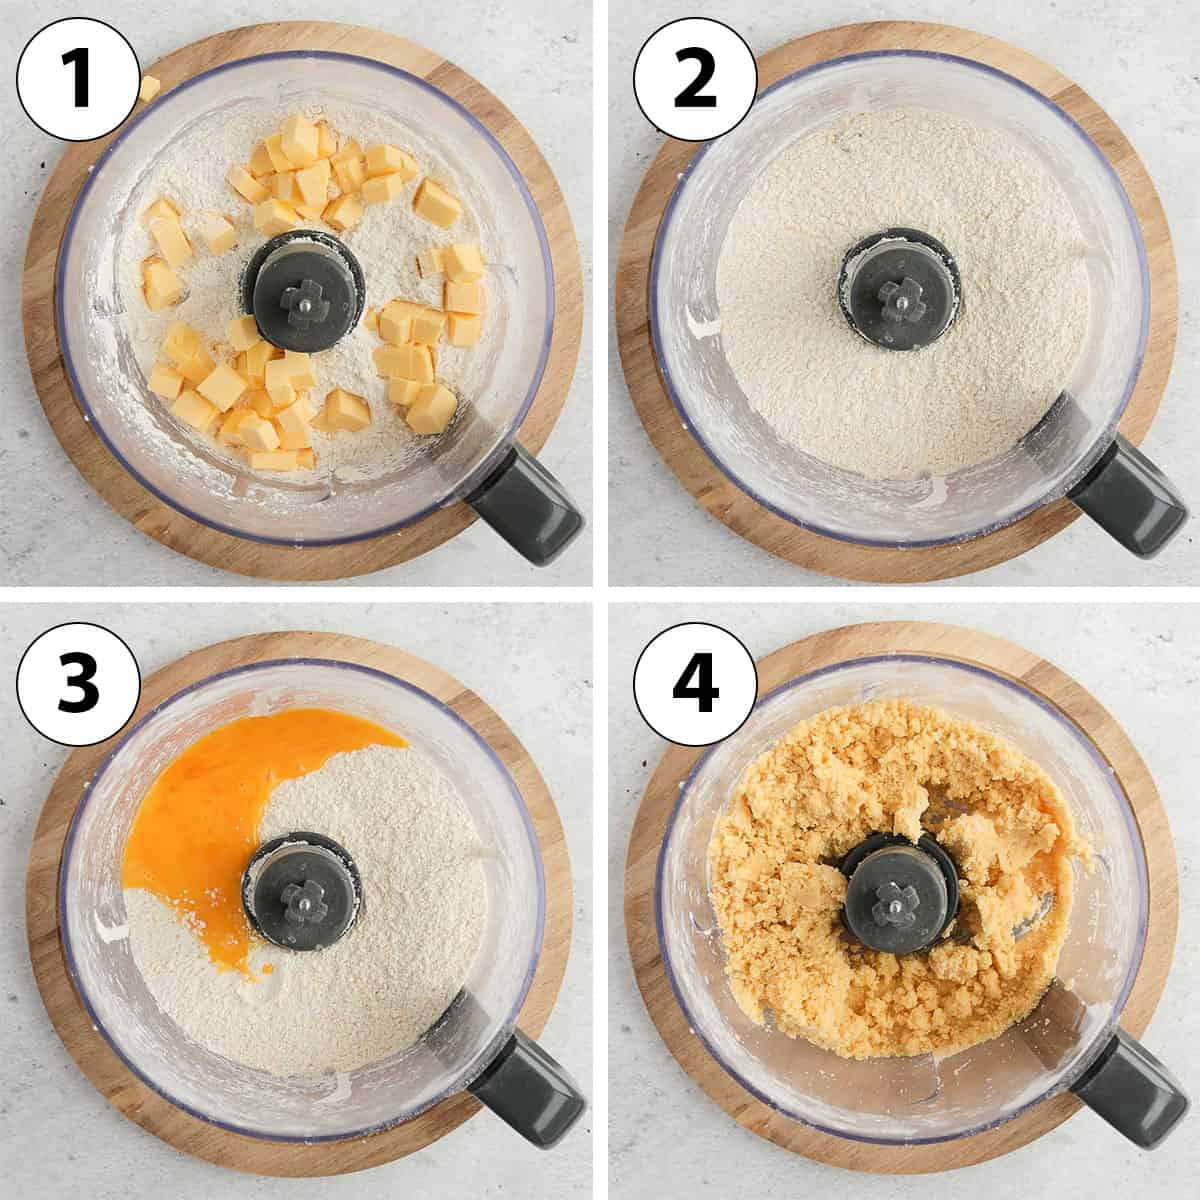
- Photo 1: place the Flour, Icing Sugar and Salt in the bowl of your food processor and pulse to mix. Add the very cold Butter cut into small cubes.
- Photo 2: blend until you get very small crumbs. Try to avoid large chunks of butter that will make the pastry more flakey (you don't want them to puff too much in the oven).
- Photo 3 & 4: add the Egg then mix to combine until a rough dough comes together, without overworking the pastry. To know it is mixed enough, press some chunks of dough together - they should stick together.
- Take out of the bowl and bring together into a ball. Place it between two sheets of baking paper and roll into a large, thin disk (about 3 mm or 1/8 inch thick). Place in the fridge to rest for at least 1 hour, or up to 24 hours.
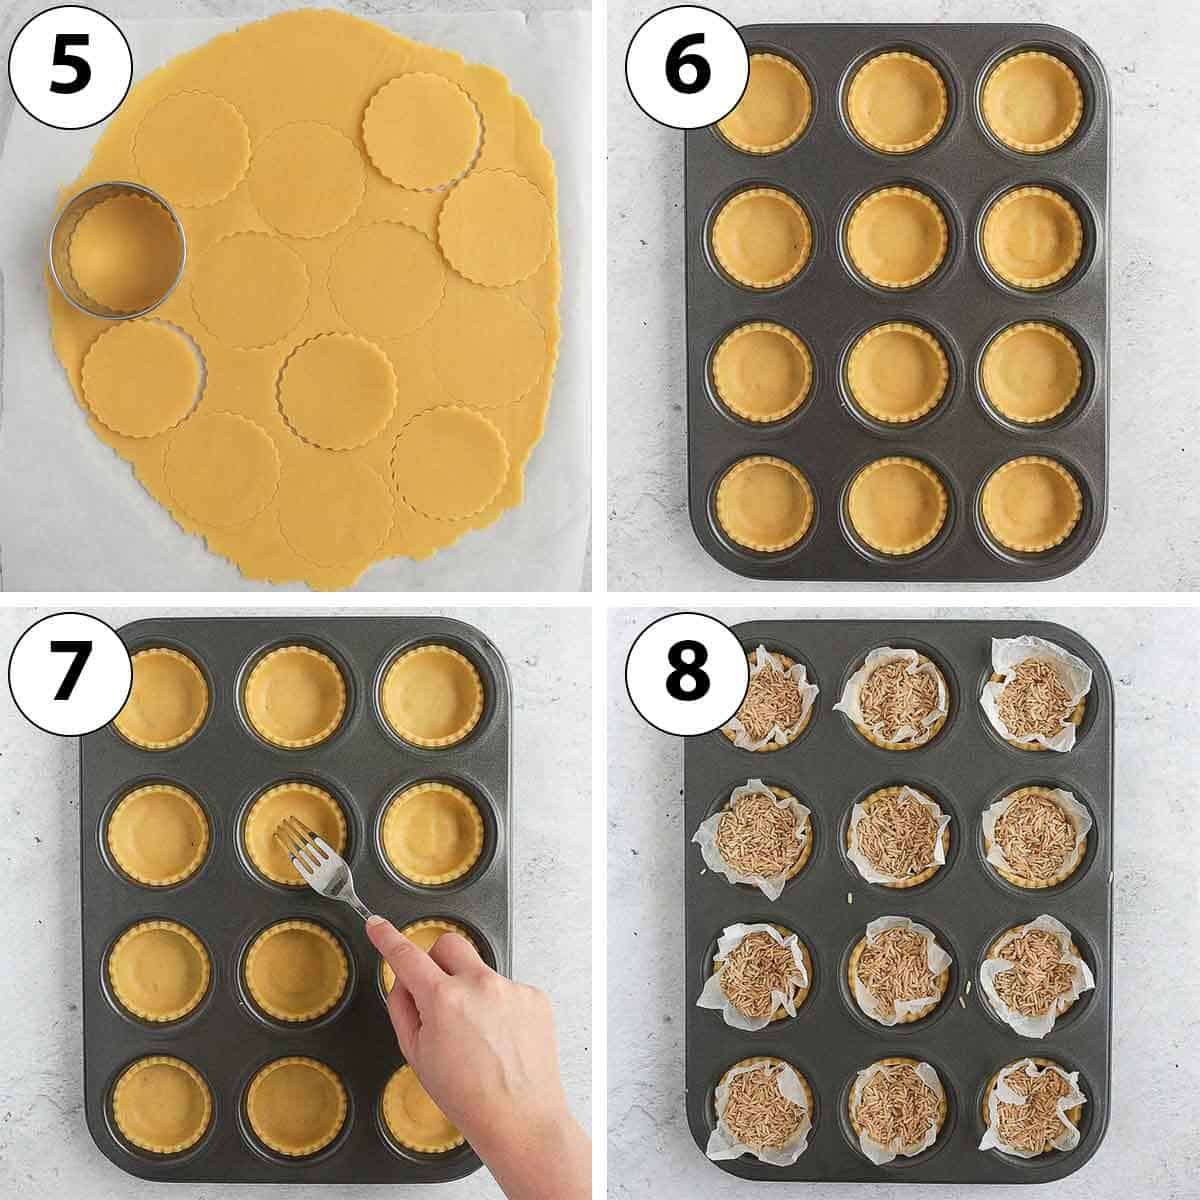
- Photo 5: Remove the baking paper sheets. With a small fluted (or rounded) cookie cutter, cut out small disks of pastry. The wider you cut the pastries, the deeper the tartlets will be. I recommend cutting them at least be as wide as the openings of the muffin pan.
- Photo 6: slide the pastry disks into the muffin pan openings. Gently press on the corner between the bottom and sides to remove any air bubbles, and press on the sides to make sure they stick to the pan.
- Photo 7: Prick the bottom of the tartlets pastries with a fork then place the pan back in the fridge to rest for at leat 1 hour - or up to 24 hours.
- Preheat your oven on 160'C/325'F. While the oven is preheating, place the muffin pan in the freezer so that the pastries are very cold.
- Photo 8: Cover each pastry shell with a small piece of crunched up baking paper and fill with weights (baking beads, dry beans or rice). Bake for 15 minutes, remove the paper and weights and put back in the oven for another 15 minutes - or until the crusts are fully baked. Set aside to cool down completely.
Would you like to save this recipe?
Orange Curd Filling
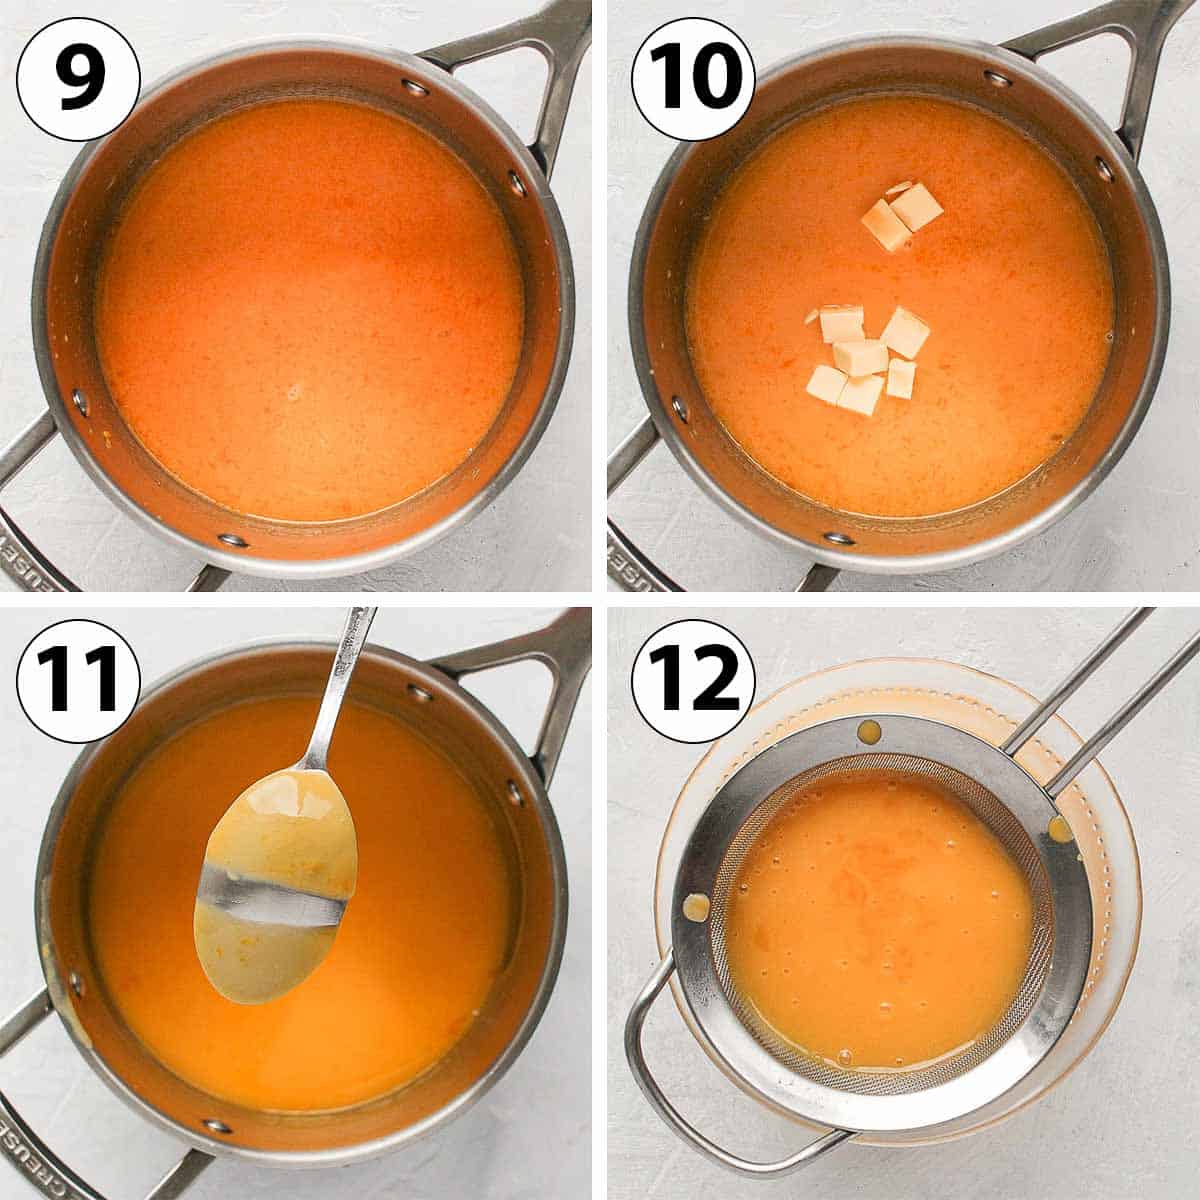
- Photo 9: Mix the Orange Juice, Zest, Egg Yolks, Sugar and Cornstarch in a small saucepan. Turn on very low heat and cook until the sugar has dissolved and the liquid starts to slightly thicken, constantly stirring.
- Photo 10: add the cubes of butter, a little bit at the time, stirring until melted before adding more.
- Photo 11: continue to cook on low heat for a few more minutes (don't stop stirring) until the orange curd has thickened. To know the curd is ready, dip the back of a spoon or spatula in the curd, draw a horizontal line and tip it down. If the line stays clear, it's ready. If the curd drips over the line, it needs more time on the stove.
The exact time will depend on the temperature of your stove. The curd should never boil to avoid scrambling the eggs, but a very low simmer is fine.
- Photo 12: pour the curd through a thin mesh sieve. This will remove any bits of cooked eggs or lumps.
Chocolate Ganache Layer & Assembling the Tarts
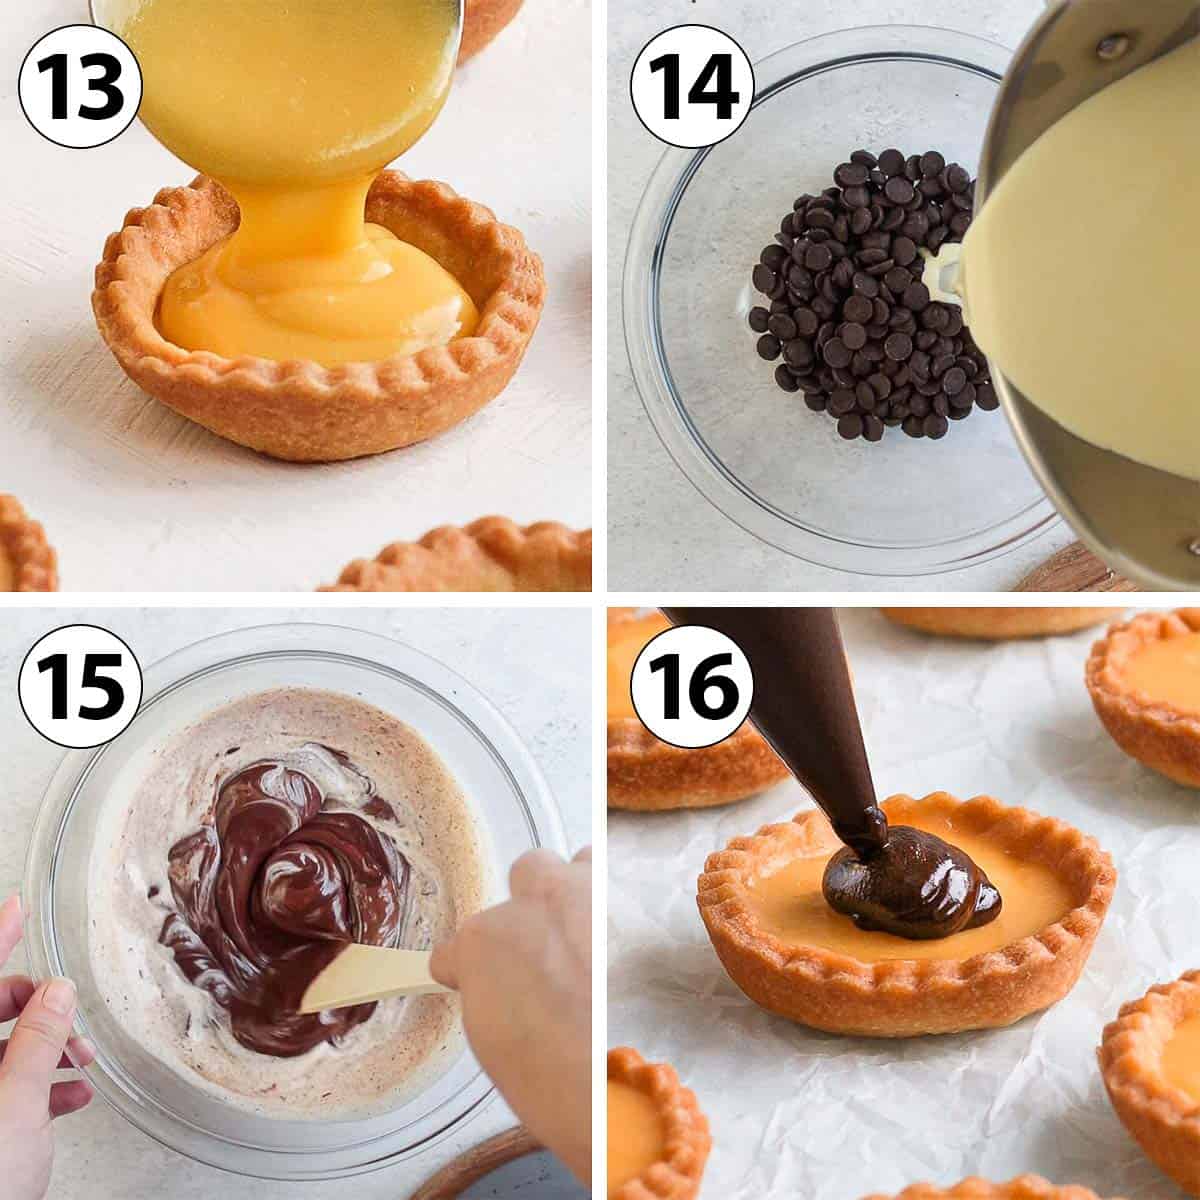
- Photo 13: Pour the curd into the baked and cooled Tartlet Shells while still warm. Gently tap each tartlet on a hard surface to pop any air bubbles and smooth out the top. Place them in the fridge to set for at least 2 - or overnight.
When the curd filling has set, it's time to make the chocolate ganache layer.
- Photo 14: place the Dark Chocolate callets (or a finely chopped cooking chocolate bar) in a heat proof bowl. Heat up the cream in a small saucepan until it simmers, then pour half of it over the chocolate.
- Photo 15: Leave for 2 to 3 minutes without touching it, then stir with a spatula. Start from the centre and mix in circular movement, making your way towards the edges of the bowl. Add the second half of the cream and repeat the process until you get a smooth ganache.
You might need to reheat the second half of the cream if it isn't hot anymore. If you still find some unmelted pieces of chocolate after mixing all the cream in, you can continue to melt it over a double boiler or for a few seconds in the microwave.
- Photo 16: pipe the chocolate ganache (when still warm) over the orange curd, and gently tap the tartlets to help the chocolate spread. Alternatively, you can also do a chocolate drizzle instead of a thick layer. Place back in the fridge for about 1 hour, or until ready to be eaten.
If the chocolate ganache is starting to harden before you finish making the tartlets, you might want to re-heat it up slightly to make it runnier (and easier to spread).
Recipe FAQs
Absolutely, although I find that homemade pastry always taste better and has a nicer, fresher texture.
The best type of chocolate for this recipe is Couverture Chocolate, if you have access to it. This type of chocolate will give you the nicest, shiniest, smoothest ganache. If you don't have couverture chocolate, make sure to use a proper Cooking Chocolate (and not an eating chocolate bar or chocolate chips).
I used a 70% dark chocolate here, but you can use any of your favourite chocolate. There is no added sugar in the ganache, so use the strength of chocolate to suit your taste and sweetness preferences.
Once assembled, they will be best eaten fresh, as soon as possible, but you can prepare both the tartlet shells and the orange curd in advance.
The tartlet shells can be kept at room temperature for 2 days (or you can freeze them for much longer if preferred) and the orange curd in the fridge to 3 days. Make sure to slightly re-heat the curd to make it more fluid and easier to fill the crusts.
Tips for Success
- Resting and Chilling the pastry is essential for success. If you skip these steps, the shells might shrink or collapse in the oven.
- For mini tartlet bites (like these Mini Lemon Meringue Tartlets), use a Mini Muffin Pan instead of a regular muffin pan.
- Always use Callets (large chips of couverture chocolate) or a finely Chopped Cooking Chocolate Bar when making a ganache. This is to help it melt more quickly with the cream without risking burning the chocolate.
- If making the orange curd in advance, slightly re-heat it before filling the tart crusts as it will be easier to pour and will set more smoothly.
Storing & Freezing
The tartlets should be kept in the fridge until ready to be eaten and will last for up to two days - but are best eaten fresh straight away (after chilling). I recommend letting them come back to room temperature for about 30 minutes before serving so that the chocolate isn't too cold/hard.
I don't recommend freezing these chocolate orange tartlets, but the tartlet shells can be made in advance and frozen (preferably un-baked).
Made this recipe?
Let us know if you liked it by leaving a comment below, and tag us on Instagram @a.baking.journey with a photo of your creation!
Recipe

Chocolate Orange Tartlets
Ingredients
Tartlet Shells
- 250 gr (1 2/3 cup) Plain / AP Flour
- 50 gr (1/2 cup) Icing Sugar, or powdered sugar
- 1 pinch Table Salt
- 120 gr (1/2 cup) Unsalted Butter, very cold
- 1 Egg
Orange Curd Filling
- 4 Egg Yolks
- 50 gr (4 tablesp.) Caster Sugar, or fine white granulated sugar
- 120 ml (1/2 cup) Orange Juice, about 3 oranges
- 1 Orange Zest
- 1 tablesp. Cornstarch
- 75 gr (5 tablesp.) Unsalted Butter
Chocolate Ganache
- 70 gr (2,5 oz) Dark Cooking Chocolate
- 70 ml (1/4 cup + 2 teasp.) Heavy / Thickened Cream
Instructions
Tartlet Shells
- In the bowl of your food processor, blend together the Flour, Icing Sugar and Salt (see note 1 if making by hands). Add the very cold Butter cut into small cubes and mix until you get very fine crumbs.250 gr (1 2/3 cup) Plain / AP Flour, 50 gr (1/2 cup) Icing Sugar, 1 pinch Table Salt, 120 gr (1/2 cup) Unsalted Butter
- Add the Egg (preferably pre-whisked in a separate bowl). Slowly mix until a dough starts to come together (see note 2).1 Egg
- Bring the dough together into a ball, place between two sheets of baking paper and roll into a large disk about 3mm thick (1/8inch). Place on a flat tray and leave in the fridge to chill and rest for at least 1 hour, or up to 24 hours.
- Remove the baking paper sheets and cut out small rounds of pastry with a round or fluted cookie cutter (see note 3), at least as wide as the opening of the muffin pan.
- Gently slide each piece of dough into a muffin pan, pressing on the bottom and the edges to remove any air bubbles. Prick the bottom with a fork and place back in the fridge to rest and chill for at least 1 hour, or up to 24 hours.
- Preheat your oven on 160'C/325'F and place the muffin pan in the freezer while the oven is preheating. Line each tartlet shells with a small piece of baking paper and fill with baking weights (beads, rice or dry beans). Bake for 15 minutes, remove the weights and baking paper then bake for another 15 minutes, or until golden and dry to the touch. Set aside to cool down completely.
Orange Curd Filling
- Place the Orange Juice & Zest, Egg Yolks, Sugar and Cornstarch in a small saucepan. Whisk to combine then turn on very low heat. Keep on stirring until the sugar has dissolved and the liquid starts to slightly thicken (3 to 5 minutes).4 Egg Yolks, 50 gr (4 tablesp.) Caster Sugar, 120 ml (1/2 cup) Orange Juice, 1 Orange Zest, 1 tablesp. Cornstarch
- Add the cubed Butter a little bit at the time, stirring until fully melted before adding more. Continue to cook on low heat for a few minutes while stirring until the orange curd has thickened (see note 4). Pour through a thin mesh sieve to remove any lumps.75 gr (5 tablesp.) Unsalted Butter
- Pour the warm orange curd into the cooled tartlet shells. Gently tap them on a hard surface to remove any air bubbles, then place in the fridge to set for at least 2 hour (or overnight), or until set.
Chocolate Ganache
- Finely chop the Cooking Chocolate and place it in a large heat-proof mixing bowl.70 gr (2,5 oz) Dark Cooking Chocolate
- Heat up the Cream in a small pot until it starts to simmer. Pour half of the hot cream over the chopped Chocolate and leave for 2 to 3 minutes without touching it. Using a stiff spatula, stir in small circular movements, starting from the centre of the bowl then making your way towards the edges until combined (see note 5).70 ml (1/4 cup + 2 teasp.) Heavy / Thickened Cream
- Pour the rest of the hot cream over the ganache (reheat it first if needed) and stir again in circular movement until all the chocolate has melted and you should get a smooth and shiny ganache (see note 6).
- Place in a piping bag, cut off the tip and pipe over the Orange Curd. Gently tap each tartlet to help the ganache spread out (or use a small offset spatula if needed). Alternatively, drizzle the chocolate over the curd for another design (see note 7)
- Place in the fridge to set for at least 1 hour.
- Finish decorating with some slices of dehydrated oranges, some orange zest or shaved chocolate / chocolate curls. Leave at room temperature for about 30 minutes before serving for the best texture.
Would you like to save this recipe?
Notes
- If you don't have a food processor, you can make the pastry by hands or using a pastry blender. You can find the detailed step by step instructions on how to make the dough by hands here.
- Avoid over-mixing the pastry and stop as soon as it comes together. To know it is mixed enough, press some lumps of pastry between your hand - they should stick together. If too dry, add a little bit of very cold water. If very sticky, add a little bit more flour.
- The wider you cut out the circles of pastry, the deeper the tartlet shells will be. It is up to you how wide you cut them out, but I recommend having the width of the muffin pan openings as a minimum. Otherwise, the crusts will be quite flat and not deep enough for a filling.
- The exact time will depend on the temperature of your stove, about 5 to 10 minutes. Make sure the curd never boils, but a very gentle simmer is fine. To know the orange curd is cooked: either check its temperature has reached 82'C/180'F (if you have a food thermometer) or check its consistency with a spoon. Dip the back of the spoon (or spatula) in the curd and draw a horizontal line with your finger. Tip the spoon down and check if the line remains clear. If some liquid drips over the line, it needs more time. If it stays clear, it's ready.
- The chocolate won't be fully melted at this point - it is normal. Gently mix until all the cream has been incorporated into the chocolate.
- f you still have some unmelted chunks of chocolate after adding the second half of the cream, either place the ganache in the microwave (for no longer than 30 seconds at the time, stirring well each time until fully melted) or preferably over a double boiler.
- If the chocolate seems to harden before you finish using it, slightly re-heat it up to make it more fluid and easier to pipe/spread.