

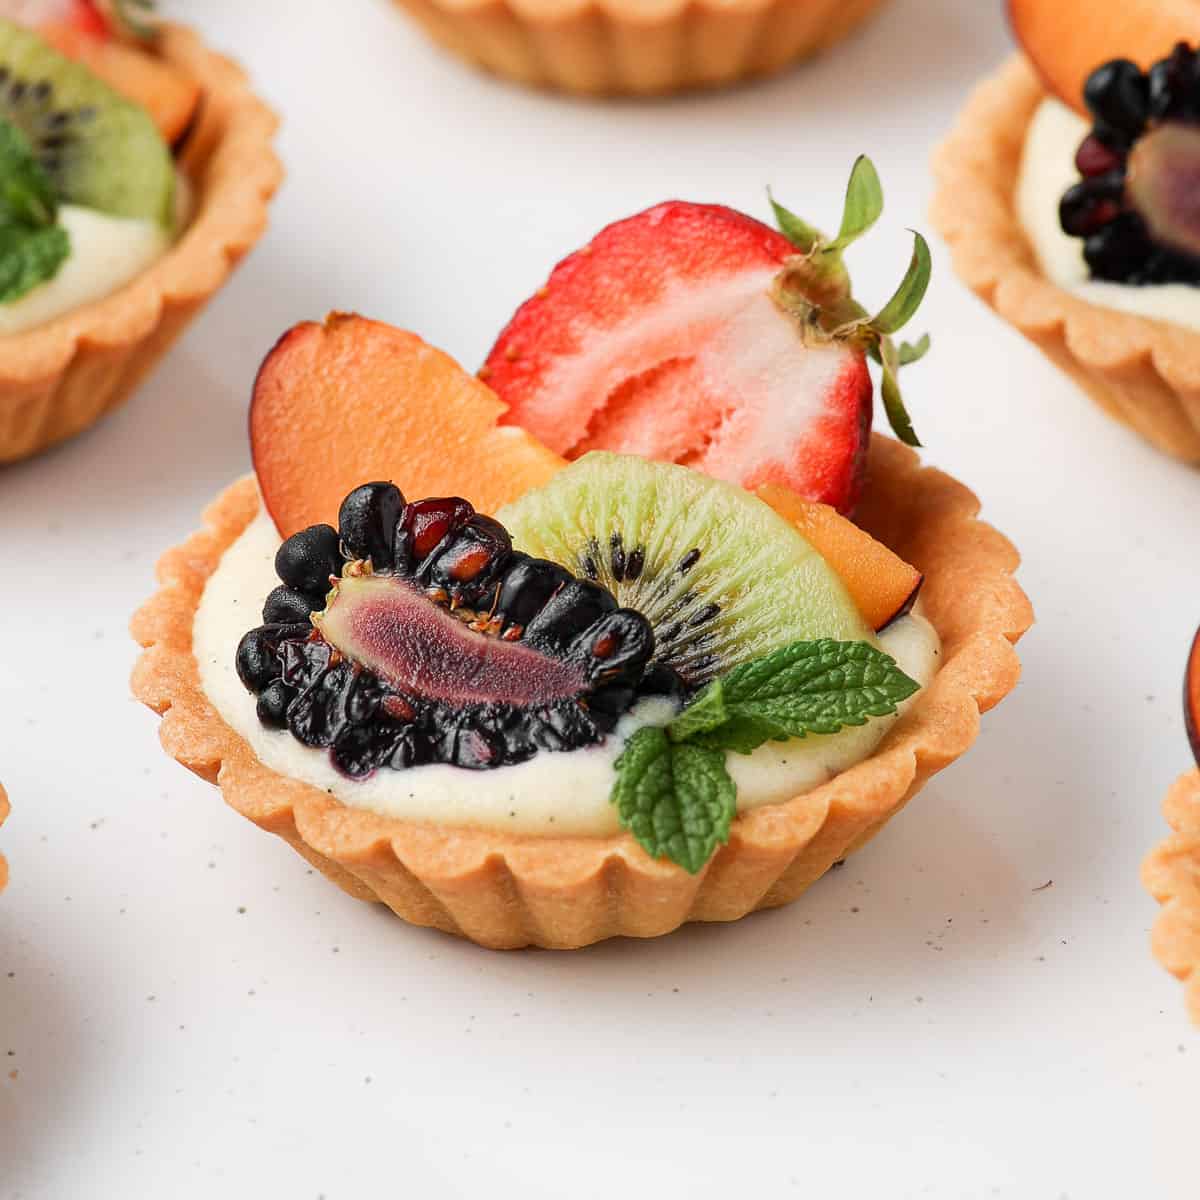
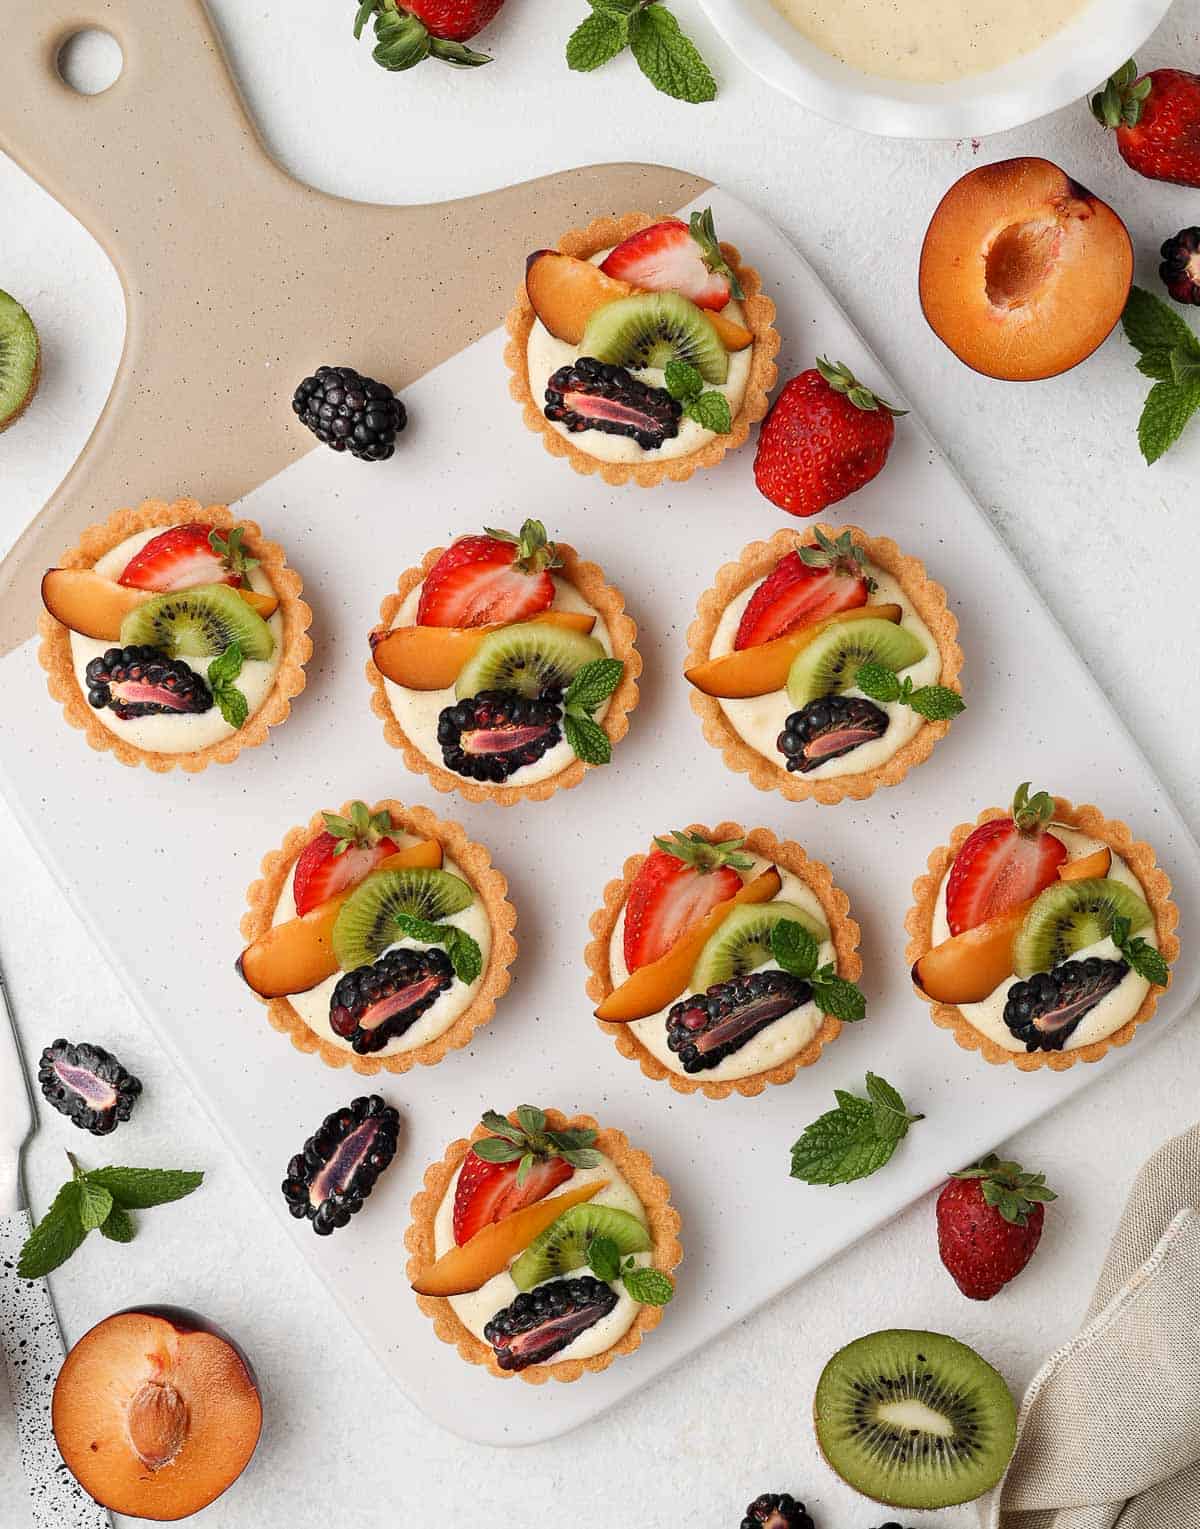
These French Mini Fruit Tarts filled with Pastry Cream are the perfect bite-sized dessert for a party or afternoon tea. The homemade buttery and crunchy tartlet shells are filled with a delicious vanilla cream and topped with fresh fruits.
Jump to:
Why we love this recipe
It doesn't get more fancy than Mini Fruit Tartlets for a special occasion or party! Combining Homemade Tartlet Shells, creamy Pastry Cream Filling (Crème Pâtissière) and seasonal fruits, these tartlets are the perfect mix of crunchy, creamy, sweet and fresh.
These mini tarts are easily customisable with your choice of favourite fruits. Think mixed berries in Summer, poached pears or apples in Winter! The custard filling can be replaced with Lemon Curd, a cream cheese filling, Chocolate Cremeux or Chocolate Pastry Cream.
Both the tartlet shells and the cream filling can be made a few days in advance. You will only need to assemble the tartlets the day of your party!
How to make Mini Fruit Tartlets
Mini Tart Shells
The pastry used to make the tartlet shells is a classic Pâte Sablée - or French Shortcrust Pastry.
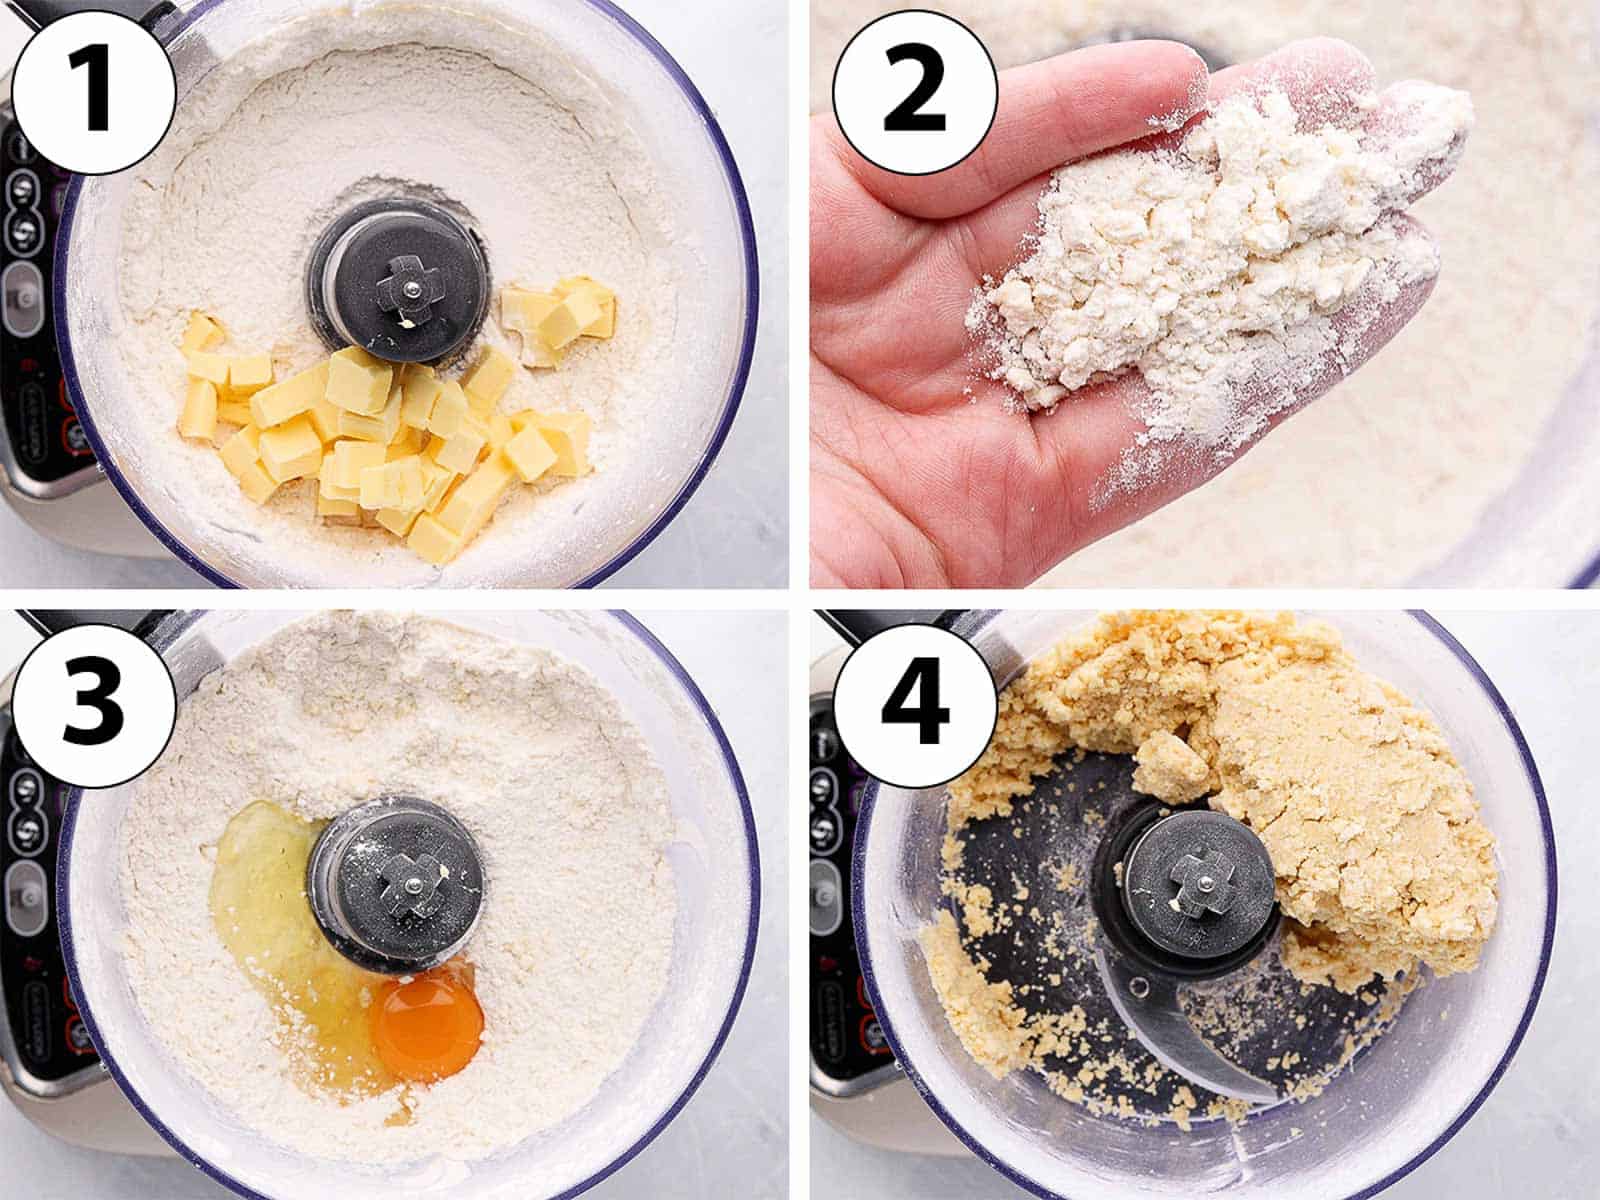
This pie crust is made from Flour (and a pinch of salt), Icing Sugar (or powder sugar), Butter (very cold) and Egg. I love to make it in the food processor for ease, but it can also be made by hands too.
- Place the Flour, Salt and Icing Sugar in the bowl of your food processor. Pulse for a few seconds to mix and break down any lumps.
- Photo 1: Add the very cold butter cut into small cubes.
- Photo 2: Blend for a few seconds or until you get small crumbs of butter.
The larger the crumbs, the flakier the pastry will be. In this case, we do not want too much flakiness so make sure the crumbs are very small.
- Photo 3: Add the Egg.
- Photo 4: Mix until a rough, slightly crumbly dough starts to come together.
To know the pastry has been mixed enough, press together some of the crumbs in your hand. If they stick together and turn into a smooth dough, it is ready.
If the dough seems too dry, add a little bit of very cold water - about 1 tablespoon at the time. Keep going until you get the desired consistency.
- Tip the pastry over a sheet of baking paper. Work it for a few seconds until it comes together into a ball.
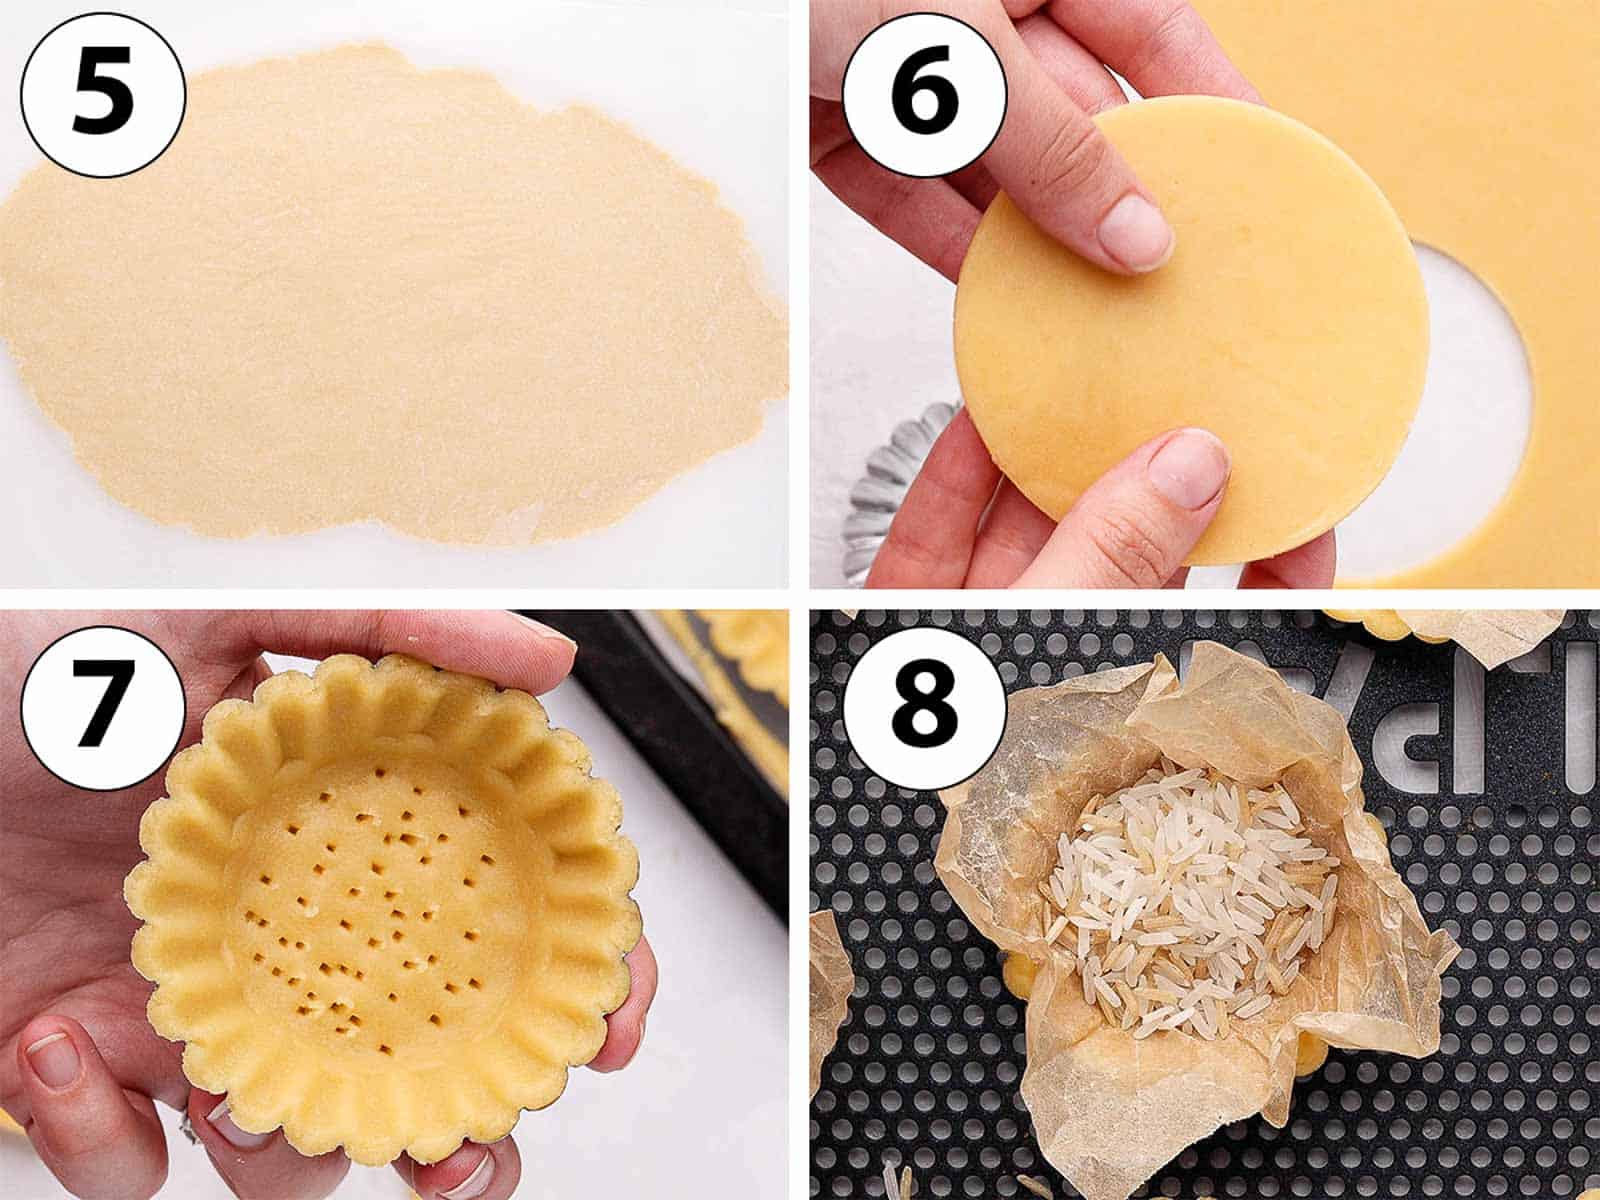
- Photo 5: Cover the pastry with a second sheet of baking / parchment paper.Rroll to a thickness of about 4 mm (1/8 inch).
- Place on a flat tray then in the fridge to chill and rest for at least one hour - or up to 24 hours.
- Photo 6: Remove the baking paper and cut out circles of pastry slightly larger than the tartlet pans you are using. I used these Mini Tart Pans that are 7 cm (1/4 inch) wide. I cut out the disks of pastry to be about 10 to 12 cm (3/8 to 1/2 inch) wide.
Alternatively, you could also make the tartlet shells in a muffin pan (or mini muffin pan). The instructions for this method can be found in my tartlet shells recipe!
- Photo 7: Gently press down the pastry into the molds to line them and cut off any excess. Optionally, use a straw to define the fluted edge. Dock the bottom of the pastry with a fork. Leftover pastry can be re-rolled, chilled and used to make more tartlets.
The temperature of the pastry is important: if too cold, it will be stiff and difficult to handle. Just let it come back to room temperature for a few minutes first. If too warm, the pastry will be soft and starts to break. Place back in the fridge for a few minutes.
- Place the tartlets shells back in the fridge to chill for at least one hour, or up to 24 hours.
- Preheat your oven on 160'c/325'f. While it is preheating, place tartlet shells in the freezer.
- Photo 8: Cover each crust with a little bit of baking paper then fill with baking weights, dried beans or rice. Bake for 15 minutes, remove the weights/baking paper and bake for an additional 10 minutes.
- Take out of the oven and leave to cool down completely. The crusts should slide straight out of the tart molds.
Pastry Cream Filling (Vanilla Custard)
Traditional Pastry Cream - or Crème Pâtissière in French - is the typical filling used to make a fruit tart. It is simply made with Full Cream / Whole Milk, Vanilla (preferably fresh vanilla bean or vanilla paste), Egg Yolks, Caster Sugar and Cornstarch.
You can start making the pastry cream filling at the same time than the pastry shells are chilling in the fridge - it will need to rest in the fridge as well.
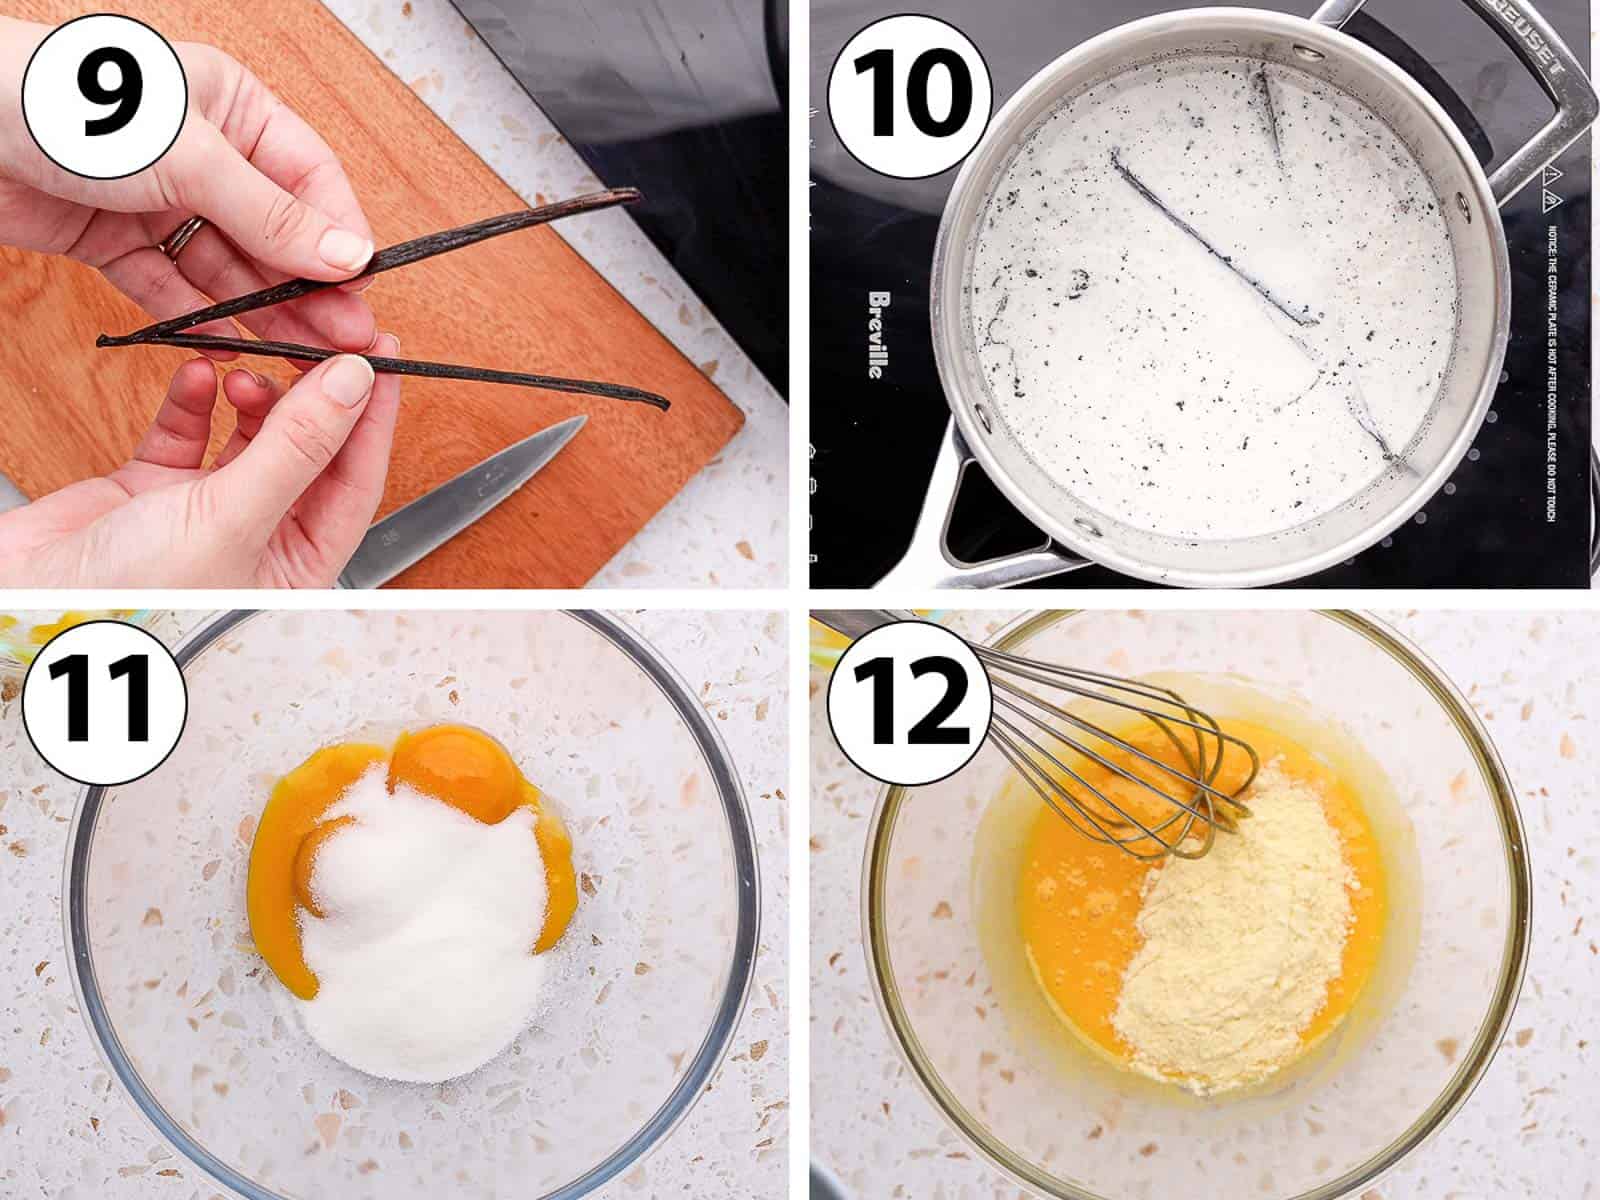
- Photo 9: If using fresh Vanilla Bean, start by carefully slicing it in half.
Would you like to save this recipe?
- Photo 10: Place the milk in a medium size saucepan and scrap the vanilla bean seeds into it. Add the pod as well.
- Heat up on low heat and bring to a simmer. Turn off the heat and cover the saucepan with a lid. Let the vanilla infuse into the milk for about 10 to 15 minutes.
If using Vanilla Paste, just add it straight to the milk and heat it up. No need to let it infuse. I personally do not like to use Vanilla Extract as the flavour is not as strong.
- Photo 11: In the meantime, prepare the other ingredients. In a small heat-proof bowl, whisk together the Sugar and Egg Yolks until smooth.
- Photo 12: Mix in the Cornstarch.
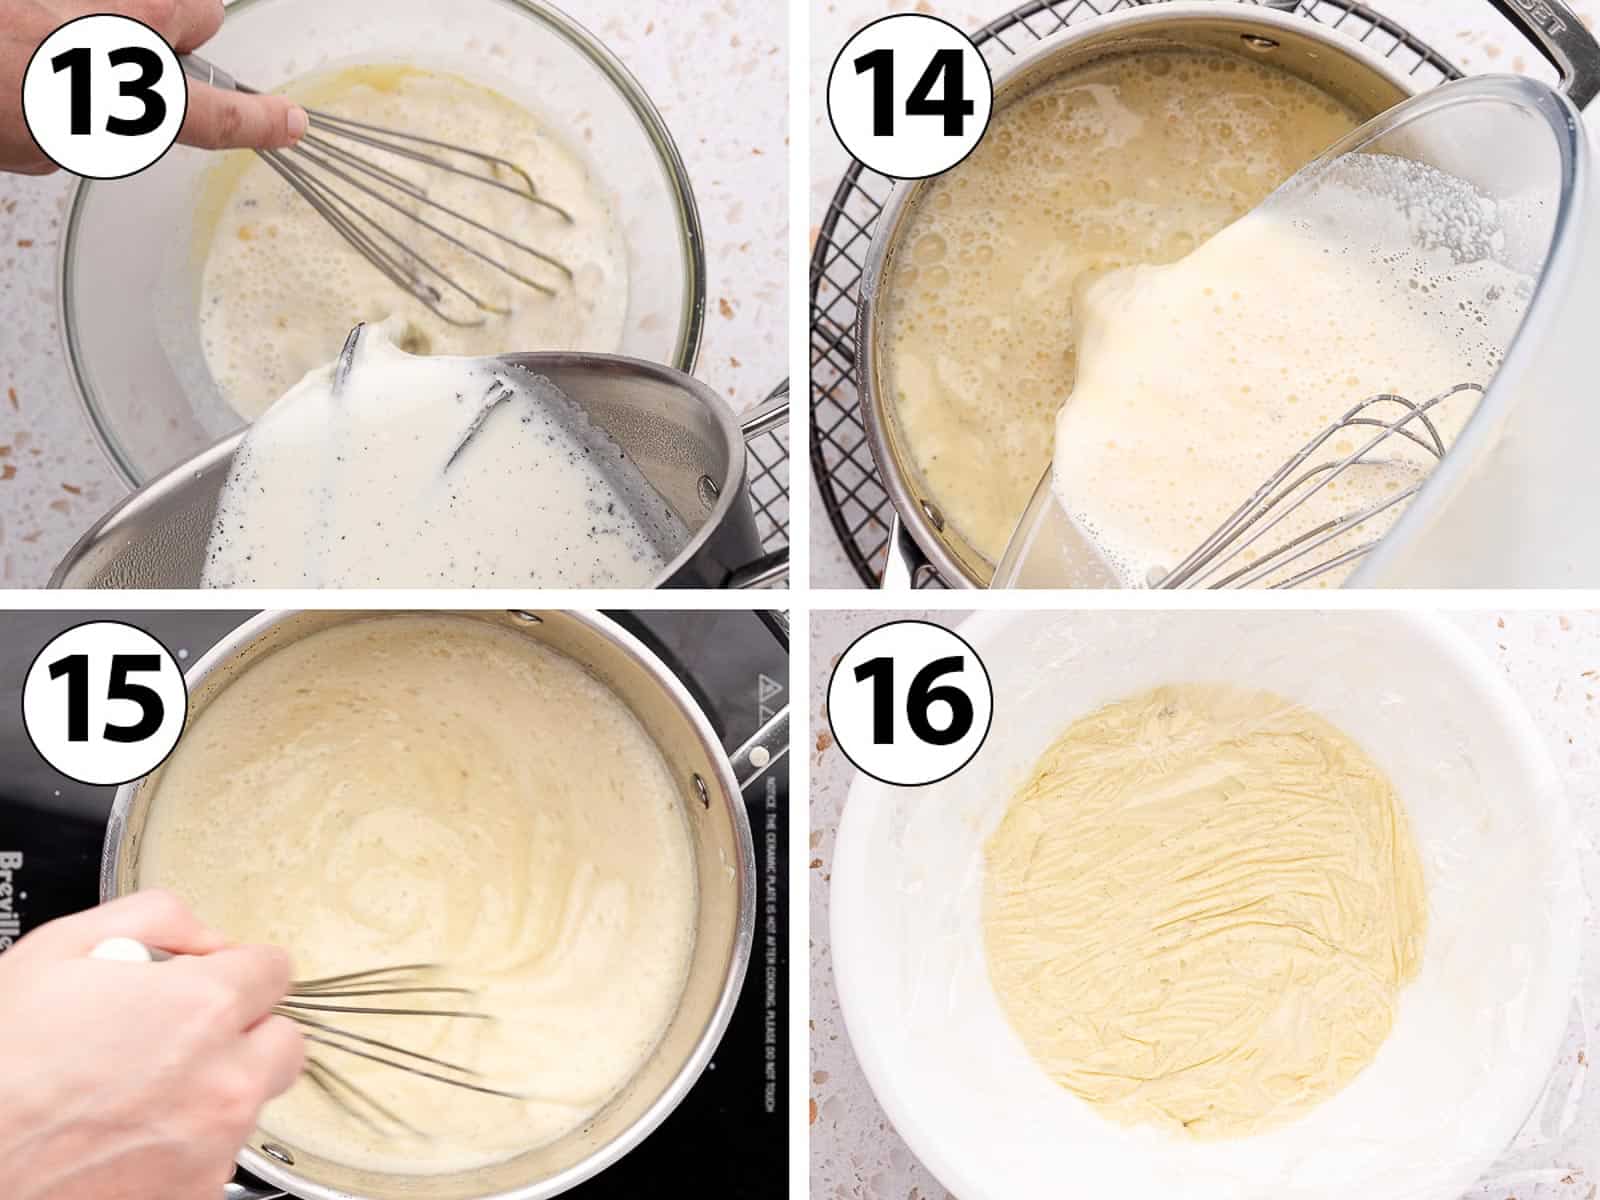
- Photo 13: Slowly pour the warm milk over the Egg/Sugar mixture while whisking. This step is used to temper the egg yolks and avoid they cook too fast on the stove.
- Photo 14: Pour the mixture back into the saucepan and remove the vanilla pod.
- Photo 15: Turn on low heat and cook for about 5 minutes, making sure to continuously stir so that the cream does not burn at the bottom. Continue to cook until the pastry cream has thickened nicely.
It is important not to let the mixture boil or the eggs will curdle. Optionally if you see lumps, pour the cream through a thin mesh sieve.
- Photo 16: Transfer into a clean bowl and cover with plastic wrap touching the surface of the cream. Place in the fridge to cool down completely for about 1 to 2 hours.
Tip: to cool down the custard more quickly, transfer it into a large shallow pan (like a brownie pan) instead of a bowl.
Assembling the Fruit Tarts
The last part of this mini fruit tart recipe is to simply assemble all the elements!
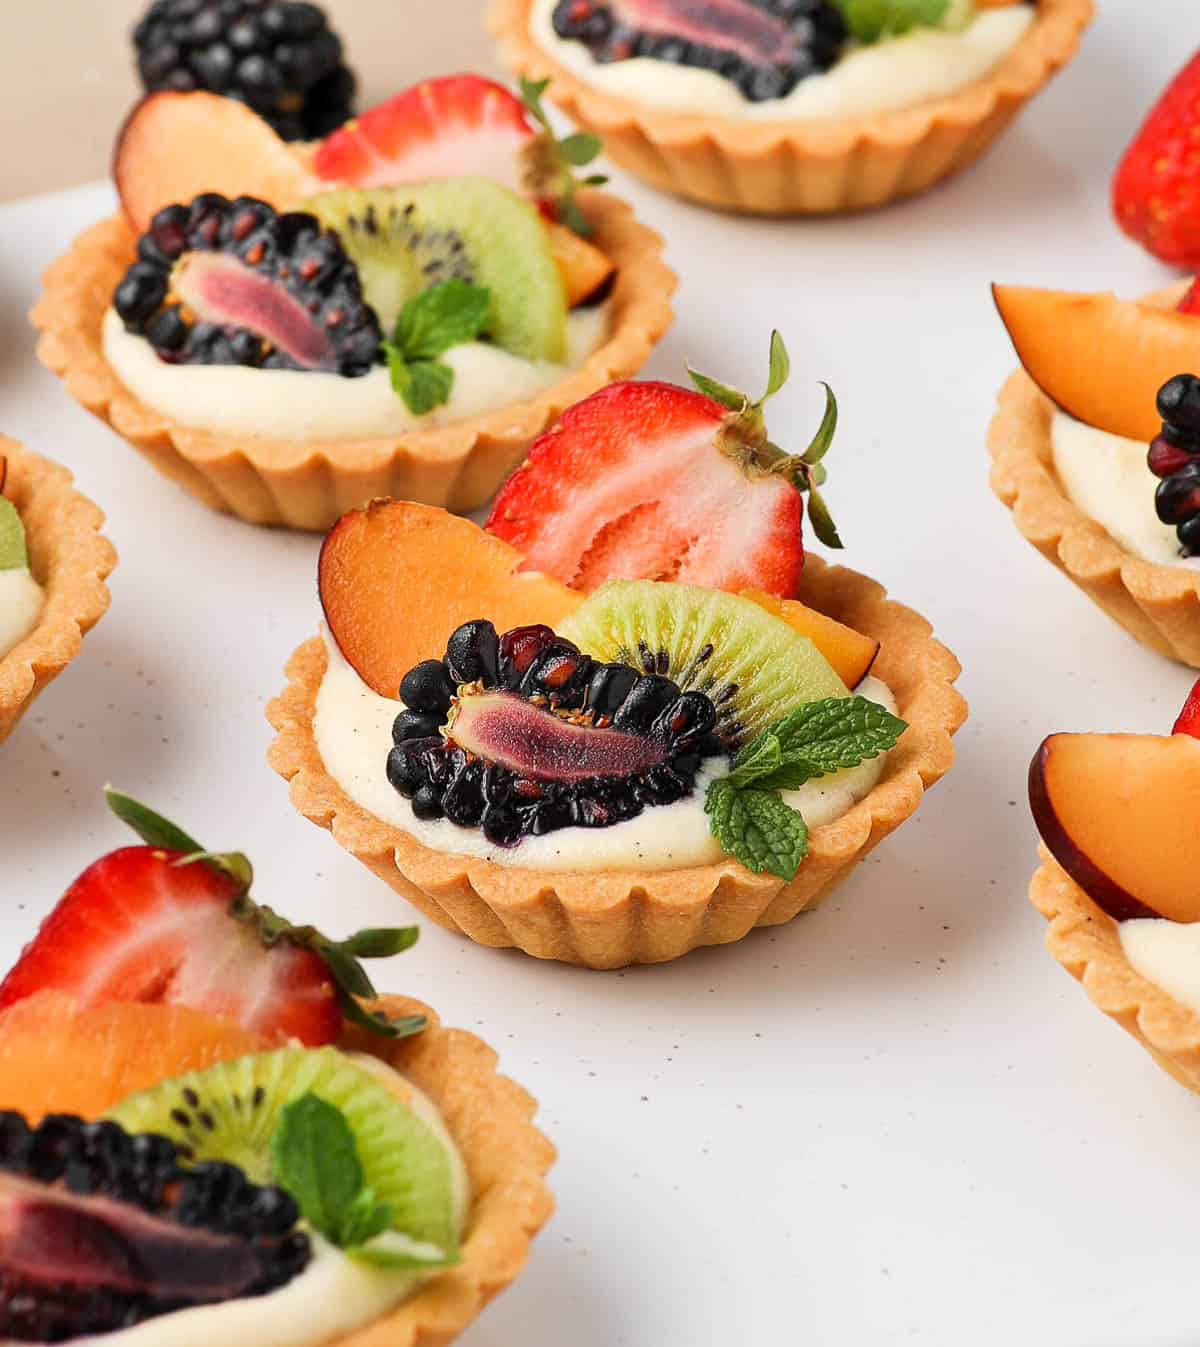
- Wash and prep your choice of fresh fruit. I used Strawberries (sliced in half), Plum (cut into thin strips), Kiwi Fruit (cut in half then in thin slices) and some Blackberries (cut in half).
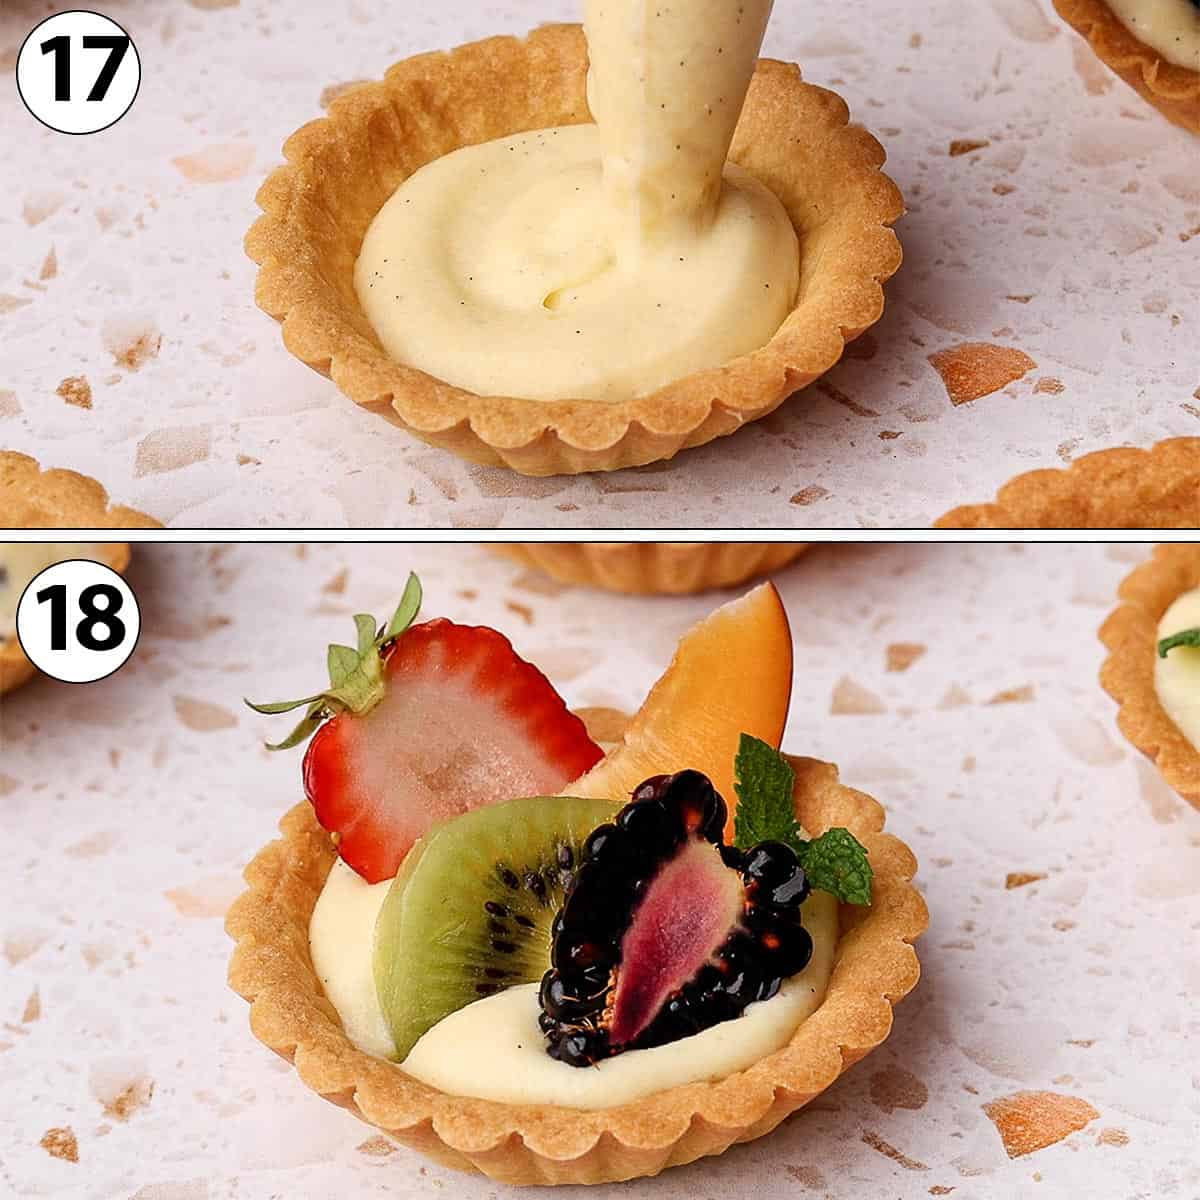
- Photo 17: Place the chilled Pastry Cream in a pastry bag and cut off the tip. Pipe the cream inside the tartlet shells, about halfway up. Gently tap the shells on a hard surface to spread out the cream.
- Photo 18: Place the fresh fruits over the cream, pressing them in slightly so secure them. Finish with some fresh mint.
Optionally, brush some apricot preserves or jam thinned with a little bit of water over the mini fruits pies to give them a nice glaze and shine. This also helps preserving the freshness and colour of the fruits for longer.
I personally prefer to assemble the tarts just before serving for freshness - at to avoid adding extra unnecessary sweetness.
Recipe FAQs
If preferred, you can absolutely make these mini fruit tarts with pre-made pie crusts. Alternatively, the homemade shells can be kept in the freezer for a couple of months if you want to prepare part of this recipe in advance.
You can if you want, but I simply believe that homemade custard tastes way better. Pudding or custard mix tend to be overly sweet. Making your own is a great way to control how much sweetness you add to your desserts!
The great thing about this recipe is that you can basically use any fruits you want based on the season and your preferences! Fresh berries like Strawberries, Raspberries and Blueberries are always great. Citrus fruits like orange or mandarin oranges are a delicious way to bring freshness to your tartlets.
Also think of colour with a pop of green from the Kiwi Fruits and some orange from the Plums, Peaches or Nectarines!
Absolutely, you can use this Mini Tart Shells recipe that is made in a regular Muffin Pan to make these mini fruit tarts. You can also use small perforated Pastry Rings like the ones I used to make these Strawberry Custard Tarts or Pear Frangipane Tartlets.
I personally do not like to use silicone molds for pastry, and highly recommend using metal when possible.

Tips & Troubleshooting
- The pastry cream is too liquid: the cream can feel too liquid when not cooked for long enough. It will also continue to thicken when chilled. To get a thicker pastry cream, you can simply increase the quantity of cornstarch slightly.
- The pastry cream is too thick: it can happen if using very large eggs, too much cornstarch or cooking the cream for too long. Simply add a dash of Milk and keep whisking until you get the desired consistency.
- How to keep fruit tarts from getting soggy: the most simply way to avoid a soggy bottom is to assemble the fruit tartlets just before serving (or as close as possible). You can also brush the tartlet shells with a little bit of egg whites in the middle of its baking time. This will create a thin skin on the pastry that will prevent it from absorbing too much moisture from the cream filling!
- How to make sure the tartlet shells don't shrink or collapse when baked: rest and chill the pastry properly, and bake it on a lower heat. This is the best way to make tart crusts that do not move in the oven. You want the gluten to be as relaxed and the butter to be as cold as possible.
- Keeping the fruits fresh for longer: although I personally do not like using a neutral or fruit glaze over the fruits (because of the added sweetness), it is the most simple way to keep them fresher for longer. A fruit glaze is made from a fruit jam or preserve like apricot jam mixed with a little bit of water.
Storing & Freezing
The tartlet shells can be kept in the fridge unbaked for 24 hours. They will last 2 days at room temperature once baked and stored in an air-tight container. You can also freeze them, preferably unbaked for the best texture.
The Pastry Cream can be kept in the fridge covered with plastic wrap touching its surface for up to three days - but is best used within 24 hours.
Once assembled with the fresh fruits, these mini fruit tarts are best served straight away or within 24 hours. The leftovers can be kept in the fridge for an additional two days.
Made this recipe?
Let us know if you liked it by leaving a comment below, and tag us on Instagram @a.baking.journey with a photo of your creation!
Recipe

Mini Fruit Tarts
Ingredients
Tartlet Shells
- 250 gr (1 2/3 cup) Plain / AP Flour
- 50 gr (1/2 cup) Icing Sugar
- 1 pinch Fine Table Salt
- 120 gr (1/2 cup) Unsalted Butter, very cold
- 1 medium Egg
Vanilla Pastry Cream
- 375 ml (1 1/2 cup) Full Cream / Whole Milk
- 1 Vanilla Bean, or 2 teasp Vanilla Paste
- 3 Egg Yolks, medium size, at room temperature
- 30 gr (2 1/2 tablesp.) Caster Sugar
- 30 gr (3 tablesp.) Cornstarch
Fruit Topping
- 1 Kiwi Fruit
- 10 Blackberries
- 10 Strawberries
- 1 Plum
- Fresh Mint, to taste, optional
Instructions
Tartlet Shells
- Place the sifted Flour, Icing Sugar and Salt in the bowl of your food processor. Pulse for a few seconds to mix, then add the very cold Butter cut into small cubes. Mix until you get fine crumbs of butter (see note 1).
- Add the Egg and mix until a rough dough starts to come together (see note 2).
- Place the pastry over a large sheet of baking paper and bring together into a ball. Cover with a second sheet of baking / parchment paper then roll to a thickness of about 4 mm (1/8 inch). Put in the fridge to rest and chill for at least 1 hour, or up to 24 hours.
- Remove the baking paper and cut out disks of pastry that are a bit larger than the tartlet pans you are using (see note 3). Line the tartlet pans with the pastry, pressing gently on the sides to slide it down (see note 4) and cut off any excess. Dock the bottom of the pastry with a fork. Leftover pastry can be re-rolled, chilled and used to make more tartlets.
- Place the tartlets shells back in the fridge to chill for at least one hour, or up to 24 hours then preheat your oven on 160'c/325'f. Place the shells in the freezer while the oven is preheating.
- Cover each crust with a little bit of baking paper then fill with baking weights, dried beans or rice. Bake for 15 minutes then remove the weights and baking paper and bake for an additional 10 minutes. Leave to cool down completely.
Pastry Cream Filling
- Place the Milk in a small saucepan. Cut the vanilla bean in half, scrap the seeds then place both the seeds and the bean in the milk. Turn on low heat and bring to a simmer. Turn off the heat, cover the sasucepan with a lid and leave to infuse for 10 to 15 minutes (see note 5).
- In a seperate heat-proof bowl, whisk the Egg Yolks and Sugar until foamy. Add the Cornstarch (preferably sifted) and whisk until incorporated and smooth.
- Carefully pour the warm milk over the Yolk/Sugar while continuously whisking (see note 6). When all smooth, transfer the whole preparation back in the saucepan and turn on low heat.
- Keep whisking on low heat until the cream starts to thicken - about 5 minutes (see note 7). Transfer into a clean bowl or large shallow pan and cover with plastic wrap touching the surface. Place in the fridge to chill for about 1 hour.
Assembling the tarts
- Wash and prepare the fresh fruits: cut the Strawberries and Blackberries in half, and the Plum and Kiwi Fruit into thin slices.
- Place the chilled Pastry Cream in a pastry bag and cut off the tip (see note 8). Pipe the cream inside the tartlet shells, about halfway up. Gently tap the shells on a hard surface to spread out the cream.
- Place the fresh fruits over the cream, pressing them in slightly so secure them. Finish with some fresh mint. Keep in the fridge until ready to serve - preferably as soon as possible.
- Optionally, brush a neutral glaze or fruit glaze over the fruits.
Video
Would you like to save this recipe?
Notes
- The larger the crumbs, the flakier the pastry will be. In this case, we do not want too much flakiness so make sure the crumbs are very small.
- Don't worry if it seems crumbly, it will come together when you roll it. To know the pastry has been mixed enough, press together some of the crumbs in your hand. If they stick together and turn into a smooth dough, it is ready. If after mixing the dough still does not seem to be coming together, you might have to add a little bit of cold water (one tablespoon at the time). It could happen if the egg you used was too small.
- I used these Mini Tart Pans that are 7 cm (1/4 inch) wide and cut out the disks of pastry to be about 10 to 12 cm (3/8 to 1/2 inch) wide.
- Optionally, use a stiff straw (or similar utensil) to press on each fluted edge in order to define their shape more. If the pastry dough seems a bit stiff, let it come back to room temperature first. The butter will soften and it will be easier to line the tins. If the pastry become too soft and starts to break, put it back in the fridge for a few minutes.
- If using Vanilla Paste, you do not need to let it infuse in the milk.
- This is to temper all the ingredients and make sure the eggs don't burn or curd once placed on the stove.
- Always work with low heat to avoid burning the cream and/or overcooking the eggs. It will take longer to thicken, but it is the best way to get the perfect creamy texture without any lumps.
- You could also just scoop the cream into the shells or use a spoon if preferred.


