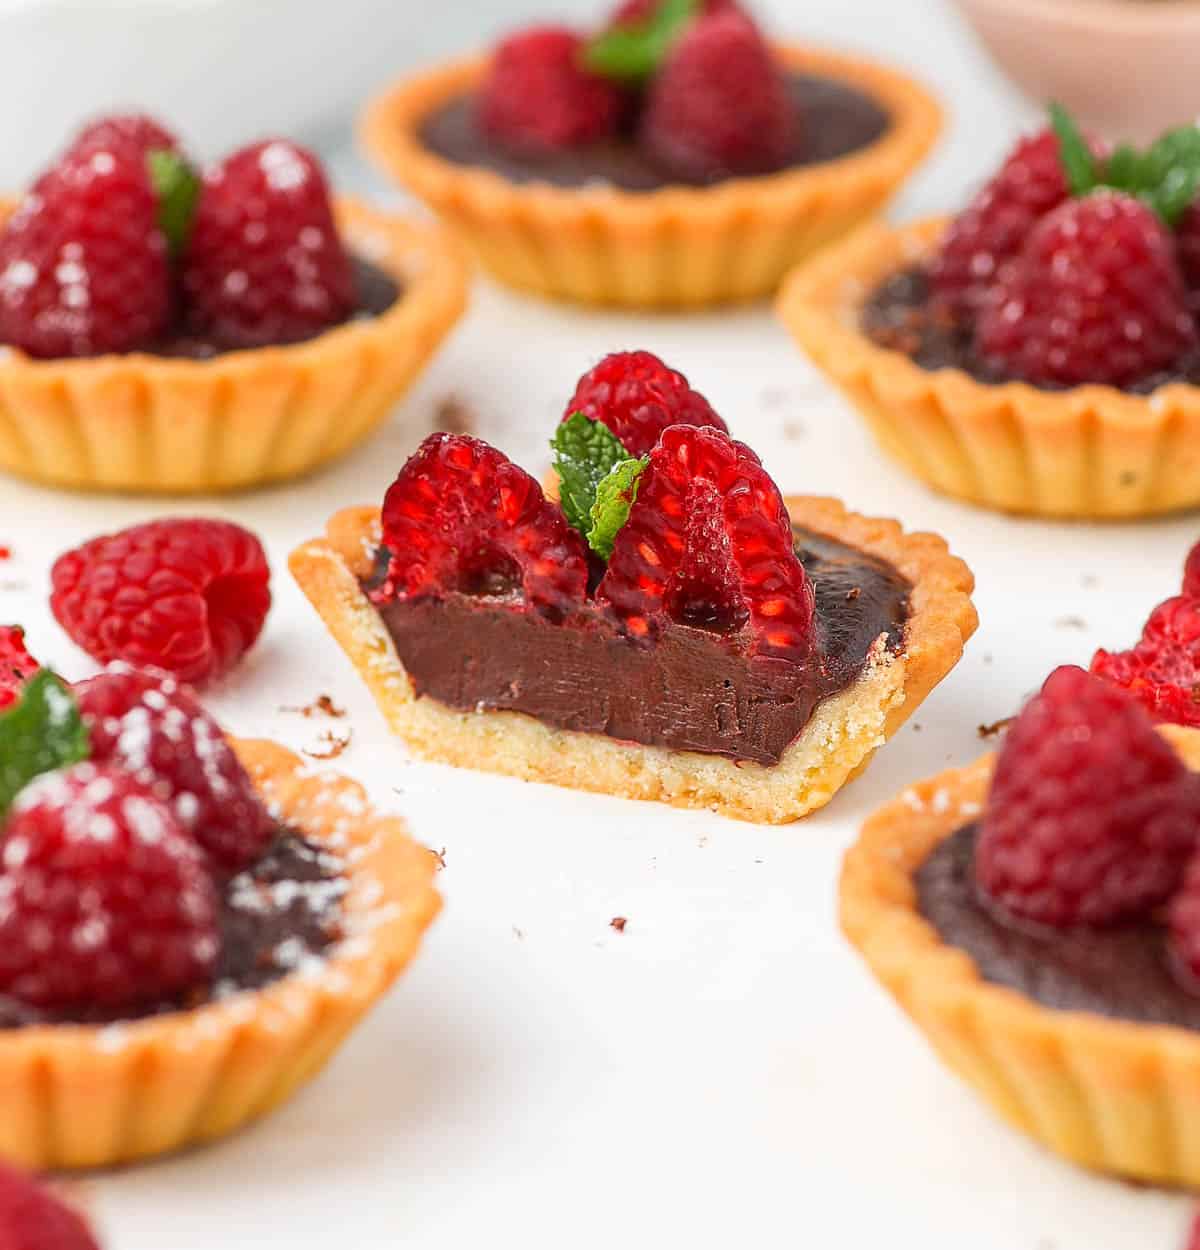
These Raspberry Chocolate Tartlets are the most delicious and decadent little treats that are perfect for a tea party or a special occasion like Valentine's Day. They combine homemade tartlet shells, a dark chocolate ganache filling and some fresh raspberries.

Jump to:
Why we love this recipe
Some tartlet shells, a chocolate ganache and fresh raspberries: that's all you need to make these deliciously mini tarts. If you love the combination of a rich, smooth dark chocolate and fresh, tangy raspberries, you will love these Chocolate Raspberry Tartlets - and its larger Chocolate Raspberry Tart version!
The homemade buttery pastry shells are made with a Pâte Sablée (French Shortcrust Pastry) and baked in cute little tartlet tins. But you could absolutely buy the tartlet shells and make this mini dessert with the only 3 ingredients required for the filling!
These Raspberry and Chocolate Tartlets are super fun to make and can actually be prepared in advance, which comes super handy if you plan on making them for a party. They will be perfect along these Mini Chocolate Tarts and Chocolate Orange Tartlets on a dessert buffet!
Love Chocolate and Raspberry together? Also try my Raspberry Truffles and Raspberry Brownies. Also try my Double Raspberry Tart!
Ingredients
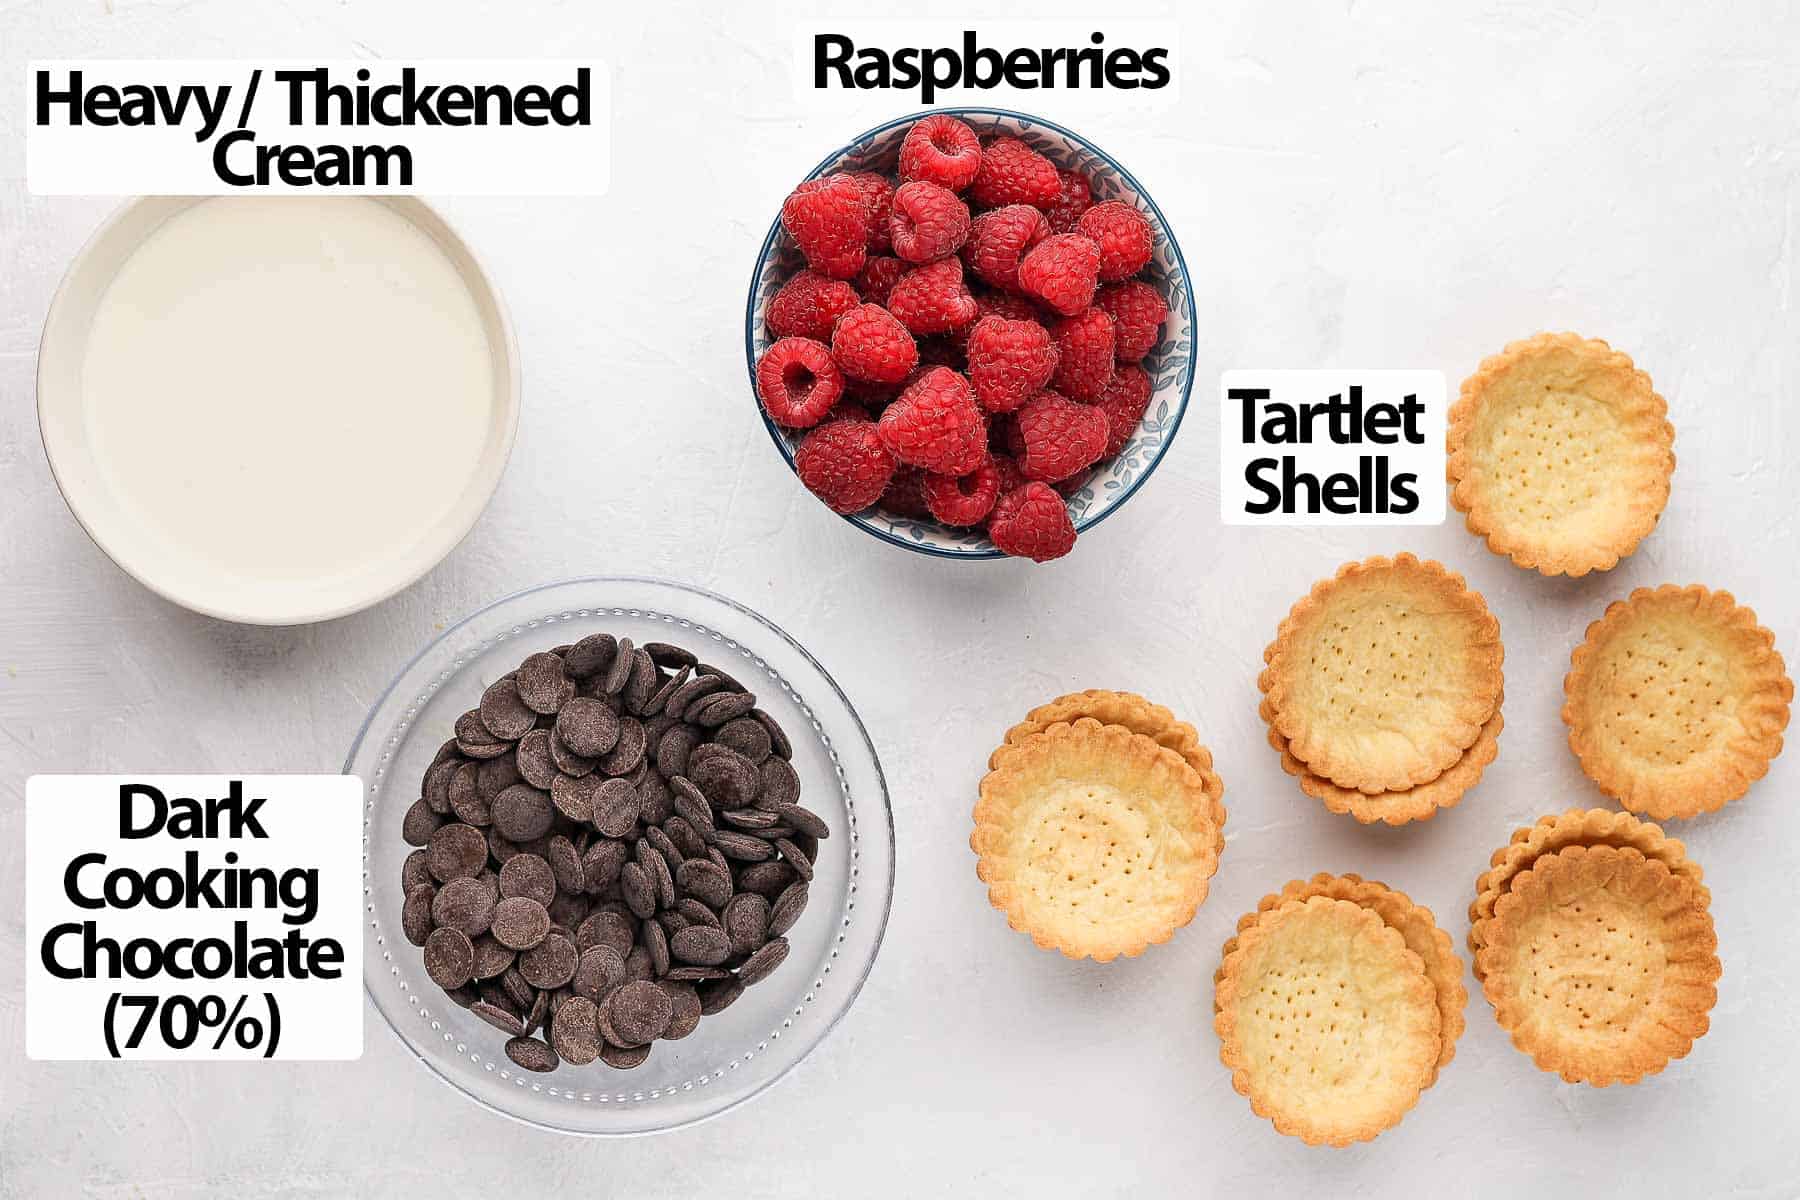
These Mini Raspberry Chocolate Ganache Tarts combine three elements: the tartlet shells, the chocolate ganache and the fresh raspberries.
Scroll down to recipe card for all quantities
For the Tartlet Shells:
- Dry Ingredients: a mix on Plain / All-Purpose Flour, some Icing Sugar (or powdered sugar) and a pinch of Salt. I recommend sifting the flour and icing sugar first.
- Butter: Unsalted and very cold, cut into small cubes.
- Egg: medium size. Can be pre-whisked or added straight from the shell; it will easily get mixed in in the food processor.
For a stronger chocolate flavour, you could also use my Chocolate Pie Dough recipe instead.
For the Chocolate Ganache Filling & Raspberry Topping:
- Chocolate: Dark Cooking Chocolate (I used a 70% cocoa solid one). Use good quality chocolate for the best flavour and texture. Make sure to use proper cooking chocolate or couverture chocolate - not eating chocolate that will not melt and set properly. If using chocolate in the form of a bar, you will need to finely chop it first.
Note that couverture chocolate callets (what I am using here) is not the same as chocolate chips. Most chocolate chips will not melt smoothly like a cooking chocolate bar or couverture chocolate.
- Cream: Thickened / Heavy Cream (30% fat content), brought to a simmer on the stove.
- Raspberries: Fresh.
You could also use a Chocolate Cremeux or Chocolate Pastry Cream for a creamier chocolate filling.
Optional Additions
You could add a few ingredients to the chocolate ganache filling for more depth of flavour - like Coffee (instant coffee granules heated with the cream), a little bit of Sea Salt or even some Orange Zest for a fruitier taste.
To finish the tartlets, I simply topped them with fresh Mint. You could also sprinkle some desiccated coconut, cocoa powder or chocolate curls for example!

How to make Chocolate and Raspberry Tartlets
Tartlet Pastry Dough
If you are making your own tartlet crusts, you will want to start by making the pastry. I make mine in the food processor, but it can also be made by hands (see instructions to make by hands in my Pâte Sablée recipe).
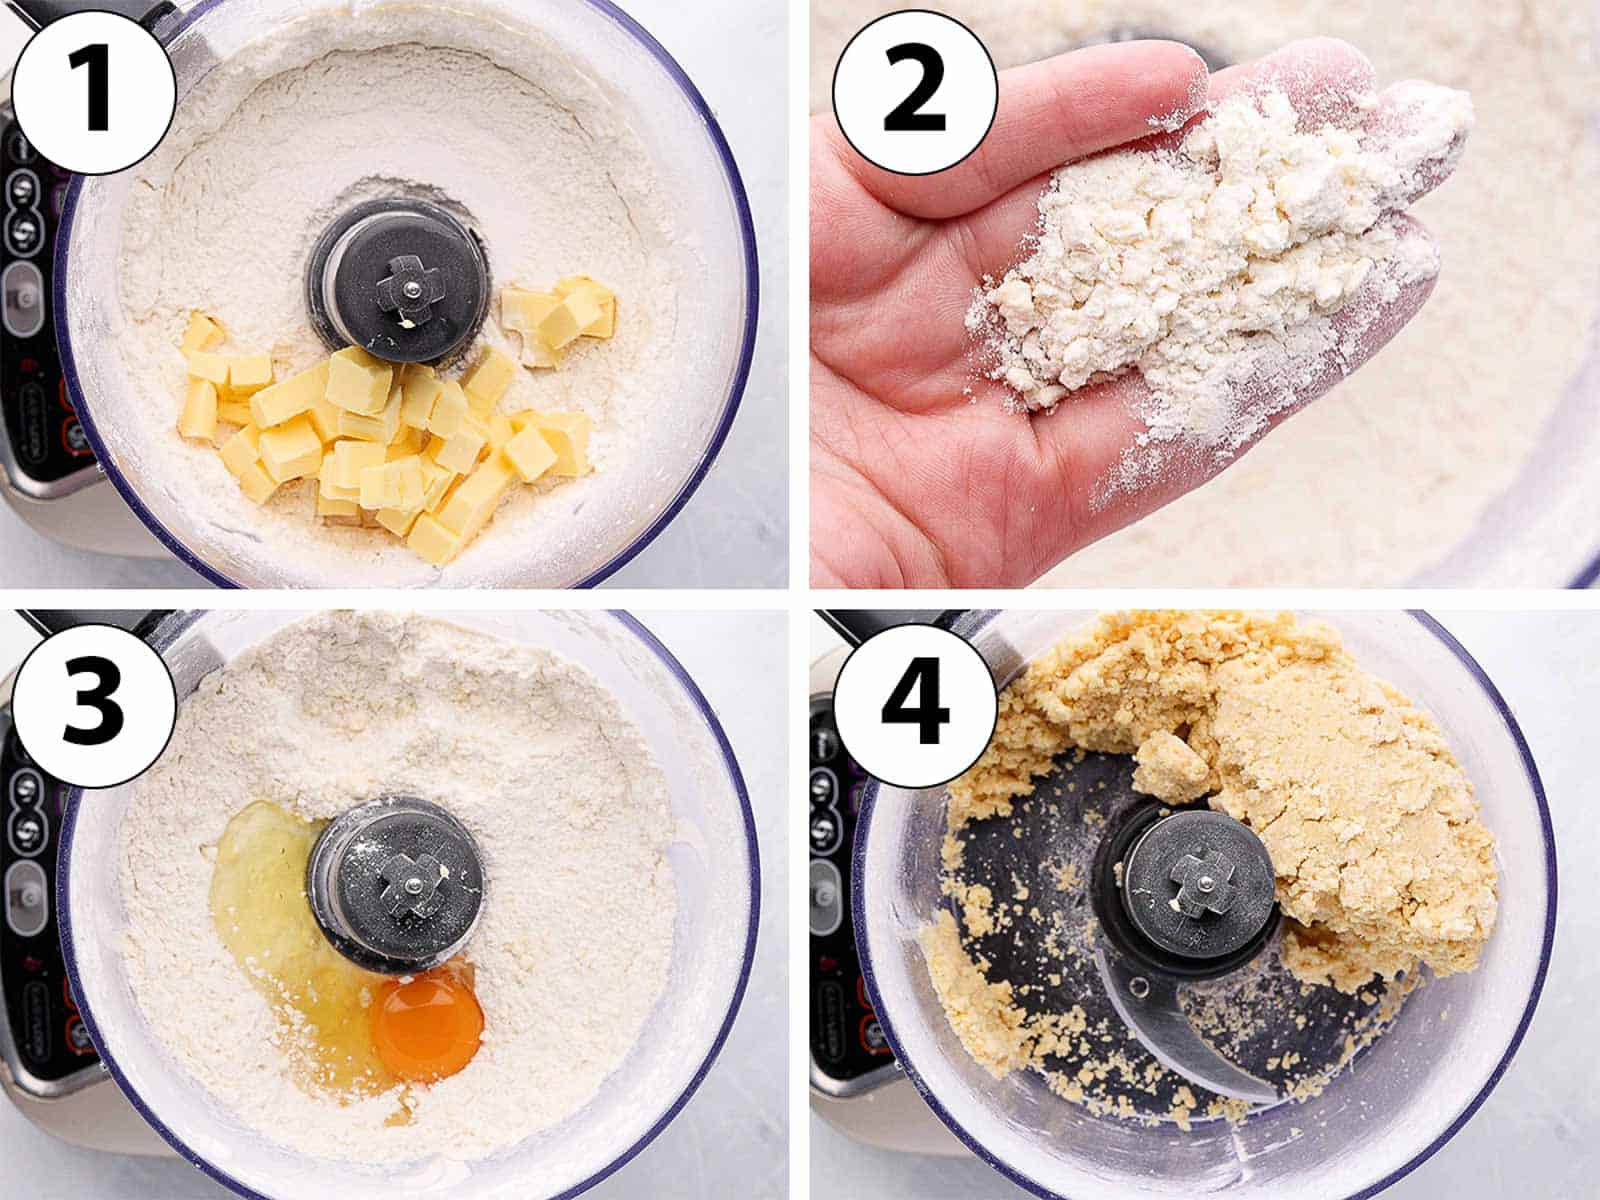
- Photo 1: Place the sifted Flour, Icing Sugar and Salt in the bowl of your food processor. Pulse for a few seconds to mix, then add the very cold Butter cut into small cubes.
- Photo 2: Mix until you get fine crumbs of butter.
The larger the crumbs, the flakier the pastry will be. In this case, we do not want too much flakiness so make sure the crumbs are very small.
- Photo 3: Add the Egg (either pre-whisked or straight from the shell).
- Photo 4: Mix until a rough dough starts to come together. Don't worry if it seems crumbly, it will come together when you roll it.
To know the pastry has been mixed enough, press together some of the crumbs in your hand. If they stick together and turn into a smooth dough, it is ready.
If after mixing the dough still does not seem to be coming together, you might have to add a little bit of cold water (one tablespoon at the time). It could happen if the egg you used was too small.
Shaping & Baking the Tartlet Shells
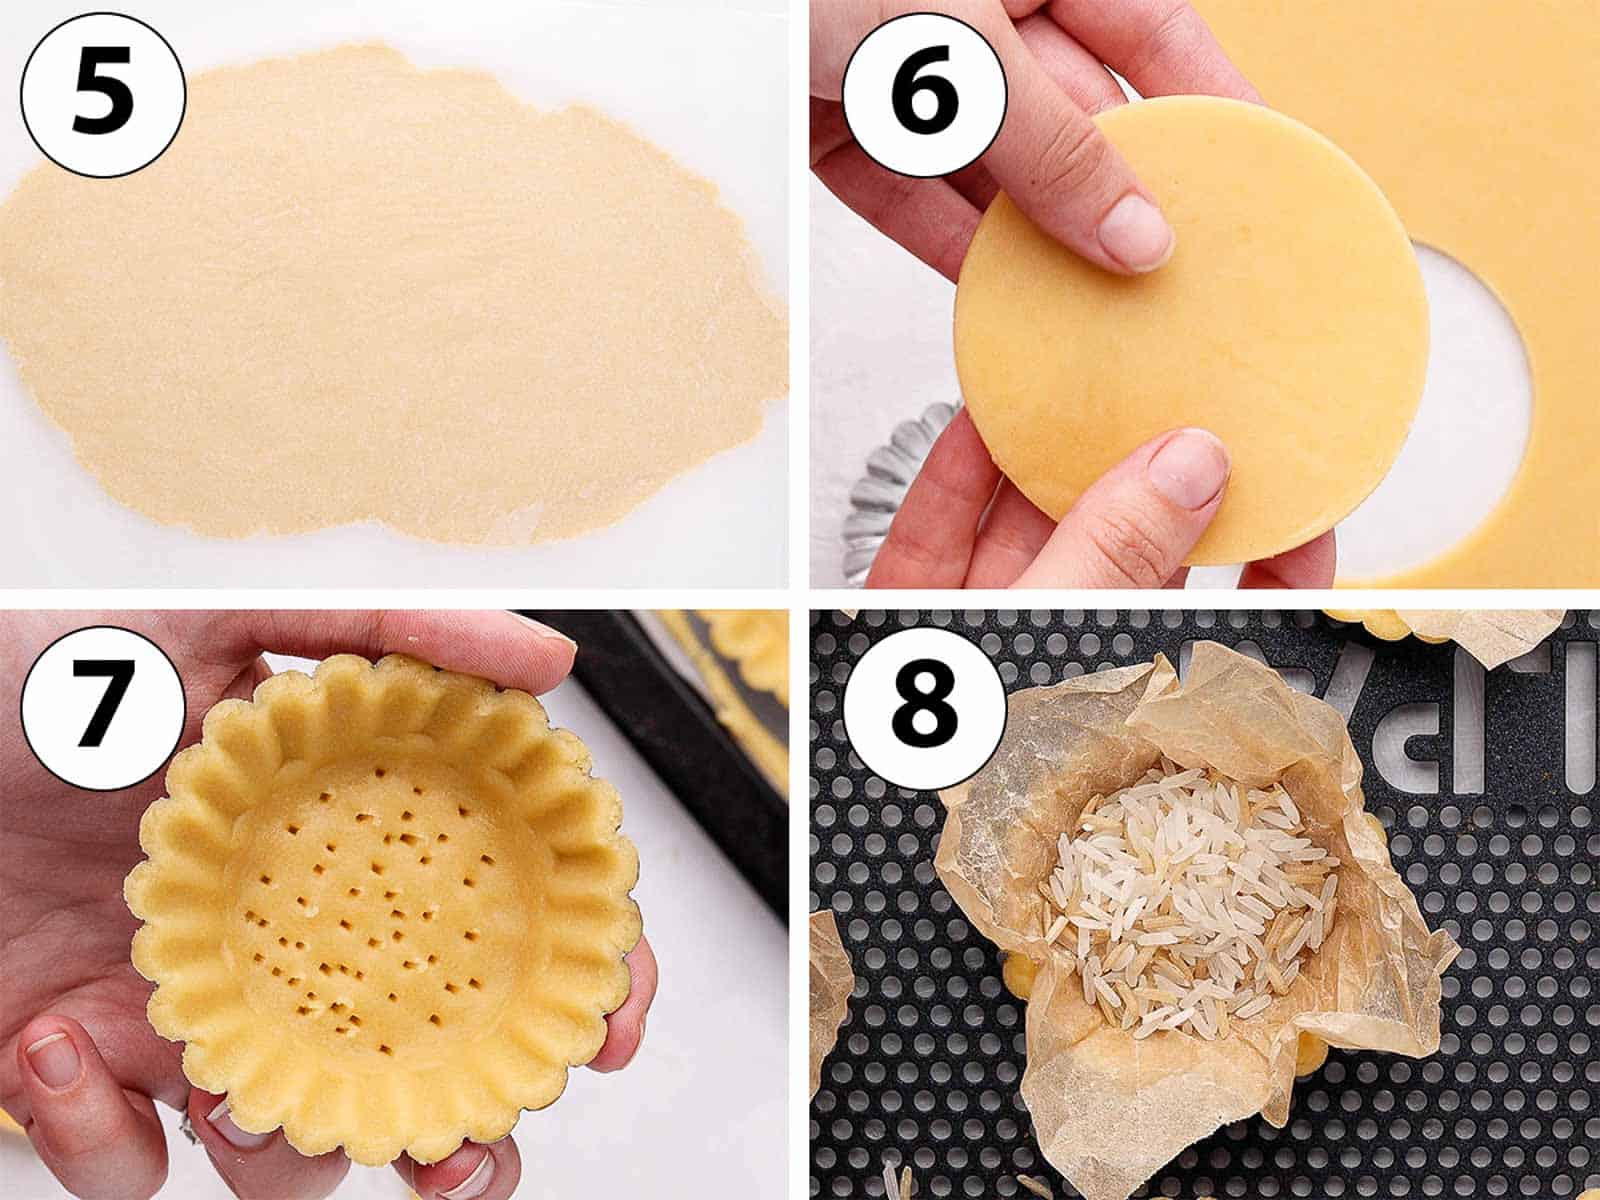
- Photo 5: Place the pastry dough over a large sheet of baking paper and bring together into a ball (you might have to work the dough a little bit to assemble all the crumbs). Cover with a second sheet of baking / parchment paper then roll to a thickness of about 4 mm (1/8 inch).
- Place on a flat tray then in the fridge to chill and rest for at least one hour - or up to 24 hours.
- Photo 6: Take the dough out of the fridge and remove the baking paper. Cut out disks of pastry that are a bit larger than the tartlet pans you are using.
I used these Mini Tart Pans that are 7 cm (1/4 inch) wide and cut out the disks of pastry to be about 10 to 12 cm (3/8 to 1/2 inch) wide. The shells should slide straight out of the tins, so there is no need to use a tin with removable bottom.
- Photo 7: Line the tartlet tins with the pastry, pressing gently on the sides to slide it down. Optionally, use a stiff straw (or similar utensil) to press on each fluted edge in order to define their shape more. Dock the bottom of the pastry with a fork.
If the pastry dough seems a bit stiff, let it come back to room temperature first. The butter will soften and it will be easier to line the tins. If the pastry become too soft and starts to break, put it back in the fridge for a few minutes.
- Place the tartlets shells back in the fridge to chill for at least one hour, or up to 24 hours.
- Preheat your oven on 160'c/325'f. Optionally, place the tins in the freezer for 10 to 15 minutes while the oven is preheating.
- Photo 8: Cover each crust with a little bit of baking paper then fill with baking weights, dried beans or rice.
- Bake for 15 minutes, then remove the weights/baking paper and bake for an additional 10 minutes. Take out of the oven and leave to cool down completely.
Dark Chocolate Ganache Filling & Raspberry Topping
Once the shells are baked and have completely cooled down, you can start preparing the filling. The shells can also be kept at room temperature in a container for 24 hours before filling them.
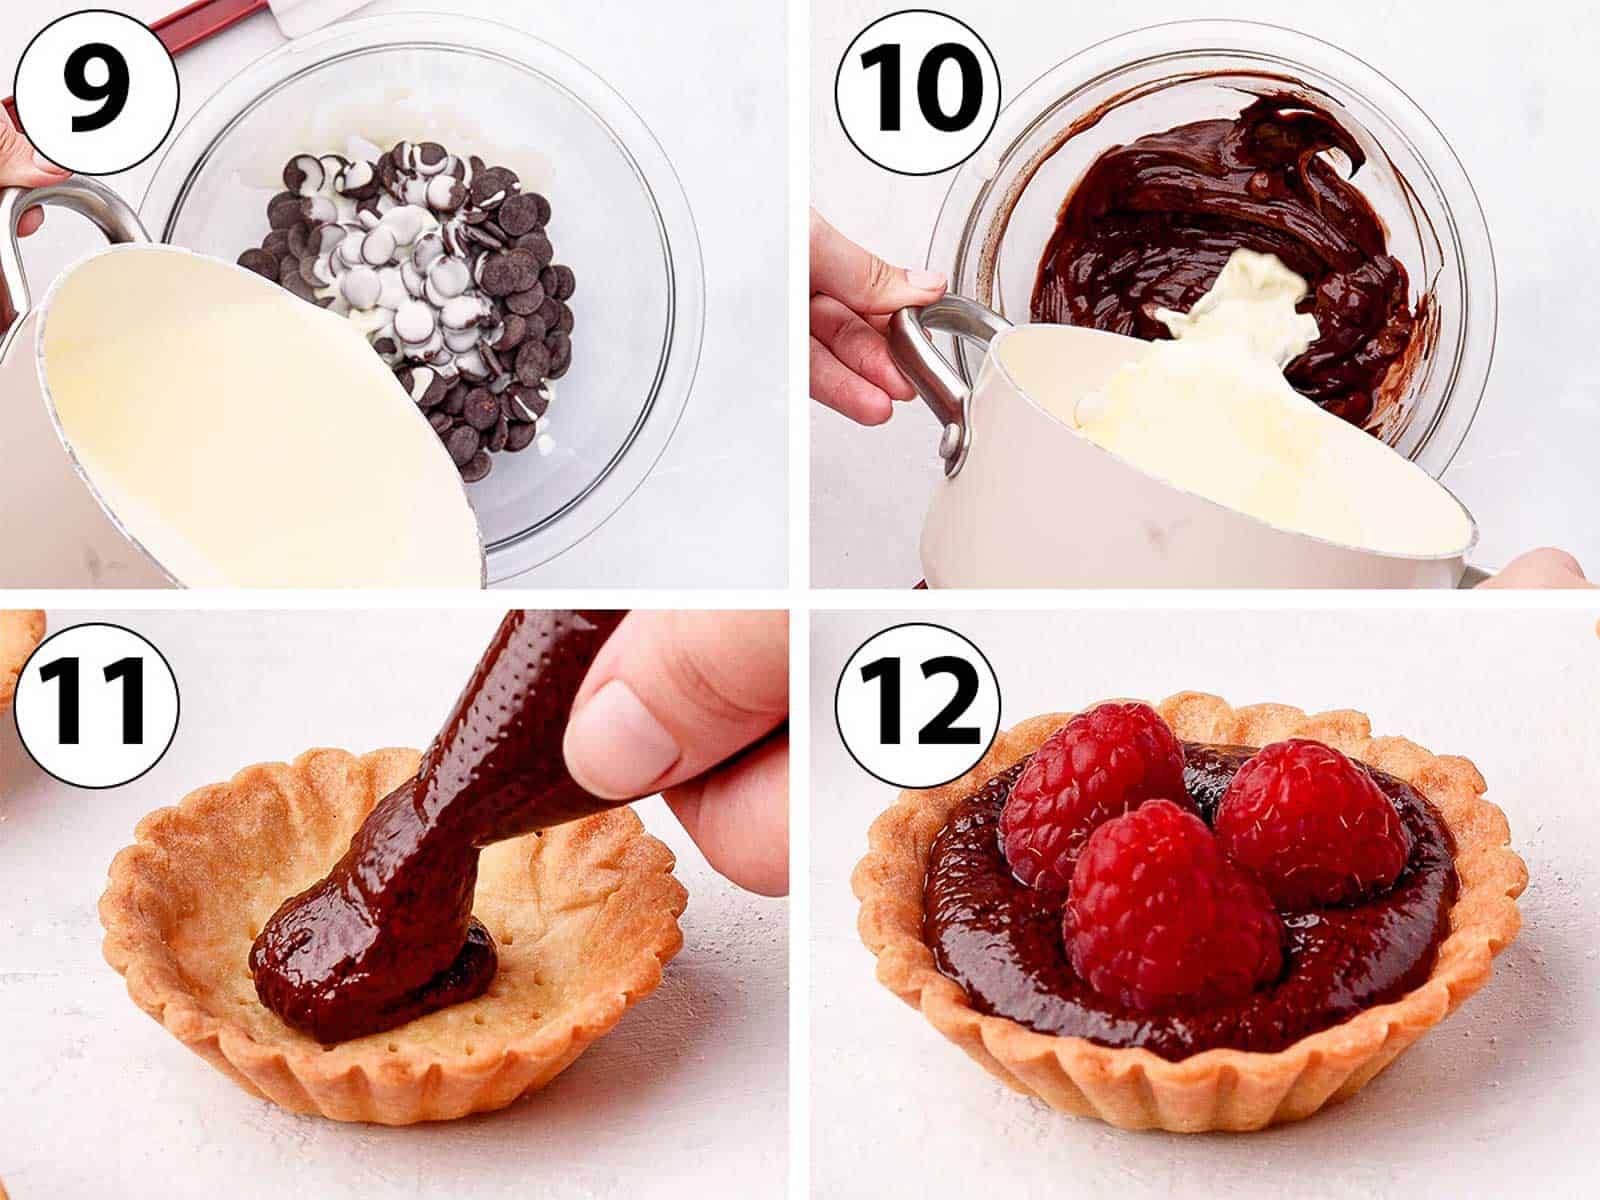
- Photo 9: Place the Chocolate in a heat-proof mixing bowl. If using a chocolate bar, finely chop it first. Heat up the cream in a small saucepan on a medium heat until it starts to simmer, then pour half of it over the chocolate. Let it sit for 2 to 3 minutes, then stir with a stiff spatula or silicone spatula in a circular motion to mix the melted chocolate.
- Photo 10: Pour the rest of the hot Cream over the Chocolate and continue to stir until fully melted, smooth and shiny. Using a spatula rather than a whisk insures you do not create too many air bubbles inside the ganache.
If the cream is not as hot the second time, you might want to heat it up again slightly. If after adding all the cream, the chocolate is still not fully melted, place it over a double boiler to finish melting it.
- Photo 11: Pour the chocolate ganache mixture in the tartlet shells while still warm. I used a pastry bag but you can simply spoon it in as well. Gently tap the tartlet over a hard surface to pop any air bubble and help the ganache spread evenly.
- Photo 12: While the ganache is still soft, press in the Raspberries. I used 3 raspberries per tartlets.
- Place in the refrigerator to set for at least an hour (or until the ganache has set) - or up to 24 hours before serving (but note that the raspberries won't be as fresh then).
You can serve them as is, or sprinkle with a little bit of icing sugar and top with fresh mint leaves.
Recipe FAQs
Yes, if you don't want to make your own mini tart shells you can absolutely buy them pre-made! Otherwise, this type of pastry freezes very well and can be prepared in advance. The shells I made had a diameter of 7 cm / 2.75 inch.
If you don't have tartlet pans like the ones I used, you could also use small tart rings or alternatively use my recipe to make Tartlet Shells in a Muffin Pan!
Go for a good quality dark chocolate (70% highly recommend for a strong, intense chocolate flavour - or slightly less dark if you want a sweeter dessert). Make sure to use proper cooking chocolate (finely chopped) or couverture chocolate. These type of chocolate will easily melt and reset without getting grainy, as opposed to eating chocolate or chocolate chips.
I simply topped them with fresh Mint leaves, but you could also garnish them with desiccated coconut, chocolate curls, some lemon or orange zest or a simple sprinkle of icing sugar.
Tips for Success
- Don't skip on the chilling and resting time for the tartlet pastry. They are essential to insure the pastry does not move, shrink or collapse when baked.
- When lining the tartlet shells, be aware of the temperature / texture of the pastry. If too cold, let it come back to room temperature first so that the pastry is softer and easier to handle. If too warm, it might start to break or be hard to handle. Place it back in the fridge for a few minutes to allow for the butter to solidify a bit.
- If the chocolate is not fully melted even after adding all of the hot cream, you can continue to melt the ganache over a double boiler. Finely chopping the chocolate first (or using chocolate callets) will help it melt faster from the start.
- Serving the tartlets just out of the fridge or at room temperature will give you two different textures. For a more dense and set texture, serve them straight out of the fridge. For a fudgier, softer texture, leave them at room temperature for about 30 minutes before serving.

Troubleshooting
- The pastry is too dry / crumbly: it is possible that the egg you used was too small. Simply add a little bit of very cold water - one tablespoon at the time - until the dough comes together.
- The tartlet shells moved, shrank or collapsed in the oven: usually happens when the pastry was not rested and chilled for long enough. Resting the pastry allows for the gluten to relax and chilling it insures that the butter is very cold when it gets in the oven and does not melt too quickly.
- The chocolate ganache split or is grainy: happens when the emulsion is not properly done (the fat and water does not bind). Try whisking the ganache very well first. If it still does not work, you can try to smooth it out with an immersion blender. In the last resort, add a little bit more cream and try mixing again. It is also possible that the ganache is grainy because the chocolate got burnt.
Storing & Freezing
These chocolate raspberry tartlets are best served within 24 hours, but will last for 2 to 3 days in the fridge. The tartlet shells can be made in advance - either unbaked in the fridge for 24 hours and/or baked at room temperature for 24 hours.
I recommend filling them with the chocolate and raspberries a few hours before serving for the best texture and crunchy pastry.
The shells can be frozen, either baked or unbaked (I recommend unbaked inside the tartlet tins), but I do not recommend to freeze them while filled with the ganache and raspberries.
Made this recipe?
Let us know if you liked it by leaving a comment below, and tag us on Instagram @a.baking.journey with a photo of your creation!
Recipe

Raspberry Chocolate Tartlets
Ingredients
Shortcrust Pastry Tartlet Shells
- 250 gr (1 2/3 cup) Plain / All-Purpose Flour
- 50 gr (1/2 cup) Icing Sugar - or powdered sugar
- 1 pinch Fine Table Salt
- 120 gr (1/2 cup) Unsalted Butter - cold
- 1 Egg - medium size
Chocolate & Raspberry Filling
- 150 gr (5oz) Dark Cooking Chocolate
- 180 ml (3/4 cup) Thickened / Heavy Cream
- 200 gr (7oz) Raspberries
Disclaimer
I highly recommend using the measurements in grams & ml (instead of cups & spoons) for more accuracy and better results.
Instructions
Shortcrust Pastry Tartlet Shells
- Place the sifted Flour, Icing Sugar and Salt in the bowl of your food processor. Pulse for a few seconds to mix, then add the very cold Butter cut into small cubes. Mix until you get fine crumbs of butter (see note 1).
- Add the Egg and mix until a rough dough starts to come together (see note 2).
- Place the pastry over a large sheet of baking paper and bring together into a ball. Cover with a second sheet of baking / parchment paper then roll to a thickness of about 4 mm (1/8 inch). Put in the fridge to rest and chill for at least 1 hour, or up to 24 hours.
- Remove the baking paper and cut out disks of pastry that are a bit larger than the tartlet pans you are using (see note 3). Line the tartlet pans with the pastry, pressing gently on the sides to slide it down (see note 4). Dock the bottom of the pastry with a fork.
- Place the tartlets shells back in the fridge to chill for at least one hour, or up to 24 hours then preheat your oven on 160'c/325'f.
- Cover each crust with a little bit of baking paper then fill with baking weights, dried beans or rice. Bake for 15 minutes then remove the weights and baking paper and bake for an additional 10 minutes. Leave to cool down completely.
Chocolate & Raspberry Filling
- Place the finely chopped Chocolate (or chocolate callets) in a heat-proof mixing bowl. Heat up the cream in a small saucepan on a medium heat until it starts to simmer.
- Pour half of it over the chocolate. Let it sit for 2 to 3 minutes, then stir with a stiff spatula or silicone spatula in a circular motion to mix the melted chocolate. Pour the rest of the hot Cream over the Chocolate and continue to stir until fully melted, smooth and shiny (see note 5).
- Pour the chocolate ganache in the tartlet shells while still warm, either with a pastry bag or with a spoon. Gently tap the tartlet over a hard surface to pop any air bubble and help the ganache spread evenly.
- While the ganache is still soft, press in the Raspberries (I used 3 per tartlet).
- Place in the refrigerator to set for at least an hour (or until the ganache has set) - or up to 24 hours before serving.
- Optionally, finish with a little bit of icing sugar and fresh Mint leaves.
Tried this recipe? Make sure to leave a comment and star rating below!
Notes
- The larger the crumbs, the flakier the pastry will be. In this case, we do not want too much flakiness so make sure the crumbs are very small.
- Don't worry if it seems crumbly, it will come together when you roll it. To know the pastry has been mixed enough, press together some of the crumbs in your hand. If they stick together and turn into a smooth dough, it is ready. If after mixing the dough still does not seem to be coming together, you might have to add a little bit of cold water (one tablespoon at the time). It could happen if the egg you used was too small.
- I used these Mini Tart Pans that are 7 cm (1/4 inch) wide and cut out the disks of pastry to be about 10 to 12 cm (3/8 to 1/2 inch) wide.
- Optionally, use a stiff straw (or similar utensil) to press on each fluted edge in order to define their shape more. If the pastry dough seems a bit stiff, let it come back to room temperature first. The butter will soften and it will be easier to line the tins. If the pastry become too soft and starts to break, put it back in the fridge for a few minutes.
- Using a spatula rather than a whisk insures you do not create too many air bubbles inside the ganache If the cream is not as hot the second time, you might want to heat it up again slightly. If after adding all the cream, the chocolate is still not fully melted, place it over a double boiler to finish melting it.




Comments
No Comments