This Chocolate Tart Crust is super easy to make by hands or in the food processor with 5 ingredients only. The Chocolate Pâte Sablée (shortcrust style pastry dough) is perfect for a fruity, creamy or chocolate tart!
Jump to:
Why we love this recipe
Buying a pre-made pie crust might be convenient, but nothing beats the taste and texture of a homemade pastry. This chocolate tart crust is a simple take on my classic French Shortcrust Pastry (Pâte Sablée) with a delicious chocolate flavor.
There are many different pie crust recipes that can suit a variety of tart and pies filling, depending on the texture and flavour you are looking for. From a crispy Sweet Shortcrust Pastry to a simple flakey Savoury Shortcrust Pastry, you can really play around and experiment.
Making your own pastry might seem intimidating if it is your first time but trust me, it is actually much easier than it seems! With a few ingredients only and some basic must-follow techniques, you will soon become a pastry expert.
This recipe will show you two ways to make this pastry: by hands and with a food processor.
You can use it to make a Chocolate Cherry Tart, Baked Chocolate Tart or Chocolate Ganache Tart for example. And you could even use this pastry recipe to make make Tartlet Shells like I did with these Mini Chocolate Tarts!
Ingredients
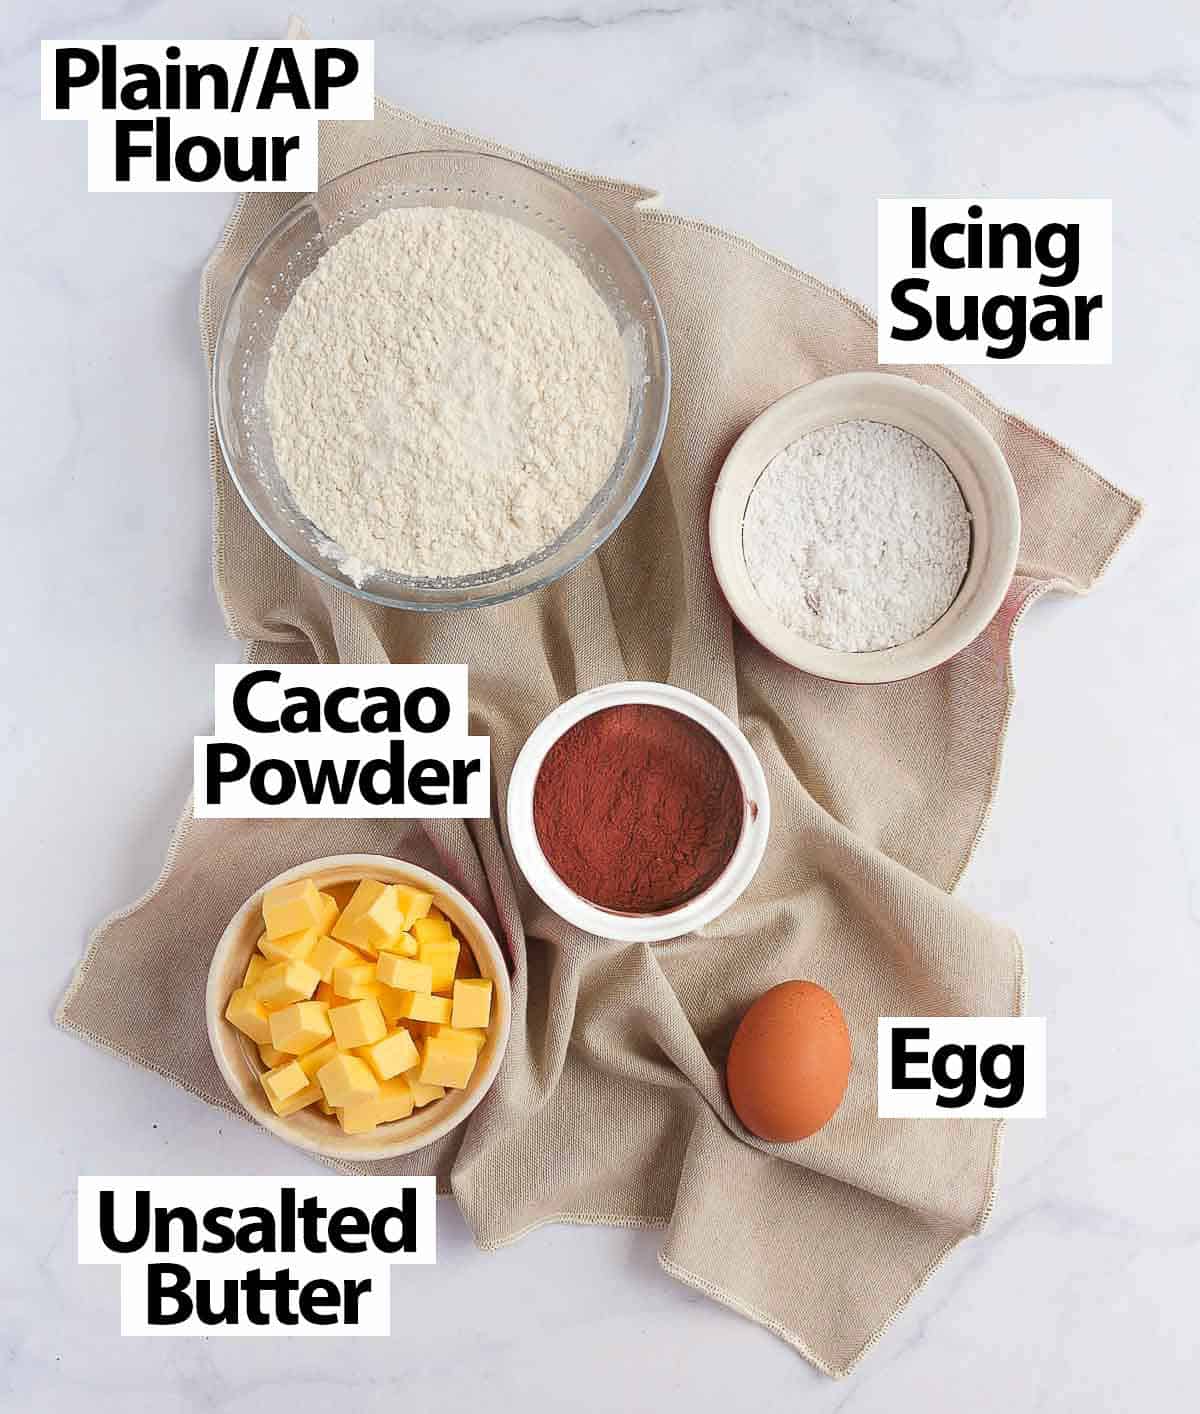
Just like the basic Pâte Sablée this recipe is based on, this chocolate tart pastry is made from 5 basic ingredients only.
What is the chocolate pie crust made from (scroll down to recipe card below for all quantities):
- Flour: Plain / All-Purpose - always sifted. I have not tried this recipe with a gluten-free flour.
- Icing Sugar: or Powdered, Confectioner's Sugar. Some recipes call for Caster or White Sugar but I personally love to use Icing Sugar to make pastry. This type of sugar combines much more easily with the rest of the dry ingredients.
- Cocoa Powder: always pick an unsweetened cocoa powder. I personally use Natural Cocoa Powder but Dutch-Processed Cocoa Powder will work as well here. Make sure to sift it well before using it as it tends to create lumps when stored.
- Butter: Unsalted Butter, very Cold. Try to use a good quality butter when you can - it will really help with flavour and texture.
- Egg: what is used to bind the pastry for this recipe, and give it some richness. I used a medium-size egg.
You can also customise the chocolate pie crust a little bit by adding some Spices to it/ I love adding a pinch on Ground Cinnamon or Cardamom for example. A little bit of Salt or even some fine Coffee Powder / Espresso Powder(1 to 2 tablespoons depending on your taste) is also always a great way to boost flavours.
How to make Chocolate Shortcrust Pastry
One of the great thing about this pie recipe is that it can be made in two ways: by hands or with a food processor. I personally always make my Sablé (shortcrust) Pastries in the food processor. It gives you the most consistent result without making any mess.
That being said, you can absolutely make this chocolate crust by hands if you don't have a food processor. Using a Pastry Cutter/Blender will help you cut the butter into the dry ingredients but you can also do it fully by hands too.
Making the Pastry By Hands
- Sift the Flour, Cacao Powder and Icing Sugar in a large Bowl. Mix to combine.
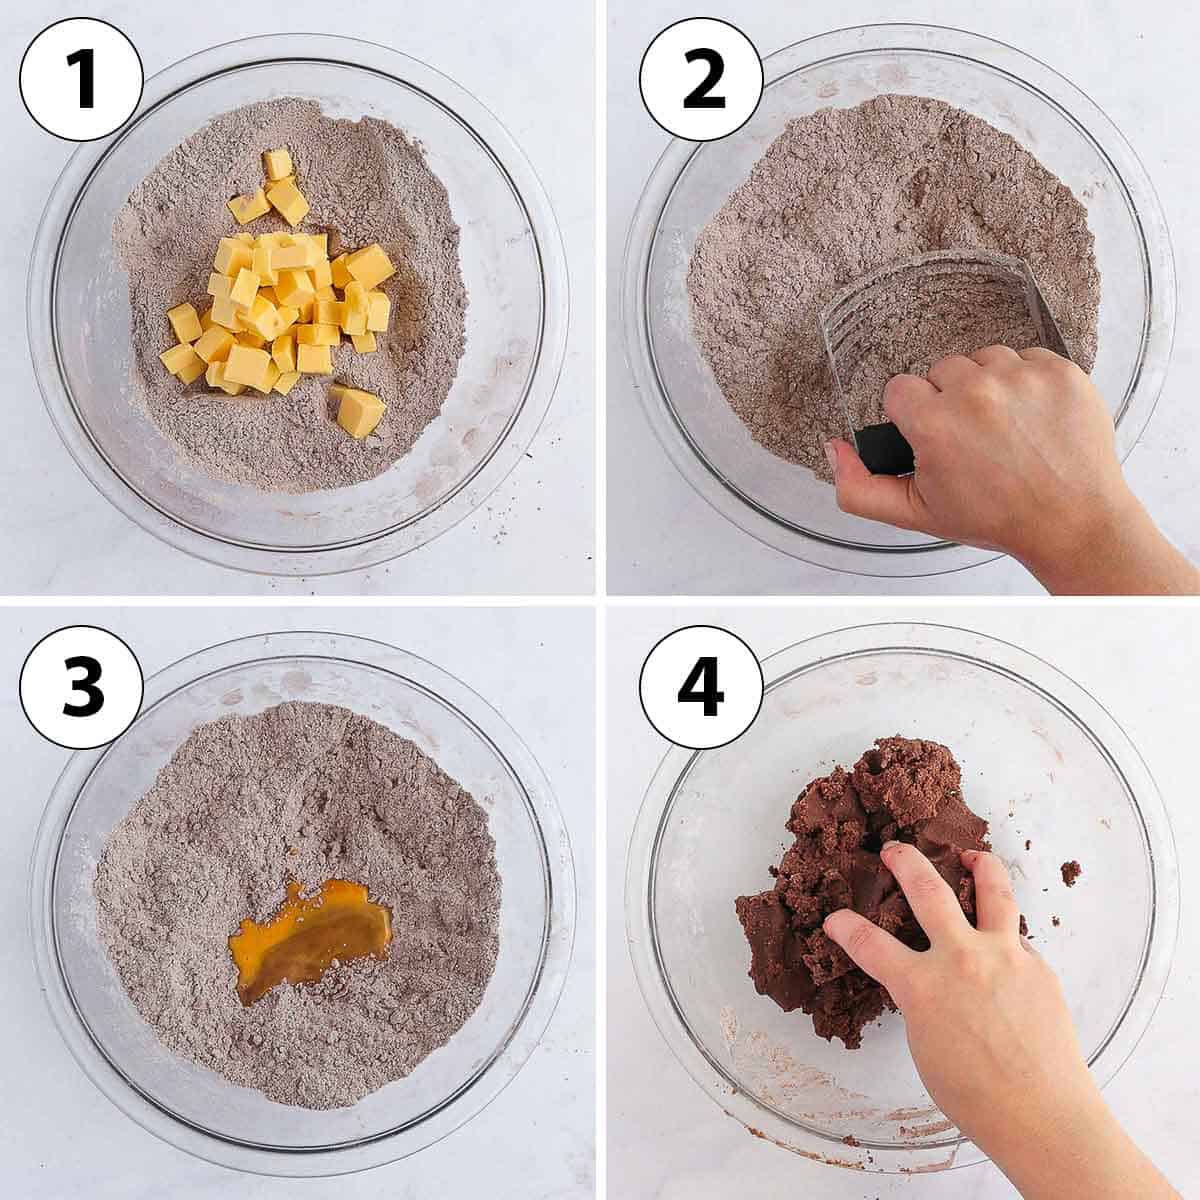
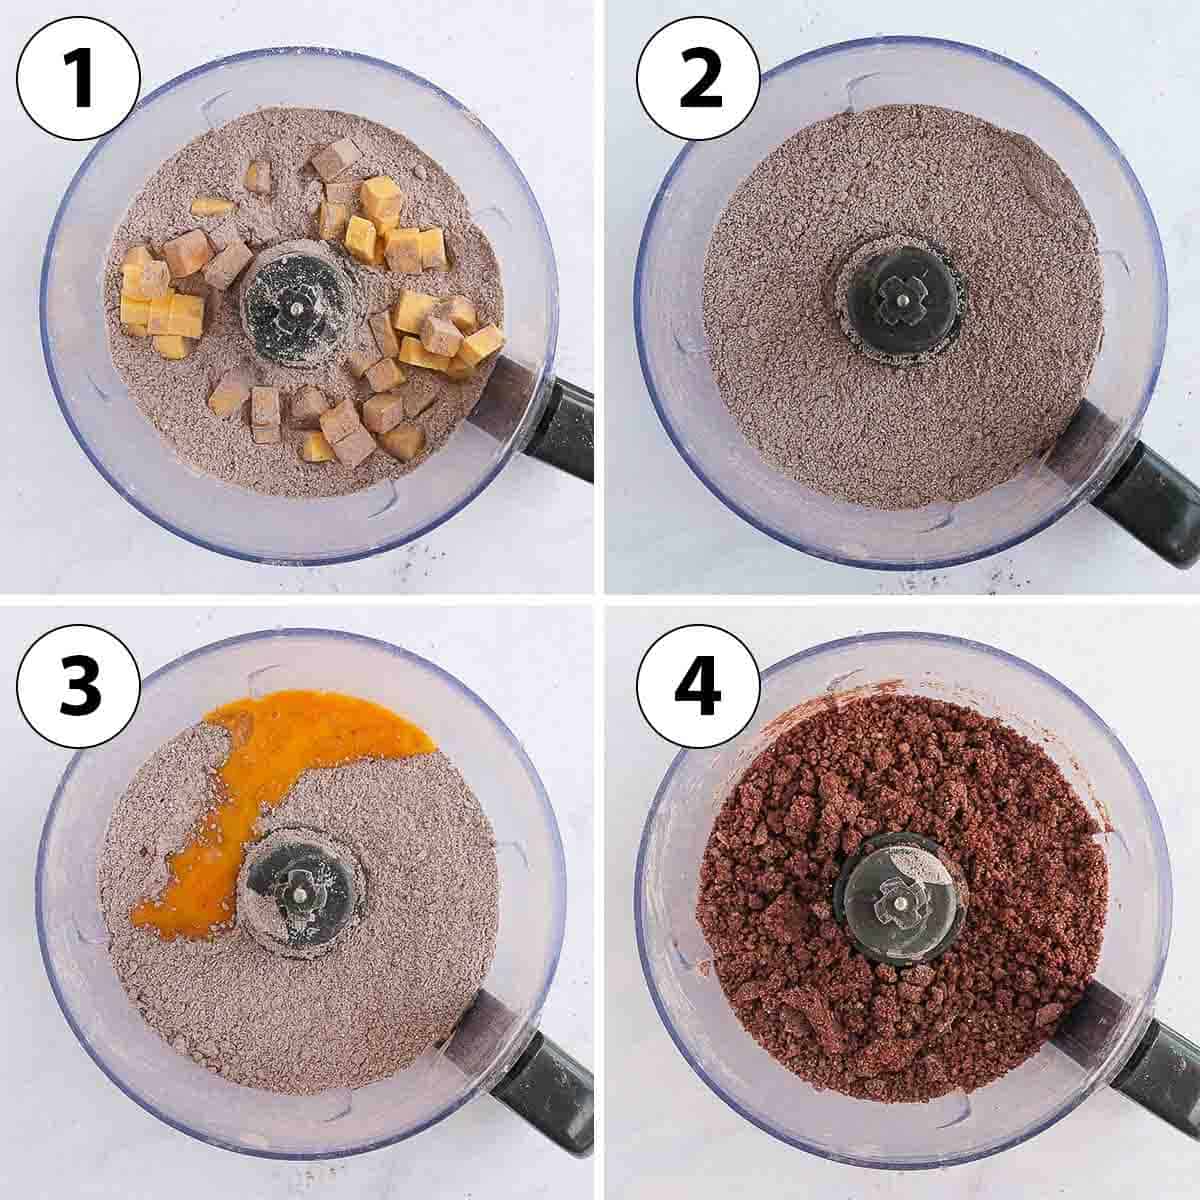
- Photo 1: Add the very cold Butter, cut into small cubes.
- Photo 2: Using your fingers or a Pastry Blender, cut the Butter into the dry ingredients until you get a fine crumb consistency. If making it fully by hands, rub the butter and the powders together between your fingers and palms to create small crumbs.
You shouldn't see large lumps of butter anymore, or any dry powders. The largest the crumbs, the flakier the pastry will be.
- Photo 3: Add the Egg, preferably pre-whisked so that it combines more easily with the rest of the ingredients.
- Photo 4: Using your hands, work the dough until it starts to come together. You can do this inside the bowl or transfer on your kitchen bench if easier. Lightly knead it until you can assemble it into a ball that sticks together (see troubleshooting below if too sticky or too dry to combine).
Making the pastry with a Food Processor
- Place the Flour, Cacao Powder and Icing Sugar in the bowl of your food processor and pulse to combine and remove any lumps.
- Photo 1: Add the very cold Butter, cut into small cubes.
- Photo 2: Pulse for a few seconds to cut the butter into the dry ingredients. You should get some very fine crumbs and no visible large lumps of butter or dry powders.
- Photo 3: Add the Egg.
I like to whisk the egg first so that is combines more easily with the rest of the ingredients.
- Photo 4: Pulse again to combine until the dough turns darker and starts to come together. If you press the crumbs together, they should stick and turn into a ball (see troubleshooting below if too sticky or too dry to combine).
Rolling the Pastry
Now that the chocolate pastry is ready (whether it is made by hands or with the food processor), it is time to bring it together and roll the dough.
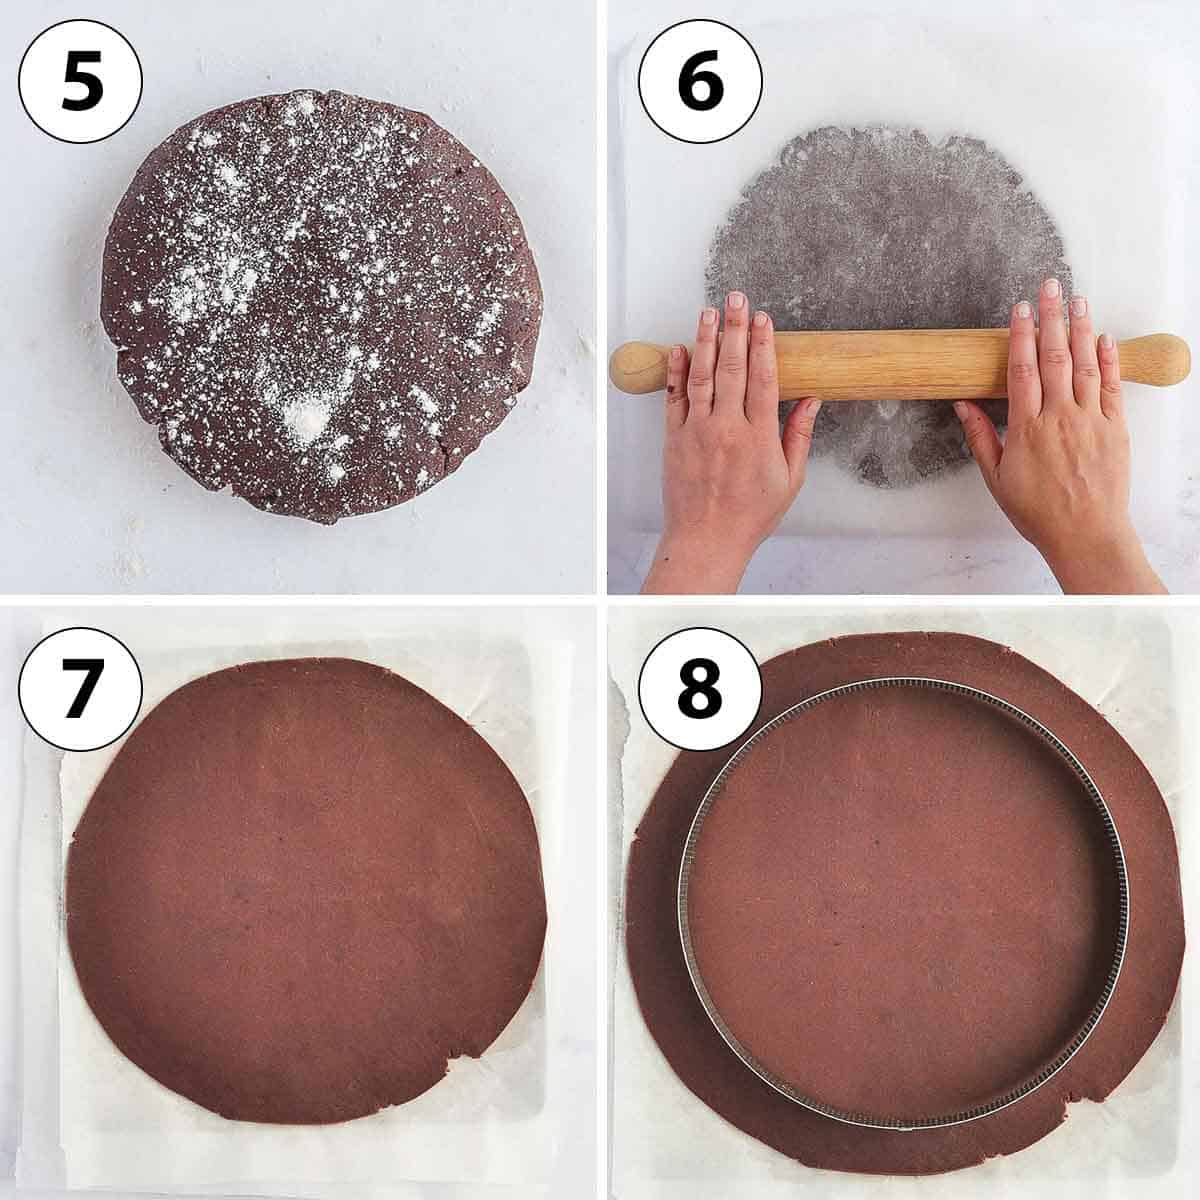
- Photo 5: Bring the mixture together into a large ball and slightly flatten it with your hands. If a bit sticky, dust a little bit of flour under and over the pastry.
If you have worked the pie crust pastry a bit too much (thus activated the gluten), you will notice that it is not very flexible and a bit hard. If it is the case, leave the dough to relax for 10 to 15 minutes before trying to roll it.
Would you like to save this recipe?
- Photo 6: Place the pastry between large two sheets of baking paper (parchment paper) and roll it into a large circle with a rolling pin. The dough should feel quite easy to roll at this stage.
The thickness of the pastry is up to you. I personally roll it to be about 3 to 4 mm (around 1/8 inch). You can roll it thicker if preferred, but I don't recommend going thinner.
- Put the rolled pie crust over a large flat tray and place in the fridge to rest and chill for at least 1 hour - or up to 24 hours.
- Photo 7 & 8: After resting in the fridge for at least an hour, remove the baking paper. Cut the edges of the pastry to be slightly larger than the tart ring or pan you will use (the highest the edges of the pan, the largest you will need the pastry to be).
Alternatively, you can keep the pastry in a plastic wrap in the fridge and roll it when ready to bake.
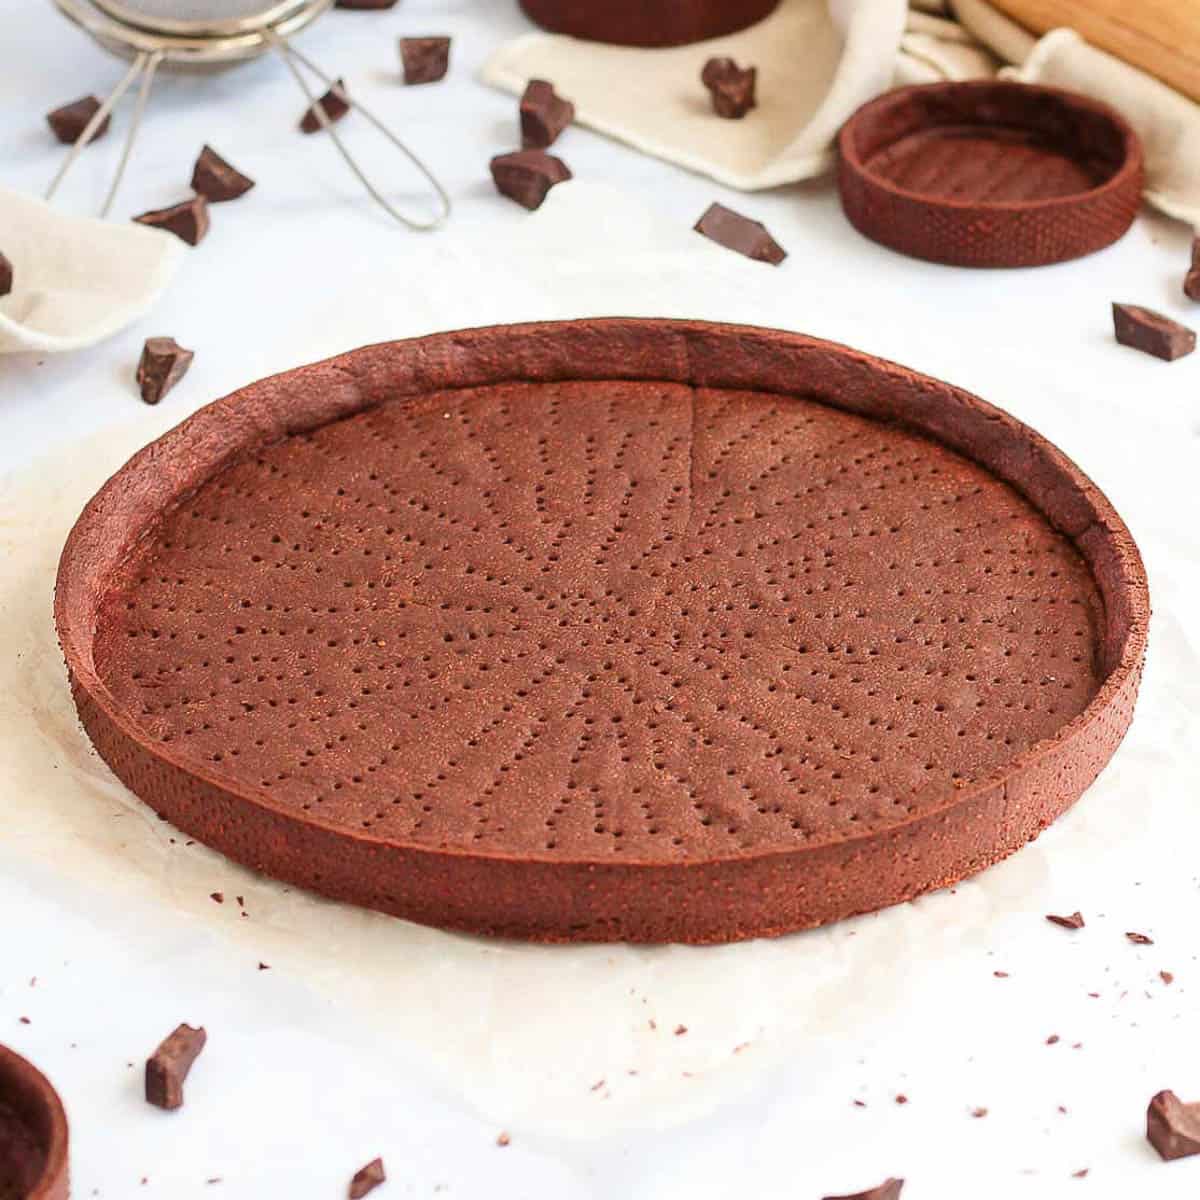
Lining the Pan
It is finally time to line your tart pan or ring! I personally like to use perforated tart rings for the best results, but you can use any type of pans you'd like: metal, ceramic, glass pie plate... You can also use this recipe to make Mini Tarts/Tartlets instead of a large Tart/Pie if you want.
Note that before lining the pan, you might need to leave the pastry come back to room temperature for a few minutes so that it is easier to handle. If too cold, the pastry might start to crack - but it can easily be patched up with your fingers.
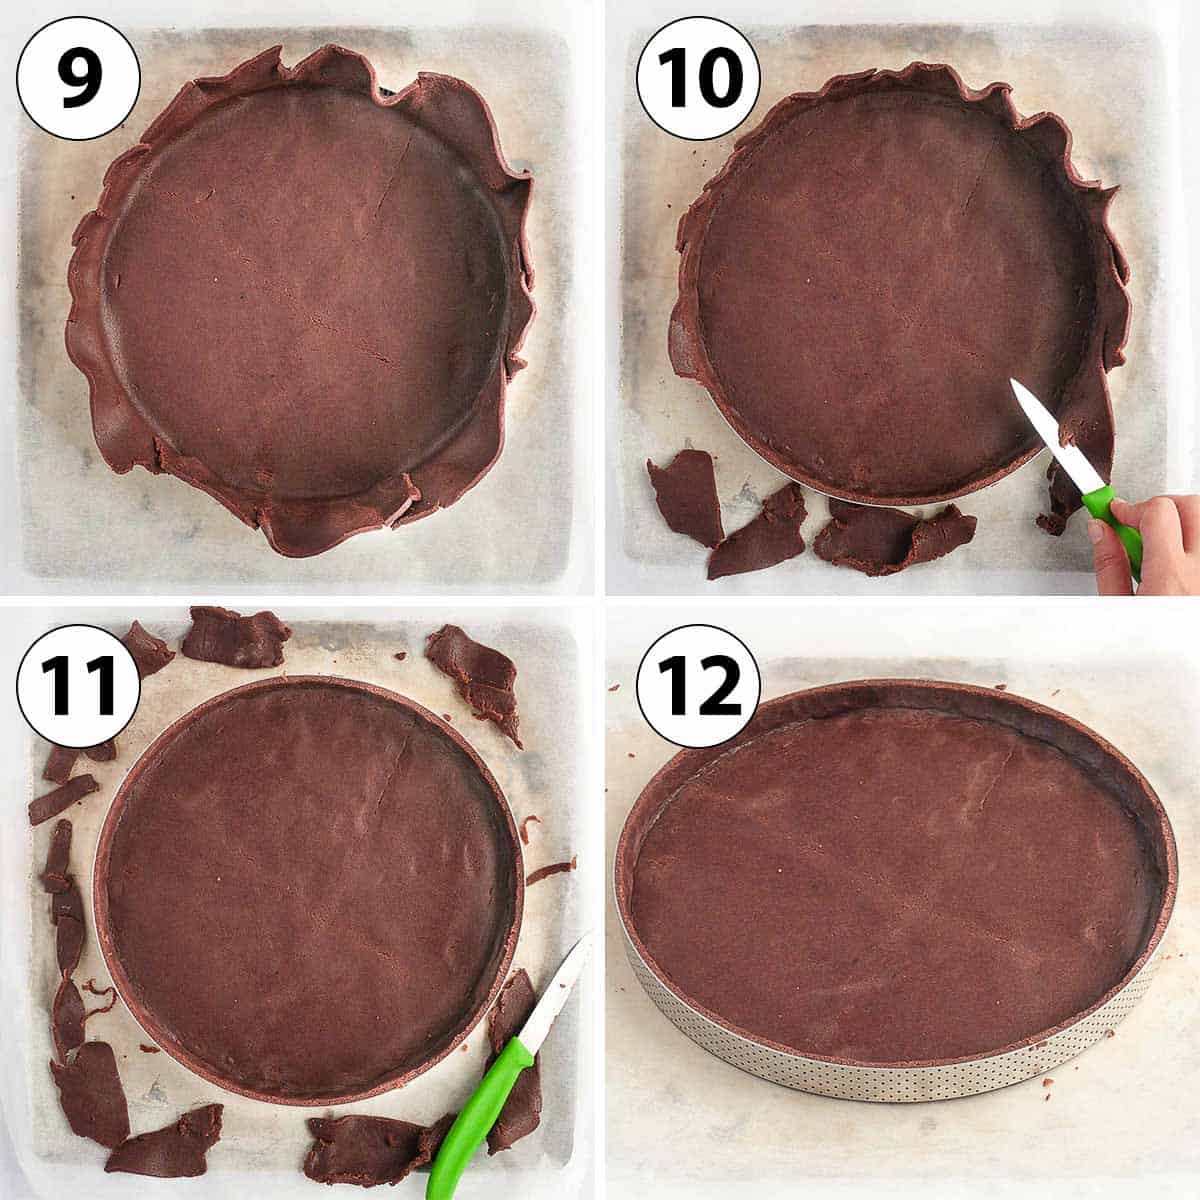
- Photo 9: Transfer the pastry inside your Tart Ring or Pie Dish. Gently slide the pastry down the edges of the ring/pan to create a right angle (you want to make sure there are no gaps between the bottom and the sides of the pastry).
- Photo 10 & 11: Using a small sharp knife, cut out any excess pastry. The knife needs to be positioned flat and parallel to the tart ring/pan to get straight, flat edges.
If prefer, you can also crimp the pastry.
- Photo 12: Adjust the crust if needed by patching any cracks or thiner edges
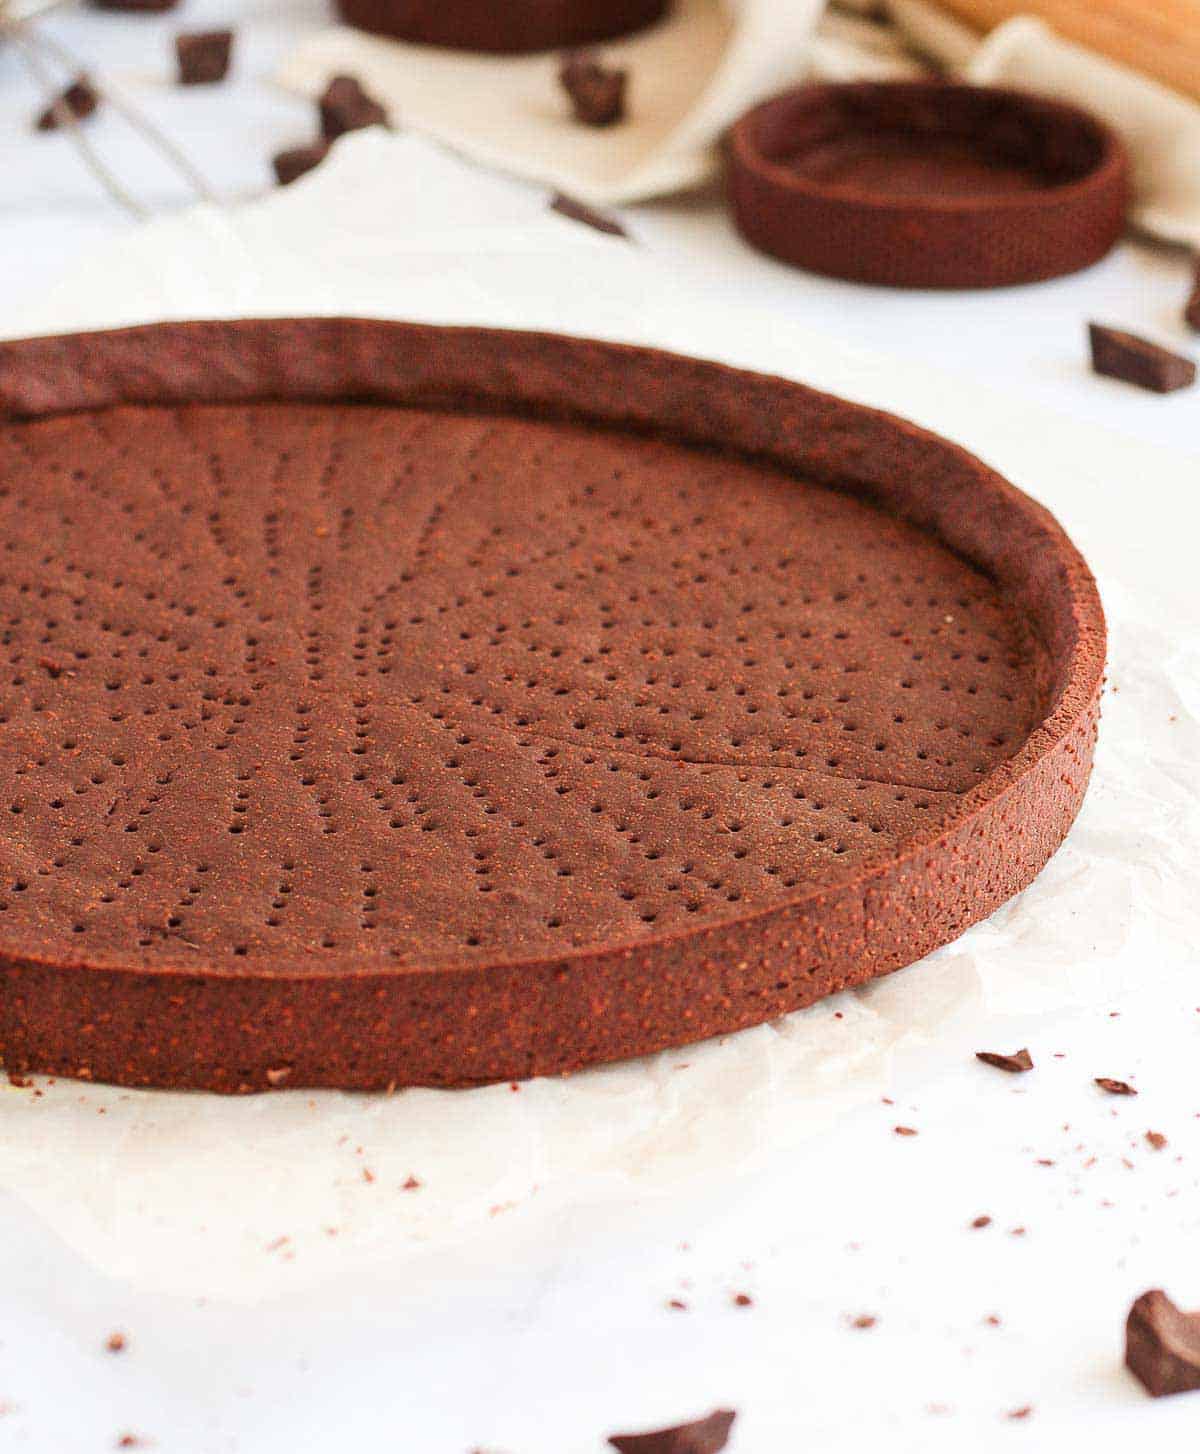
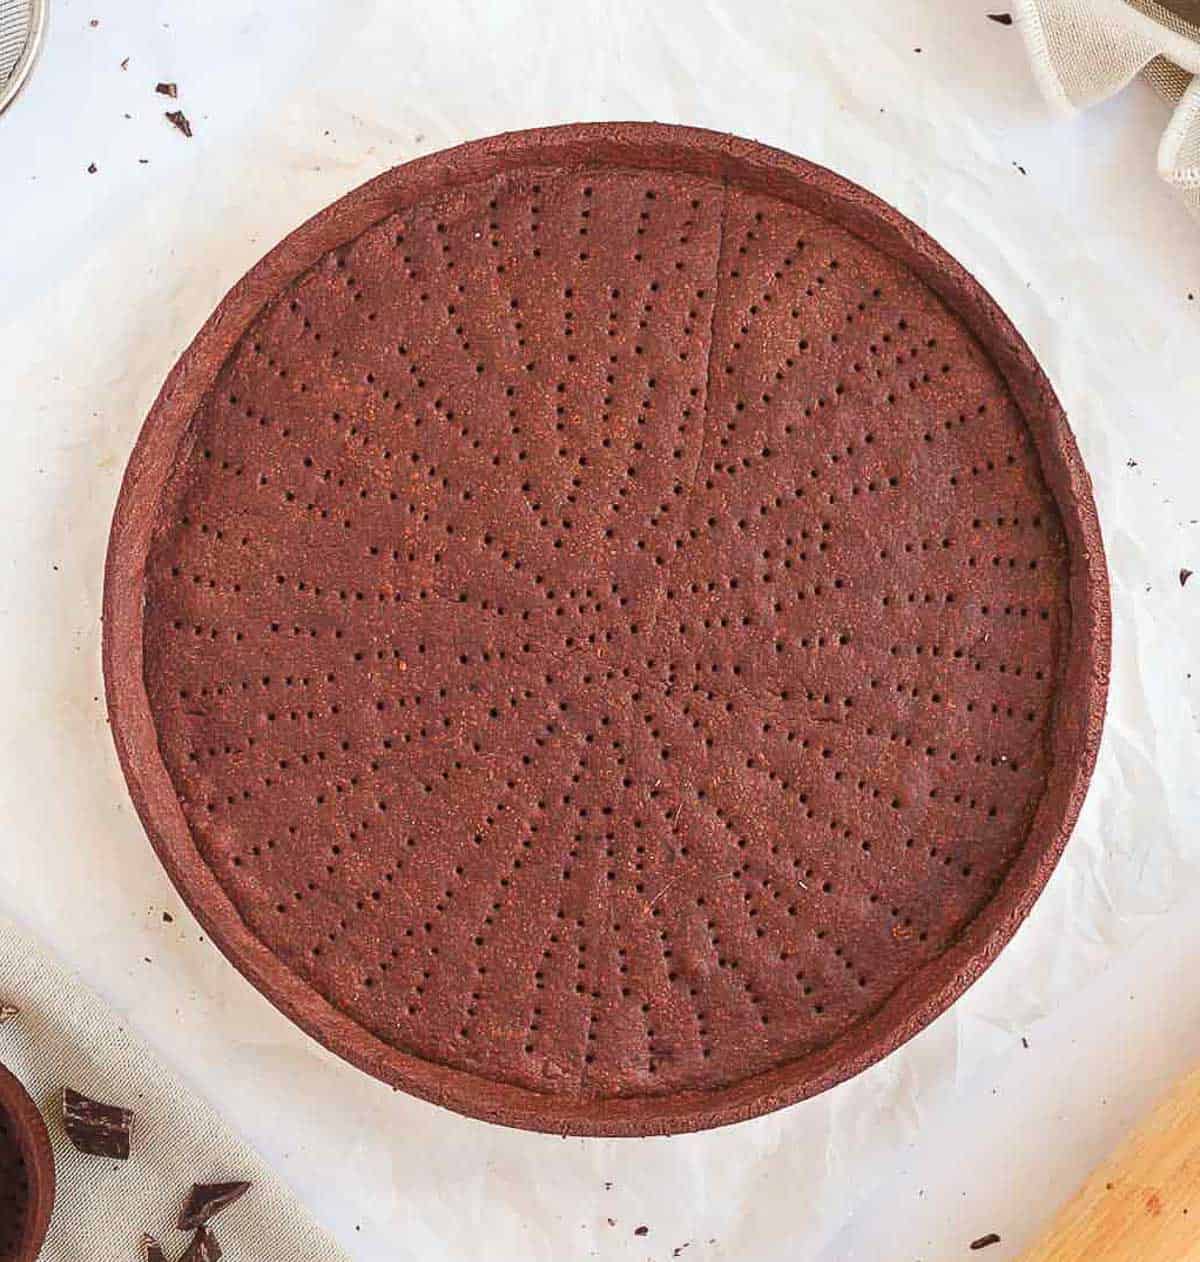
- Dock the pastry with a fork (which means pricking the bottom of the pastry before baking it, which will let any air trapped under the pastry get out). Then place back in the fridge to rest for another hour at least - or up to 24 hours in advance. Place in the freezer for 15 minutes while your oven is preheating when ready to bake.
Depending on the recipe you are using for the filling, either fully blind-bake the pastry, par-bake it or bake it completely filled from the start. I would personally advise to blind-bake it for 15 minutes to dry out the bottom of the pastry before filling it.
You can use pie weights or dry beans to fill the pie shell before baking it, but if well rested and chilled, the crust should not move in the ove,
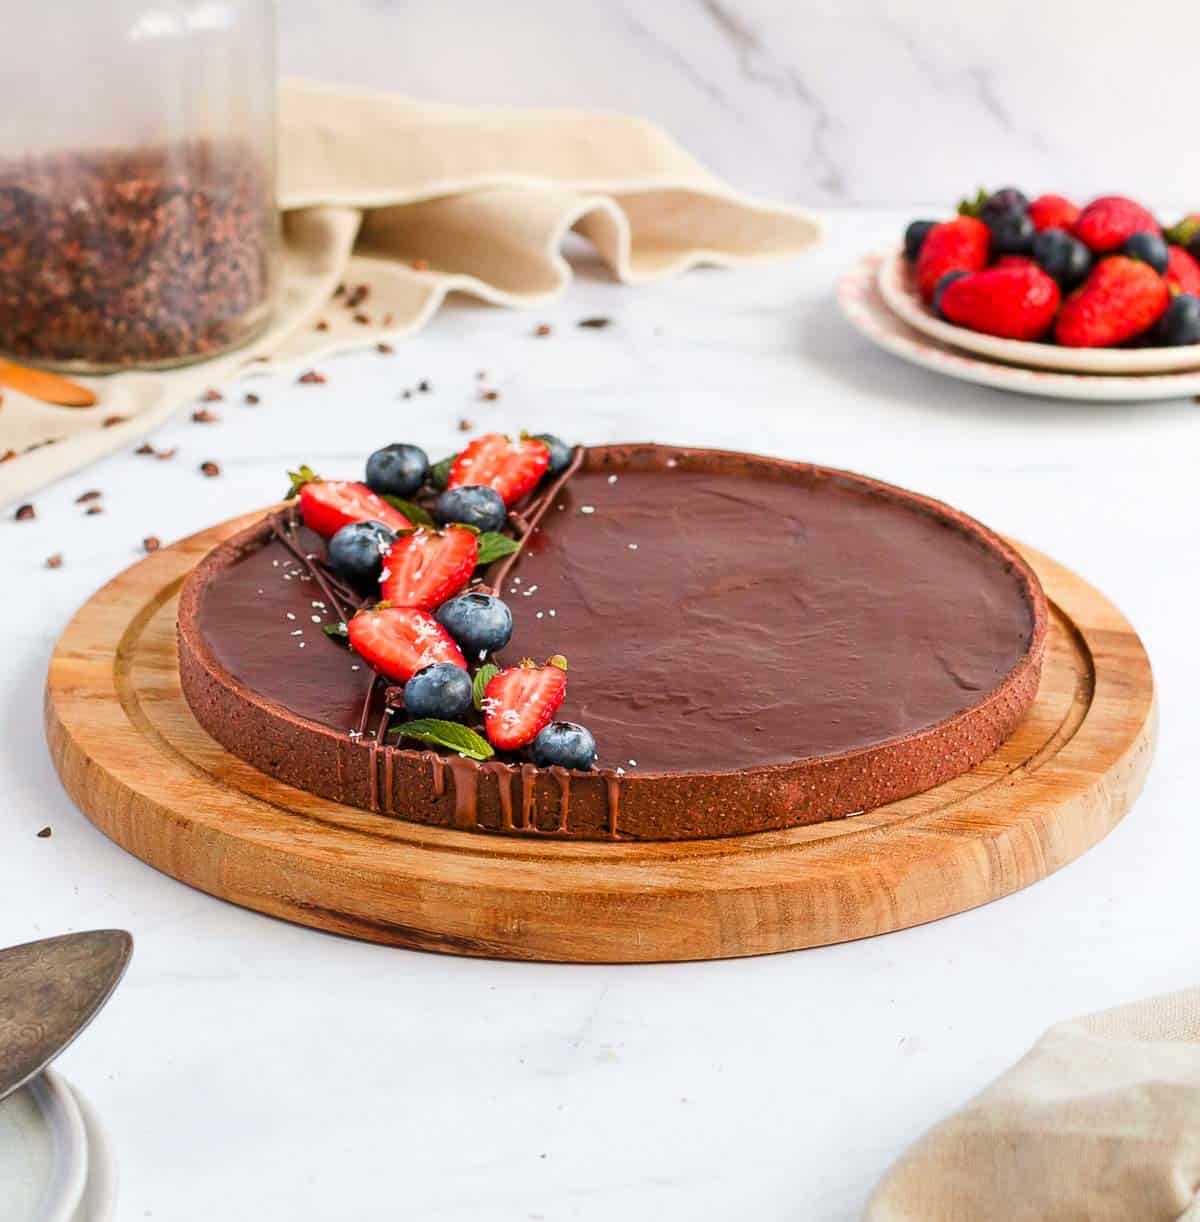
For this specific tart, I made a Chocolate Ganache Filling which did not require any baking so I fully baked the pastry at 160'C/325'F for about 30 to 40 minutes.
Tips for success
- The larger the chunks of butter, the flakier the pastry will be. Using the food processor will usually give you smaller pieces of butter, resulting in a more cookie-like texture. For a flaky pastry, I recommend making it by hands.
- Temperatures are extremely important, whether it is the temperature of the ingredients or the chilling of the pastry before baking it. Pastries need to be very cold to get the best texture and insure the crust does not shrink or collapse in the oven.
- Don't skip on the recommended resting time. It might seem like a long process, but it is the best way to make sure the pastry does not shrink, moves or collapse in the oven.
- Use a rolling pin with thickness rings to get an even thickness in the pastry and roll the pastry between two sheets of baking paper. This is a great tip to avoid having the pastry stick to the rolling pin and to get a nice and even flat pastry.
- Freeze the pastry for about 15 minutes before baking it. It is the best way to insure the butter is very very cold and the crust does not move or collapse in the oven.
- How do you keep chocolate pie crust from getting soggy: any type of filling will eventually make the pastry go slightly soggy, so make sure to fill it as close to serving as possible. A fun tip is to brush the pastry with an egg white mid-way through its baking. This will help "seal" the pastry and keep it crunchy for longer.

Recipe FAQs
I have personally never used lard or shortening to make pastry - I am all about the butter! If you do not want to use butter, I recommend finding a recipe specifically made with another fat as I cannot tell if a substitution will work.
Because the cocoa powder does not need to react with baking powder or baking soda, you can use both unsweetened Natural Cocoa Powder or Dutch-processed Cocoa Powder in this recipe. You could even use Black Cocoa Powder for a very dark pie!
It depends on the filling, but as a general rule, I always recommend blind-baking it for about 15 minutes at 160'C/325'F. For a filling that does not require baking, the pie crust will take about 30 to 40 minutes to fully bake.
Because the pastry itself is brown, you can't really rely on colour to tell if it is properly baked. The pastry should feel dry to the touch and the edges should be fully set.
Troubleshooting
- The pie dough is too dry to come together: this might be due to the type (and brand) of flour you used or the size of the egg. Add a little bit of very cold, iced water (be careful with the amount, always start with a few drops and add more if necessary) until the pastry comes together.
- The chocolate tart crust is very sticky: add a little bit of flour - but only if it is really too sticky to roll. Usually, rolling the pastry between two sheets of baking paper makes it easy to roll even if slightly sticky.
- The pastry pulls when I roll it / is hard to roll: you probably worked the dough a little bit too much and activated the gluten. Simply leave the pastry to rest for 15 to 20 minutes to relax the gluten before rolling it again.
- The pastry cracks when I try to line the pan: you might need to let it come back to room temperature for a few minutes if the pastry is hard coming out of the fridge. Cracks can be patched with your fingers once the butter gets softer.
Storing & Freezing
I recommend filling the pastry within a day. It can be stored at room temperature for that time, then might need to be kept in the fridge depending on the filling.
The great thing about homemade pastry is that you can prepare it in advance and bake it when ready to be filled. Unbaked, it can be stored in the fridge for 24 hours (or up to 2 days) either in a ball wrapped in plastic, pre-rolled between two sheets of baking paper or already lined in the pie pan.
The chocolate pastry also freezes well, either baked or unbaked. For the best texture, freeze it unbaked already lined in the tart or pie pan, so that your shell is ready to bake straight away (and does not need to thaw to be rolled or lined).
More Basic French Pastry Recipes
Made this recipe?
Let us know if you liked it by leaving a comment below, and tag us on Instagram @a.baking.journey with a photo of your creation!
Recipe

Chocolate Pie Crust
Ingredients
- 225 gr (1 1/2 cup) Plain / All-Purpose Flour
- 20 gr (2 tablesp.) Unsweetened Cacao Powder, or Dutch-Processed
- 50 gr (1/3 cup + 2 tablesp.) Icing Sugar, or Powdered Sugar
- 1 pinch Salt
- 120 gr (1/2 cup or 1 stick) Unsalted Butter, very cold
- 1 Egg, medium size
Instructions
Making the Pastry By Hands
- Sift the Flour, Cacao Powder and Icing Sugar in a large bowl. Mix to combine.
- Add the very cold Butter, cut into small cubes. Using your fingers or a pastry cutter/blender, cut the butter into the flour until you get a fine crumbs consistency (see note 1).
- Add the whisked Egg and work the dough to combine it in until the pastry starts to come together (see note 2). The crumbs should stick together when compressed.
Making the Pastry with a Food Processor
- Place the Flour, Cacao Powder and Icing Sugar in the bowl of your food processor and pulse to combine and remove any lumps.
- Add the very cold Butter, cut into small cubes and pulse until you get a fine crumbs consistency (see note 1).
- Add the whisked Egg and pulse to combine until a sticky dough starts to come together. If you press the crumbs together, they should stick.
Rolling & Lining the Pan
- Bring the pastry together into a ball and gently flatten it into a disk. Dust with a little bit of flour if sticky (see note 3).
- Place the pastry between two sheets of baking paper and roll it into a large circle that has your preferred thickness (see note 4). Put over a flat tray and place in the fridge to rest for at least an hour, or up to 24 hours in advance.
- Take the pastry out of the fridge and let it come back to room temperature for 5 minutes. Remove the baking paper sheets and place inside your tart ring or pie pan. Gently slide the pastry along the edges of the pan to create a right angle.
- Using a small sharp knife, cut out any excess pastry. Dock the bottom of the pastry (prick it with a fork) then place it back in the fridge to rest and chill for at least an hour (or up to 24 hours in advance).
Baking the Pastry
- Preheat your oven on 160'C/325'F and place the pastry in the freezer while the oven is preheating.
- Blind bake for 15 minutes or fully bake for 30 to 40 minutes, depending on your choice of filling and the recommendation of the filling recipe.
Would you like to save this recipe?
Notes
- You should not see large lumps of butter anymore or any loose dry powders. The largest the crumbs, the flakier the pastry will be.
- You can do it inside the bowl or by gently kneading the pastry on your kitchen bench or flat surface. Try not to over-work the pastry.
- If too sticky to roll, add a little bit of flour. If too dry and crumble, add a few drops of very cold water and work it into the dough until you get the desired consistency.
- I usually roll the pastry to be about 3 mm - 1/8 inch but you can roll it slightly thicker if preferred. I don't recommend rolling it thiner or it will become hard to transfer into the tart pan without breaking.