

This Dacquoise Sponge (or Biscuit Dacquoise in French) is super easy to make with a handful of ingredient only. Simply made by combining a French meringue with ground nuts, this slightly crispy, light and soft sponge is great to use for entremets and layered cakes!

Jump to:
What is Dacquoise
A Dacquoise is a classic French biscuit sponge that is best described as a baked nutty meringue. Some ground nuts - typically almond or hazelnut - are folded into a French meringue then baked into a thin layer to make a sponge cake. The ingredients and method are very similar to a macaron.
The name 'dacquoise' comes from the French town of Dax where the recipe originates from.
This dacquoise recipe can be used as a sponge inside entremets (mousse cakes), to make layered cakes and incorporated onto other pastries such as tarts.
Ingredients

Scroll down to recipe card below for all quantities
What is "Biscuit Dacquoise" made of:
- Ground Nuts: most traditionally, a dacquoise is made with ground almonds (almond meal). But you can actually use any type of ground nuts to make it such as hazelnut. The coarseness of the ground nut will give your dacquoise a more or less crunchy sponge.
You can use store-bought almond meal or almond flour - or make your own by grinding the whole almonds (or whole hazelnuts) in a food processor until you get a fine but very slightly coarse powder. The nuts can be skinned or not, toasted or not.
- Egg Whites: from large eggs. Keep the egg yolks for other recipes such as Crème Pâtissière. They can be at room temperature or straight from the refrigerator - I find that it does not make much of a difference here.
- Caster Sugar: or fine white granulated sugar. To be used to make the meringue.
- Powdered Sugar: or icing sugar. To be used with the ground nuts. Make sure the powdered sugar is sifted before using it.
Some salt or vanilla extract can be added to intensify the flavours of the sponge too.
Variation
- add cocoa powder to make a chocolate dacquoise.
- use extracts such as almond extract to deepen the flavour of the cake.
- swap the almond flour for other ground nuts such as hazelnut, walnut or cashews.
How to make Dacquoise step-by-step
1. Making the meringue

You can make this recipe using either a silicone sheet pan (30 x 40 cm / 12 x 15 inch) OR two lightly greased pastry rings (20 cm / 8 inch) placed on baking sheets lined with a piece of parchment paper or a silicone baking mat.
- Preheat your oven on 160 degrees Celsius / 325 degrees Fahrenheit.
- Photo 1: sift the almond meal and powdered sugar over a large mixing bowl. Set aside.
- Photo 2: Place the egg whites in the bowl of your stand mixer fitted with the whisk attachment (or a large bowl if using a hand mixer). Start whipping the eggs on medium speed until it doubles in volume and starts turning white. It should have the consistency of a light shaving cream.
- Photo 3: with the mixer on medium speed, slowly add the caster sugar a little bit at a time until it has all been incorporated.
- Photo 4: when all the sugar has been added, increase the speed to high and continue to whisk until you reach stiff peaks.
The meringue should be thick, glossy and have triple in volume.
2. Folding in the dry ingredients
Would you like to save this recipe?
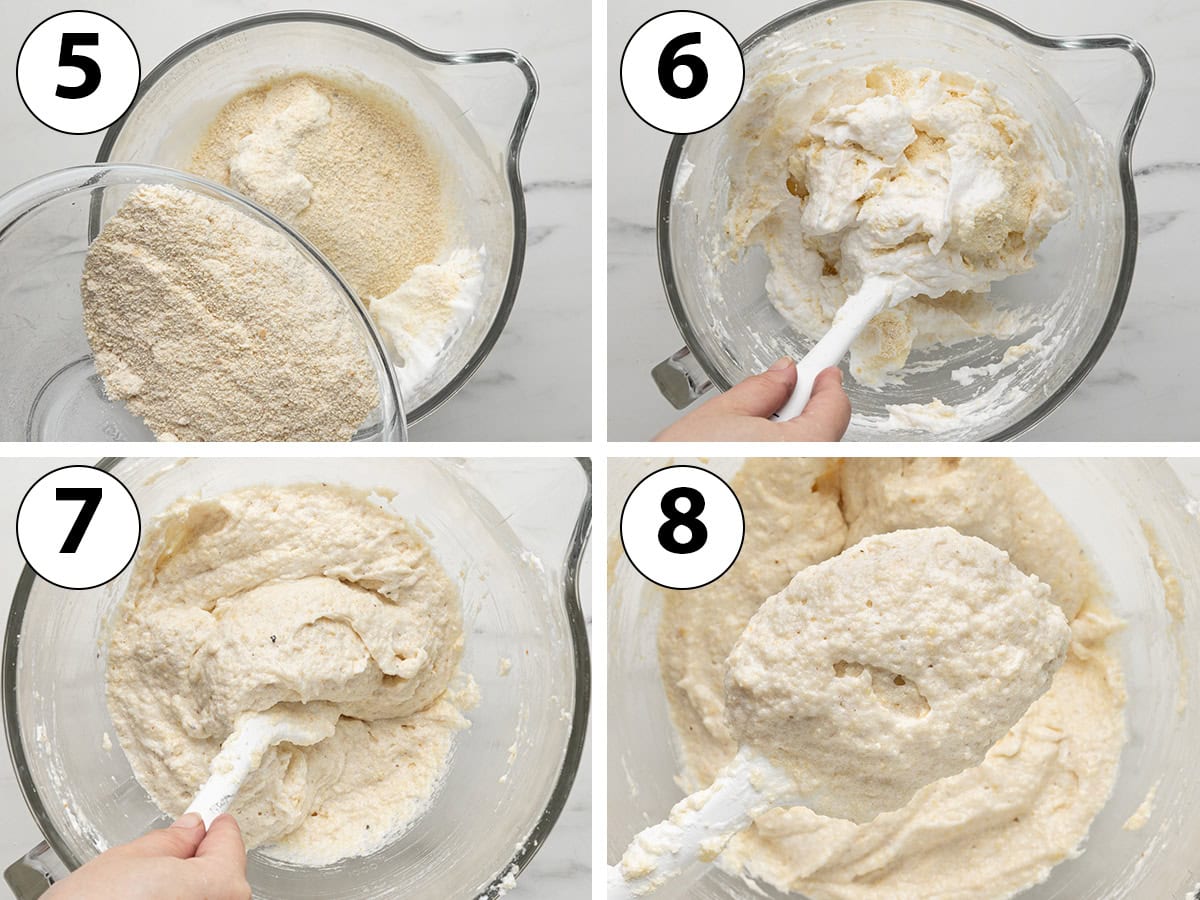
- Photo 5: add about a third of the sifted almond meal and powdered sugar to the meringue.
- Photo 6: Gently fold the dry ingredients into the meringue using a spatula. Try to avoid deflating the egg whites.
- Photo 7 & 8: Add the rest of the dry ingredients in one or two times and fold until it just combined. You should get a light, fluffy batter that is slightly sticky and grainy.
3. Spreading the dacquoise sponge

If using a silicone sheet pan:
- Photo 9: pour the dacquoise batter in the centre of the sheet pan.
- Photo 10 & 11: using a large offset spatula, gently spread the batter from the centre of the pan towards the four corners.
- Photo 12: continue to spread until you get an even layer. Try to avoid having sections that are thicker than others because the dacquoise will bake differently.
Try to avoid going back over the batter too many times with the spatula once it's spread out to avoid deflating it.
If using a round pan:
I recommend transferring the batter into a piping bag and pipe it directly inside the pan in a spiral pattern. It will be easier to create an even layer this way.
Alternatively, pour the batter into the pan and use a small offset spatula to spread it around.
- Bake for 18 to 20 minutes for the sheet pan or 22 to 24 minutes in the pastry rings. The top of the dacquoise should look golden but still feel soft. Place on a wire rack and allow to cool down completely before peeling the sponge off the silicone sheet or removing from the rings.
- Once cool, it is ready to be used as intended.

Recipe FAQs
A macaron and dacquoise batter are very similar in both their ingredients and the way they are made. The main difference resides in the way the macaron batter is mixed to deflate part on the air from the meringue (called "macaronage") while a dacquoise batter is very gently folded to retain as much air as possible.
Dacquoise sponge will have a rougher, more rustic look while a macaron will have a smooth, shiny shell as a result.
If you can't find almond meal or almond flour, you can simply make some by blending some skinned or un-skinned almonds in the food processor. You can lightly toast the almonds in the oven first for a deeper taste.
Make sure to slowly pulse the nuts and stop as soon as you reach the desired coarseness, before the nuts start releasing oil.
The sponge can be used inside entremets and layered cakes or used as inserts inside pastries.
It can also be used on its own with fillings such as whipped cream, custard, buttercream or even chocolate ganache. In this case, the cake is also called a "dacquoise" (yes, confusing!).
For example, the "Succès" is a classic French cake that combines layers of dacquoise sponge with a Praline Mousseline Cream filling.

Tips & Troubleshooting
- Baking Time: the exact baking time will vary based on the thickness of your sponge. I spread the dacquoise mixture on a silicone sheet pan to create a rather thin layer here, so the baking time was quite short. If you are baking the sponge into a thicker layer, you will need to bake it for longer.
- What pan to use: silicone pans are best used here as they will allow to easily 'peel off' the sponge once baked. If using metal pans, make sure to line them with baking paper or parchment paper and lightly grease the sides.
- Dacquoise texture: you can play with the coarseness of the ground nuts to create different textures. Keeping the nuts ground relatively coarse will give some crunchiness to your sponge. Using finely ground almond flour will create a lighter, softer texture.
- Spreading the batter: be gentle when handling the batter once the nuts have been folded into the meringue. The air whipped into the egg whites is what will give your biscuit dacquoise its lightness so you don't want to deflate the batter when spreading it over your pan.
Storing & Freezing
The sponge can be stored at room temperature for a day, either in an airtight container or wrapped in plastic. It will last for longer in the fridge but the cold with dry it out more quickly. Once used in an entremet or layer cake, follow the storing instructions of the cream filling.
You can also freeze the dacquoise - either inside an entremet or on its own. Wrap it well in cling wrap and freeze for up to a month. Leave at room temperature to thaw.

More basic French pastries
I am so excited to share that my debut cookbook
"Bite-Sized French Pastries for the Beginner Baker"
is now available for purchase!
Recipe

Dacquoise Sponge (Biscuit Dacquoise)
Equipment
- 1 x 30 by 40 cm / 12 by 15 inch silicone sheet pan
- or
- 2 x 20 cm / 8 inch pastry rings
Ingredients
- 180 gr Almond Flour, or almond meal
- 100 gr Powdered Sugar, sifted
- 180 gr Egg Whites, (about 6 egg whites)
- 50 gr Caster Sugar
Instructions
- Preheat your oven on 160℃ / 325℉. Prepare a 30 x 40 cm / 12 x 15 silicone sheet pan or two lightly greased 20 cm / 8 inch lightly greased pastry rings placed on a lined baking tray (see note 1).
- Sift the Almond Flour and Powdered Sugar into a large bowl to combine them. If using coarse ground almond, only sift the powdered sugar and mix in the ground almond. Set aside.
- Place the egg whites in the bowl of a stand mixer fitted with the whisk attachment (or large mixing bowl if using a hand mixer). Whisk on medium speed for about 5 minutes or until the egg whites have increased in volume, turned white and frothy (see note 2).
- While still whisking on medium speed, slowly add the caster sugar about 1 tablespoon at the time. Once all the sugar has been incorporated, increase the mixer speed to high and keep on whisking for another 3 to 5 minutes or until you have reached stiff peaks (see note 3).
- Remove the bowl from the mixer. Add about a third of the almond flour / powdered sugar mix to the meringue and very gently fold it in with a spatula. Add the remaining mix in one or two times and very gently fold until all incorporated (see note 4). The mixture will have slightly deflated - that's normal; but try to avoid over-folding to keep as many air bubbles as possible.
- If using a 30 x 40 cm / 12 x 15 silicone sheet pan: gently pour the dacquoise batter in the centre of the sheet pan. Using an offset spatula, gently spread the batter towards the corner of the sheet pan then continue to spread into an even layer.
- If using two 20 cm / 8 inch pastry rings, either pour half the batter into each rings and spread into an even layer with a small offset spatula, or use a pastry bag fitted with a large round piping tip to pipe a spiral of batter into the rings.
- Place in the oven and bake for 18 to 20 minutes for the sheet pan or 22 to 24 minutes for the pastry rings (see note 5). The top of the dacquoise should look golden but still feel soft. Place on a wire rack and allow to cool down completely before using as intended.
Would you like to save this recipe?
Notes
- You can use a silicone sheet pan and cut the sponge to the shape you require, or use pastry rings the size of your cake (if making a layer cake for example). You can really use any shape of pan you need, simply make sure to adjust the baking time to the thickness of the batter.
- I call this the "shaving cream" consistency; it should still be quite soft and loose (more loose than soft peaks) but have turned white rather than lightly yellow and translucent.
- The meringue should have more than doubled in volume and appear quite stiff. If you pick some on the meringue with the whisk, it should hold its shape without dripping back down or moving.
- Make sure to go all the way down to the bottom of the bowl to insure the mixture is evenly combined.
- The exact baking time will vary based on the thickness of your sponge. I spread the dacquoise mixture on a silicone sheet pan to create a rather thin layer here, so the baking time was quite short. If you are baking the sponge into a thicker layer, you will need to bake it for longer.
Nutrition (per serving)
Made this recipe?
Let us know if you liked it by leaving a comment below, and tag us on Instagram @a.baking.journey with a photo of your creation!


Comments
No Comments