

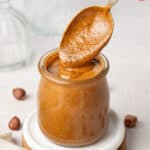
This homemade hazelnut butter recipe is extremely easy to make with 1 ingredient only. No added oil, no sugar, no salt... just the delicious goodness of roasted hazelnuts blended into a luscious spread!

Jump to:
Why buy expensive nut butter when it is so easy to make at home? Just like my Pistachio Paste, this hazelnut spread is simply made out of pure hazelnut - and nothing else! It is gluten-free, dairy-free and vegan.
Homemade nut spreads are great to use over toast, drizzled over pancakes and waffles, added to smoothies, mixed into porridge and oatmeal, baked into brownies, cakes or cookies.
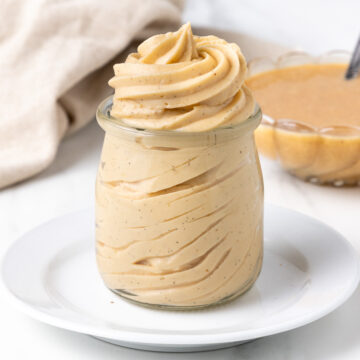
This hazelnut butter with also be a great way to flavour creams and ganaches like Pastry Cream or Whipped Ganache Frosting.
Did you know that combined with caramelised sugar before blending, your hazelnut butter with turn into the most delicious Hazelnut Praline Paste!?
Ingredient

You only need one ingredient: unsalted raw hazelnuts - with or without skin. I don't recommend using pre-roasted hazelnuts; it is much nicer when roasted at home (and the heat with help with the blending process).
Keeping the skin will add a slight bitterness to the nut butter so I recommend removing it after roasting the hazelnuts - though you could keep them if you like that taste!
Optional Addition
This recipe gives you a great base to create delicious homemade spreads. Here are a few additional ingredients that can be used to flavour your hazelnut butter:
- Cocoa powder + liquid sweetener to turn your paste into a homemade chocolate hazelnut spread.
- Pinch of salt for more savoury use.
- Vanilla extract (or any of your favourite extract).
- Spices such as Cinnamon, Ginger or Nutmeg.
- Liquid sweetener such as maple syrup, honey, agave syrup or golden syrup / corn syrup if you are after a sweetened version.
How to make Hazelnut Paste step-by-step

- Preheat your oven on 180 degrees Celsius / 350 degrees Fahrenheit. Place the raw hazelnuts on a large baking tray (no need to line it with baking paper).
- Photo 1: roast the hazelnuts for 8 to 12 minutes or until their skin turn dark in colour and the nuts are fragrant and golden. The exact time can vary based on your hazelnuts and oven so make sure to keep an eye on them to avoid burning.
- Take the hazelnuts out of the oven and leave to cool down on a cooling rack for 5 minutes.
- Photo 2: working in small batches, transfer the hazelnuts over a clean kitchen towel. Vigorously rub the hazelnuts inside the towel to detach the skin. Separate the peeled hazelnuts and discard the leftover skin. Repeat until all the hazelnuts have been peeled.
Don't worry if some of the skins stay attached unless you want to remove most of the bitterness and have a hazelnut butter that is lighter in colour.
📔Note: if the skins don't seem to be coming off easily, it is usually a sign that the hazelnuts need to be roasted for a little bit longer. Fresh hazelnuts will also peel more easily than older ones.
Would you like to save this recipe?
- Photo 3: transfer the peeled hazelnuts to the bowl of your food processor. Start blending on medium to high speed. The hazelnuts will first turn into crumbs then slowly turn liquid as the natural oils start to release.
- Photo 4: blend for 5 to 10 minutes or until the hazelnuts have turn into a liquid paste. Stop every few minutes to scrape the sides and bottom of the bowl to get an even texture. The exact blending time can vary based on the strength of your food processor.
You can blend the nuts more or less depending on the texture you are after (if you want it more smooth or keep small bits for extra crunch).
- Transfer into a clean jar and keep refrigerated for up to a month.

Recipe FAQs
Absolutely! I still recommend roasted the hazelnuts for flavour but you can skip the step of rubbing the hazelnuts in the kitchen towel.
Roasting the hazelnuts provides two things: first, it detaches the skins from the nut to easily peel them. Secondly, it develops the flavours of the hazelnut, providing you with a much tastier nut butter. I don't recommend skipping this step!
Unfortunately no; a regular blender or immersion blender will not work here. You need a food processor that is quite powerful to be able to turn the nuts into a spread.

Tips & Troubleshooting
- The skin is not peeling off: usually indicates that the hazelnuts need to be roasted for a little bit longer in the oven. This can also happen if the hazelnuts are a bit old and not as fresh.
- The hazelnuts are not turning into a spread: the nuts you are using are either naturally low in natural oil or the food processor is not powerful enough. Give it a bit more time to blend.
- Smooth vs crunchy hazelnut spread: there is no right or wrong when it comes to texture and consistency - it is completely up to you! For a crunchy hazelnut, stop blending when you get very small crumbs of hazelnuts. For a smoother spread, continue to blend until the crumbs disappear.
- Work with large quantities of hazelnuts (at least 300 grams): it is actually easier for your food processor to work with larger quantities. With smaller quantities, nut crumbs tend to fall to the bottom of the bowl and not get picked up by the blades.
How to use Hazelnut Butter
- As a spread over toast, pancakes, waffles, french toast,... You can slightly flavour the hazelnut paste with a liquid sweetener, some vanilla or spices as well for more flavour.
- Mixed into porridge, overnight oats or smoothies.
- Added to cake, brownies or cookies batter.
- To flavour frostings, creams and ganaches such as Chocolate Pastry Cream or Diplomat Cream - the same way I used my Pistachio Paste to make Pistachio Pastry Cream.
Storing & Freezing
Store the hazelnut butter in an airtight container or jar in the fridge for up to a month. If the oil starts to separate, simply stir to re-combine. If you notice a change in colour or smell, it can indicates that your hazelnut butter is off and it is time to make a new batch.
You can freeze hazelnut butter and thaw it in the fridge overnight or at room temperature for a few hours. Mix well to re-incorporate the oils if needed.

I am so excited to share that my debut cookbook
"Bite-Sized French Pastries for the Beginner Baker"
is now available for purchase!
Recipe
How to make Hazelnut Butter
Equipment
- Food Processor
Ingredients
- 300 grams Raw Hazelnuts, (skin on or off).
Instructions
- Preheat your oven on 180 degrees Celsius / 350 degrees Fahrenheit.
- Place the raw hazelnuts on a large baking tray. Roast for 8 to 12 minutes or until their skin turn dark in colour and the nuts are fragrant and golden (See note 1). Remove from the oven and place on a cooling rack for 5 minutes.
- If using unpeeled hazelnuts: working in small batches, transfer the hazelnuts over a clean kitchen towel. Vigorously rub the hazelnuts inside the towel to detach the skin. Separate the peeled hazelnuts and discard the leftover skin. Repeat until all the hazelnuts have been peeled (see note 2).
- Place the peeled hazelnuts to the bowl of your food processor. Start blending on medium to high speed. The hazelnuts will first turn into crumbs then slowly turn liquid as the natural oils start to release.
- Continue to blend for 5 to 10 minutes or until the hazelnuts have turn into a liquid paste. Stop every few minutes to scrape the sides and bottom of the bowl to get an even texture. The exact blending time can vary based on the strength of your food processor and the texture you are after (see note 3).
- Transfer into a clean jar or airtight container and keep refrigerated for up to a month.
Would you like to save this recipe?
Notes
- The exact time can vary based on your hazelnuts and oven so make sure to keep an eye on them to avoid burning.
- if the skins don't seem to be coming off easily, it is usually a sign that the hazelnuts need to be roasted for a little bit longer. Fresh hazelnuts will also peel more easily than older ones. Don't worry if some of the skins stay attached unless you want to remove most of the bitterness and have a hazelnut butter that is lighter in colour.
- You can blend the nuts more or less depending on the texture you are after (if you want it more smooth or keep small bits for extra crunch).
Nutrition (per serving)
Made this recipe?
Let us know if you liked it by leaving a comment below, and tag us on Instagram @a.baking.journey with a photo of your creation!


Comments
No Comments