

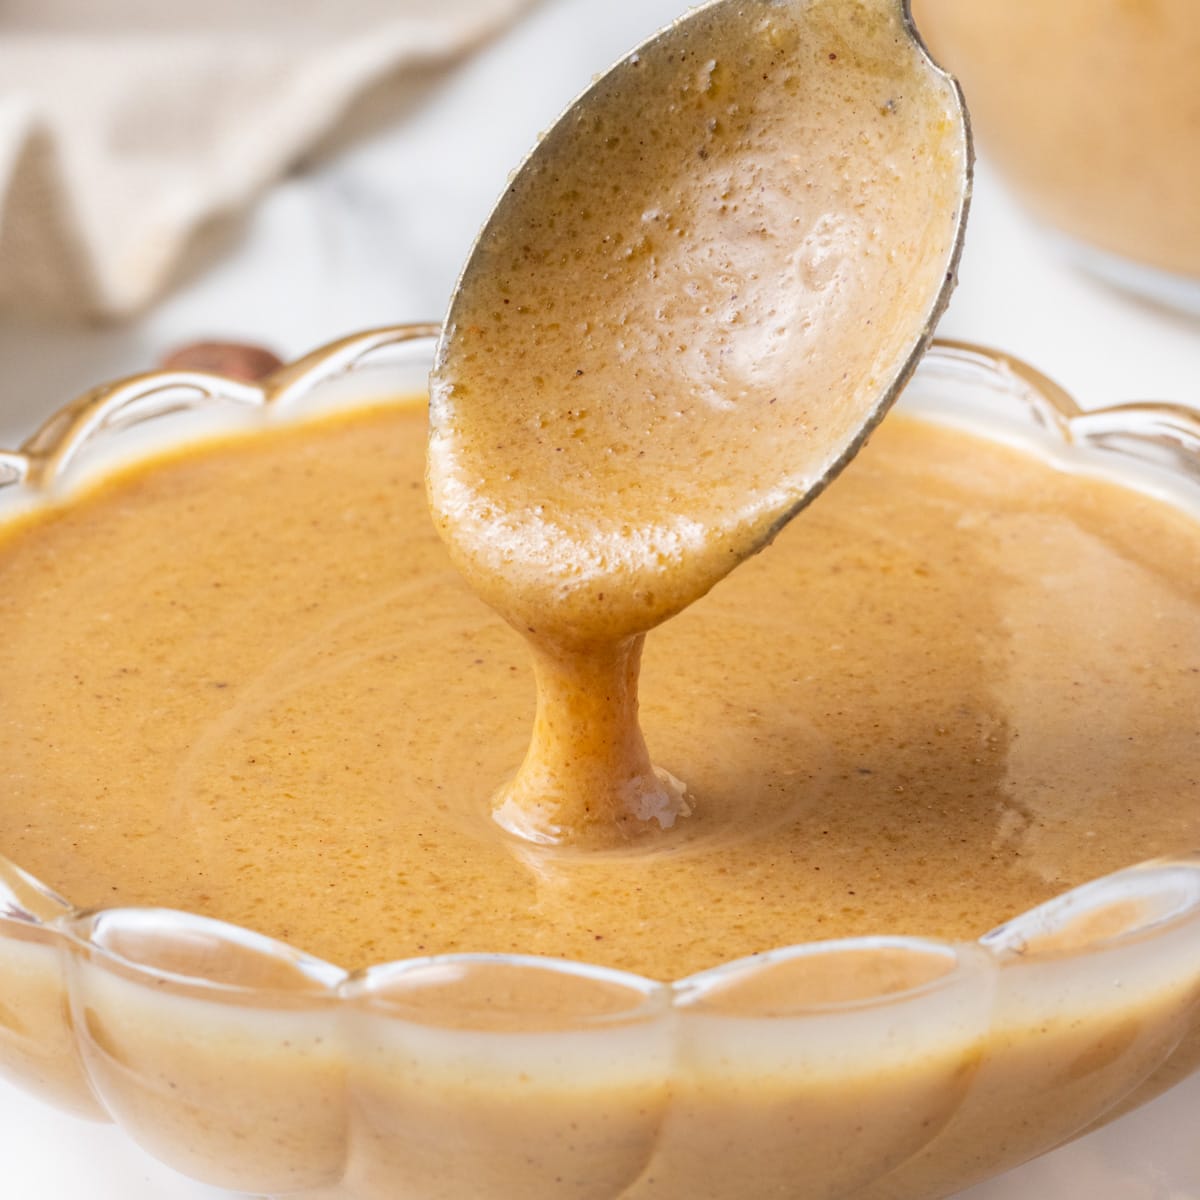
This super indulgent Hazelnut Praline Paste is an incredible base to create delicious creams, frostings, cakes and desserts - or even use on its own as a spread. Made from a handful of ingredients, it will keep for months in your fridge!
Jump to:
Why we love this recipe
Who knew that homemade Praline Paste was such an easy recipe? All you need is two ingredients (+ 2 optional ones), a good food processor and a bit of patience.
This 100% hazelnut praline paste is incredibly tasty and decadent. It adds a rich, sweet and nutty depth to any dessert. It is incredibly versatile too.
Add it to your favourite creams like Mousseline Cream (Praline Mousseline Cream), Crème Pâtissière, Bavarian Cream or Diplomat Cream.
Fold it into a classic frosting or buttercream, use as a filling inside chocolate bonbons, swirl it into cakes, cheesecakes and brownies, pour it over vanilla ice cream, use it as a decadent vegan, dairy-free and gluten free spread... the possibilities are infinite!
Also check out my Hazelnut Butter recipe if you love hazelnut spreads!
What is praline paste
Praline paste - "Pâte de Praliné" or just "Praliné" in French - is a classic preparation regularly used in French pastry. It is made from blending caramelized sugar and roasted nuts until you get a thin, liquid, slightly crunchy paste.
Praliné is traditionally made with either hazelnut, almonds or a mix of both, but you can actually use any nuts (and even some seeds) to make it!
The traditional recipe is made with a ratio of 1:1 nuts to sugar (exact same quantity of nuts and sugar). But you can play around with those quantities a bit to make a slightly less sweet praline paste if preferred.
Note that a traditional (or 'academic') praline paste recipe is made in a special copper pot where the nuts are slowly roasted and caramelised in sugar. This recipe uses a less traditional but easier method that is more accessible to the home-baker in a domestic kitchen.
Ingredients
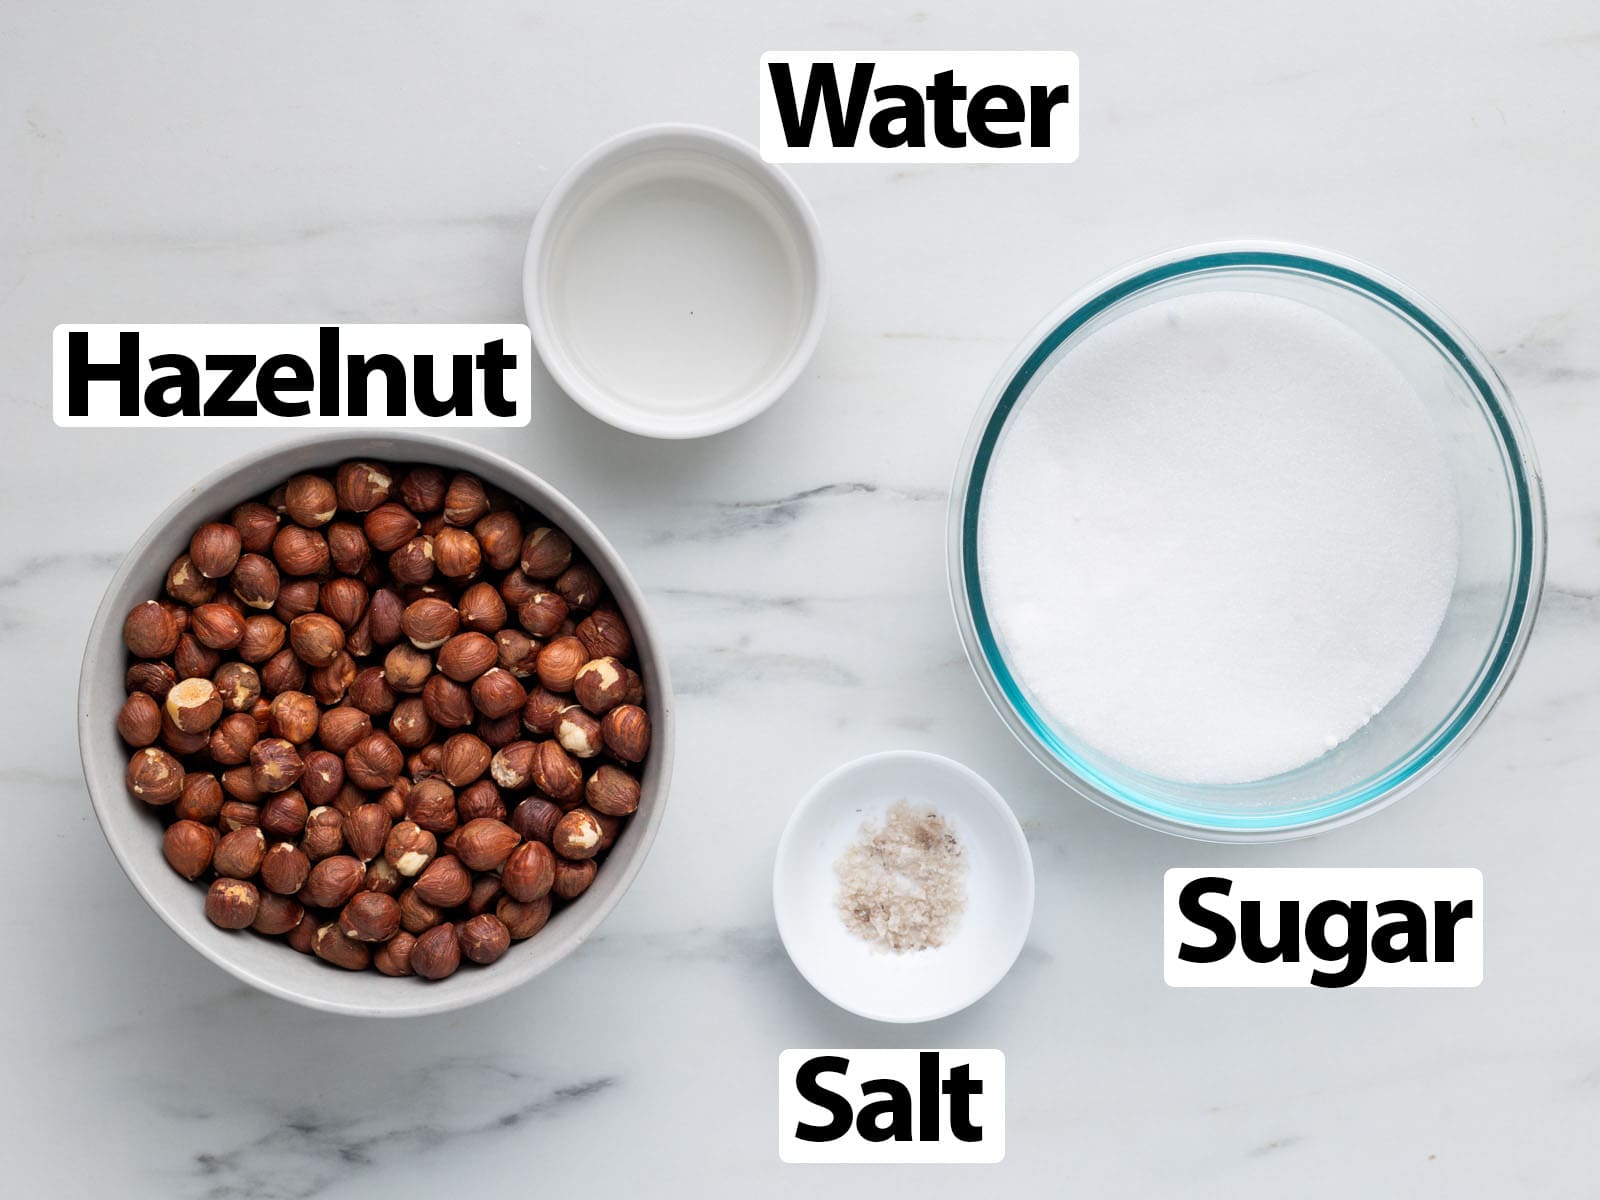
Scroll down to recipe card below for all quantities.
What is hazelnut praline paste made of:
- Hazelnut: you can use either whole hazelnuts with skin or simply by pre-peeled blanched hazelnuts. I used whole hazelnuts that I skinned after roasting them - but you could also keep the skin for a slightly more bitter praliné flavour.
- Sugar: use Caster Sugar or superfine white granulate sugar that will dissolve easily into a syrup then turn into caramel.
- Water: optional, simply used to start your caramel and avoid burning the sugar as it starts to melt.
- Salt: also optional, but will balance the sweet flavours of your hazelnut praliné. I use flaky sea salt but any type of salt will do here!
Variation
- Use a different nut: this praline paste is exclusively made from hazelnut but you can actually use any type of nuts - and even some seeds - to make praline paste. Other traditional versions use almonds or a 50/50 combination of both hazelnuts and almonds. You could also use pistachios, peanuts, cashew Nuts, walnuts, macadamia nuts,... or even sesame seeds!
- Add flavouring: like vanilla (a fresh vanilla bean, vanilla paste or vanilla extract), some coffee or almond extract,... you can really play around with many delicious extra ingredients!
- Make chocolate praline paste: simply add some unsweetened cocoa powder to the paste when it has almost reached the right consistency in the food processor. You can also mix your finished paste with melted chocolate, but it will change the overall texture of the preparation.
Utensils
To make this hazelnut praline paste, you will need a few specific utensils:
- Flat baking sheet + silicone baking mat: first used to roast the nuts in the oven, then as a surface to let the liquid caramel cool and turn hard. You can use parchment paper / baking paper instead of baking mat, but I find it easier to "peel" the hardened mixture off a silicone mat than paper.
- Large saucepan or pan: to make the caramel. A light coloured metal saucepan will give you the best res
- Food processor: the most important tool to make praliné. Unfortunately, you won't be able to make this recipe without it; there are no possible substitute here. You need a rather powerful food processor to turn the hard caramelised hazelnuts into a liquid paste. I have a Breville Food Processor.
I am so excited to share that my debut cookbook
"Bite-Sized French Pastries for the Beginner Baker"
is now available for purchase!
How to make Hazelnut Praline Paste step-by-step
The "traditional" method
The traditional or classic method to make praline paste is slightly different than the one used here. With this method, you first make a sugar syrup in a large pot (a copper one for the super-traditional way).
Once the syrup has reached 116 to 118 degrees Celsius, add the whole (or peeled) raw nuts and keep on stirring with a wooden spoon or heat-proof spatula. The sugar will crystallise around the nuts but eventually will turn into a golden caramel. This can take anywhere between 20 to 45 minutes of cooking.
Once ready, the caramelised nuts are left to cool down on a flat sheet then blended into a paste in a food processor.
This method is quite long and tedious - for an end result that is virtually the same as the "at-home" method explained below. For this reason, the easy method used for this recipe is my personal favourite!
The "at-home" method
- Preheat your oven on 180 degrees Celsius / 350 degrees Fahrenheit.
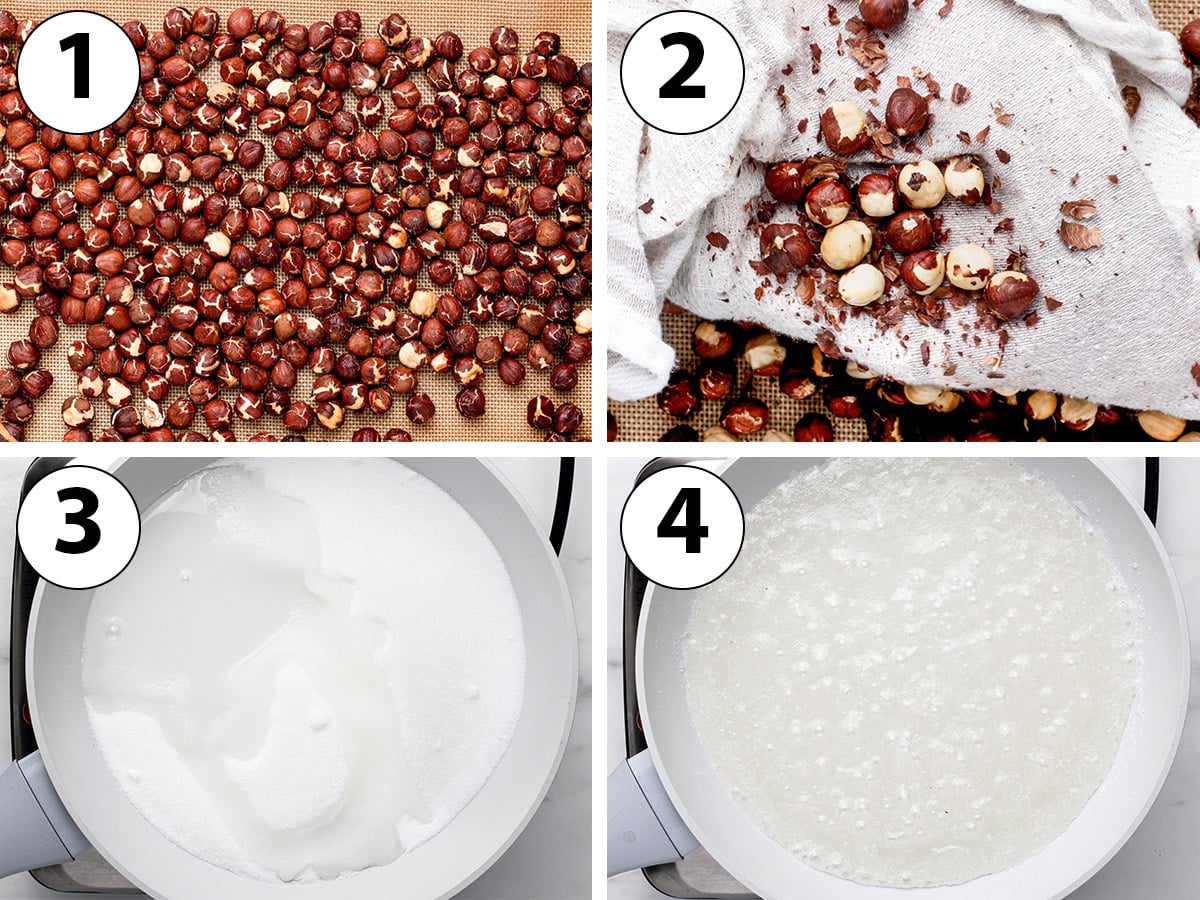
- Photo 1: Spread the hazelnuts into a single layer over a lined baking sheet. Place in the oven and leave to roast for 8 to 10 minutes. The hazelnut skin should turn darker and have started to crack. Remove from the oven and place on a cooling rack.
Would you like to save this recipe?
- Photo 2: if using hazelnuts with the skin on, carefully rub the hot nuts inside a clean tea towel to remove their skins. Don't worry if some of the skin does not peel off - it's fine. Discard all the skins and place the nuts back on the baking tray. Set aside.
If using blanched nuts, you can skip this step (but still roast the nuts for flavour!).
- Photo 3: In a large saucepan or metal skillet, combine the sugar and water. Turn on medium-high heat.
- Photo 4: leave for 10 to 15 minutes without touching the sugar at all - or you risk crystallising it. The sugar will slowly melt and start bubbling.
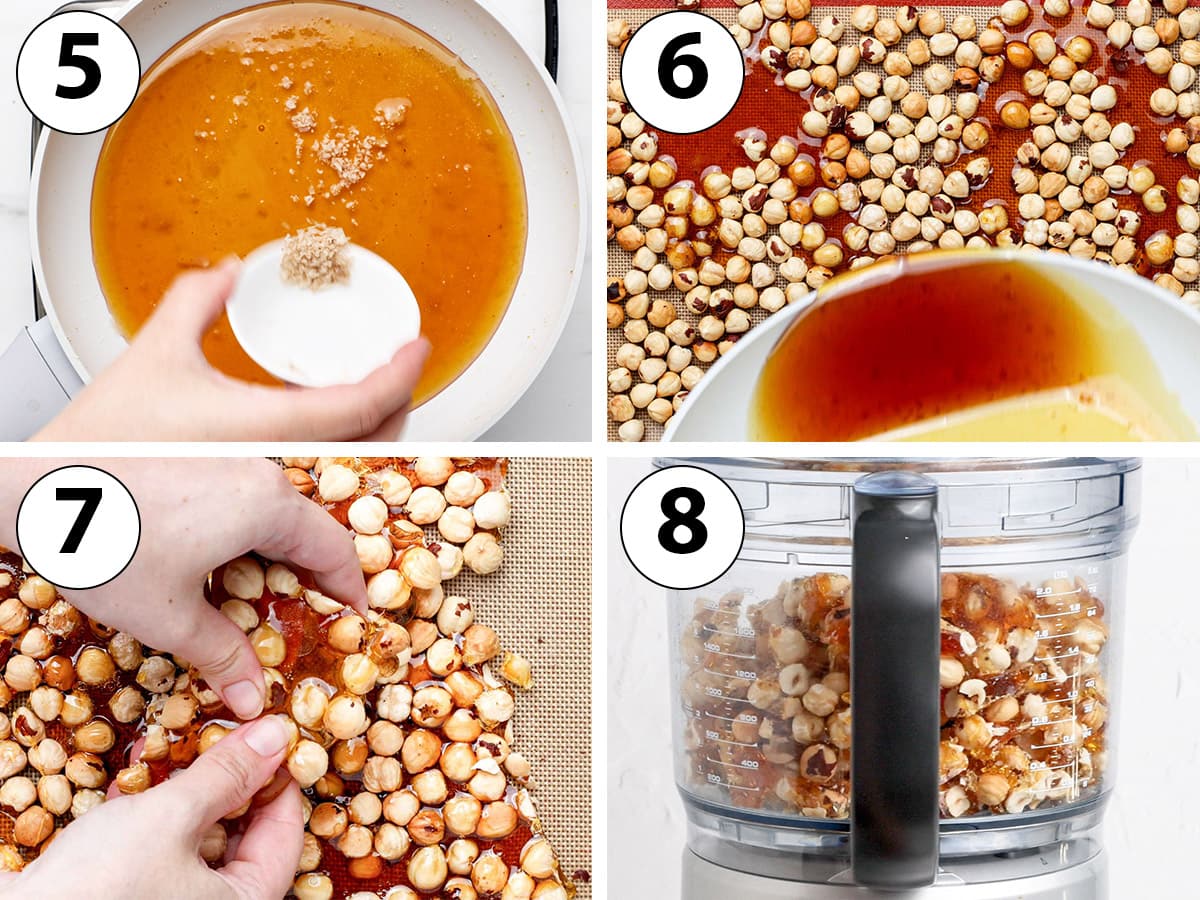
- Photo 5: continue to cook the sugar until it turns a golden amber colour. Turn off the heat, add the pinch of salt and quickly stir to dissolve it.
The darker the caramel, the less sweet it will taste. Be careful not to push it too far or it will burn though.
- Photo 6: directly pour the caramel on top of the nuts over the lined baking sheet. Don't worry if it does not fully cover all the nuts.
Warning: the caramel will be extremely hot and can cause bad burns (I have learned the hard way...). Please be careful when pouring the hot caramel over the nuts and make sure not to touch it until it has completely hardened!
- Photo 7: Leave for 30 minutes to 1 hour, or until the caramel has completely solidified and turn hard. At this point, you should be able to easily break it into smaller chunks. You can also use a large sharp knife to chop it.
Small shards of hardened sugar can be quite sharp so be careful once again - it could cause small cuts.
- Photo 8: Place all the chunks of caramelised nuts in the bowl of your food processor.
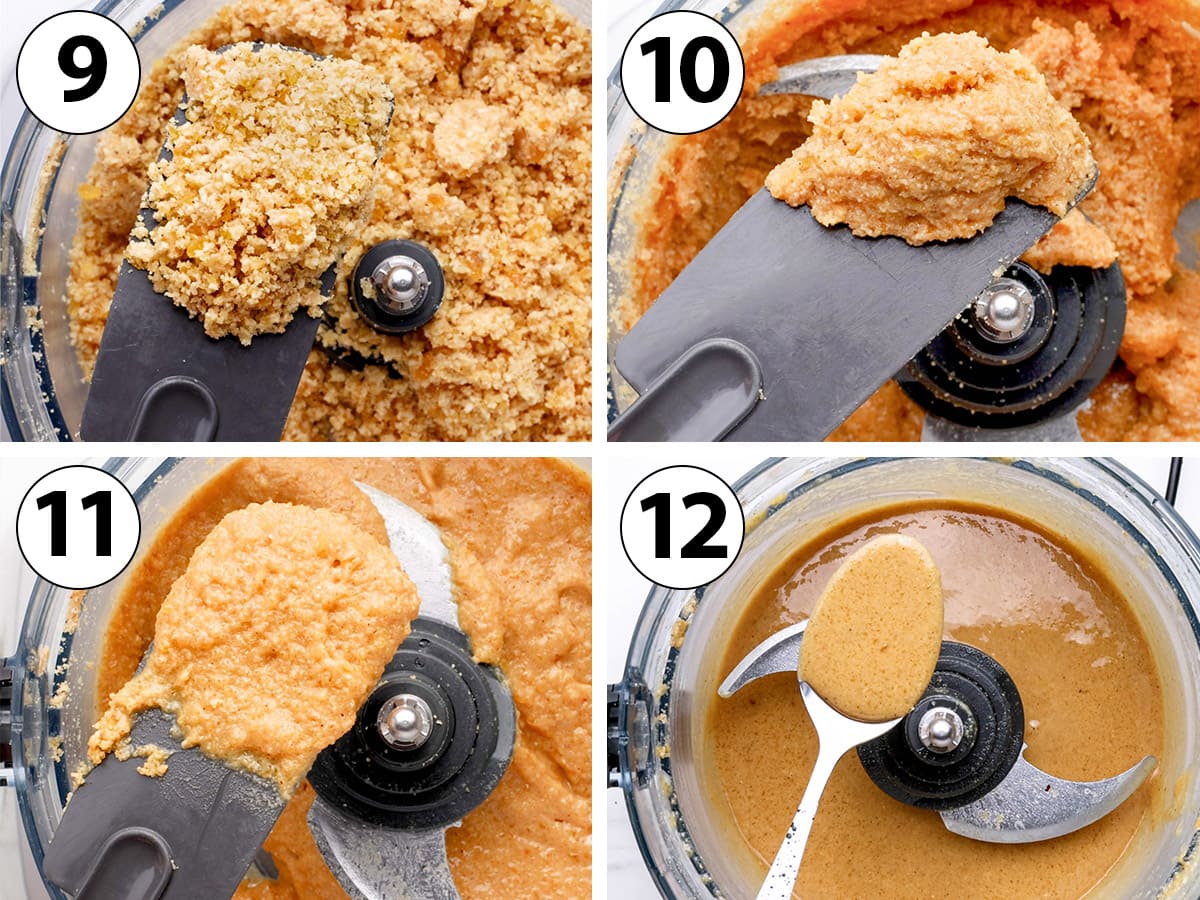
- Photo 9: Turn on the food processor on low (or pulse) to start breaking the nuts and hard caramel. Make sure the food processor is on a secured surface as it might move / shake a fair bit at this point. Process for a few minutes or until the mixture turns into a rough powder. At this stage, you've made "Pralin"!
The pralin powder can be used on its own as a topping for desserts, ice cream, pastries,....
Tip: if the food processor struggles at the start and the nuts remain quite hard after a few minutes of processing, you can add about a tablespoon of neutral oil (such as Grapeseed Oil or Canola Oil) to help turn the texture from a powder to a paste.
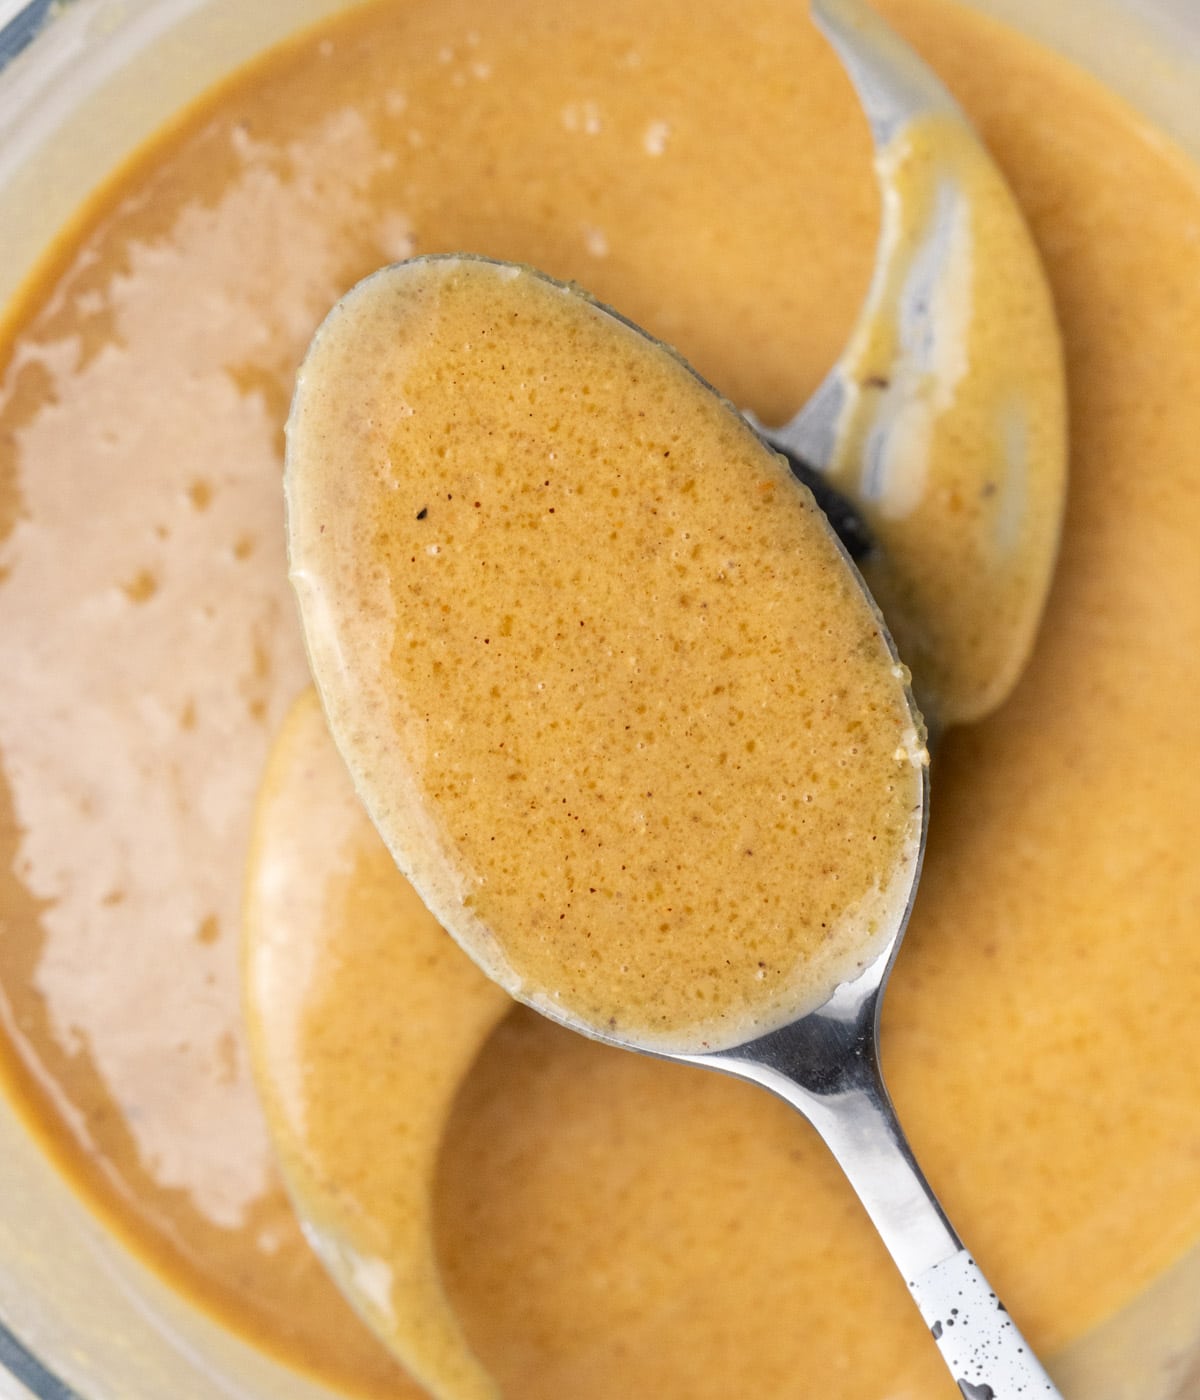
- Photo 10 to 12: Continue to blend on medium to high speed for 15 - 20 plus minutes; the exact time will depend on how powerful your food processor is. The powder will slowly turn into a very thick paste, then a thinner paste until it reaches a completely liquid stage as the nuts heat up and release their natural oil.
You might need to stop the food processor and let it cool down during the process if it starts to over-heat (very common). Don't push the machine too hard or it might break; better to let it cool down and start again than try to rush the process!
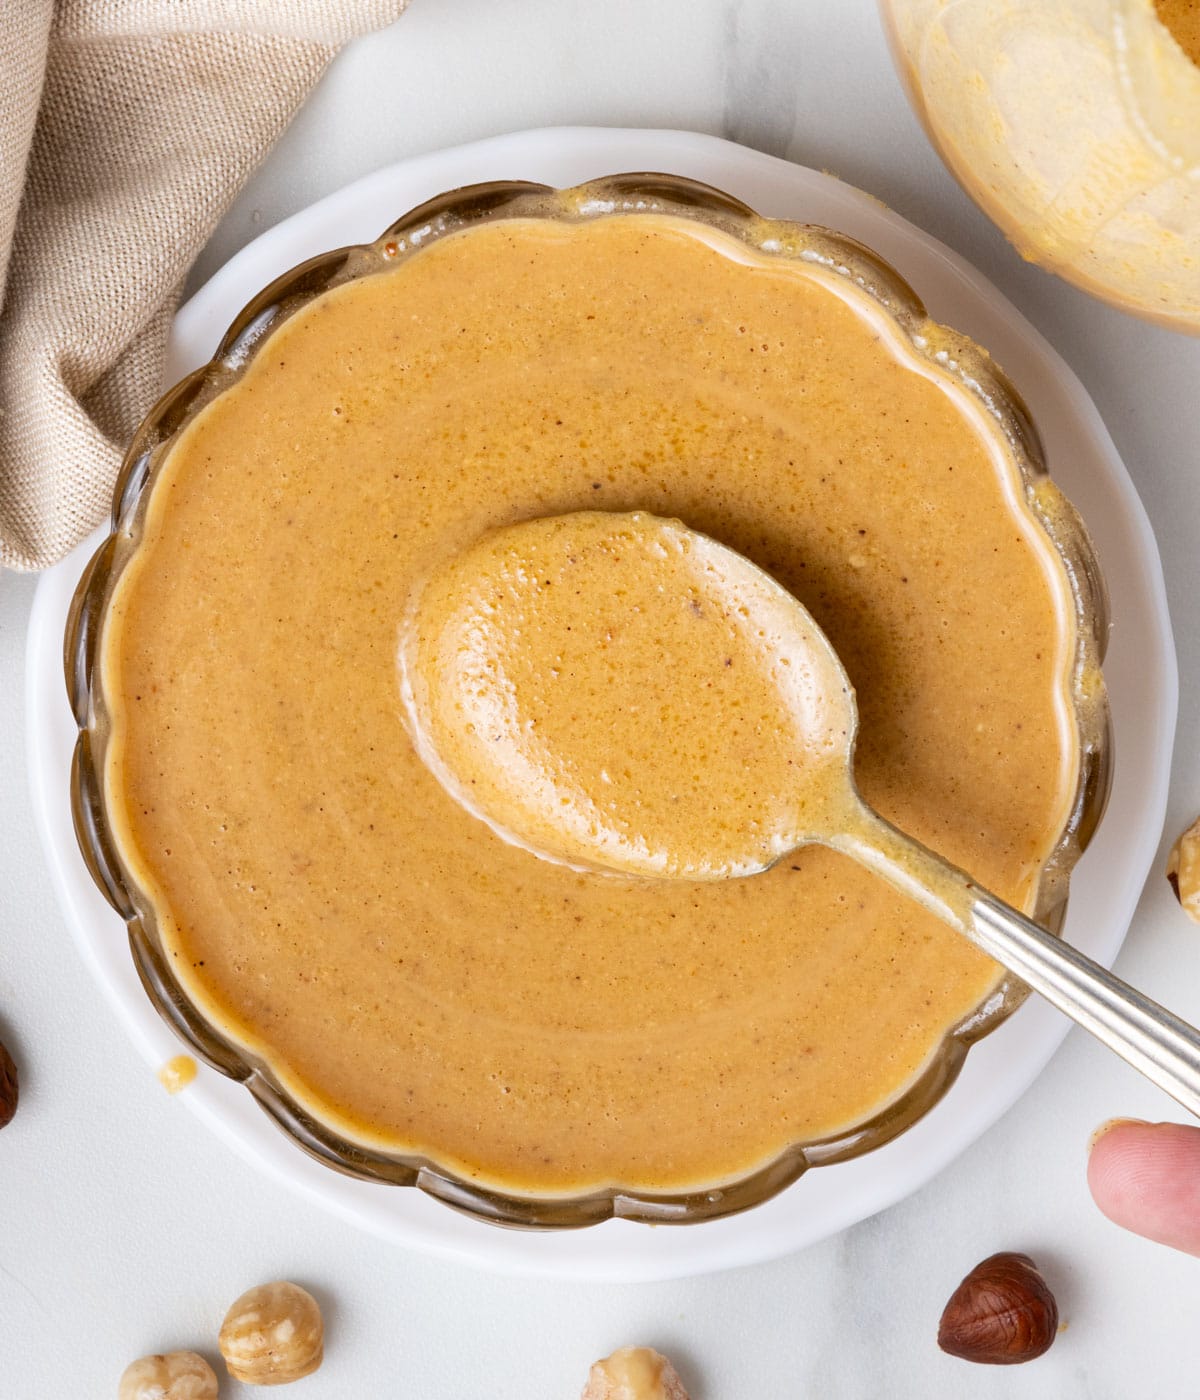
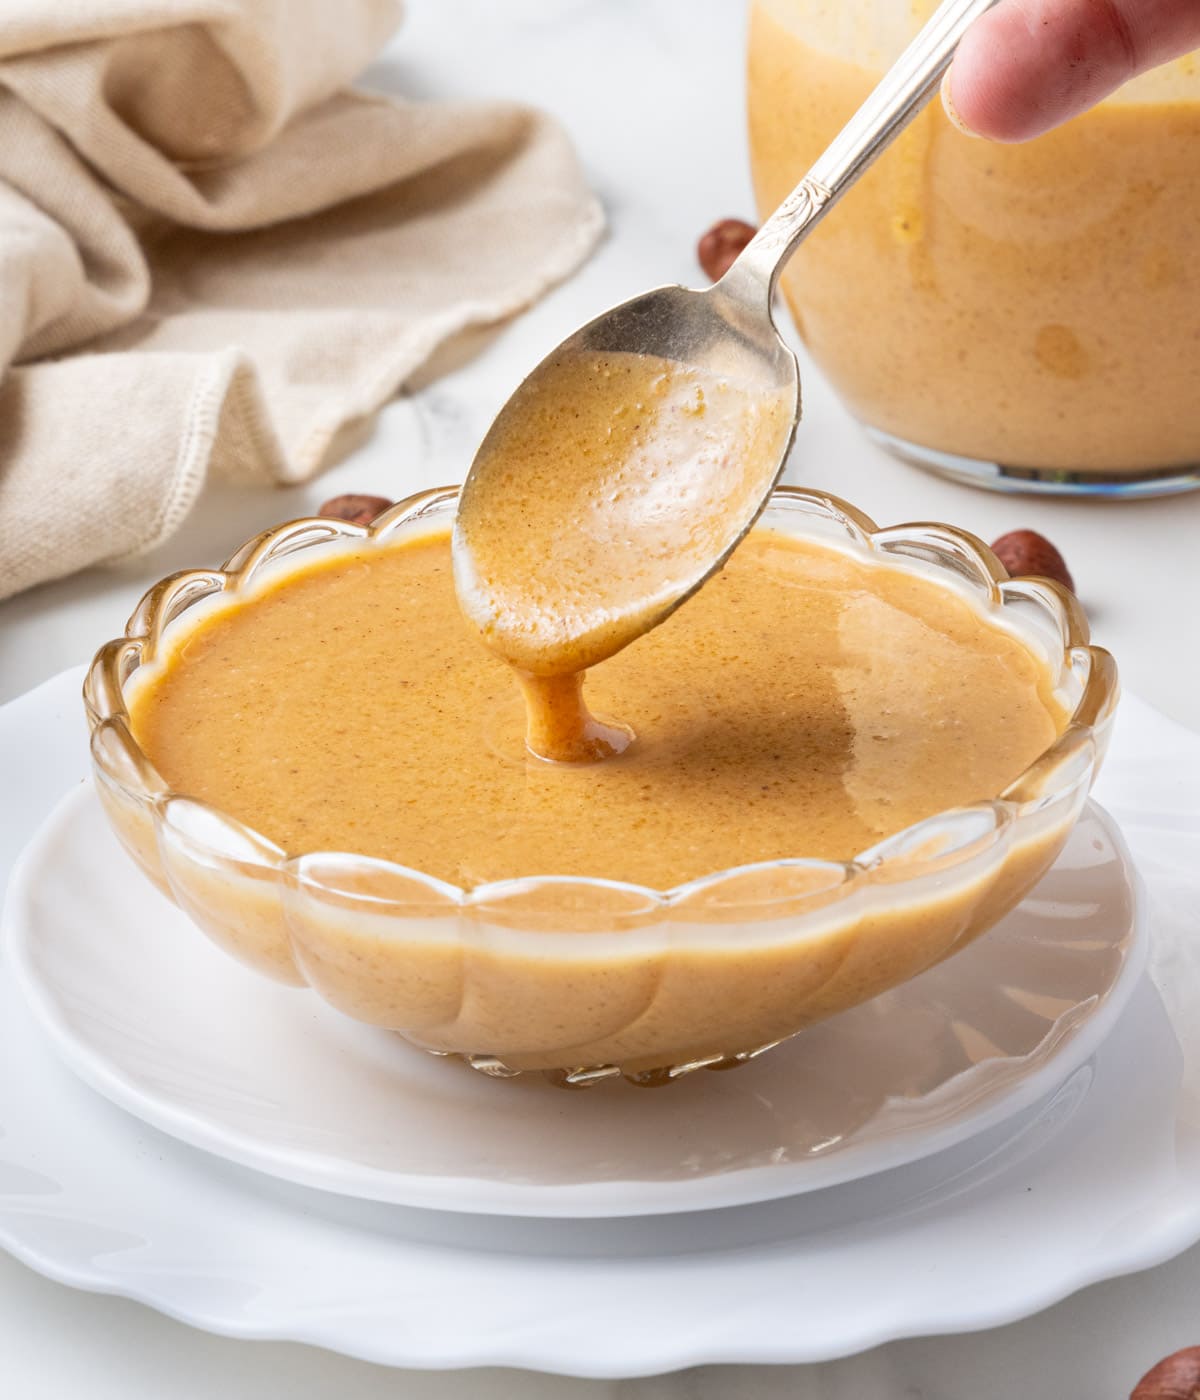
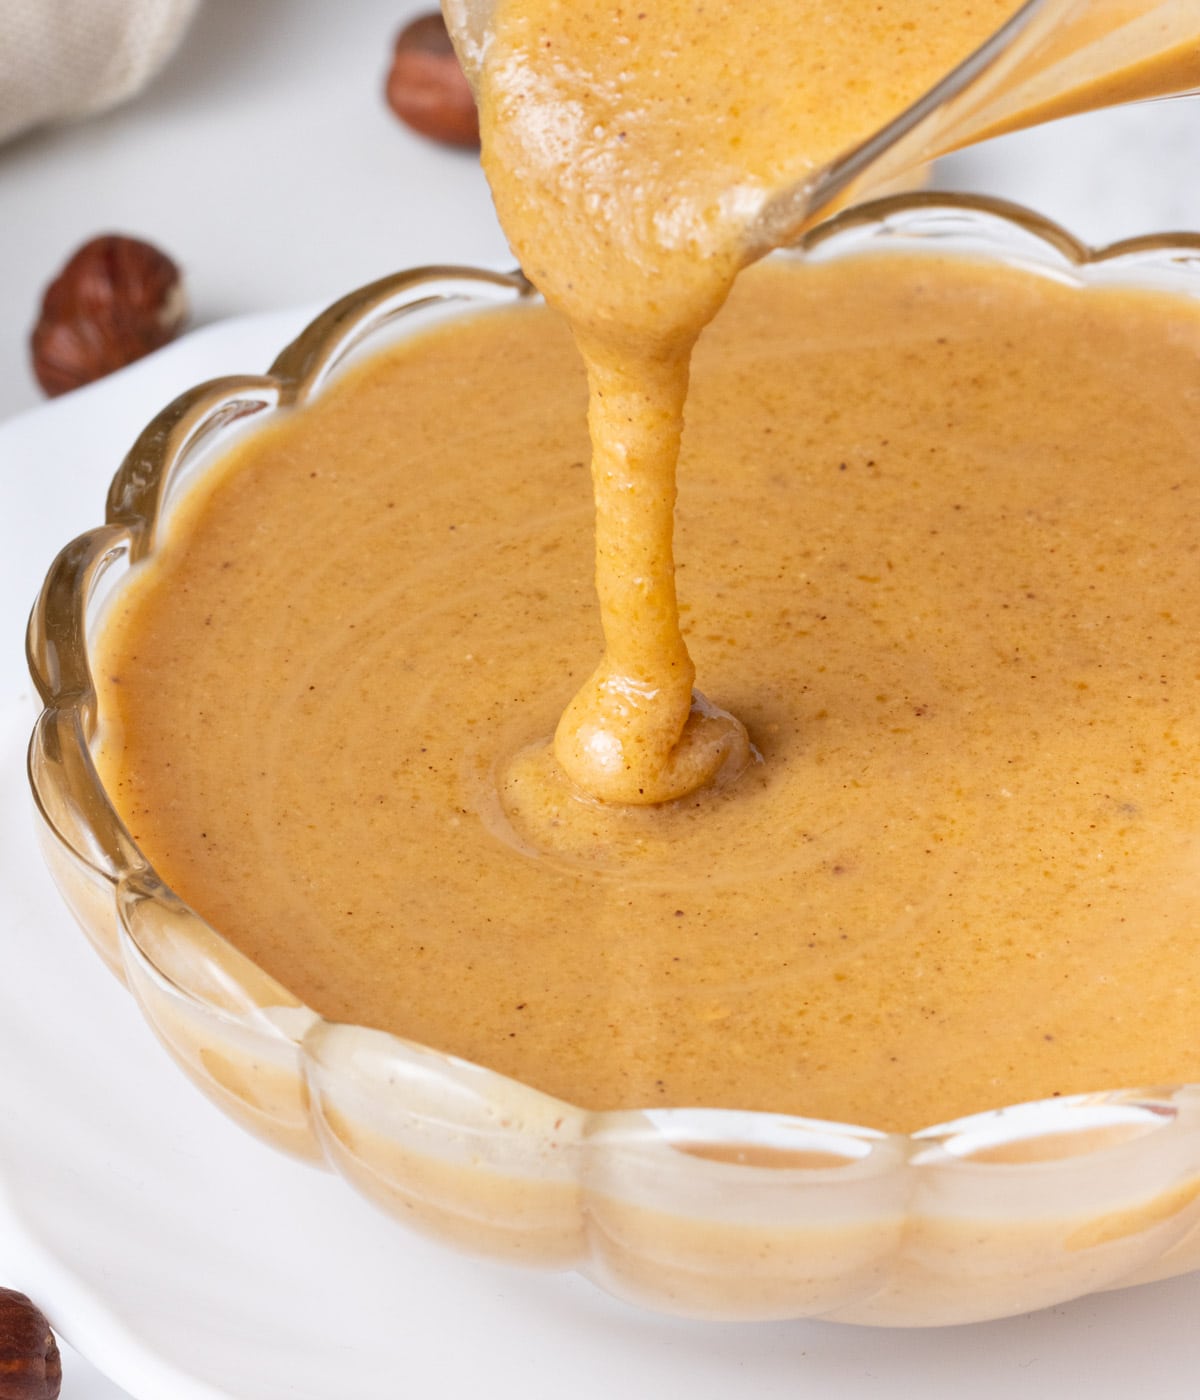
- You can blend the praline paste more or less depending on the consistency you are after. A slightly rougher, crunchy consistency is completely acceptable here if that's the texture you are after!
- Once ready, the hazelnut praline paste can be used straight away or transferred into a jar or airtight container and kept at room temperature (for a week or two) or in the fridge for a few months!

Recipe FAQs
Praline: candied nuts (usually almonds of hazelnuts), made by slowly roasting nuts with sugar in a large saucepan to enrobe them in a caramelised shell coating. When adding pink (or red) food colouring, you get "Praline Rose" - a speciality from the city of Lyon in France.
Note that French Pralines are different than American Pralines, a confectionery usually made from Pecans, sugar, cream and butter.
Chocolate Praline: a traditional Belgian chocolate bonbon filled with a variety of fillings such as ganaches, creams, fruits, caramel... or even praline paste!
Pralin: a thick, crunchy powder (more or less coarse) made from blending roasted nuts and hardened caramel. It is the texture you get during the first stage of blending praline paste. It is used as a dessert topping.
Praline Paste: a thick, more or less liquid and smooth paste made from blending roasted nuts and caramelised sugar.
Unfortunately, no. You will also need a rather powerful food processor to get the right paste consistency. Thermomix blenders are often used nowadays.
There is no right or wrong texture here - it simply depends on your preference and how you plan on using the hazelnut praliné. You can keep it a bit more thick and crunchy or continue to blend until liquid and smooth, it's up to you!
Note that depending on your food processor, you might simply not be able to get an extremely smooth, liquid paste.
Absolutely! Although the most common praline paste are made from almonds or hazelnuts (or a mix of both), you can basically use any nut and even some seeds: pistachio, walnuts, pecans, cashews, peanut, macadamia, sesame seeds, pumpkin seeds,...
Tips & Tricks
- The sugar has clumped and hardened in the saucepan: means that the sugar has crystallised rather than melted. I find that this can happen when the sugar is being disturbed either by movement (unnecessary stirring) or sudden change of temperature. It can also happen with some non-stick pan coatings or if the water has evaporated too quickly. To fix it, you can try to add some water to dissolve and break up the clumps. It is sometimes easier to just start again.
- The nuts aren't turning into a paste: as mentioned before, the food processor you use needs to be rather powerful to turn the caramelised nuts into a paste. If the food processor is struggling to pass the first powder ("pralin") stage, a simply trick is to add a little bit of neutral oil such as Grapeseed or Canola Oil.
- The paste is grainy: simply keep blending - allowing for your food processor to rest and cool down if it starts to overheat. But note that unless you have an extremely powerful (or commercial) mixer, it is hard to get a completely smooth paste. And having some added crunch to the praline paste is actually delicious if you ask me!
- My food processor is over-heating: this will often happen with a residential food processor - it's completely normal! Simply turn off the machine and let it cool down for a few minutes (or more if needed) before starting again.
How to use Praline Paste
- To flavour creams, frosting and buttercreams: add it to Crème Pâtissière, Bavarian Cream, Diplomat Cream or straight into your favourite buttercream. In its most classic use, praline paste is added to Mousseline Cream to make a Paris-Brest filling (Praline Mousseline Cream).
- Use as a spread on toast, as a cake filling or turn into a decadent filling for cookie sandwiches, macarons and more by mixing it to melted chocolate or chocolate ganache.
- Swirl into vanilla or chocolate cake like my Chocolate Hazelnut Cake, cheesecake or even brownies.
- Use as a filling for pastries and desserts such as Crêpes, Choux au Craquelin or Brioche Donut.
- As a sauce drizzled over ice cream, pancakes, waffles and more!
Storing & Freezing
Because hazelnut praline paste has a high content of sugar, it will preserve for a very long time! When ready, transfer it into a jar or air-tight container. Keep it in a cool, shaded spot at room temperature for a week or two or in the fridge for a couple of months. If the paste and oil starts to split, give it a quick stir before using.
You can also freeze the praline paste, though it might not really be necessary since it lasts for so long in the fridge!
More basic French Pastry recipes
Made this recipe?
Let us know if you liked it by leaving a comment below, and tag us on Instagram @a.baking.journey with a photo of your creation!
Recipe

Hazelnut Praline Paste
Equipment
- 1 Food Processor
Ingredients
- 200 gr Raw Hazelnut, with skin or blanched
- 200 gr Caster Sugar
- 30 ml Water
- 1/2 teaspoon Sea Salt
- 1 tablespoon Neutral Oil such as Grapeseed or Canola, optional - see note 4
Instructions
- Preheat your oven on 180 degrees Celsius / 350 degrees Fahrenheit. Spread the hazelnuts into a single layer over a lined baking sheet. Place in the oven and leave to roast for 8 to 10 minutes. The hazelnut skin should turn darker and have started to crack. Remove from the oven and place on a cooling rack.
- If using hazelnuts with the skin on, carefully rub the hot nuts inside a clean tea towel to remove their skins (see note 1). Discard all the skins and place the nuts back on the baking tray. Set aside.
- In a large saucepan, combine the sugar and water. Turn on medium to medium-high heat and leave for 10 to 15 minutes without touching the sugar at all. The sugar will slowly melt and start bubbling then eventually turn a golden amber colour (see note 2). Make sure to stop once the caramel gets the desired colour or it might taste bitter and/or burn.
- Turn off the heat, add the salt and stir with a heat-proof spatula to dissolve it.
- Directly pour the caramel on top of the nuts over the lined baking sheet. Don't worry if it does not fully cover all the nuts.Warning: the caramel will be extremely hot and can cause bad burns (I have learned the hard way...). Please be careful when pouring the hot caramel over the nuts and make sure not to touch it until it has completely hardened!
- Leave for 30 minutes to 1 hour, or until the caramel has completely solidified and turn hard. Break or chop into chunks (see note 3) and transfer in the bowl of your food processor.
- Turn on the food processor on low (or pulse) to start breaking the nuts and hard caramel. Make sure the food processor is on a secured surface as it might move / shake a fair bit at this point. Process for a few minutes or until the mixture turns into a rough powder. At this stage, you've made "Pralin".
- Continue to blend on medium to high speed for 15 to 20 + minutes; the exact time will depend on how powerful your food processor is (see note 4 if the mixture remains hard or powdery and does not start to turn into a paste). The powder will slowly turn into a very thick paste, then a thinner paste until it reaches a liquid stage. If your food processor starts to over-heat, stop and let it cool down before starting again.
- Blend the praline paste more or less depending on the consistency you are after: from a slightly crunchy consistency to a smooth liquid.
- Use straight away or transfer into a jar or airtight container and kept in a cool, shaded spot at room temperature for a week or two - or in the fridge for a few months.
Video
Would you like to save this recipe?
Notes
- Don't worry if some of the skin does not peel off - it's fine! You could also keep the skin if preferred, but it will give a slightly more bitter taste to the paste.
- If the sugar turns into a dry, lumpy paste and does not melt, it means the sugar has crystallised again. To fix it, you can try to add some water to dissolve and break up the clumps. It is sometimes easier to just start again.
- Small shards of hardened sugar can be quite sharp so be careful once again - it could cause small cuts.
- if the food processor struggles at the start and the nuts remain quite hard after a few minutes of processing, you can add about a tablespoon of neutral oil (such as Grapeseed Oil or Canola Oil) to help turn the texture from a powder to a paste.


