

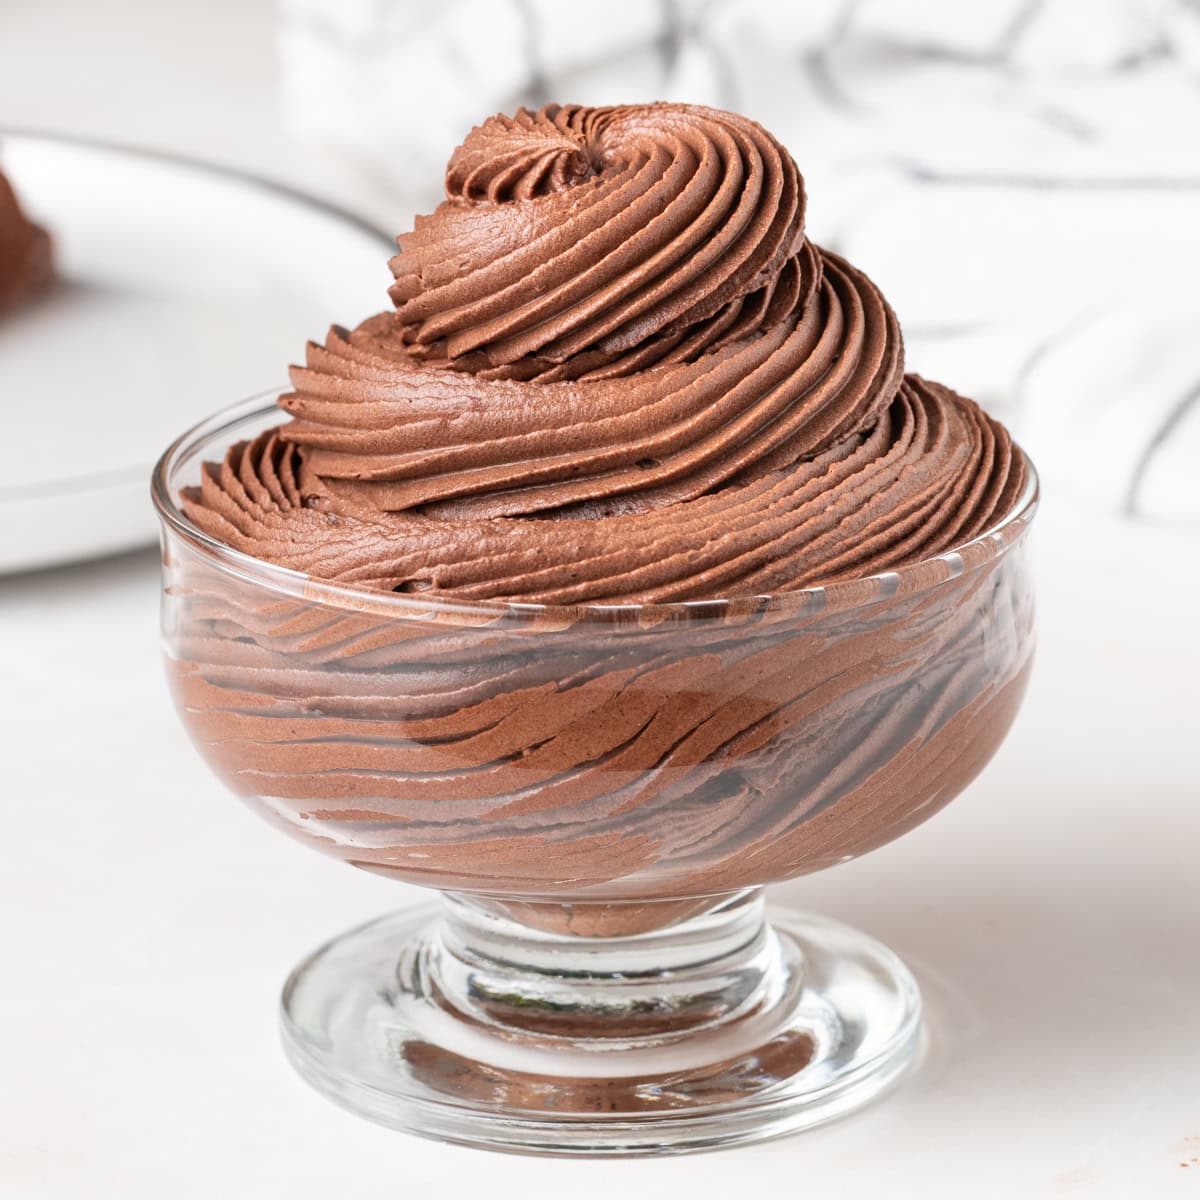
This Chocolate Whipped Cream Frosting recipe is super easy to make with 3 ingredients and in less than 10 minutes. With its deliciously creamy texture and intense chocolate flavour, it is a great frosting to use over cakes, cupcakes and desserts - or simply eat by the spoonful!
Jump to:
Why we love this recipe
If you are after a chocolate frosting that is:
- Super quick and easy to make.
- Has a light and fluffy texture but intense chocolate taste.
- Is made with no butter, no eggs and no gelatine.
- Is not overly sweet.
This chocolate whipped cream recipe is for you!
Ingredients
What is Chocolate Whipped Cream made of:

Scroll down to recipe card below for all quantities
Ingredient Notes:
- Cream: Heavy Whipping Cream / Thickened Cream that contains at least 30% fat (preferably 35%). A cream with a lower fat percentage will not whip properly and deflate after being whipped.
- Sugar: Powdered Sugar or Confectioners Sugar are best to use here as it will easily dissolve into the cream, as opposed to granulated sugar. You could use Icing Sugar instead (that contains a small amount of starch/cornstarch) as well - it can sometimes help with stability.
- Cocoa Powder: Raw, Dutch-processed or Natural cocoa powder. Because the mixture is not baked along with another ingredient that would react to it (ie: baking soda), the type of cocoa powder you use is more based on taste preference.
Note that the type of cocoa powder you use can give your frosting a different flavour, and you might need to adjust the level of sweetness accordingly:
- Natural Cocoa Powder: slightly acidic in taste, lighter in colour.
- Dutch-processed Cocoa Powder: less acidic flavour, richer in chocolate taste, darker in colour.
- Raw Cocoa Powder: slightly bitter but intense taste, lighter in colour.
Optional addition: vanilla extract and/or a bit of sea salt. For a different flavour, you could also add some fruit zest or even pre-infuse the cream with some coffee.
How to make chocolate whipped cream

I highly recommend using cold utensils as well as ingredients. If using a metal bowl for example, place it in the freezer for 10 minutes before making this recipe. With a glass bowl, chill in the fridge for 20 minutes. The whisk attachment can also be chilled before use.
- Photo 1: Pour the very cold cream in a large mixing bowl (if using a hand mixer) or the bowl of your stand mixer fitted with the whisk attachment. Optionally, add the vanilla.
- Photo 2 & 3: Sift in the powdered sugar and cocoa powder, making sure no lumps remain at all. You can also mix the cocoa and sugar in a separate bowl first then sift it in together.
- Photo 4: Start whipping the cream on low speed until the powders have been incorporated, stopping to scrape the bowl with a spatula if needed. Increase to medium high speed and whip for about 3 minutes or until you reach medium / medium-stiff peaks.
Don't over-whip the cream or it will turn slightly grainy. The cocoa acts as a stabiliser so it does not actually need to be whipped all the way to stiff peaks!
Would you like to save this recipe?
- The cream will whip much faster than your usual whipped cream because of the cocoa powder. Make sure to keep an eye on it and stop whipping as soon as the cream gets thicker. You should see "waves" on top of the cream. Optionally, you can also finish whipping the cream by hands with a whisk.
- If not used directly, cover the cream with plastic wrap touching its surface and keep to chill in the refrigerator until ready to use.

Recipe FAQs
Because the cocoa is not used for leavening purposes (as used in baked goods), the type of cocoa powder you can be based on taste and colour preference:
- Raw Cocoa: slightly bitter but intense taste, lighter in colour.
- Dutch-Processed Cocoa: less acidic flavour (because treated with alkaline solution), richer in chocolate taste, darker in colour.
- Natural Cocoa: slightly acidic in taste, lighter in colour.
- Black Cocoa: an extra-alkalised dutch-processed cocoa, very dark in colour but mild in chocolate flavour. Not recommended here.
I find that adding melted chocolate directly into whipped cream creates a less optimal texture as the temperature difference between the two mixture can make the chocolate seize and/or the cream to deflate.
For a version of whipped cream made with chocolate instead of cocoa powder, have a look at my Chocolate Whipped Ganache Frosting.
It simply depends on how you intend to use the whipped cream. Because the cocoa powder will make the cream more stable than regular whipped cream, I personally find that medium peaks give you the best results in terms of texture. Stiff peaks can simply be... "too stiff" with a texture that is a bit hard and a cream that has a tendency to turn grainy.
Because of the use of cocoa powder, this frosting is actually relatively stable on its own! If you are looking for an even more stable frosting, you could either substitute about 20 to 30% of the heavy cream with mascarpone like for my Mascarpone Whipped Cream frosting. Alternatively, use a little bit of gelatine.

Troubleshooting
- The cream won't whip: can happen if you use a cream that contains less than 30% fat, or if your ingredient and/or equipments are too warm.
- The whipped cream is grainy or lumpy: the grainy texture could be due to the cocoa powder and/or icing sugar not being sifted enough. You could also get grain/lumps of the cream has been over-whipped, as the fat and water from the cream start to separate.
- The cream deflates after whipping: this can happen if the heavy cream does not contain enough fat. The fat is needed to stabilise air bubbles created during the whipping process. This can also happen in warm temperatures when that fat starts to melt.
Tips for Success
- Place the beaters / whisks and bowl of your stand mixer / hand mixer in the fridge (or even freezer for a few minutes) before whipping your cream. Using very cold equipment will help your cream whip faster and remain more stable. If too warm, the fat that wraps around the air bubbles created while whipping starts to melt, causing for your whipped cream to deflate.
- Make sure not to over-whip the cream or it will turn grainy and might split. Chocolate whipped cream whips much faster than regular chantilly cream. It is also a bit more stable, so no need to whip it all the way to stiff peaks - medium peaks will give you the perfect texture!
- Adjusting the ingredients to taste: because the type of cocoa powder can affect the overall flavour of the frosting, you might need to adjust the sugar quantity to suit your taste. I recommend tasting the cream once it has reached soft peaks and add powdered sugar at this stage if required.
Storing & Freezing
This chocolate whipped cream frosting will remain stable in the fridge for up to 3 days. Like all whipped cream, heat will affect its stability so it is recommended to keep it chilled until ready to use / serve.
This cream should not be frozen.

More Chocolate Cream Frostings
I am so excited to share that my debut cookbook
"Bite-Sized French Pastries for the Beginner Baker"
is now available for purchase!
Recipe

Chocolate Whipped Cream Frosting
Ingredients
- 75 gr Powdered Sugar
- 1 teaspoon Vanilla Extract (optional),
- 50 gr Unsweetened Cocoa Powder, raw, natural or dutch processed (see note 1)
- 360 ml Heavy / Thickened Cream, min 30% fat
Instructions
- Before you start, make sure the utensils you use are very cold. Place the bowl and whisk attachment in the fridge (with glass bowl) for 20 minutes or freezer (with metal bowl) for 10 minutes.
- Pour the very cold cream and vanilla (optional) in a large mixing bowl if using a hand mixer or the bowl of your stand mixer fitted with the whisk attachment.
- Sift in the powdered sugar and cocoa powder, making sure no lumps remain at all (see note 2).
- Start whipping the cream on low speed until the powders have been incorporated, stopping to scrape the bowl with a spatula if needed.
- Increase to medium high speed and whip for about 3 minutes or until you reach medium / medium-stiff peaks. Stop whipping as soon as the cream gets thicker and you see "waves" on top of the cream. Don't over-whip the cream or it will turn slightly grainy (see note 3).
- If not used directly, cover the cream with plastic wrap touching its surface and keep in the fridge until ready to use.
Video
Would you like to save this recipe?
Notes
- Because we are not baking the recipe (and the cocoa powder does not need to react with another ingredient for leavening purposes), the type of cocoa powder you use is more based on taste preference. You can use either raw, dutch-processed or natural cocoa powder here. You might need to adjust the sweetness level accordingly.
Natural Cocoa Powder: slightly acidic in taste, lighter in colour.
Dutch-processed Cocoa Powder: less acidic flavour, richer in chocolate taste, darker in colour.
Raw Cocoa Powder: slightly bitter but intense taste, lighter in colour. - You can also mix together the cocoa and sugar in a separate bowl first, then sift it over the cream.
- The cocoa acts as a stabiliser so it does not actually need to be whipped all the way to stiff peaks.
Nutrition (per serving)
Made this recipe?
Let us know if you liked it by leaving a comment below, and tag us on Instagram @a.baking.journey with a photo of your creation!


