
This easy French Apple Tart with shortcrust pastry (pâte sablée) is a delicious dessert to make in Winter and for the Holidays. The shortcrust pastry is filled with a simple applesauce and topped with thinly sliced fresh apples.

Jump to:
Why we love this recipe
If you are looking for a super easy apple tart recipe, you will not find an easier one than this one! Perfect to serve at a dinner party, bring to friends or for the Holiday season, this French apple tart is best served warm with a scoop of ice cream.
This tart is basically like a slightly more advanced version of my Puff Pastry Apple Tart and Mini Apple Tarts. They all have the same delicious flavours of apples and applesauce but this recipe has a crunchier base made from a Pâte Sablée (shortcrust pastry).
Ingredients
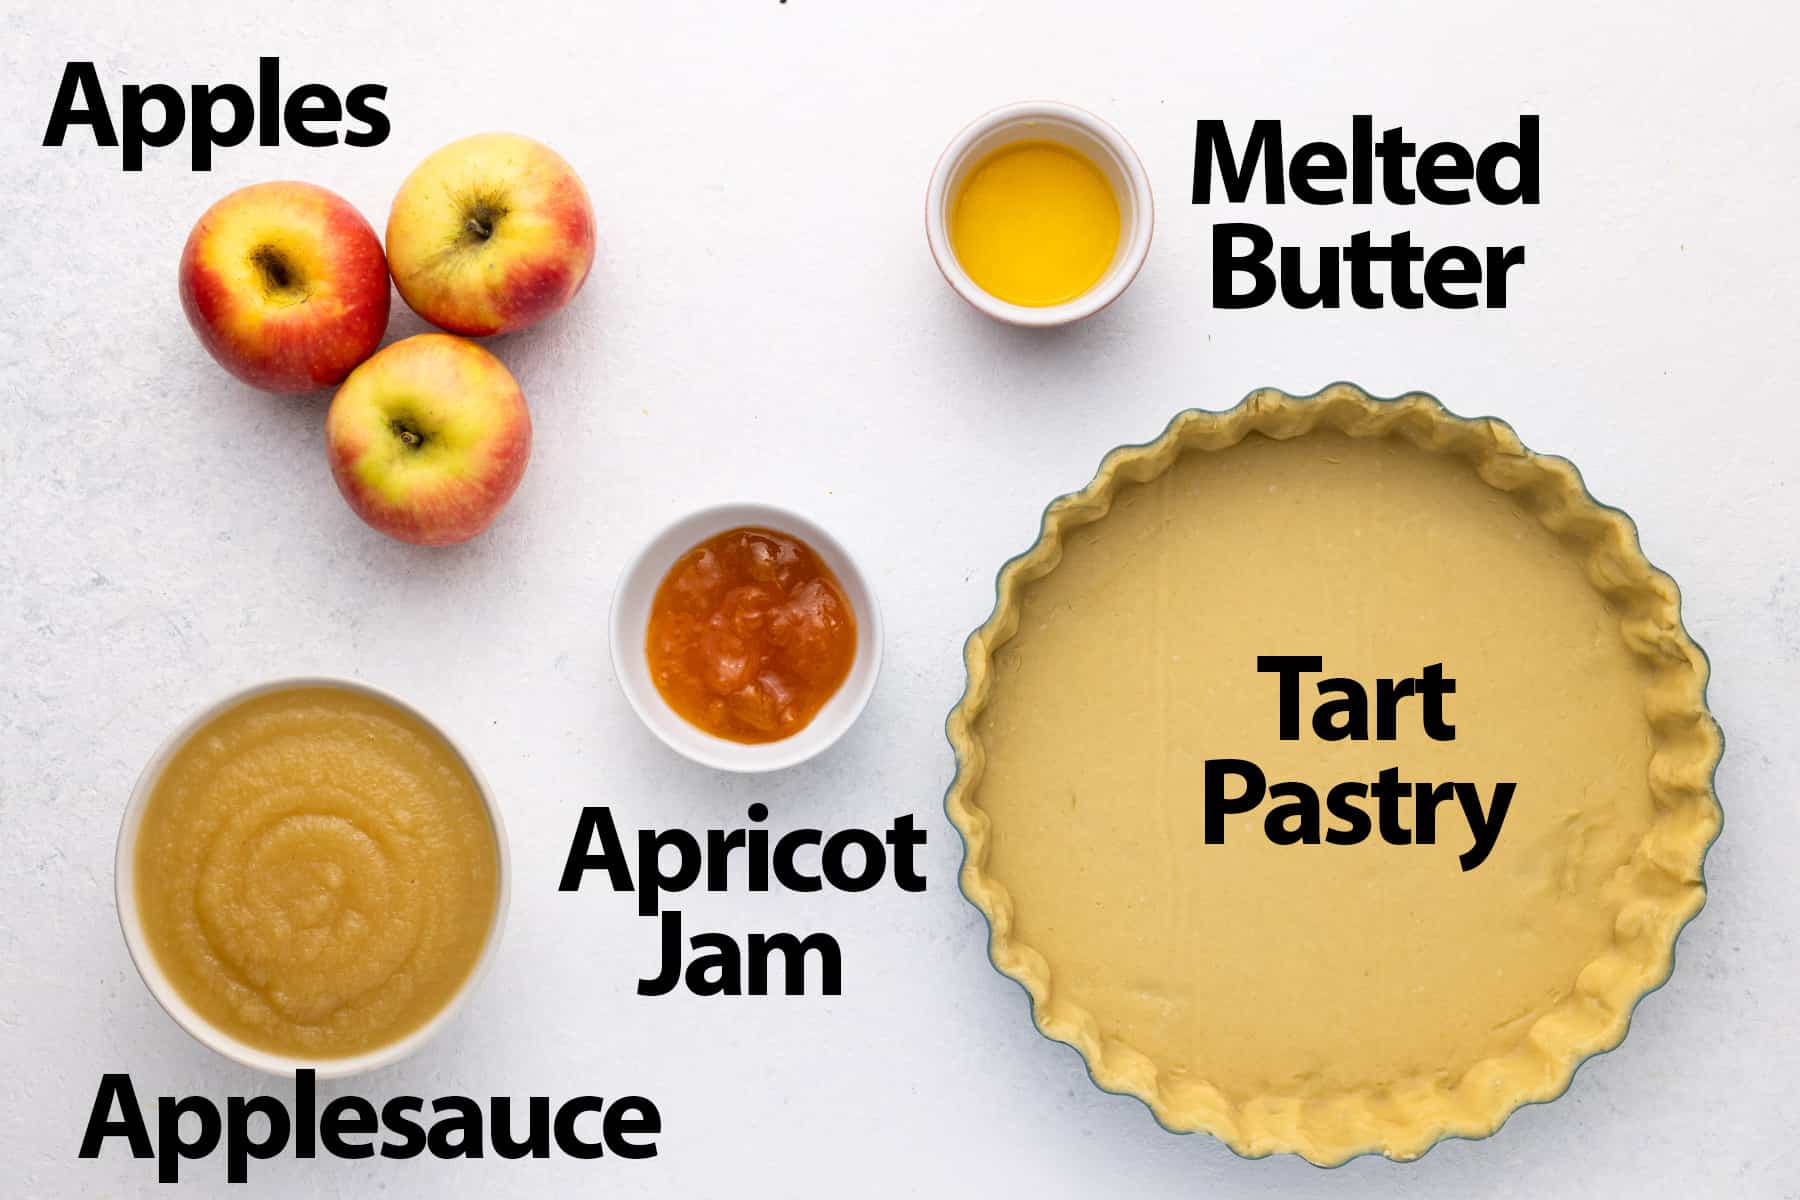
What is French apple tart made of:
For the shortcrust pastry:
- Plain / All Purpose Flour, Icing Sugar, Unsalted Butter (very cold) and a large Egg.
For the filling:
- Applesauce: preferably homemade! You can use either sweetened or unsweetened applesauce, smooth or chunky.
- Apples: I used Pink Lady Apples which offer the perfect mix of sweet and tart. The kind of apple you use will really change the taste of the dessert so it is up to you to pick the one you prefer!
Something like a Granny Smith will give a strong, acid taste to the dessert while a Crispin or Golden Delicious will add a lot of sweetness.
Make sure you read my "Best Apple for Baking Guide" to pick the right apple for you and your dessert!
- Lemon Juice: simply used to help the apple slices not turn brown.
- Butter: unsalted butter, melted - to brush over the apples before baking.
- Apricot Jam (or apricot jelly): optional, but a simple ingredient that will provide both a touch of sweetness and some shine to the apple tart.
How to make an Apple Tart
Sweet Shortcrust Pastry
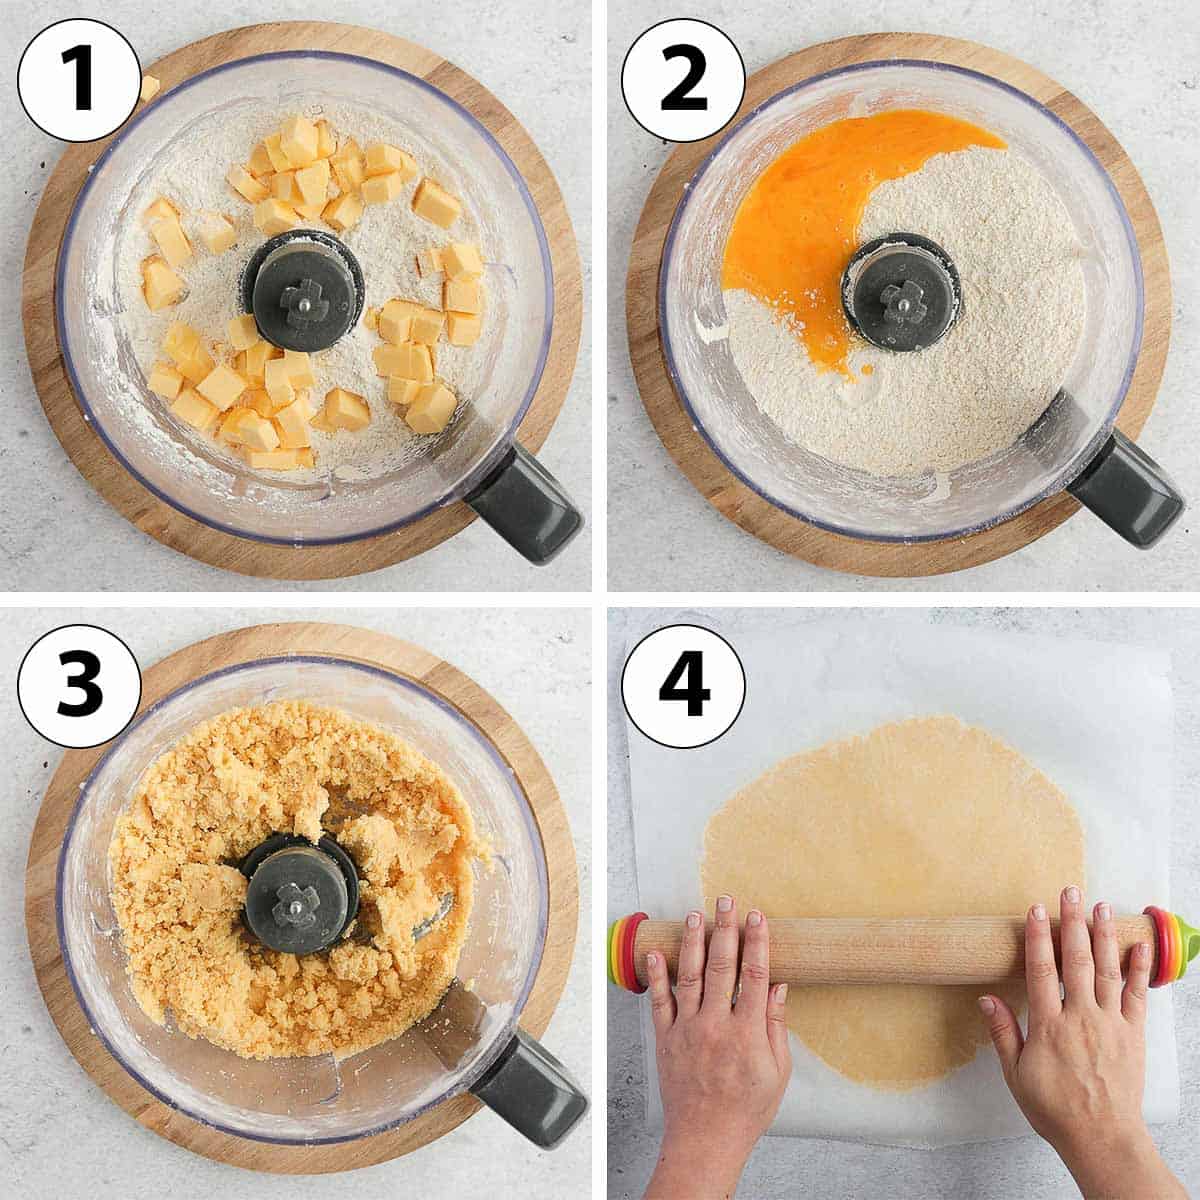
- Combine the Flour and Icing Sugar (and optionally a pinch of salt) in the bowl of your food processor and pulse to mix.
- Photo 1: Add the very cold butter, cut into small cubes. Pulse for a few seconds until you get very small crumbs of butter. The larger the chunks of butter, the flakier the pastry will be.
- Photo 2: Add the Egg. You can pre-whisk the egg in a separate bowl first if you want.
- Photo 3: Mix for 30 seconds to 1 minute, or until a rough dough starts to come together. If you press some of the dough between your fingers, the crumbs should stick together and create a smooth dough.
- Photo 4: Bring the dough together into a large ball and place it between two sheets of baking paper / parchment paper. Slightly flatten the dough with your hands. Using a rolling pin, roll into a large circle that is about 4 mm (1/6 inch) thick.
- Place the rolled pastry over a flat tray and chill in the fridge for at least 1 hour, or up to 24 hours.
Note that you can also make it by hands, using your fingers or a Pastry Blender to cut the butter into the dry ingredients.
Would you like to save this recipe?
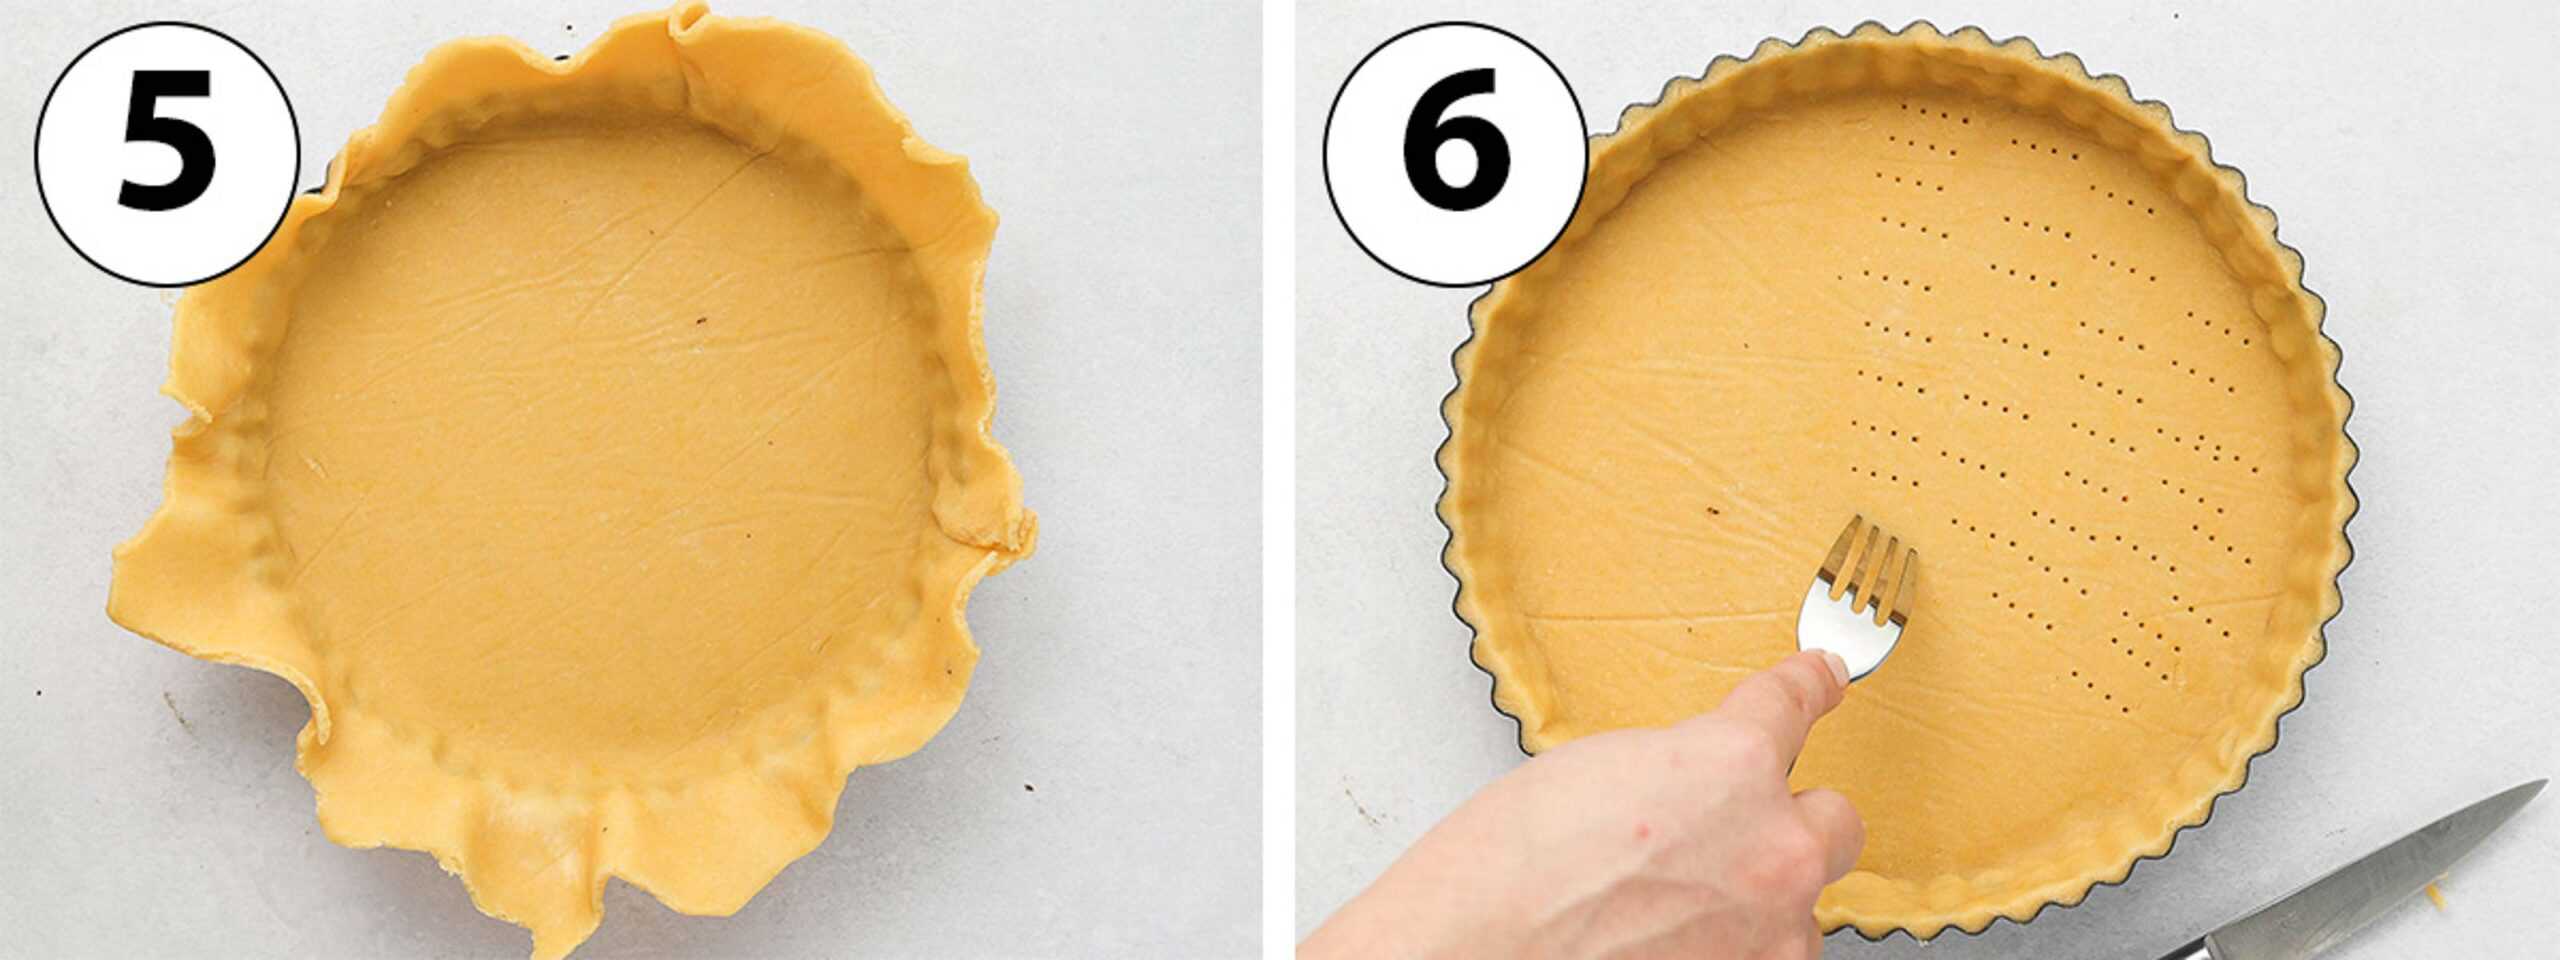
- Take the pastry out of the fridge and let it come back to room temperature for about 5 minutes (it shouldn't feel completely hard).
- Photo 5: Place the pastry over a 24 cm / 9,5 inch Tart Pan. Gently slide the pastry along the edges of the pan to create a 90 degree angle with the bottom. Press on every edge and corner to insure the pastry sticks to the pan.
For the best results, use a perforated tart pan with removable bottom - or perforated tart ring.
- Use a small knife to cut out any excess dough and smooth out the edges with your fingers.
- Place the pastry back in the fridge for at least 2 hour, preferably overnight (or up to 24 hours).
- Photo 6: Preheat your oven on 160 degrees Celsius / 325 degrees Fahrenheit. Dock the bottom of the pastry with a fork (poke small holes) and place the tart crust in the freezer while your oven is preheating.
- Cover the bottom of the pastry with some baking paper and fill with baking weights. Bake for 10 minutes, remove the weights and paper and bake for another 15 minutes. Take out of the oven and leave to cool down.
Tart Filling
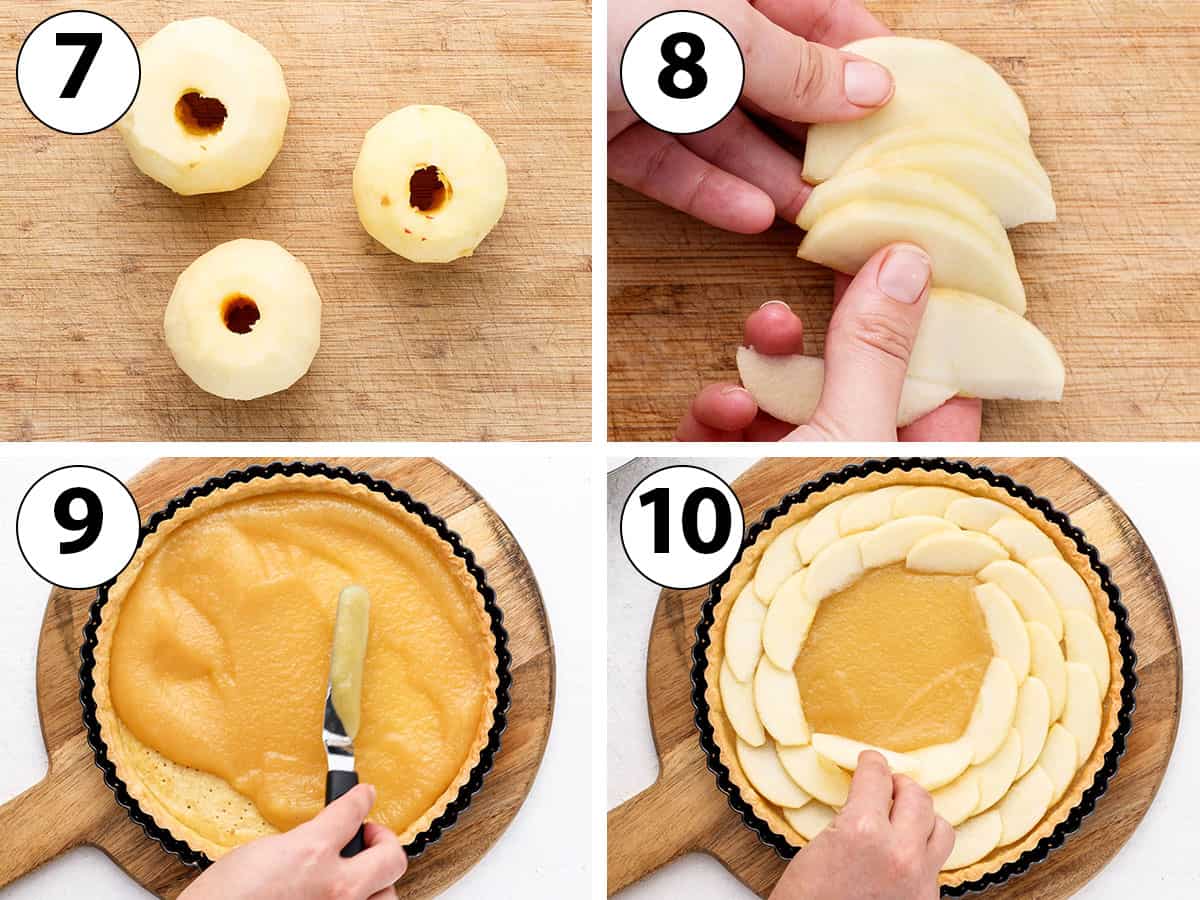
- Photo 7 & 8: Peel, core and cut the apples into four. Using a sharp knife or Mandoline Slicer, thinly cut each apple quarters into very thin slices. Place in a bowl with the Lemon Juice and toss to coat.
- Photo 9: pour the applesauce at the bottom of the par-baked tart pastry and spread it around into an even layer.
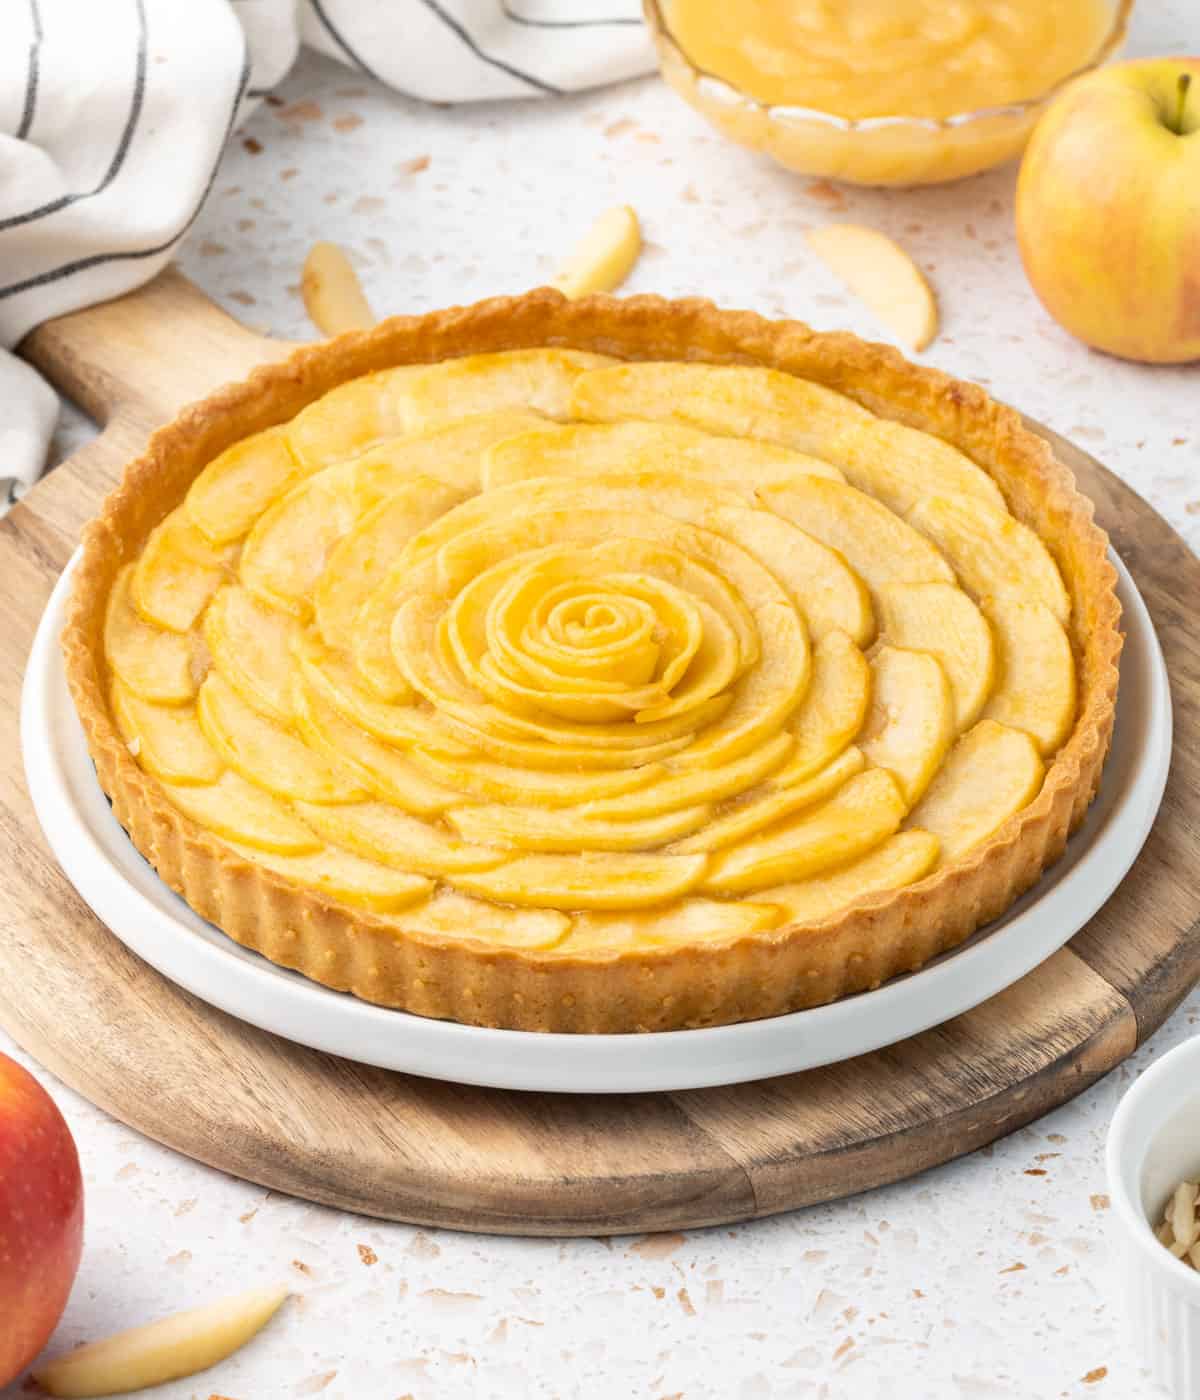
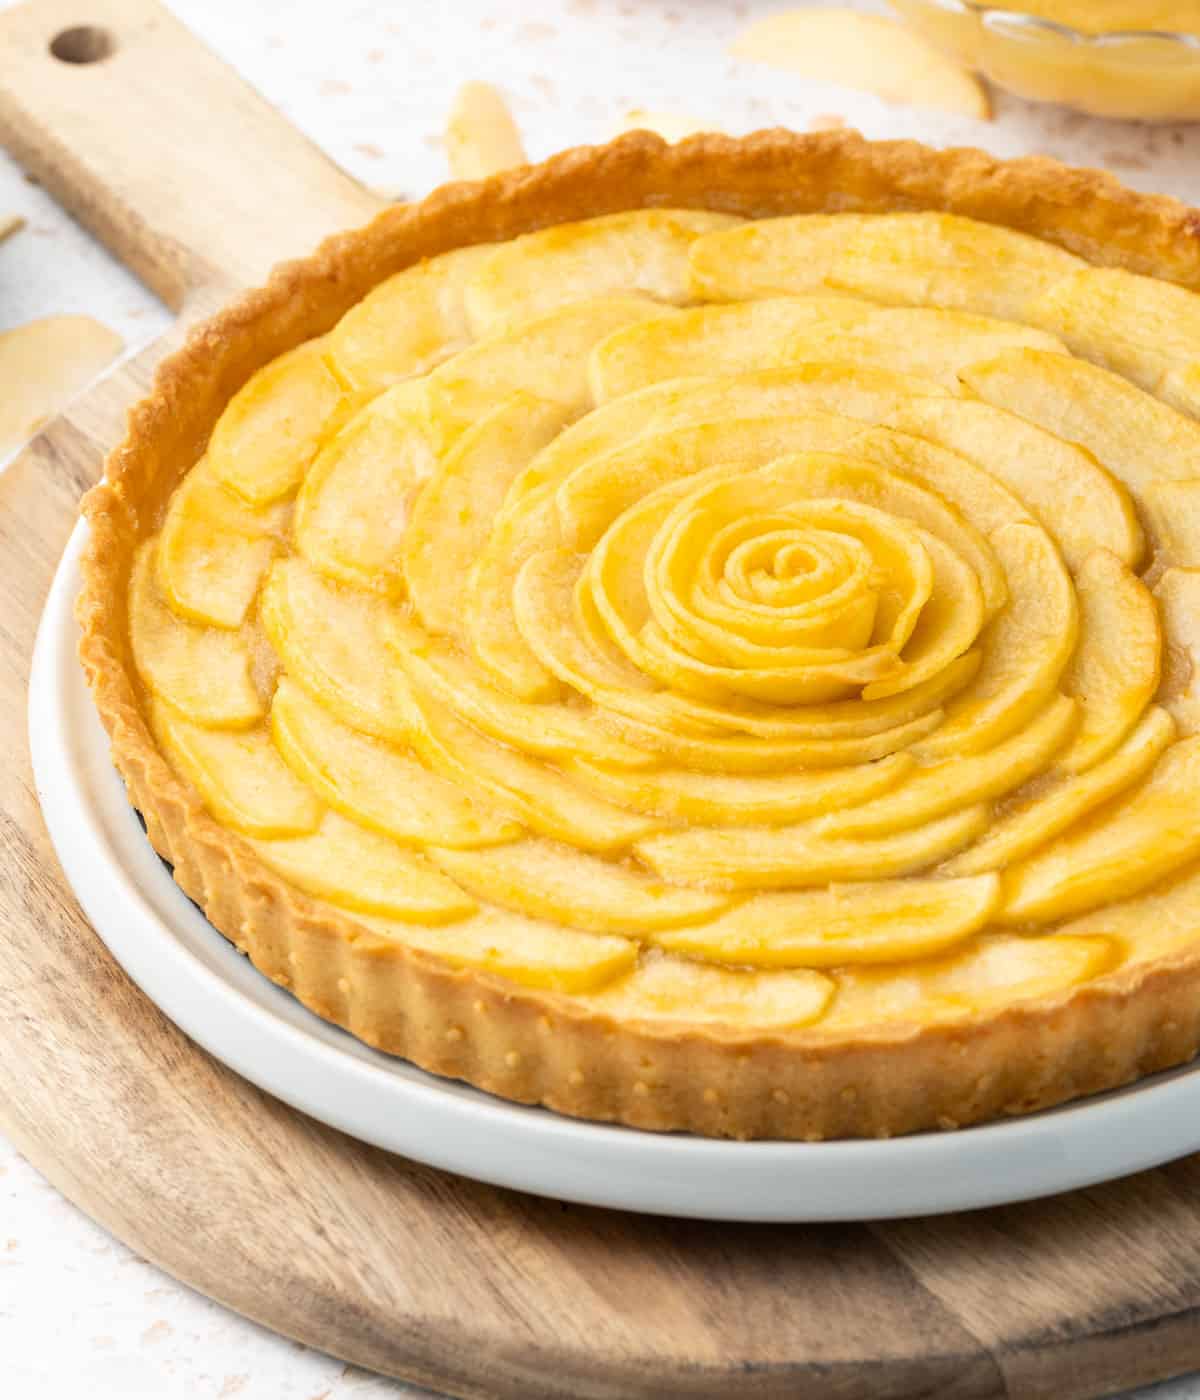
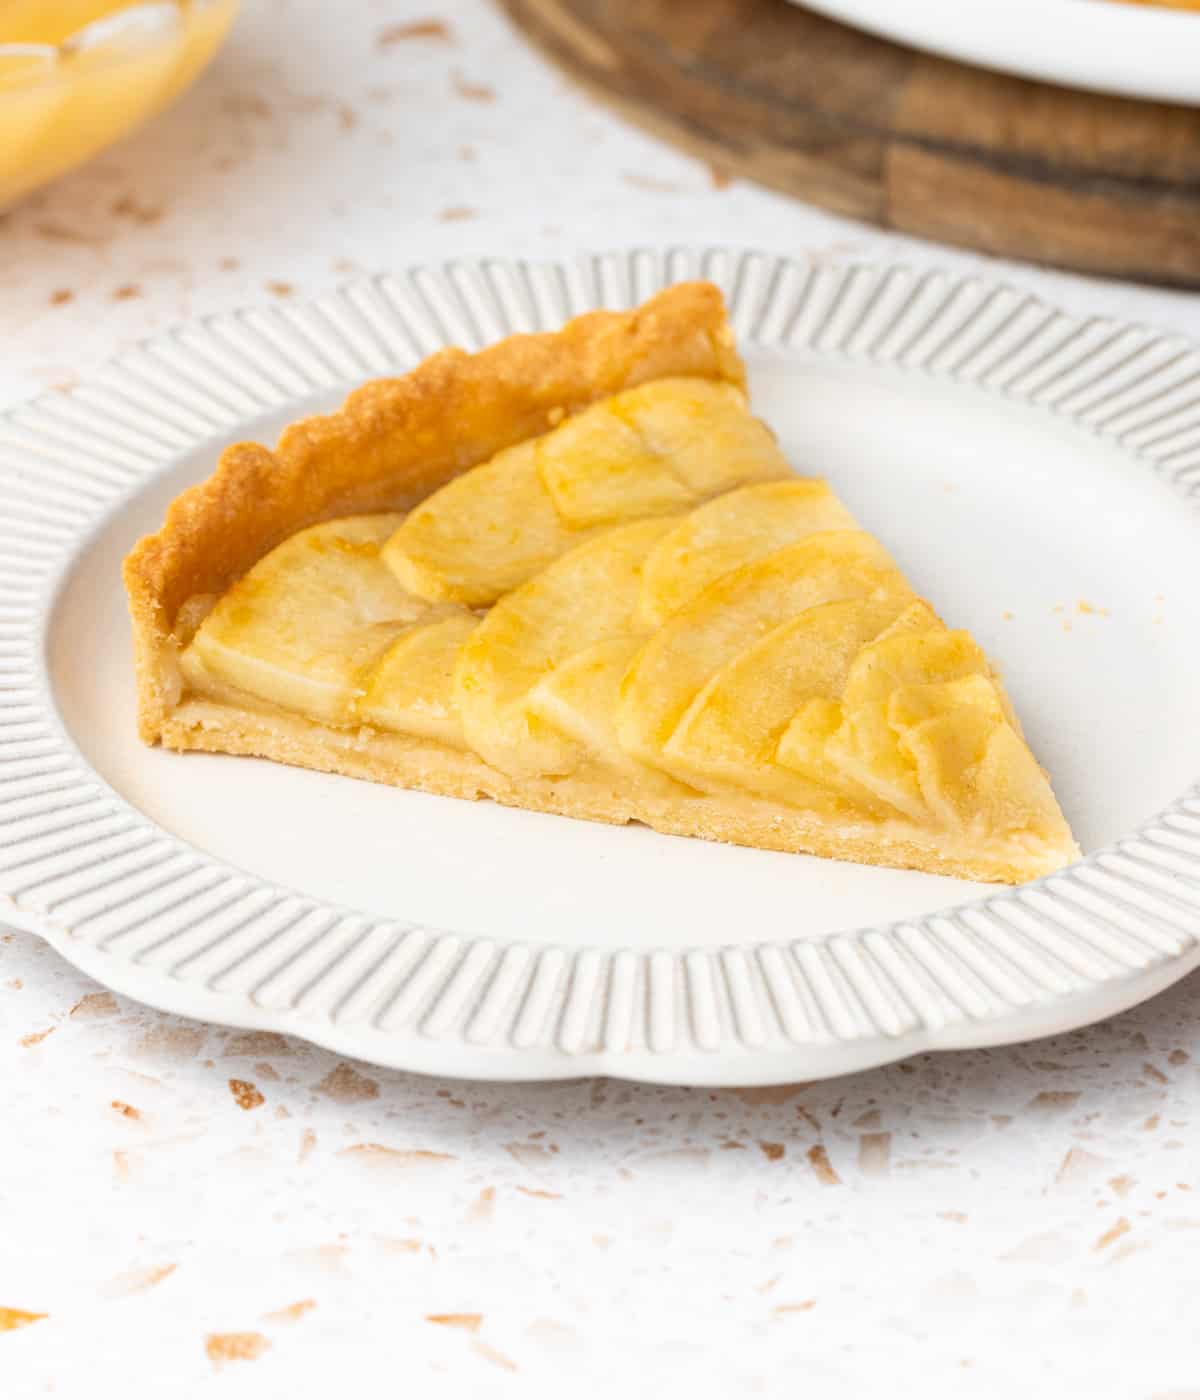
- Photo 10: Place the sliced apples in circles over the applesauce, starting from the edges of the tart and going towards the centre. Slightly overlap each circle. Once you get to the centre of the tart, roll a few slices around each other to create a rose pattern and place it in the middle.
If the apple slices are too stiff to roll into a rose shape, you can place them in a small bowl filled with water and microwave them for a few seconds to soften them. Make sure to drain them fully before adding over the tart.
- Brush the apple slices with some melted butter. Optionally, you could also sprinkle with some sugar or even mix the melted butter with sugar and cinnamon before brushing it over the apples.
- Bake at 160 degrees Celsius / 325 degrees Fahrenheit for 35 to 40 minutes, or until the apples are soft.
If the apples start to brown or burn too quickly, reduce the temperature of your oven.
- Optionally, when just out of the oven, brush the apple slices with the apricot jam diluted with a little bit of water.
Recipe FAQs
I personally love to make my own pastry but you can absolutely use a store-bought one if preferred. Make sure to use an all-butter shortcrust pastry for a similar result.
I used Pink Lady Apples which offer the perfect mix of sweet and tart. Apples such as Granny Smith will give a strong, tart taste while a Crispin or Golden Delicious will bring a lot of sweetness. Other options include gala, jonagold, fuji or honeycrisp apples.
You can check my "Best Apple for Baking Guide" to read about the different types of apples used in baking.
For a classic combination, serve the tart with a scoop of vanilla ice cream, some whipped cream, crème anglaise or Chantilly cream.
You could also top it with more Applesauce for even more apple flavours, or go with another fruit coulis or compote like a strawberry compote or blueberry coulis.
You could add some spices or vanilla to both the applesauce and the apple slices to add extra flavour to the apple tart.
You could also add a little bit of rum or calvados to the lemon juice in which the apple slices are getting tossed.
Storing
This tart is better eaten straight away, or within 24 hours. The Applesauce filling is rather liquid/wet and will start soaking the pastry straight away; which is not especially a problem for taste, but will change the texture of the pastry overtime.
If not eaten straight away, I recommend keeping this apple tart in the fridge for 24 hours (for an optimal texture) or up to 48 hours. Re-heat it a little bit in the oven at low temperature before serving it.
Freezing
Although technically, you could basically freeze anything, I do not recommend freezing this one. With the applesauce filling and the thinly sliced apples, it is a rather delicate dessert that would not do well in the freezer.
The pastry itself can be prepared in advance and frozen unbaked, inside the tart tin. Simply add 5 minutes to the blind-baking time to thaw the pastry in the oven.
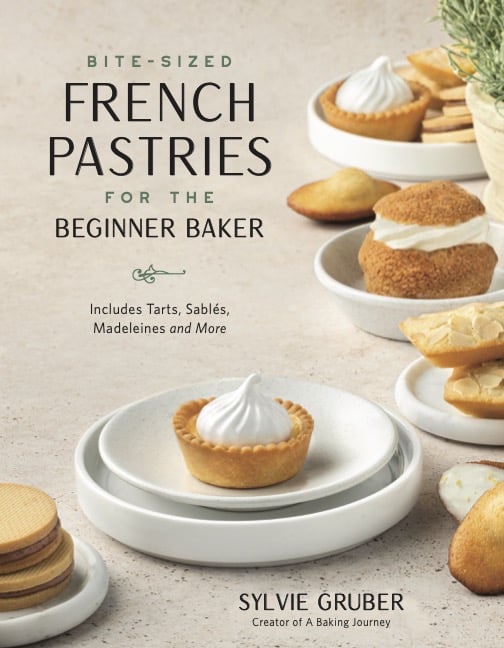
I am so excited to share that my debut cookbook
"Bite-Sized French Pastries for the Beginner Baker"
is now available for purchase!
Recipe

Easy French Apple Tart
Ingredients
Shortcrust Pastry (Pâte Sablée)
- 250 gr Plain / All-purpose Flour
- 50 gr Icing Sugar
- 1 pinch Fine Table Salt
- 120 gr Unsalted Butter, very cold, cubed
- 1 Egg
Apple Tart Filling
- 3 small Apples
- 1 teaspoon Lemon Juice
- 350 gr Applesauce, preferably homemade
- 20 gr unsalted butter, melted
Glaze (optional)
- 1 tablespoon apricot jam
- 1/2 tablespoon water
Instructions
Shortcrust Pastry
- Mix the Flour, Icing Sugar and Salt in the bowl of your Food Processor. Add the cold Butter cut into small cubes, then pulse to blend until you get very thin crumbs. You shouldn't see any large lumps of butter anymore.
- Add the Egg, preferably pre-whisked, and slowly blend until the dough starts to form (see note 1). Remove from the food processor and bring the dough together into a ball.
- Assemble the dough into a large ball and place it between two sheets of baking paper. Roll into a large circle that is 4mm thick (1/6 inch). Place the rolled pastry over a flat tray and leave in the fridge to rest and chill for at least an hour, or up to 24 hours.
- Remove the two layers of baking paper and place the pastry inside a 24 cm (9,5 inch) Tart Pan. Slide the dough along the edges of the pan and try to make sure you get a sharp 90 degree angle between the bottom and the sides of the pan.
- Place back in the fridge to rest and chill for at least 2 hours, preferably overnight (see note 2).
- Preheat your oven on 160 degrees Celsius / 325 degrees Fahrenheit. Dock the pastry (poke the bottom with a fork), cover with baking paper and fill with baking weights or dry beans. Bake for 10 minutes, remove the weights and baking paper and bake for another 15 minutes. Set aside to cool down.
Apple Tart Filling
- Peel, core and thinly slice the Apples using a Mandoline or a sharp knife. Place in a bowl with the Lemon Juice and toss to coat.
- Fill the pastry crust with the Applesauce and spread it evenly using a spatula or the back of a spoon.
- Place the sliced apples in circles over the applesauce, starting from the edges of the tart and going towards the centre. Slightly overlap each circle. Once you get to the centre of the tart, roll a few slices around each other to create a rose pattern and place it in the middle.
- Brush the apple slices with the melted butter.
- Bake at 160 degrees Celsius / 325 degrees Fahrenheit for 35 to 40 minutes, or until the apples are soft.
Glaze (optional)
- Mix the apricot jam and water in a small bowl. Using a pastry brush, gently brush it over the slices of apples.
Video
Would you like to save this recipe?
Notes
- At this point, you should see large lumps and crumbs of dough. If you press the lumps in your hands, they should stick together. Try not to over-mix the pastry at this point.
- You will get the best results by chilling the pastry overnight; it can be kept in the fridge for up to 24 hours before baking as well.
Nutrition (per serving)
Made this recipe?
Let us know if you liked it by leaving a comment below, and tag us on Instagram @a.baking.journey with a photo of your creation!