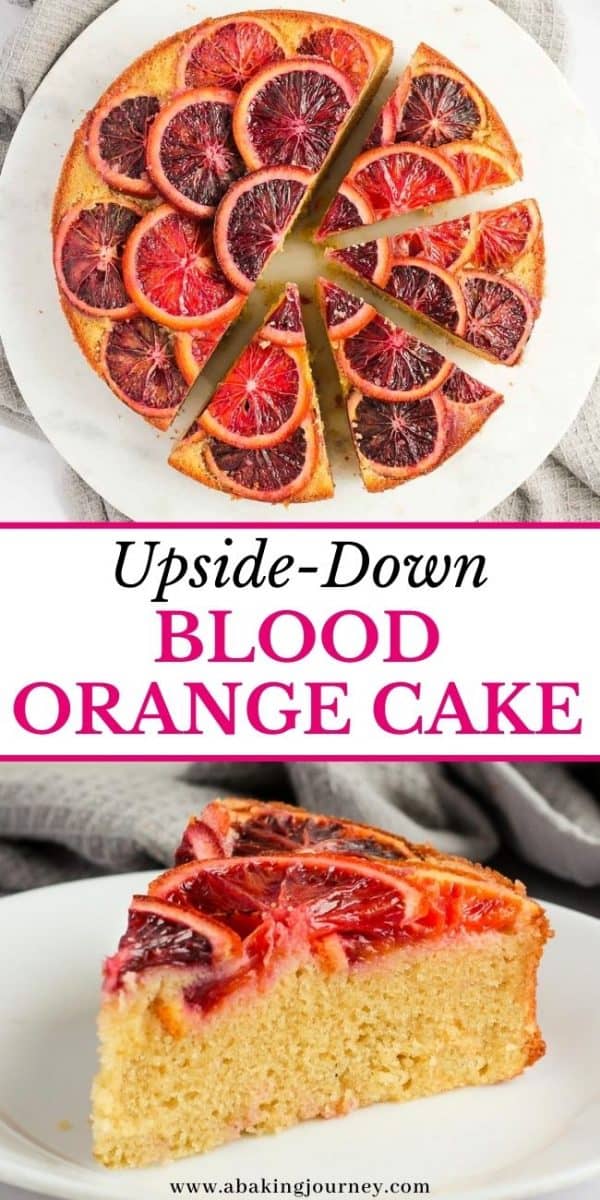
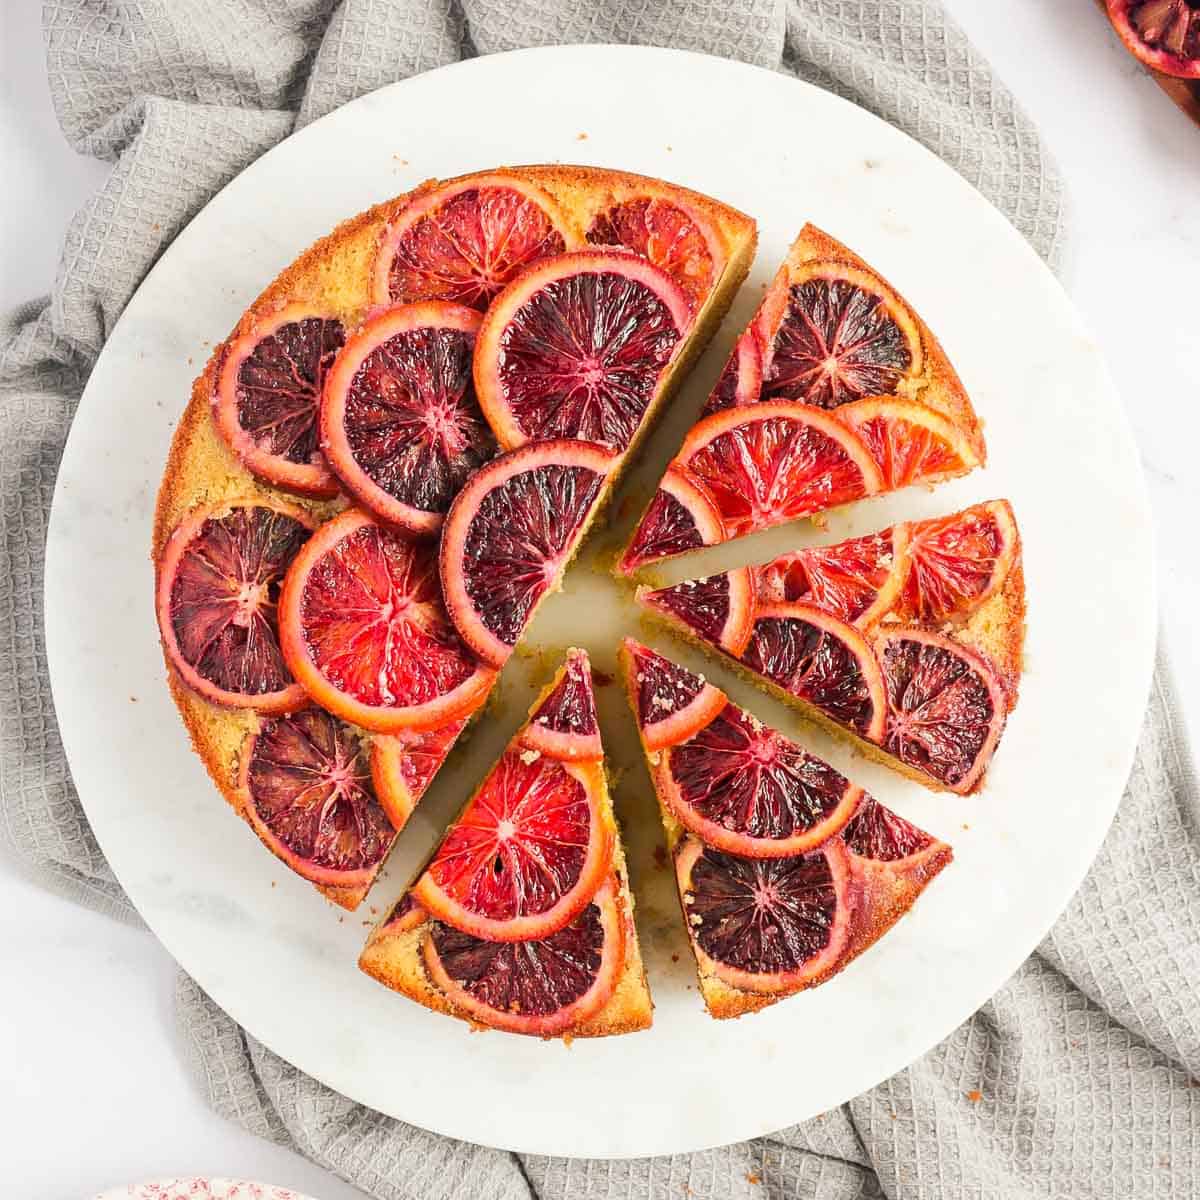
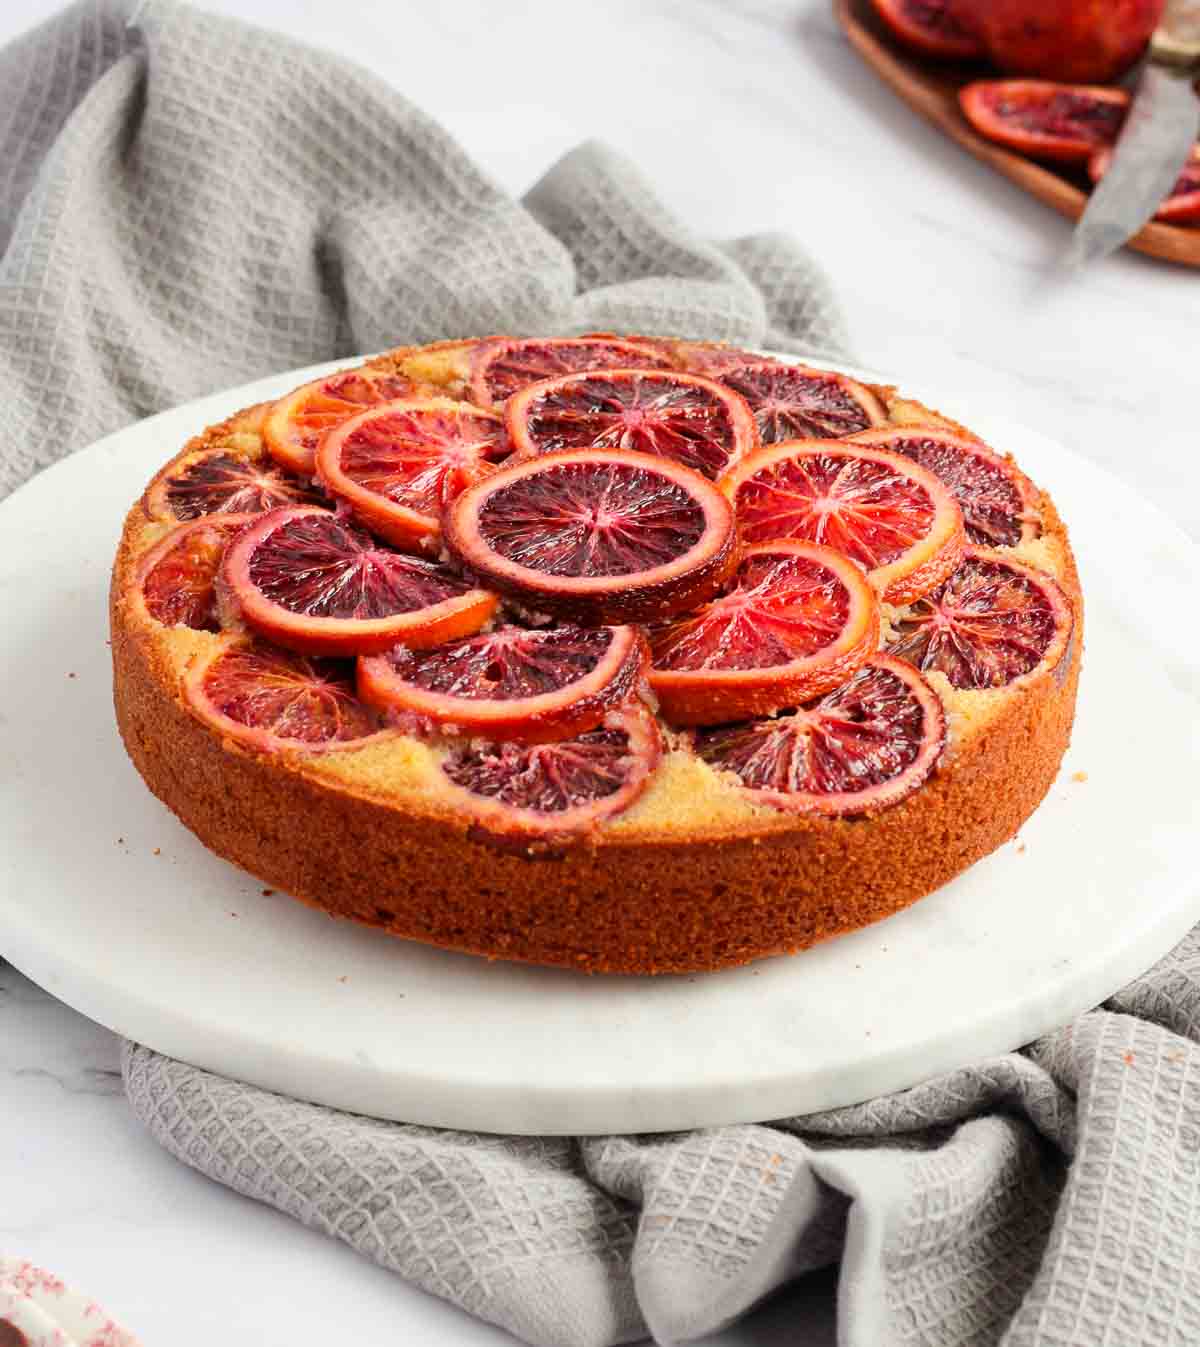
This easy Blood Orange Upside Down Cake is a delicious cake to make this Winter. The slightly caramelised blood oranges are baked under a light and fluffy butter cake, creating a fresh yet comforting cake to serve for dessert or afternoon tea!
Jump to:
Why we love this recipe
There is something simply irresistible about Blood Oranges and I can't help myself when I see them on the supermarkets shelves. I always get so excited to slice them up and discover their beautiful intense red and purple colours!
The light and fresh taste of blood oranges is a delicious mix between sweet oranges and tangy lemons; a perfect flavour balance. Just like my Mini Semolina Blood Orange Cakes, this recipe is an easy, simple yet impressive-looking way to use Blood Oranges.
Plus, how fun is it to make upside down cakes!? Whether it is an upside down cake made with Apples, Plums, Strawberries or Blackberries, baking fruits under a light and cake batter it is really a great way to make fruits shine!
Ingredients
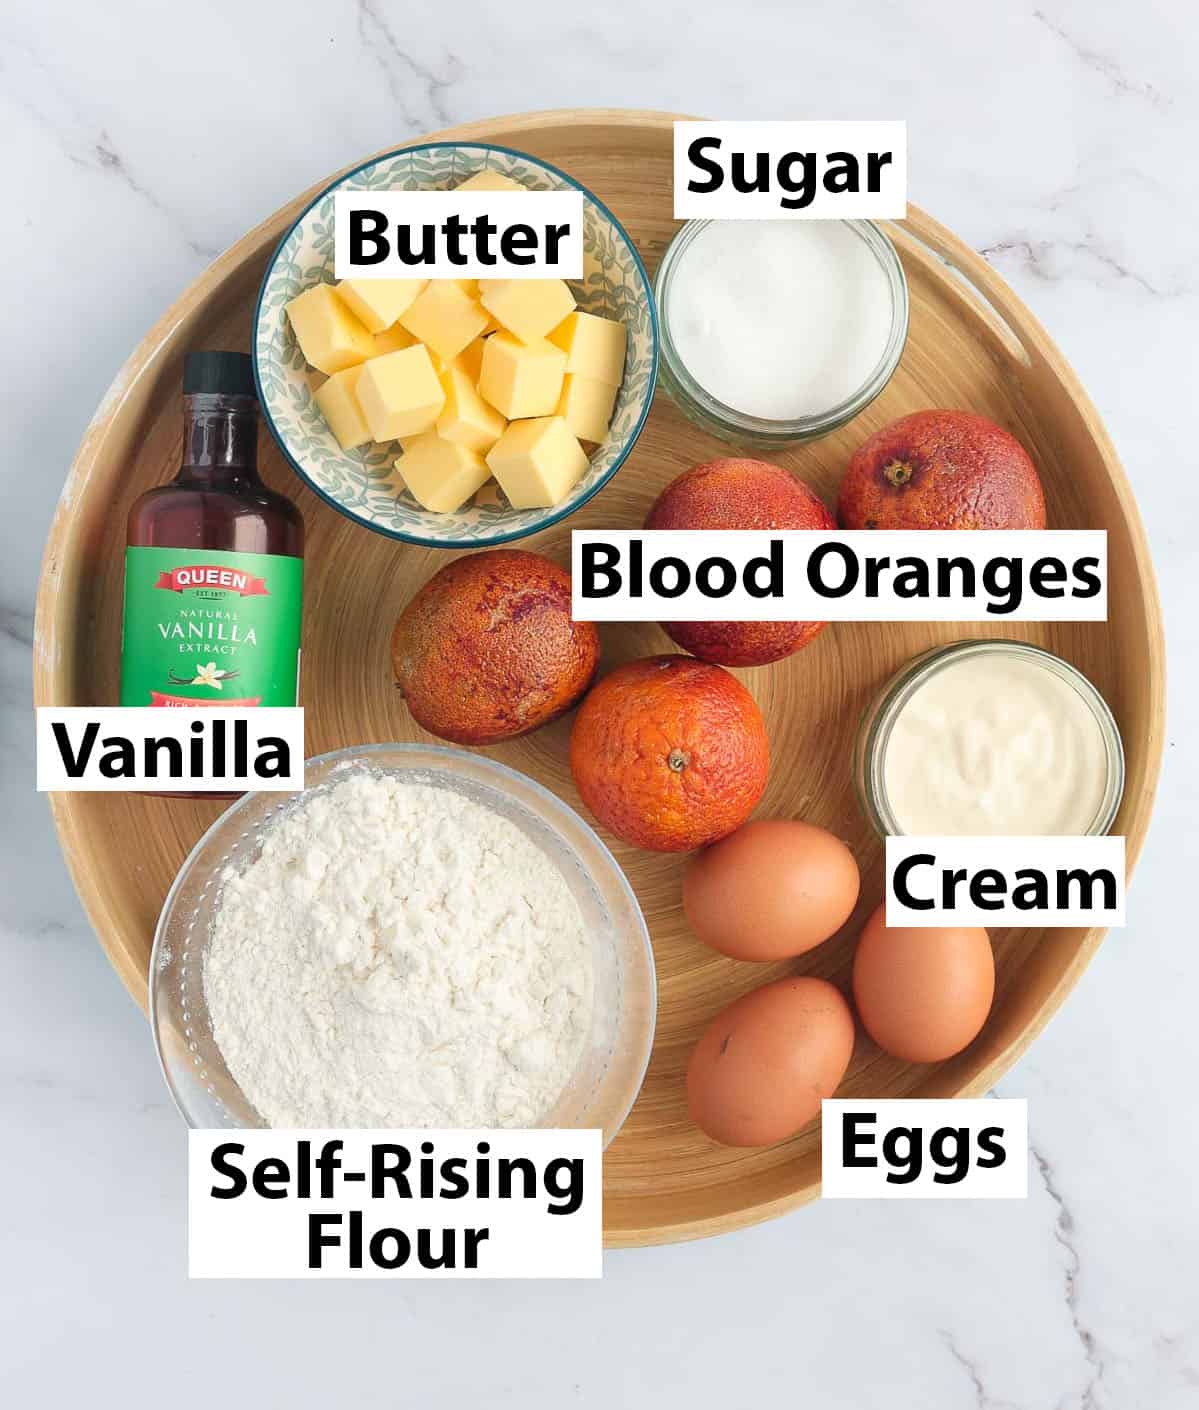
Only 7 ingredients are required to make this upside down blood orange cake, and nothing you shouldn't already have in your pantry!
(Scroll down to recipe card for all quantities)
- Butter: a simple Unsalted Butter that needs to be very soft and at room temperature. Try to use a good quality butter when you can to optimise the flavours of the cake!
- Sugar: I used Caster Sugar (Fine White Sugar) but Brown Sugar could be a nice way to go to if you want to really play on those caramelised flavours.
- Eggs: what will give the cake its deliciously light and spongy texture. They need to be at room temperature.
- Blood Oranges: the star of the show! I used relatively small blood oranges here, so if the ones you find are larger, you might only need 3 instead of 4.
- Cream: Heavy / Thickened Cream. As always, i do not recommend using a light cream to bake with.
- Vanilla: always optional, but vanilla is an easy way to boost the flavours of the other ingredients. I used Vanilla Essence but you could also use Vanilla Paste for a stronger taste.
- Self-Rising Flour: the easiest type of flour when it comes to baking, that does not require you to add any extra rising agent to the batter.
How to make a Blood Orange Upside Down Cake
There are three main steps to make this cake: prepare the blood orange layer that will be placed at the bottom of your pan, make the cake batter and pour it over the fruit slices.
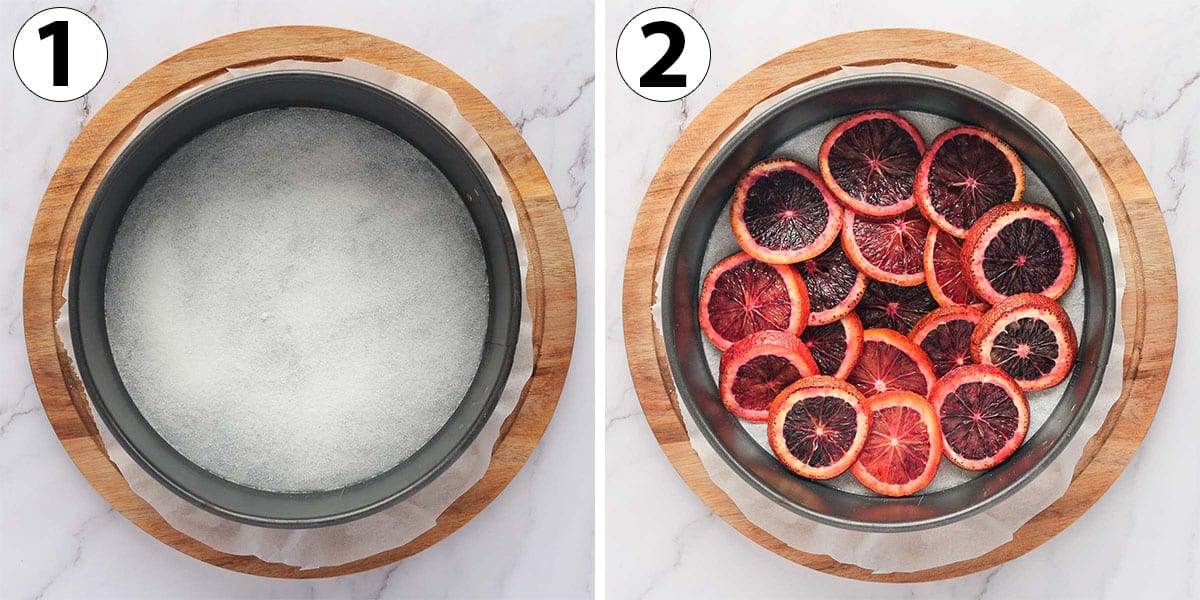
Step 1 to 2
First, get your bottom fruit layer ready.
- Preheat your oven on 180'C / 350'F. Line a 22 cm / 9 inch Springform Pan (or Round Pan) with some Baking Paper (you don't want the fruits to stick to the bottom of the pan).
- Photo 1: Sprinkle some Caster Sugar all over the bottom of the pan to get a thin, even layer of sugar.
- Photo 2: Cut your Blood Oranges into thin slices and arrange them over the layer of Sugar. Start from the centre of the pan, then go around in circle toward the edges of the pan, slightly overlapping each slice of blood orange.
- Set aside the pan.
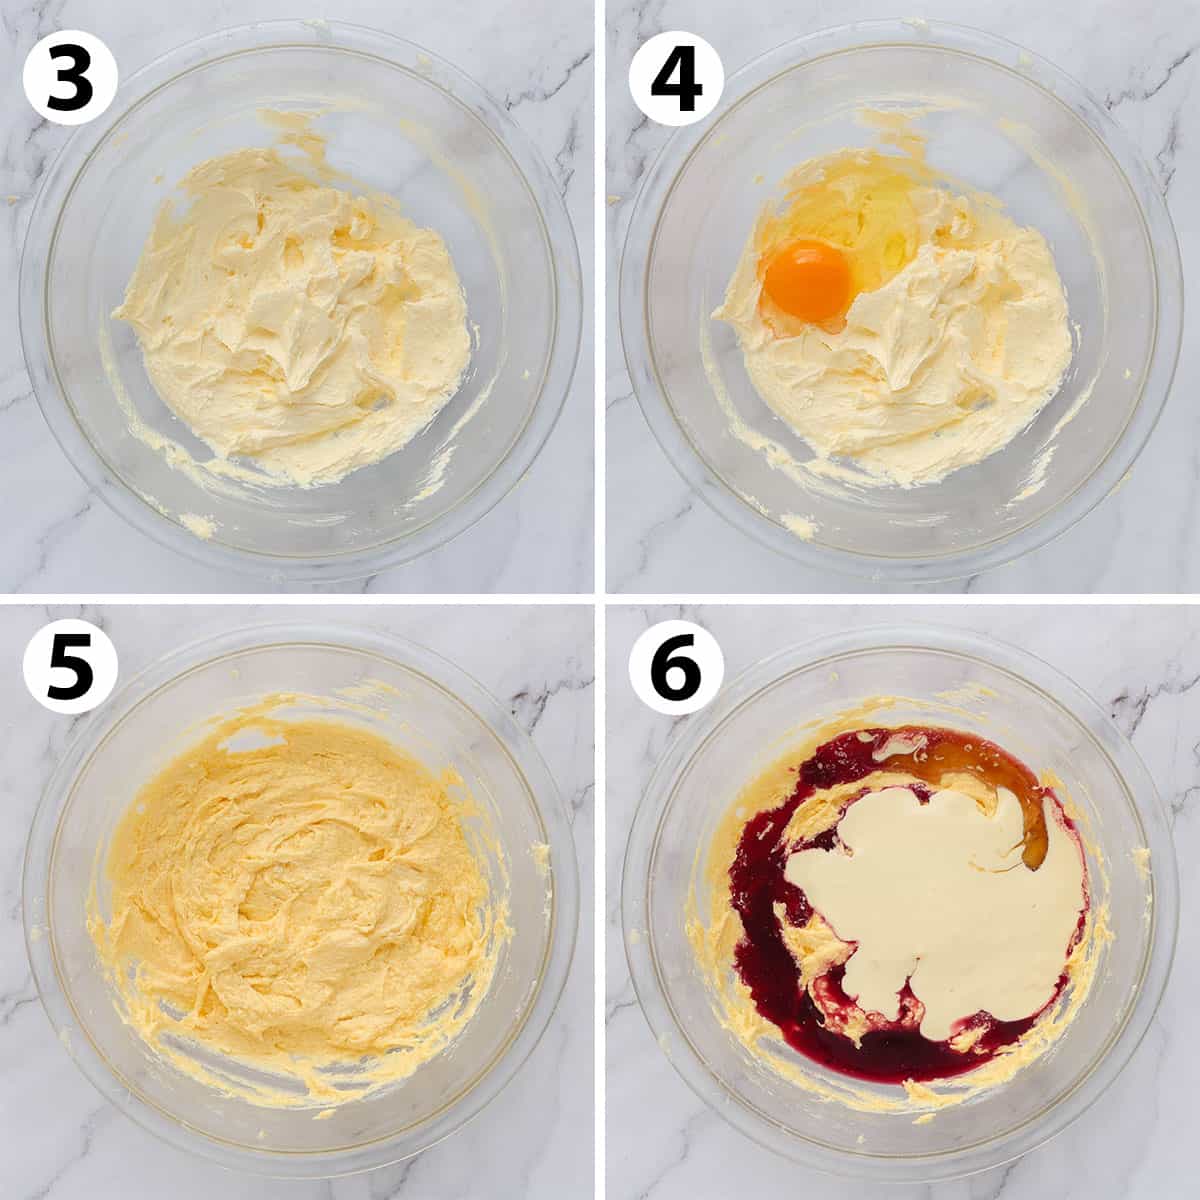
Step 3 to 6
Now that the bottom layer is ready, it is time to prepare the cake batter.
- Photo 3: In a large bowl, cream together the very soft Butter and caster Sugar for about 2 to 3 minutes, or until it has doubled in volume and looks pale. Use a stand or hand mixer for the best results
- Photo 4 & 5: Mix in the Eggs (at room temperature) one at the time on low speed until fully incorporated.
Would you like to save this recipe?
- Photo 6 & 7: Add the rest of the wet ingredients: Cream, Vanilla and the Juice and Zest of a Blood Orange. Mix until combined
Make sure the Eggs are at room temperature and are mixed in very slowly, one at the time, or the mixture will curdle.
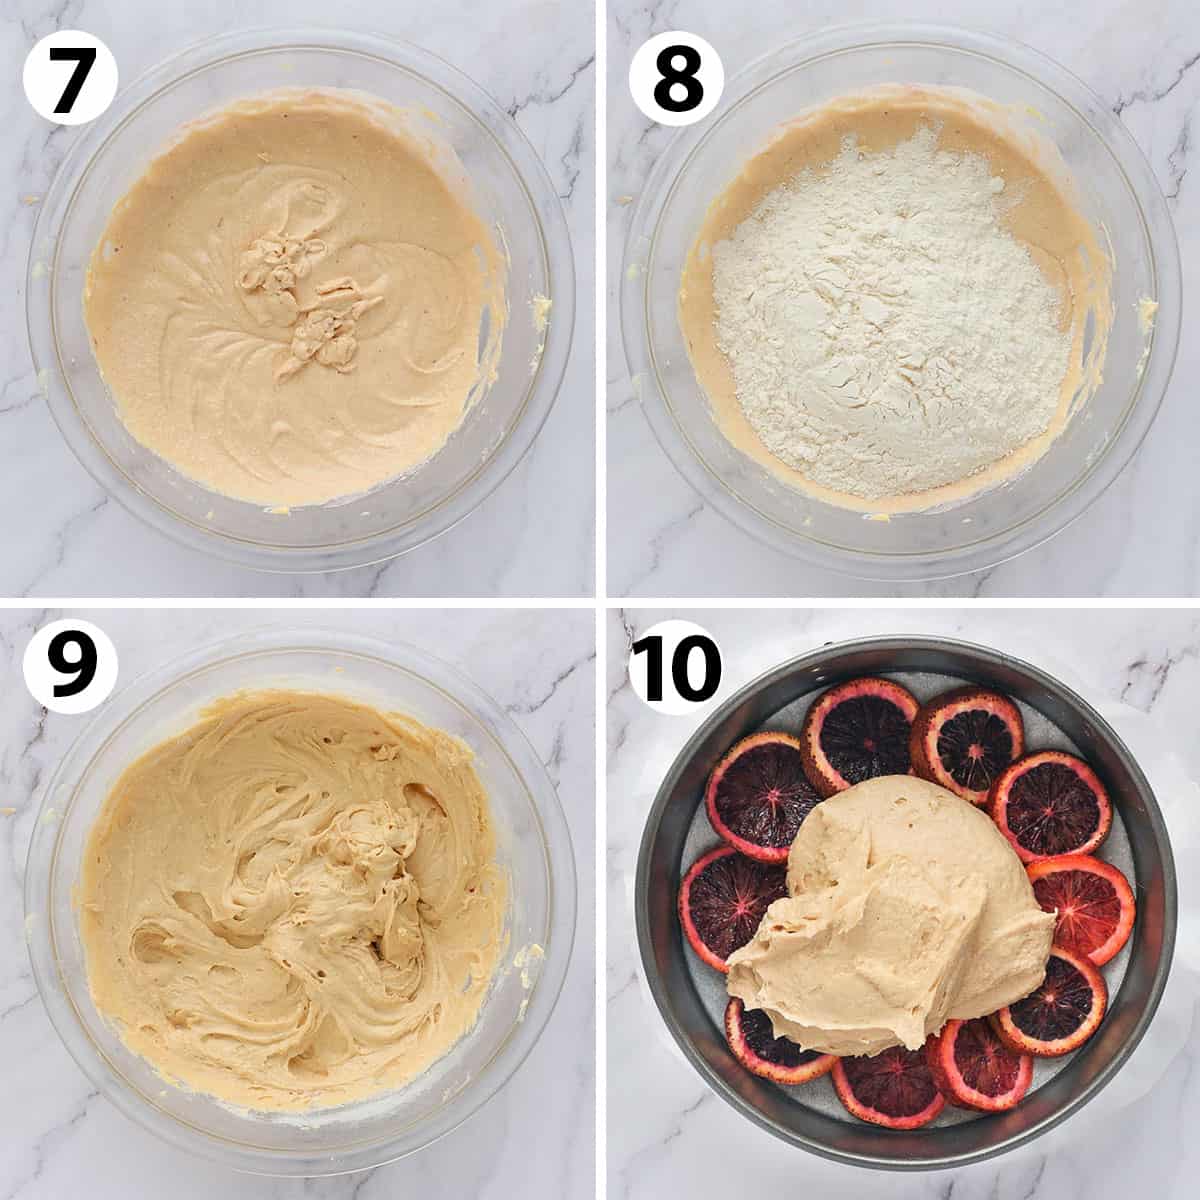
Step 7 to 10
Lastly, add the dry ingredients and pour over the fruits.
- Photo 8 & 9: Add the Self-Rising Flour (preferably sifted) to the wet ingredients and mix in on low speed. Stop as soon as the flour is all incorporated as you do not want to over-mix the batter.
- Photo 10: Pour the batter over the Blood Orange Slices. If required, use the back of a spoon or a small offset spatula to evenly spread it over the fruits and push it all the way to the edges of the pan.
- Bake for 35 to 45 minutes (*), or until a skewer comes out clean.
- Remove from the oven and leave to cool down completely before flipping the cake.
(*) Note that when it comes to baking time, it can always vary depend on your oven. So I always recommend keeping an eye on the cake and check on it about mid-way through the baking. Always check with a skewer or a knife if the batter is fully baked before removing it from the oven.
Tips to make this recipe
- Caramelised fruits will tend to stick to a pan so don't forget to line the baking pan with baking paper. It will make flipping the cake much easier and avoid having the fruit layer getting stuck at the bottom of the pan.
- Make sure the Blood Oranges Slices aren't too thick if you want them to caramelise nicely in the oven.
- Add some spices: for a lightly spiced cake, you can also toss the Blood Orange Slices in a little bit of Sugar mixed with your choice of Spices (Ginger, Cinnamon,...) or add a little bit of ground spices into the cake batter.
- Ingredient Temperature: the butter needs to be very soft and the Eggs are at room temperature. They ideally should both be at about the same temperature when you mix them together to avoid curdling.
- If the batter splits (curdle) after you add the Eggs, you can rectify it by mixing in a little bit of Flour.
- Do not over-mix the batter once you add the Flour to avoid getting a tough and chewy cake. As soon as you cannot see any flour, it is time to stop. Also don't forget to sift your flour to avoid lumps.
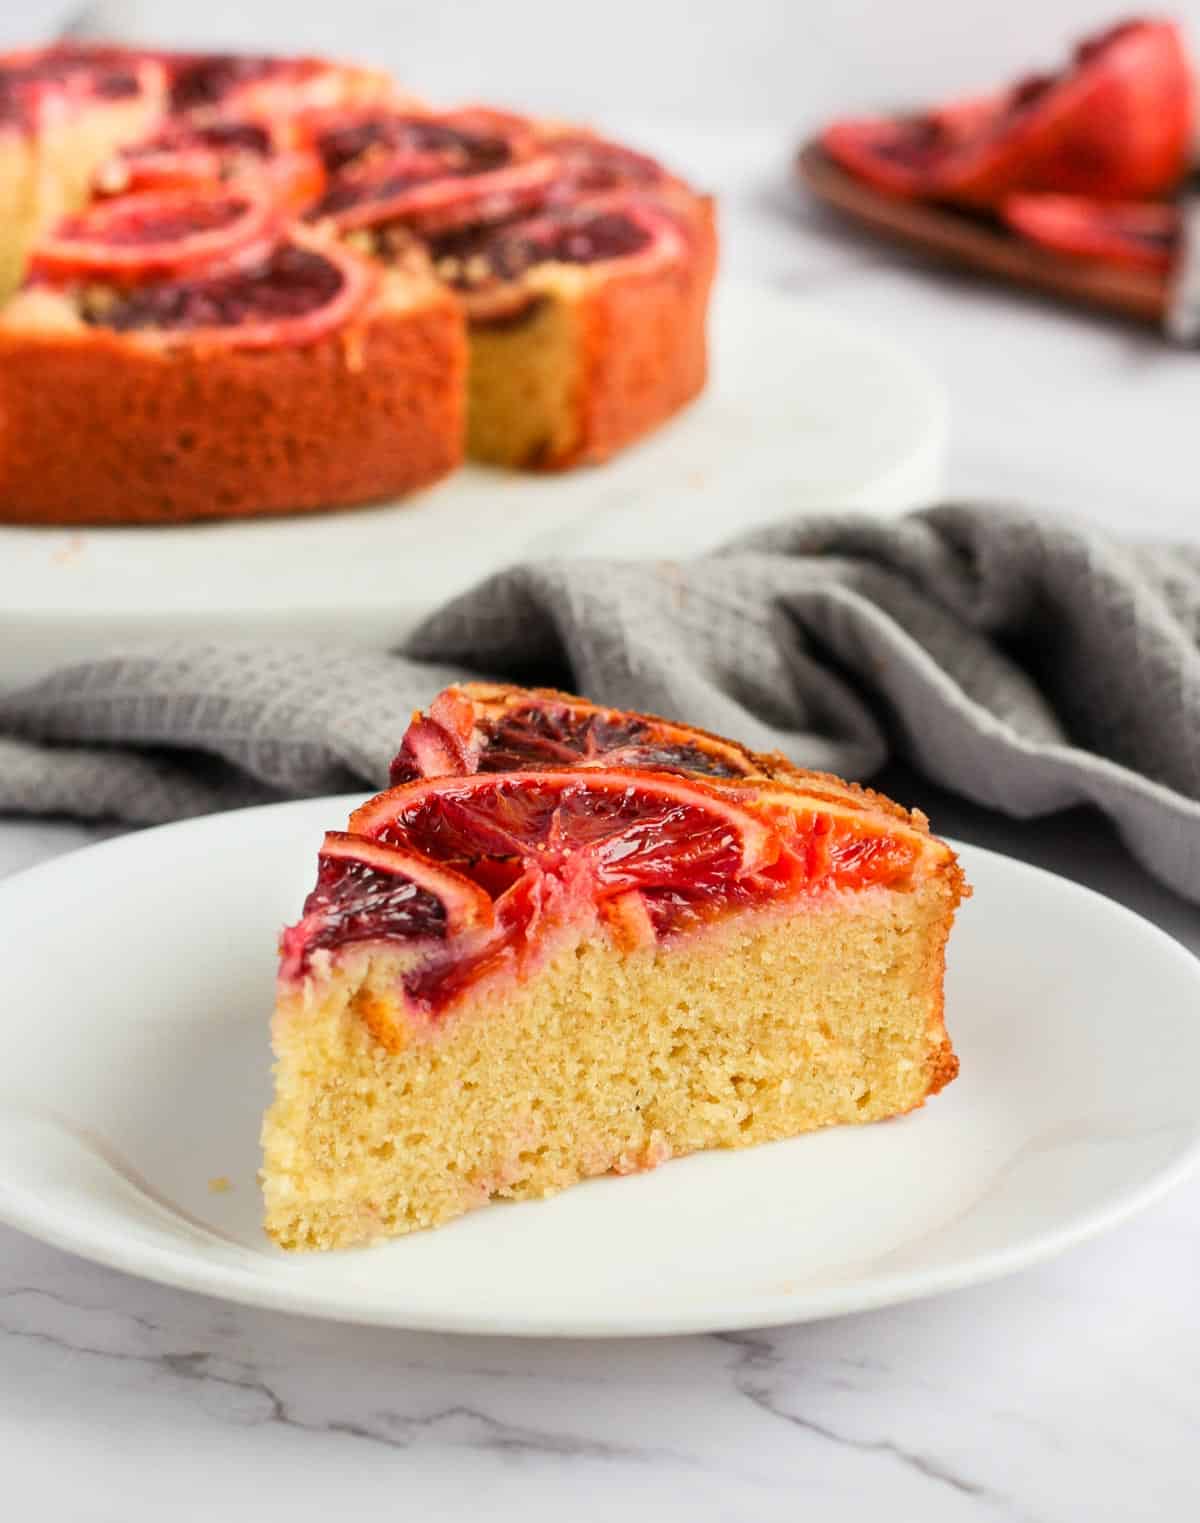
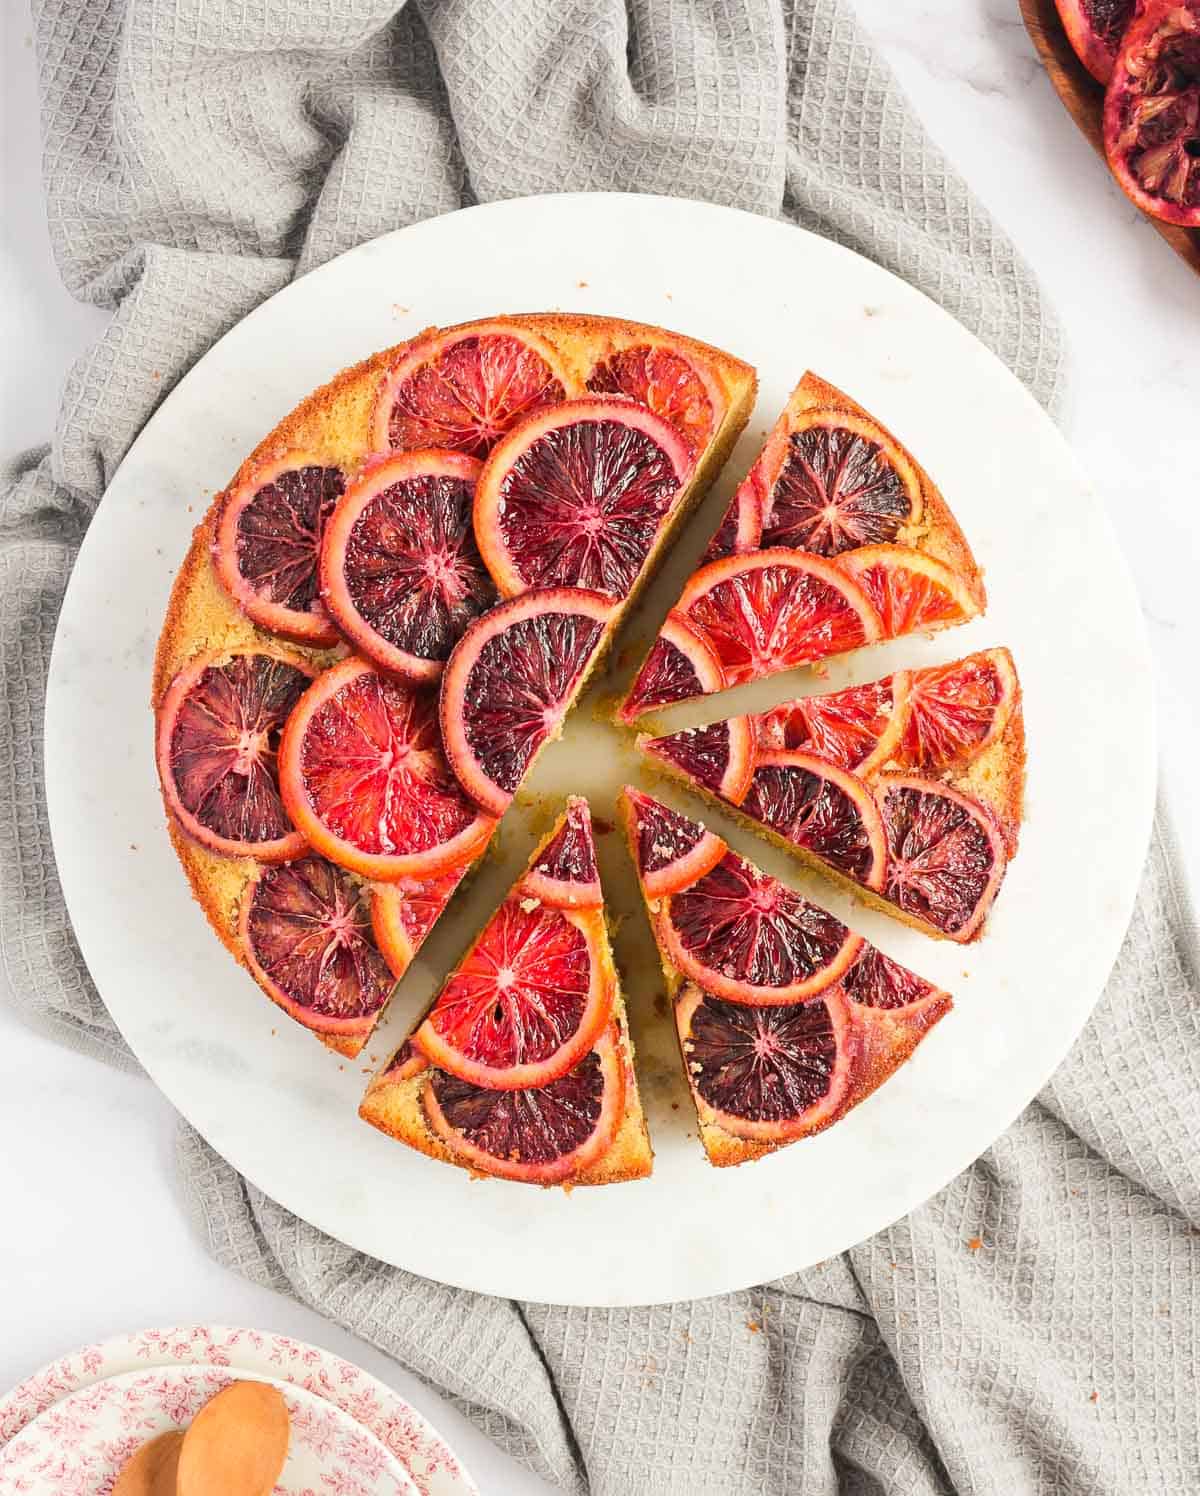
- Wait for the blood orange cake to have completely cooled down before flipping it. Remove the edges of your Springform Pan, then place your serving plate over the top of the cake. Flip it over in one quick movement, then remove the bottom springform pan plate and baking paper.
- For an even more caramelised fruit, sprinkle with a little bit more sugar and use a Kitchen Torch to caramelise the fruits. This will give a crème brulée type of finish to the dessert!
Recipe FAQs
Absolutely. Use the same quantity of Plain Flour than Self-Rising Flour, but add 1 1/2 teaspoon of Baking Powder and 1 pinch of salt. Make sure to mix these 3 ingredients together first before sifting them over the cake batter.
I personally did not not, but if you don't like the slightly bitter taste orange peels can have, you definitely can remove them first.
This cake will be delicious on its own, with a scoop of Vanilla Ice Cream, Whipped Cream or even a Crème Anglaise (pouring custard). Or go full on Blood Orange with a dollop of Blood Orange Curd on each slice.
Storing & Freezing
This blood orange upside down cake can be stored at room temperature, well covered or in an air-tight container, for up to 2 days. It will last for 3 to 4 days if stored in the fridge (again, well covered to avoid absorbing any smells from the fridge) but this will tend to make the cake drier.
I do not recommend freezing this cake if you want to maintain a nice caramelisation of the fruits.
More Citrus Desserts
- French Orange Tart
- Orange and Poppy Seed Muffins
- Lemon Meringue Cake
- Mini Orange Tarts
- Lemon Ricotta Cheesecake
- Semolina Orange Cake
- Gluten Free Almond Orange Cake
- Orange Loaf Cake
Made this recipe?
Let us know if you liked it by leaving a comment below, and tag us on Instagram @a.baking.journey with a photo of your creation!
Recipe

Upside Down Blood Orange Cake
Ingredients
Blood Orange Layer
- 25 gr (2 tablesp.) Caster Sugar
- 3 Blood Oranges
Butter Cake
- 120 gr (1/2 cup) Unsalted Butter, very soft
- 75 gr (1/3 cup) Caster Sugar, (*)
- 3 Eggs, at room temperature
- 120 ml (1/2 cup) Heavy / Thickened Cream
- 1 Blood Orange, Zest + Juice
- 1 1/2 teasp. Vanilla Extract
- 225 gr (1 1/2 cup) Self-Raising Flour
Instructions
- Preheat your oven on 180'C / 350'F. Line a 22 cm / 9 inch Springform Pan (or round pan) with Baking Paper.
Blood Orange Layer
- Sprinkle the Caster Sugar into an even layer at the bottom of your pan.
- Thinly slice the Blood Oranges and arrange them over the layer of Sugar (see note 1). Set aside.
Butter Cake
- Cream the very soft Butter and Sugar for 2 to 3 minutes or until doubled in volume and pale, using a Stand or Hand Mixer.
- On the lowest speed, mix in the Eggs one at the time (at room temperature) until all combined. (see note 2).
- Add the Cream, Vanilla and Blood Orange Zest and Juice. Mix until combined.
- Slowly mix in the sifted Self-Rising Flour. Stop as soon as combined to avoid over-mixing the batter.
- Pour the cake batter over the slices of Blood Oranges, using the back of a spoon or small offset spatula to spread it if needed.
- Bake for 35 to 45 minutes (see note 3) or until a skewer comes out clean. Remove from the oven and leave to cool down completely before removing the edges of the springform pan and flipping the cake over a serving plate.
Would you like to save this recipe?
Notes
- Start by placing one slice of blood orange at the centre of your pan, then arrange the slices in circle around it, each slice slightly overlapping on the next one.
- If the mixture curdles, it is usually because the butter and/or eggs weren't at room temperature or the eggs were added too fast. You can rectify a curdling batter by adding a little bit of the flour.
- As always when it comes to baking, the recommended baking time is indicative only and might vary based on your oven. Always check on the cake about halfway through the baking and keep baking until a skewer or tip of a knife comes out clean. If the cake looks like it is starting to burn before it is fully baked, reduce the oven temperature and optionally cover the pan with aluminium foil.