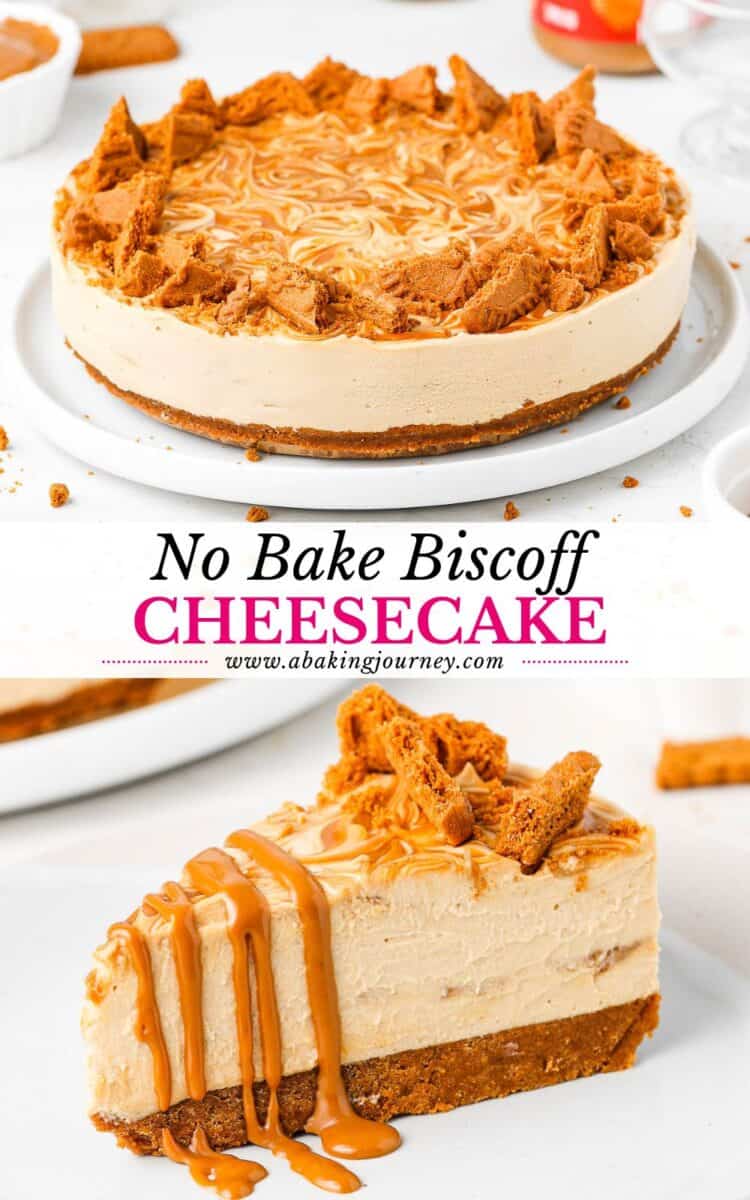
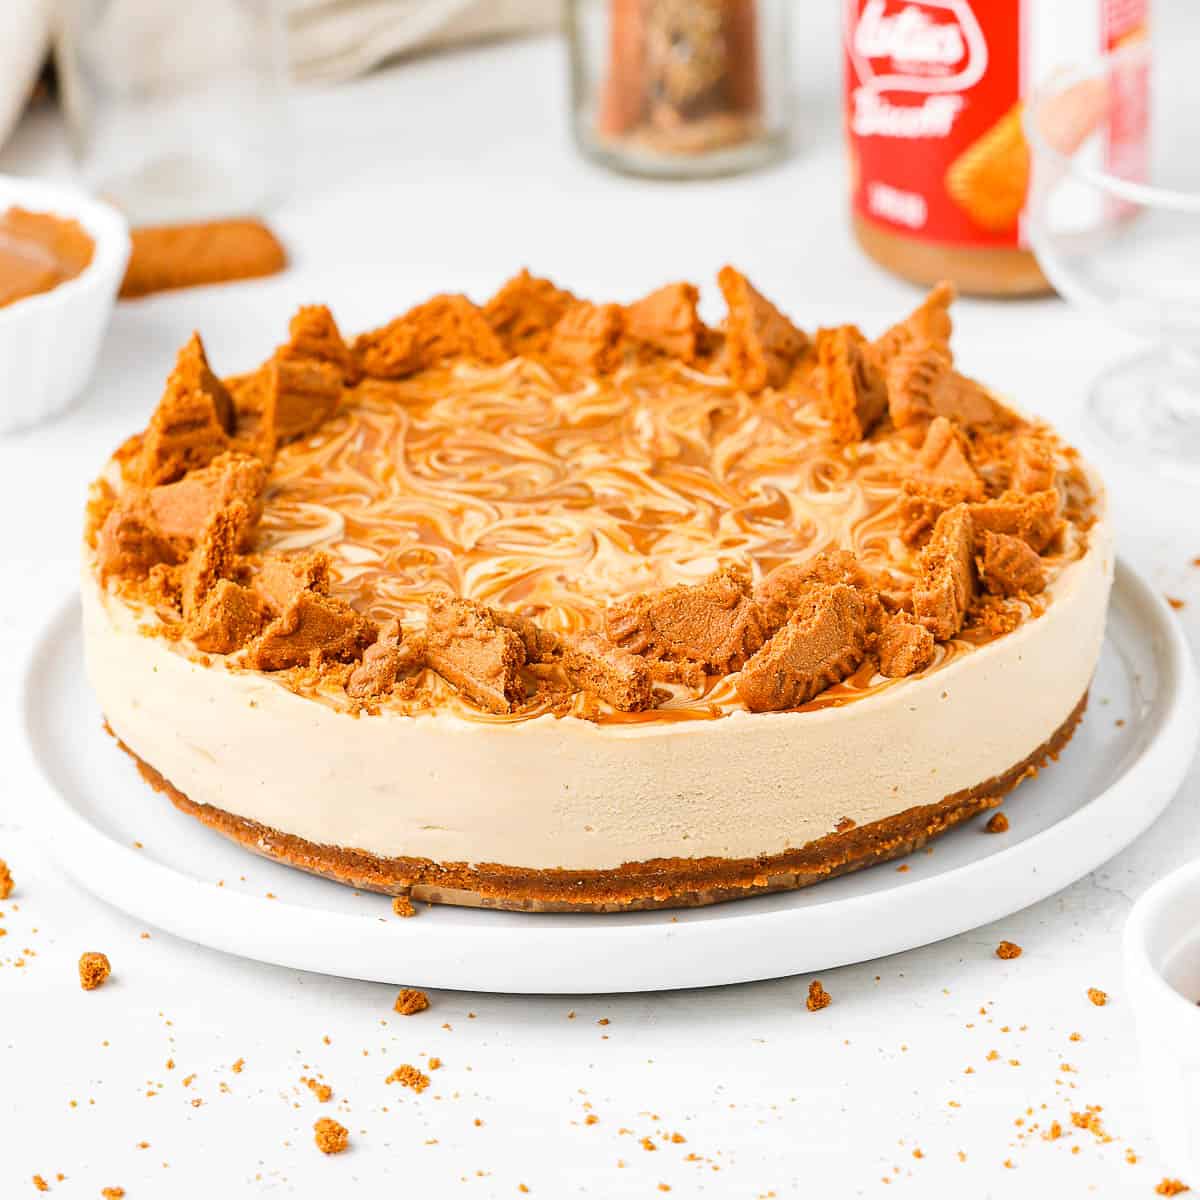
This No Bake Biscoff Cheesecake is super easy to prepare with 7 ingredients only - no eggs and no gelatine required! It is packed with the spicy flavours of Biscoff Cookie Butter (Speculoos) and makes a decadent dessert that is perfect for a special occasion.
Jump to:
Why we love this recipe
There aren't many desserts that I love more than a Biscoff Cheesecake. Being originally from Belgium, the sweet and spicy flavours of Biscoff (or Speculoos as they are traditionally called) bring me straight back home.
This recipe is a great No Bake dessert that is a fun variation to my Baked Biscoff Cheesecake or Mini Biscoff Cheesecakes versions. All you need to make it are 7 ingredients; no eggs and no gelatine required!
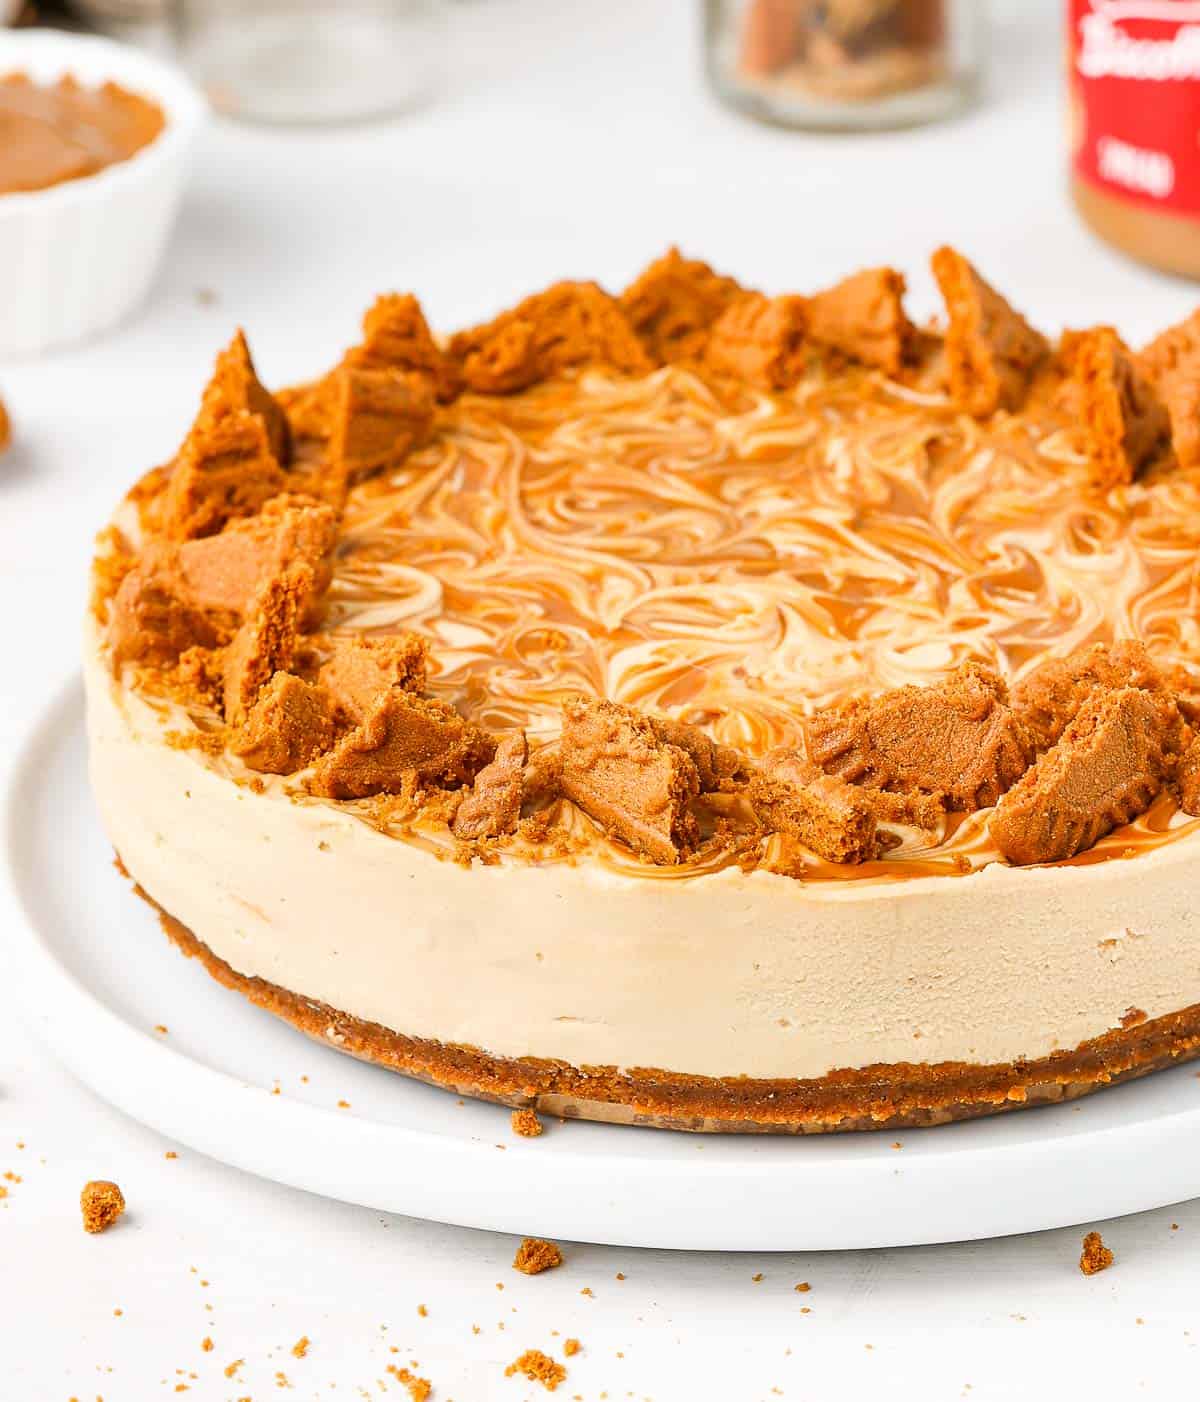
This No Bake Lotus Biscoff Cheesecake Recipe is packed with Biscoff flavours: in the Biscoff cookie crust, the cookie butter cheesecake filling, the fun Lotus Biscoff spread swirls and Speculoos Cookies topping. The creamy, slightly tangy cream cheese simply works perfectly with the fragrant flavours of Biscoff.
More Cheesecake Recipes:
Ingredients
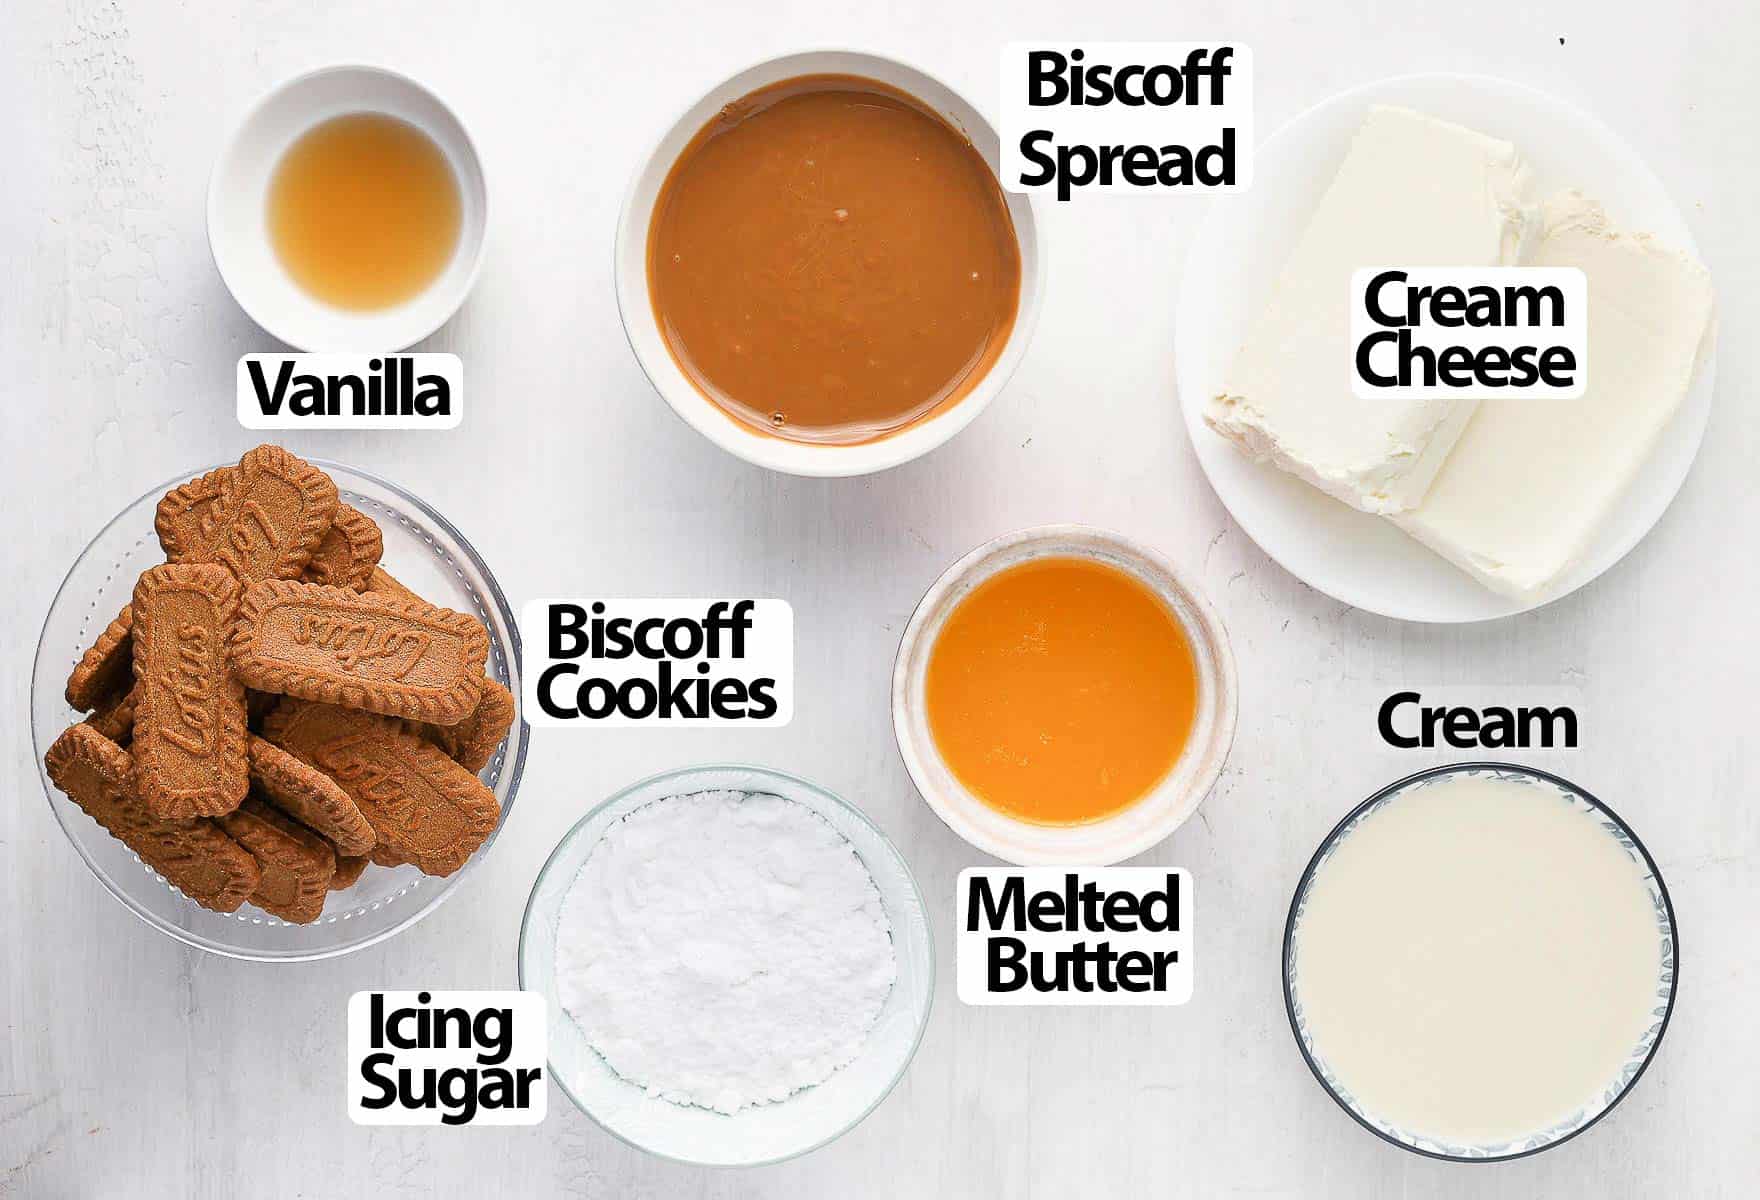
You only need 7 basic ingredients to make this lotus biscoff cheesecake; how easy is that!? Some of them are used a few different times like the biscoff biscuits for the crumbs and topping and the cookie butter spread inside the cheesecake filling and for the swirl.
Scroll down to recipe card below for all quantities.
For the base:
- Biscoff Cookies: you will need to crush them into a biscoff cookie crumbs. You can use the Lotus Biscoff Cookies brand or any type of Speculoos Cookies.
- Butter: Unsalted and melted Butter.
For the Cheesecake Mixture:
- Cream Cheese: make sure it is soft and at room temperature or it won't mix evenly with the rest of the ingredients. I used Philadelphia Cream Cheese but any brands will do.
- Biscoff Spread: or your preferred brand of Cookie Butter. Biscoff usually sets quite thick so I recommend melting it slightly in the microwave before using it. We will also use some to create the swirl in the centre of the cheesecake and on top of it.
- Icing Sugar: this very fine powdered sugar is recommended to make no bake cheesecakes so that you don't feel the coarse grains of sugar when you eat it. It also contains cornstarch that will help to stabilise the cake. Make sure to sift it before use.
- Cream: heavy cream (thickened cream) or whipping cream. Make sure it contains at least 30% fat or it won't whip (light cream or fat reduced cream won't work here).
To finish the cheesecakes, I cut some lotus biscoff biscuits into chunks and pressed them into the cheesecake mixture once set.
How to make No Bake Biscoff Cheesecake step-by-step
Making the Biscoff Crust
Instructions:
- Start by preparing a 9 inch / 22 cm Springform Pan. Lightly grease the bottom and sides of the pan and line the bottom with baking paper. You can also add strips of baking paper / parchment paper on the sides if you want.
- Crush the biscoff cookies into very thin crumbs. You can use a food processor or place the cookies in a sealed bag and crush them with a rolling pin.
- Melt the Butter in the microwave.
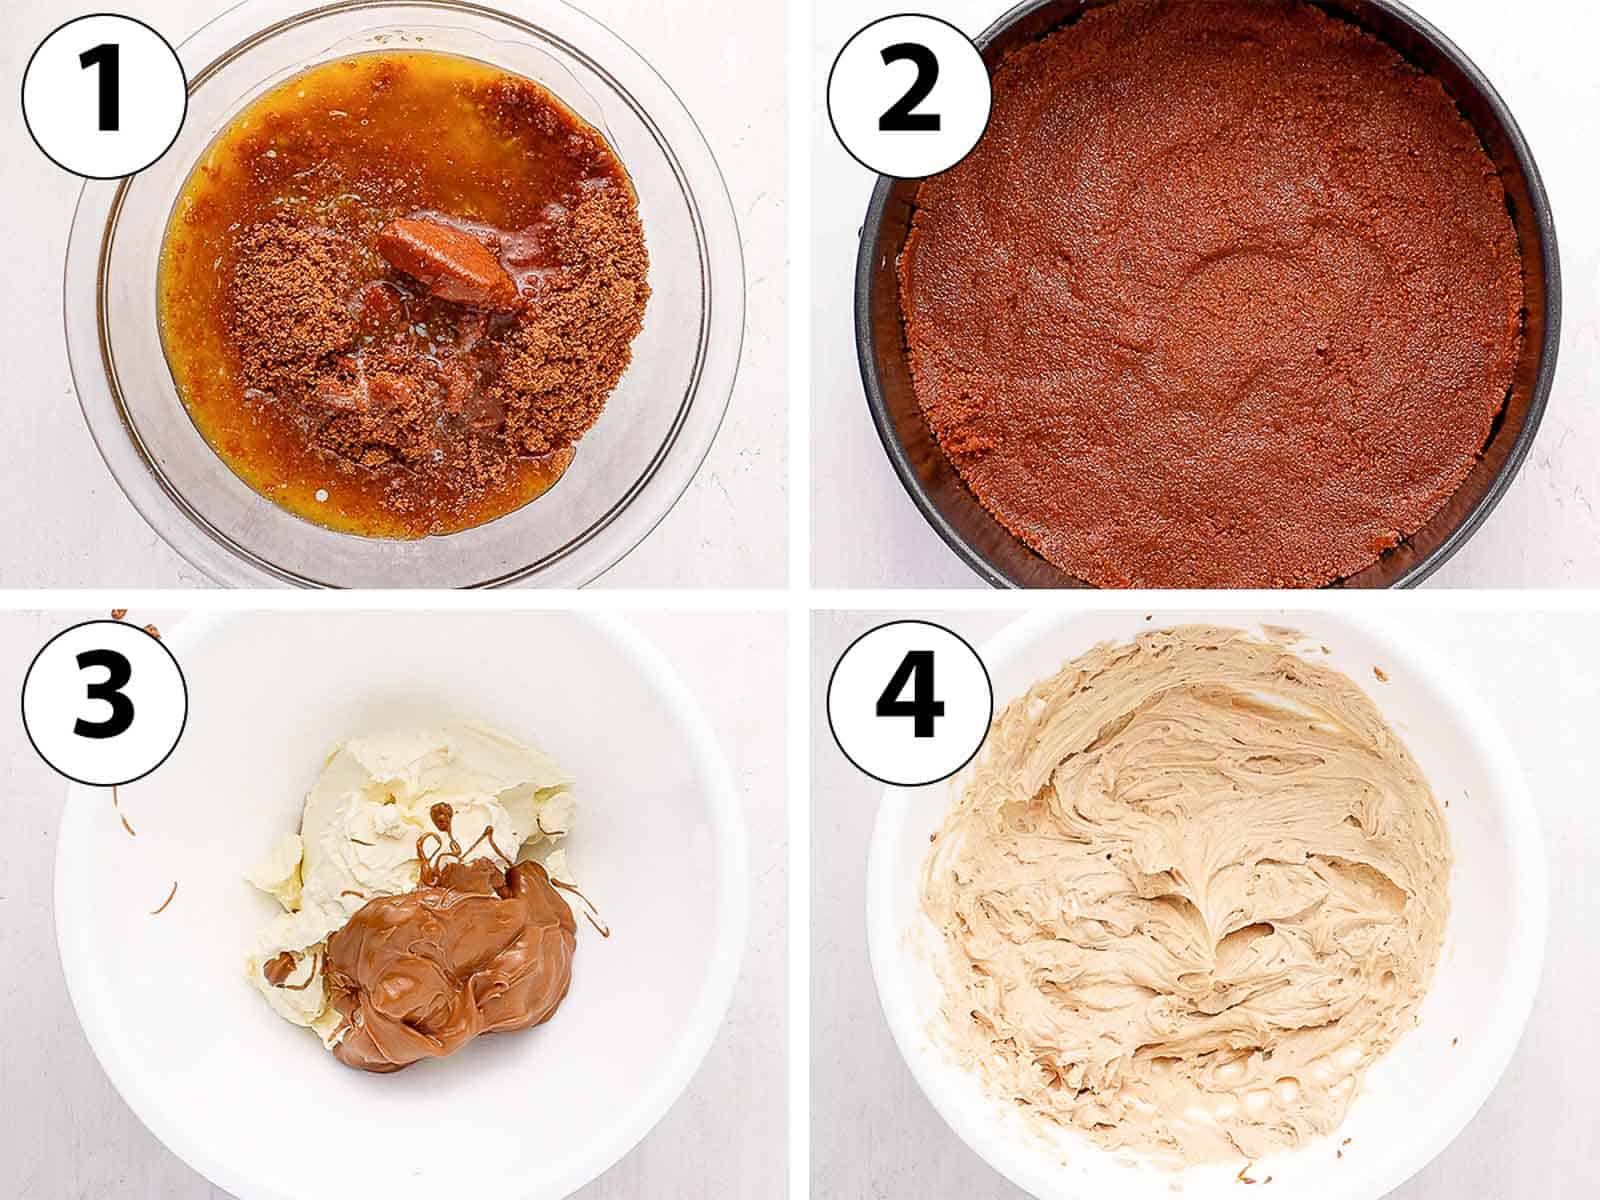
- Photo 1: Place the biscoff crumbs and melted butter in a small bowl. Using a spatula, mix together until it gets the consistency of wet sand.
- Photo 2: Pour the mixture into the prepared springform tin. Using a small offset spatula or bottom of a cup, press the crumbs to line the base of the tin. Make sure it is packed very well. Place in the fridge to set.
Making the Cheesecake Mixture
- Photo 3: In a large bowl, place the soft, room temperature Cream Cheese, Vanilla and melted Biscoff Spread.
Would you like to save this recipe?
- Photo 4: Using a hand mixer or stand mixer (fitted with the paddle attachment), mix for two to three minutes or until very smooth and creamy. There shouldn't be any lumps left.

- Photo 5: Sift in the Icing Sugar. You could also add extra spices at this point if you want such as Speculoos Spice Mix or Cinnamon.
- Photo 6: Mix on slow speed until incorporated and set aside.
- Photo 7: In a separate bowl, whisk the Cream until it reaches soft to medium peaks. It should have the texture of a light shaving cream.
- Photo 8: Pour the whipped cream into the cream cheese mixture. Gently fold it in until slightly incorporated. This step is optional and you could use a mixer to mix it in straight away.
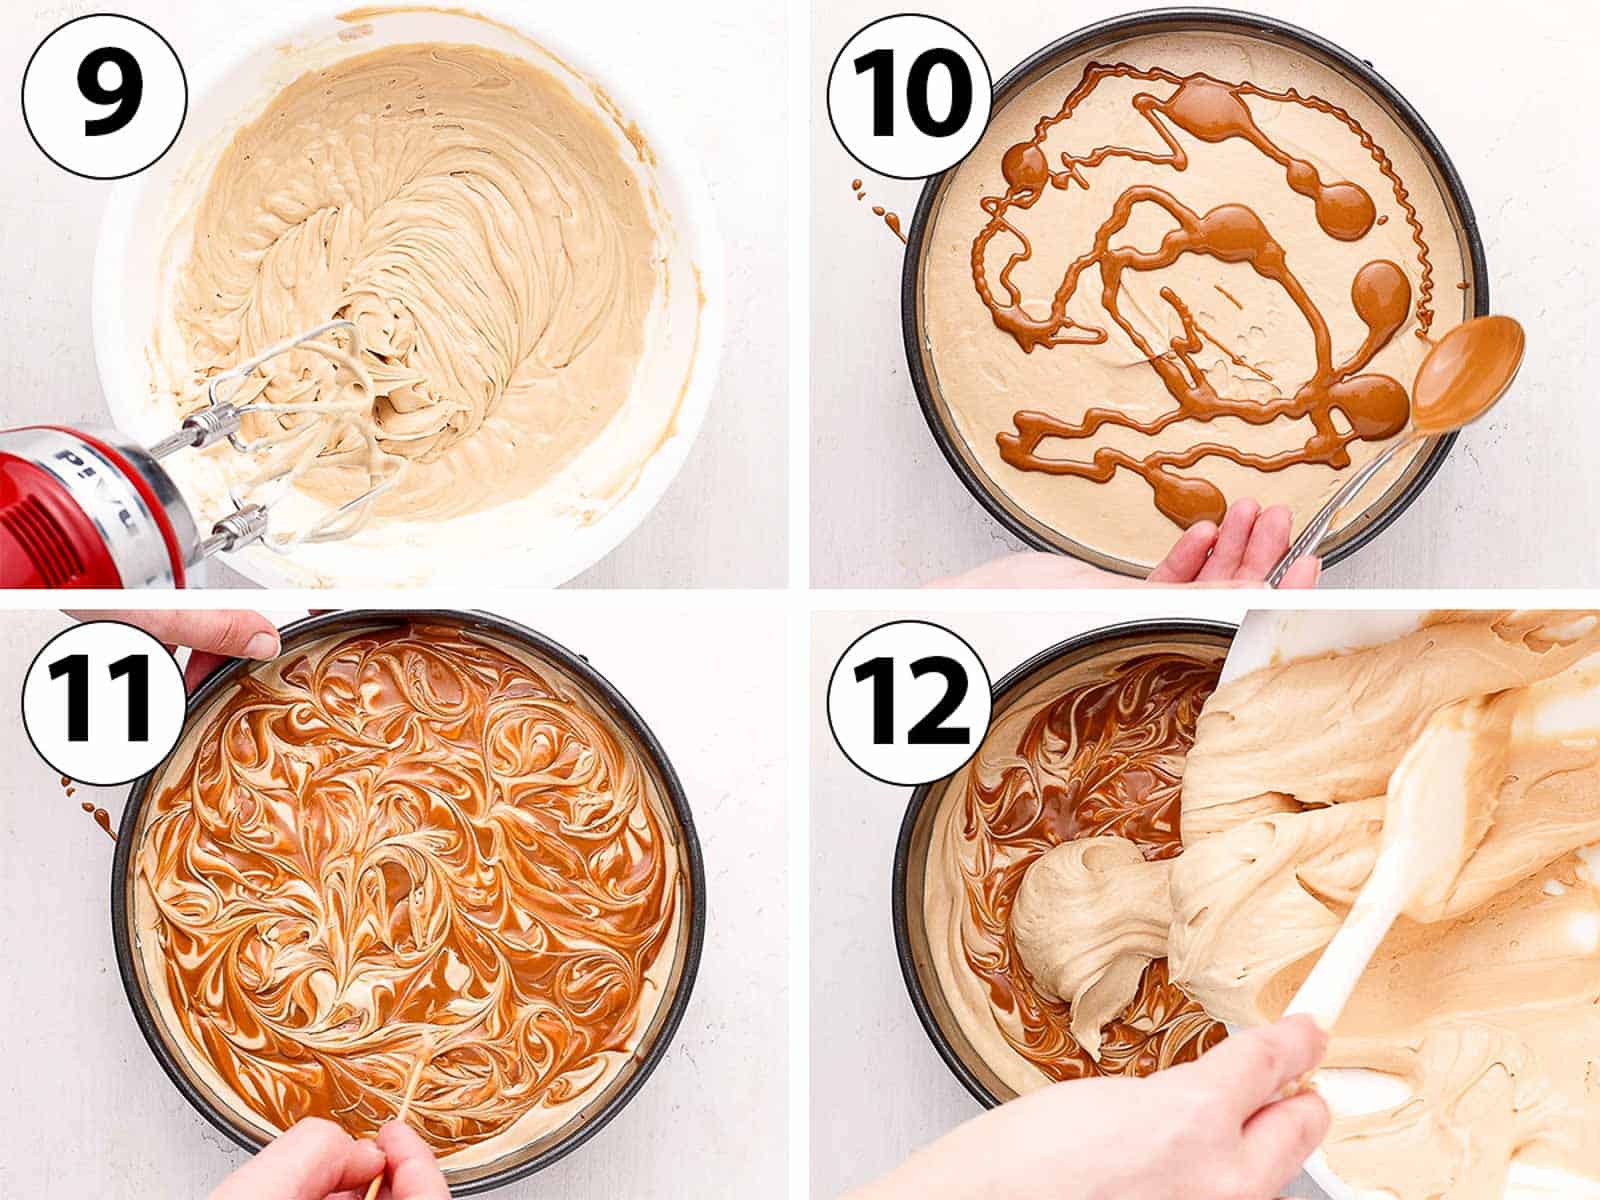
- Photo 9: With a hand mixer (or stand mixer with whisk attachment), mix on medium speed for about 1 to 2 minutes or until the mixture starts to thicken.
Assembling the Cheesecake
- Photo 10: Pour half of the Biscoff cheesecake mixture over the chilled crust. Spread it around with the back of a spoon or offset spatula. Drizzle half of the Biscoff spread (melted if needed) over the mixture.
- Photo 11: Using a skewer or small knife, swirl the cookie butter into the cheesecake mixture.
- Photo 12: Pour the second half of the cream cheese mixture over the cheesecake. Drizzle with the rest of the melted cookie butter and create a swirl with the skewer.
Making this cheesecake in two layers separated with a swirl of biscoff is optional here. If preferred, pour the entire cheesecake mixture over the chilled crust and use half of the biscoff spread quantity to create the swirl over it.
- Place the cheesecake in the refrigerator to set for at least 3 hours, preferably overnight.
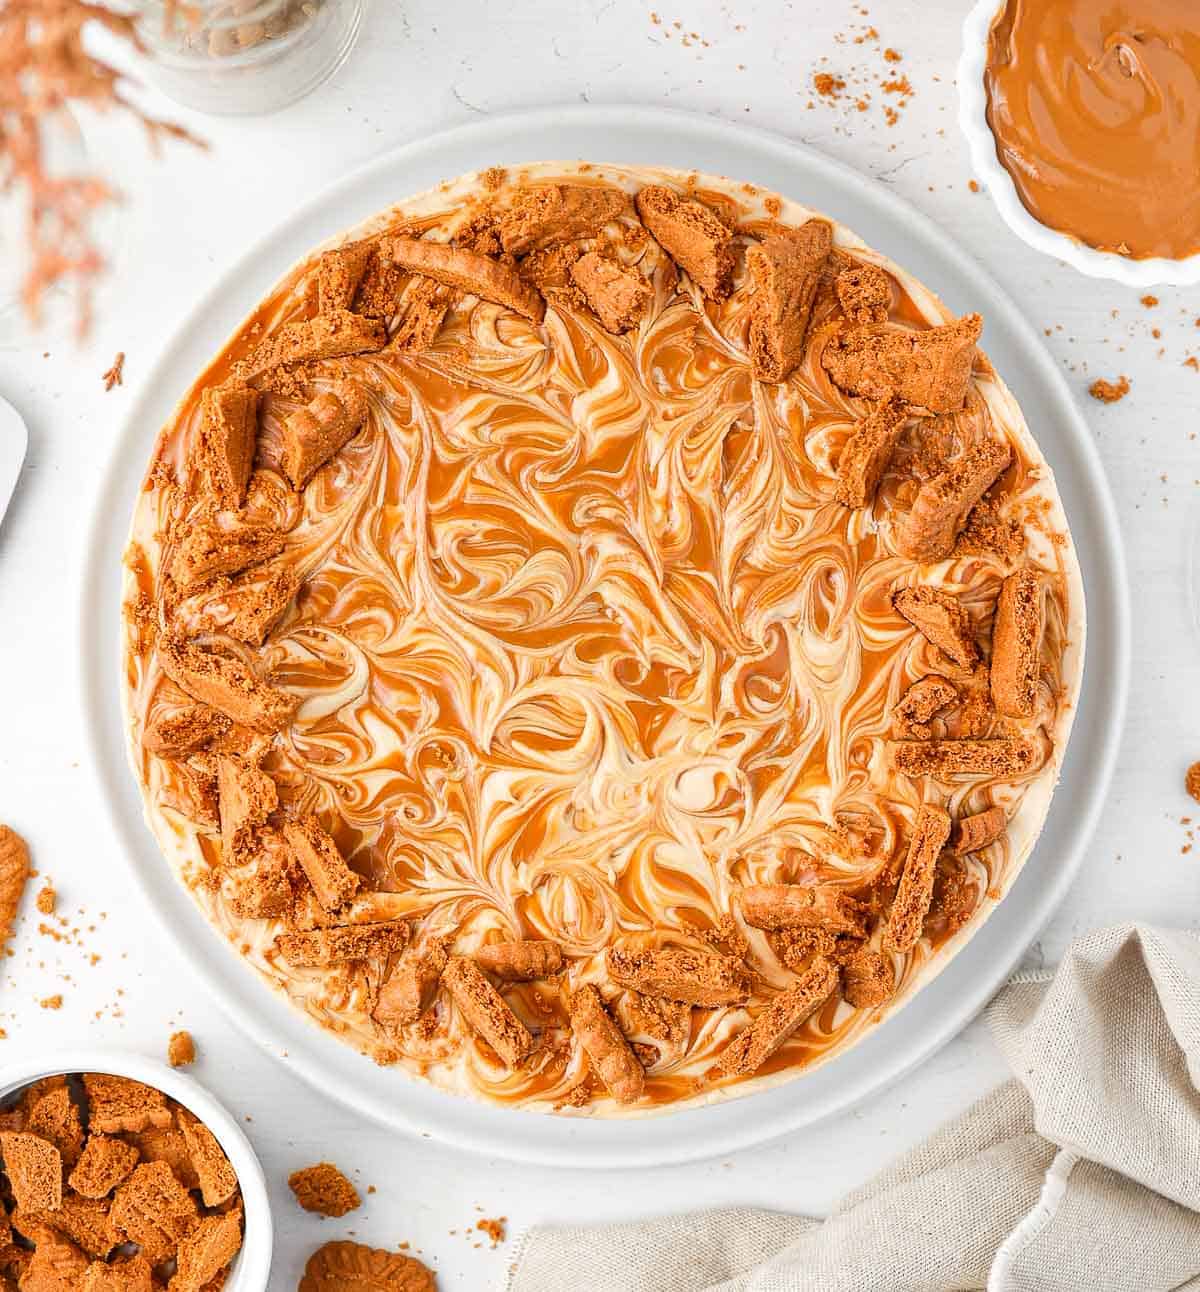
- Once chilled and completely set, carefully remove the cheesecake from the springform pan. Optionally, cut some Biscoff Cookies into large pieces and press them into the cheesecake to create a ring of cookies.
Recipe FAQs
Speculoos are traditional Belgian Cookies (sometimes called Speculaas or Spekulatius in other neighbouring countries) made from a specific type of Brown Sugar ("vergeois brune") and a mix of Spices. They have a spicy caramel flavour and the spread made from it has the consistency of peanut butter.
Biscoff was a name given to Speculoos Cookies by the Belgian company Lotus when they started to export the cookies outside of Europe. So even though Biscoff is a Speculoos Cookie, not all Speculoos Cookies are Biscoff.
Biscoff is a branded product by the Belgian company Lotus while Cookie Butter (sometimes called Speculoos Butter) is a more generic name used by different brands.
Although each brands recipe slightly vary, both Biscoff Spread and Cookie Butter are basically made from crushed Speculoos Cookies mixed with oil. They can be substituted equally.
Absolutely, using the crunchy cookie butter spread will add a fun texture to the cheesecake! You can use it both inside the cream cheese mixture or to create the Biscoff swirl.
I didn't want to cover the pretty pattern created by the Biscoff Swirl so I simply finished the cheesecake with small pieces of Biscoff Cookies.
For an even more decadent dessert, you could also pipe some Cookie Butter Cream Cheese Frosting over it or finish the cake with the same Biscoff Whipped Cream I used over this Biscoff Cake.
Tips & Troubleshooting
- Make sure the Cream Cheese is at room temperature and quite soft before mixing it with the rest of the ingredients. If too cold, it won't mix in well and you will end up with small lumps of cream cheese in the cake.
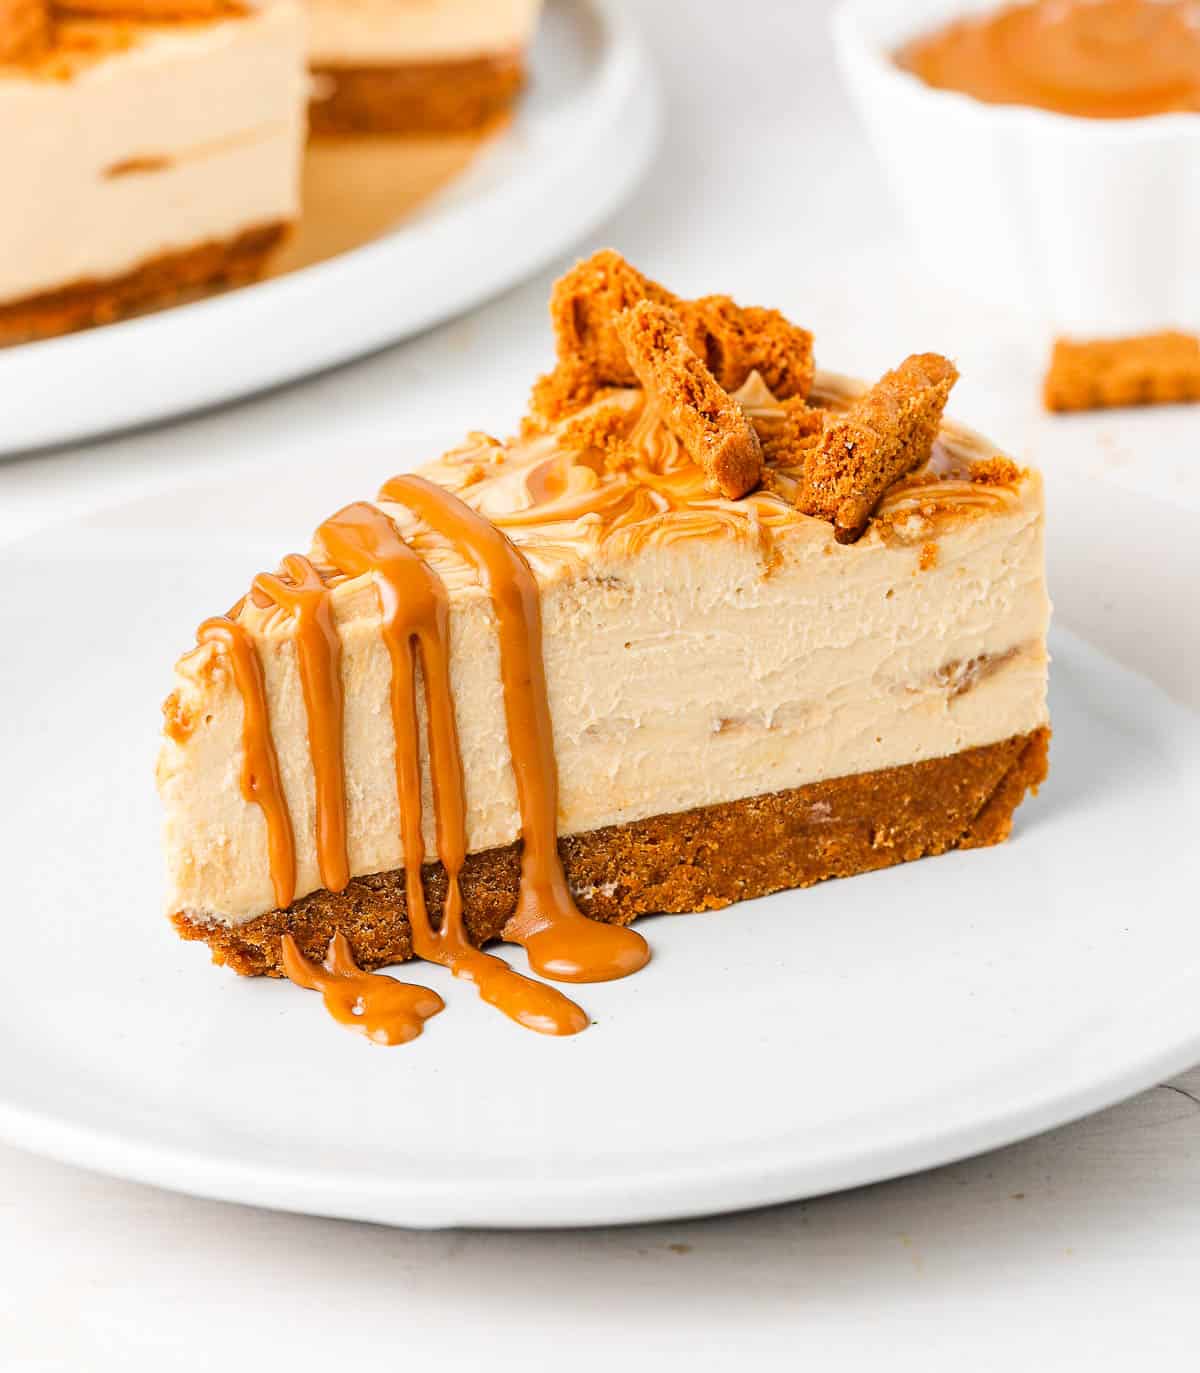
- Instead of making a Biscoff Swirl, you could also melt the Biscoff Spread until very fluid and pour it over the set cheesecake to create a full layer of Biscoff. For a drip cake effect, gently push the spread over the edges while still warm.
- Decorate the cheesecake with the chunks of Biscoff Cookies just before serving as they will tend to go soggy when stored in the fridge.
- The no bake cheesecake is not setting: this could happen if the cream wasn't whipped enough or if the cheesecake has not spent enough time in the fridge. Leave it for a little bit longer in the fridge and it should eventually set!
Storing & Freezing
The No Bake Biscoff Cheesecake should be kept in the fridge. Because it needs a little while to set, it is actually a great make ahead dessert that can be prepared a day in advance and left in the fridge to set overnight. It is best served within a day but leftovers can be kept in the fridge for up to 3 days.
This dessert can be frozen, although I recommend eating it fresh for the best texture.
More Biscoff Recipes
Made this recipe?
Let us know if you liked it by leaving a comment below, and tag us on Instagram @a.baking.journey with a photo of your creation!
Recipe
No Bake Biscoff Cheesecake
Ingredients
Biscoff Crust
- 250 gr (9 oz) Biscoff Cookies
- 120 gr (1/2 cup) Unsalted Butter, melted
Biscoff Cheesecake
- 500 gr (18 oz) Cream Cheese, at room temperature
- 240 ml (1 cup) Biscoff Spread, or cookie butter, melted
- 1 1/2 teaspoon Vanilla Extract
- 75 gr (3/4 cup) Icing Sugar
- 240 ml (1 cup) Thickened / Heavy Cream, min 30% fat
Biscoff Swirl & Topping
- 80 ml (1/3 cup) Biscoff Spread, or cookie butter, melted
- 6 Biscoff Cookies, optional
Instructions
Biscoff Crust
- Prepare a 9 inch / 22 cm Springform Pan by lightly greasing the bottom and sides and lining the bottom with baking paper.
- Crush the Biscoff Cookies into very thin crumbs in the food processor (see note 1). Melt the Butter and combine the two in a bowl. Mix the crumbs and melted butter until it resembles the consistency of wet sand.
- Pour the mixture into the prepared springform pan. Using a small offset spatula or bottom of a cup, press the crumbs to line the base of the pan until even and very well packed. Place in the fridge to set.
Biscoff Cheesecake
- In a large bowl, place the room temperature, very soft Cream Cheese, Vanilla and melted Biscoff Spread. Mix for two to three minutes with a hand mixer or in a stand mixer until very smooth and no lumps remain.
- Sift in the Icing Sugar and mix on slow speed until incorporated. Set aside.
- In a separate bowl, whisk the Cream until it reaches soft to medium peaks.
- Pour the whipped cream into the Cream Cheese mixture. With a hand mixer (or stand mixer with whisk attachment), mix on medium speed for about 1 to 2 minutes or until the mixture starts to thicken (see note 2).
Biscoff Swirl
- Melt the Biscoff Spread until very liquid.
- Pour half of the Biscoff cheesecake mixture over the chilled crust and spread it around until flat. Drizzle half of the melted Biscoff Spread and swirl it into the cheesecake mixture with a skewer or small knife.
- Repeat the process with the second half: pour over the rest of the cream cheese mixture. Drizzle with the rest of the melted Biscoff Spread and use a skewer to create a swirl pattern (see note 3).
- Place the cheesecake in the refrigerator to set for at least 3 hours, preferably overnight.
- Once chilled, completely set and ready to serve, carefully remove the cheesecake from the springform pan. Optionally, cut some Biscoff Cookies into large pieces and press them around the edges of the cheesecake to create a ring (see note 4).
Video
Would you like to save this recipe?
Notes
- If you don't have a food processor, you can crush them by hands. Place the cookies in a sealed bag and use a rolling pin to crush them.
- The mixture should have the consistency of whipped cream that has reached stiff peaks. If it starts to look a little bit grainy, you have over-mixed it.
- Making the cheesecake in two layers separated with a swirl of biscoff is optional here. If preferred, pour the entire cheesecake mixture over the chilled crust and use half of the biscoff spread quantity to create the swirl over it.
- Decorate the cheesecake with the chunks of Biscoff Cookies just before serving as they will tend to go soggy when stored in the fridge.