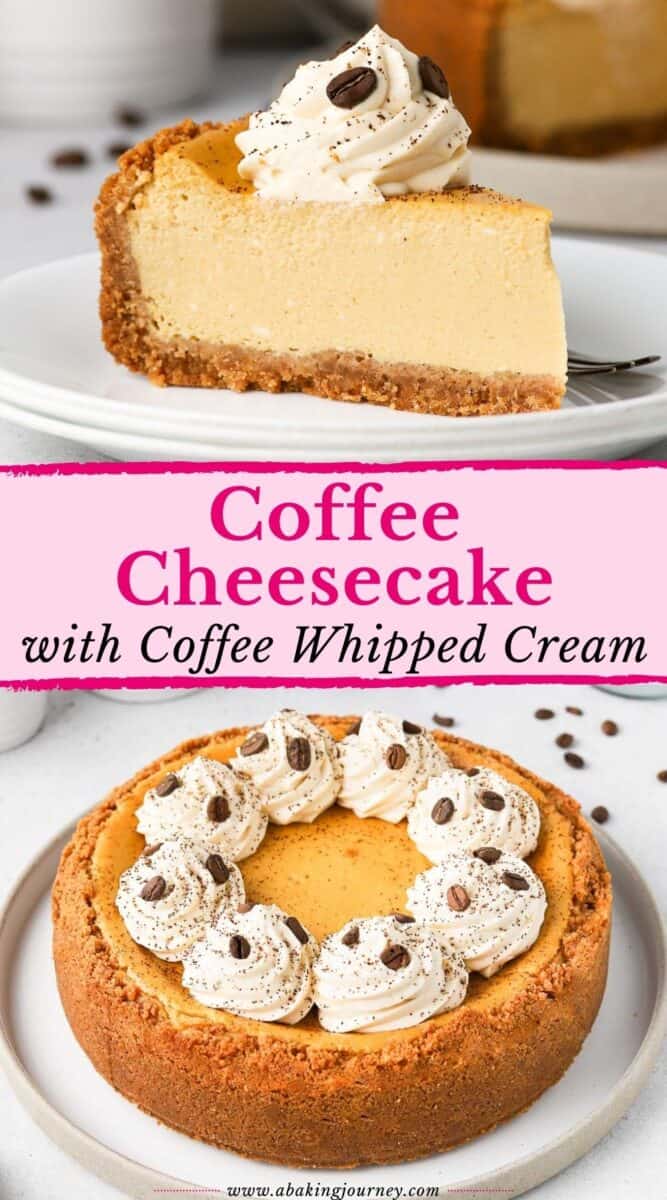
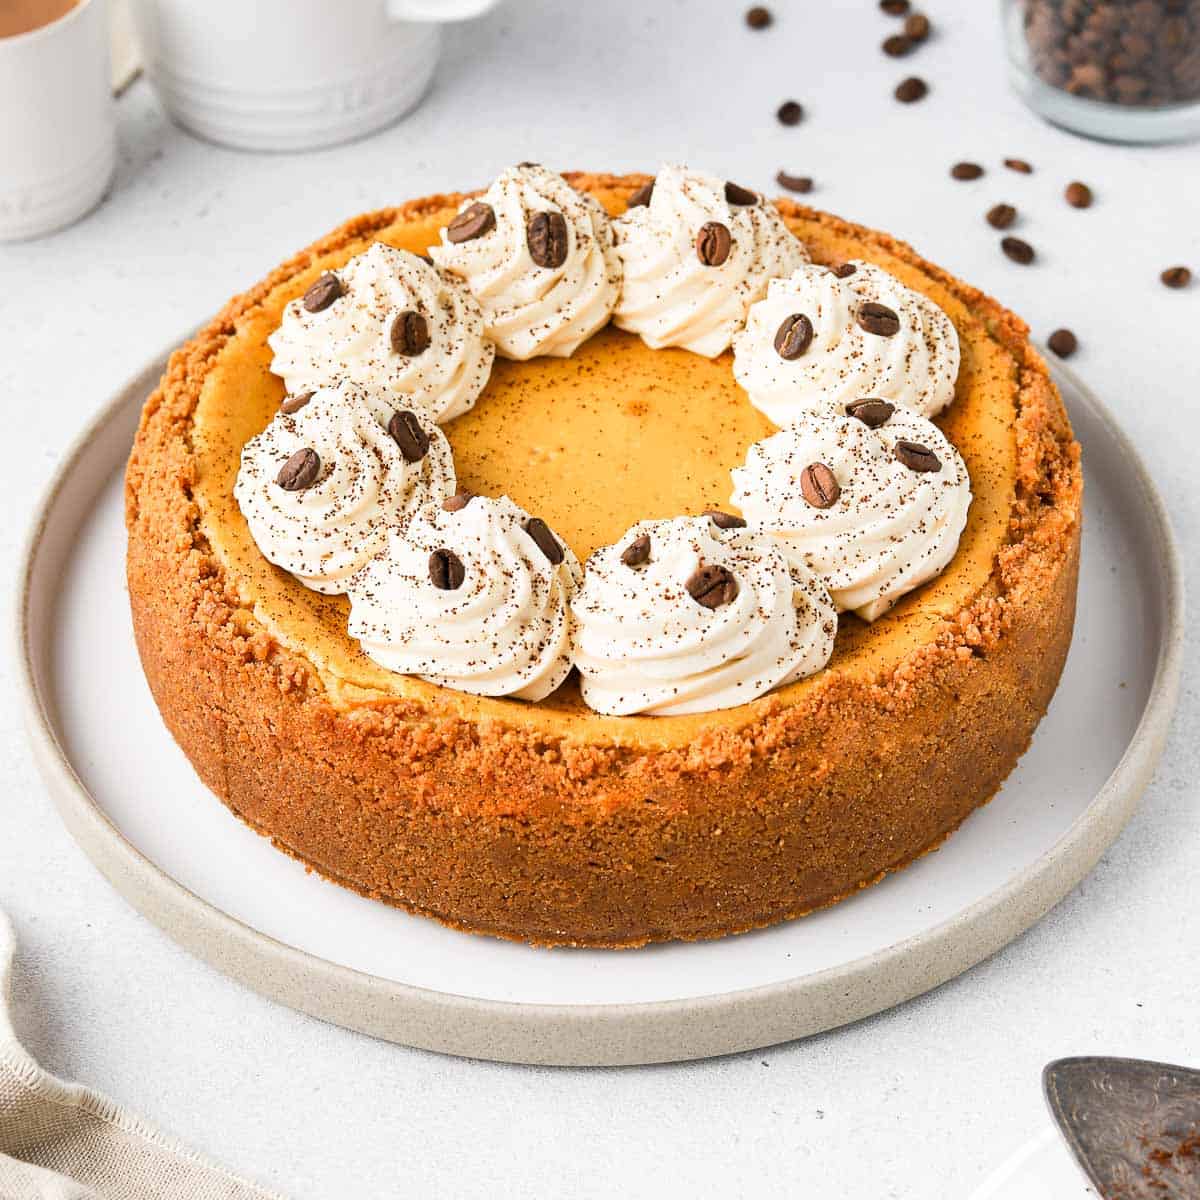
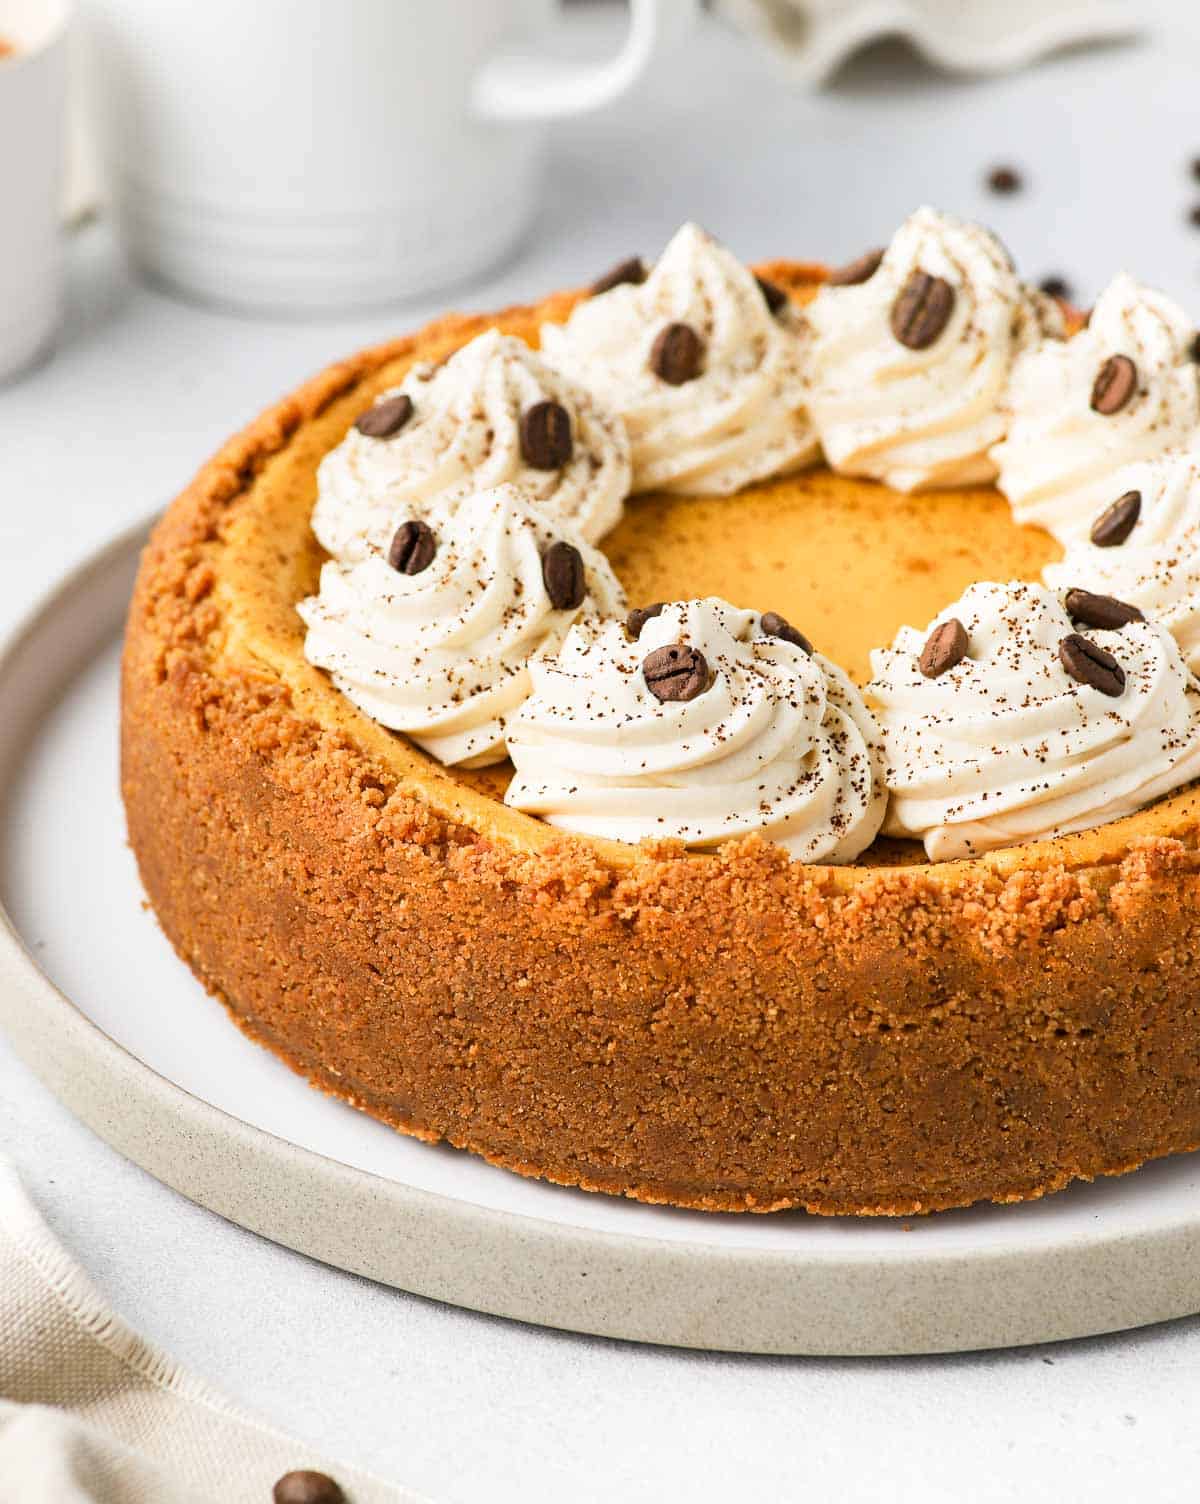
This Baked Coffee Cheesecake with Coffee Whipped Cream is a decadent dessert that is perfect for any coffee lovers. Packed with espresso flavours, it is creamy, crunchy, smooth and simply delicious!
Jump to:
Why we love this recipe
If you are after a moorish, decadent dessert for a special occasion or dinner party, this Baked Coffee Cheesecake recipe is for you! It combines a simple cookie crust, espresso cheesecake filling and a coffee whipped cream to finish it.
It might be a baked cheesecake but it has a deliciously light and creamy texture with a coffee flavour that shines through without overpowering the dessert. It is also a great make-ahead dessert that can be kept in the fridge until ready to serve.
This Espresso Cheesecake is made without a water bath which makes it SO much easier. Simply follow my tricks and you will get a beautiful no water bath baked cheesecake without any cracks!
Ingredients
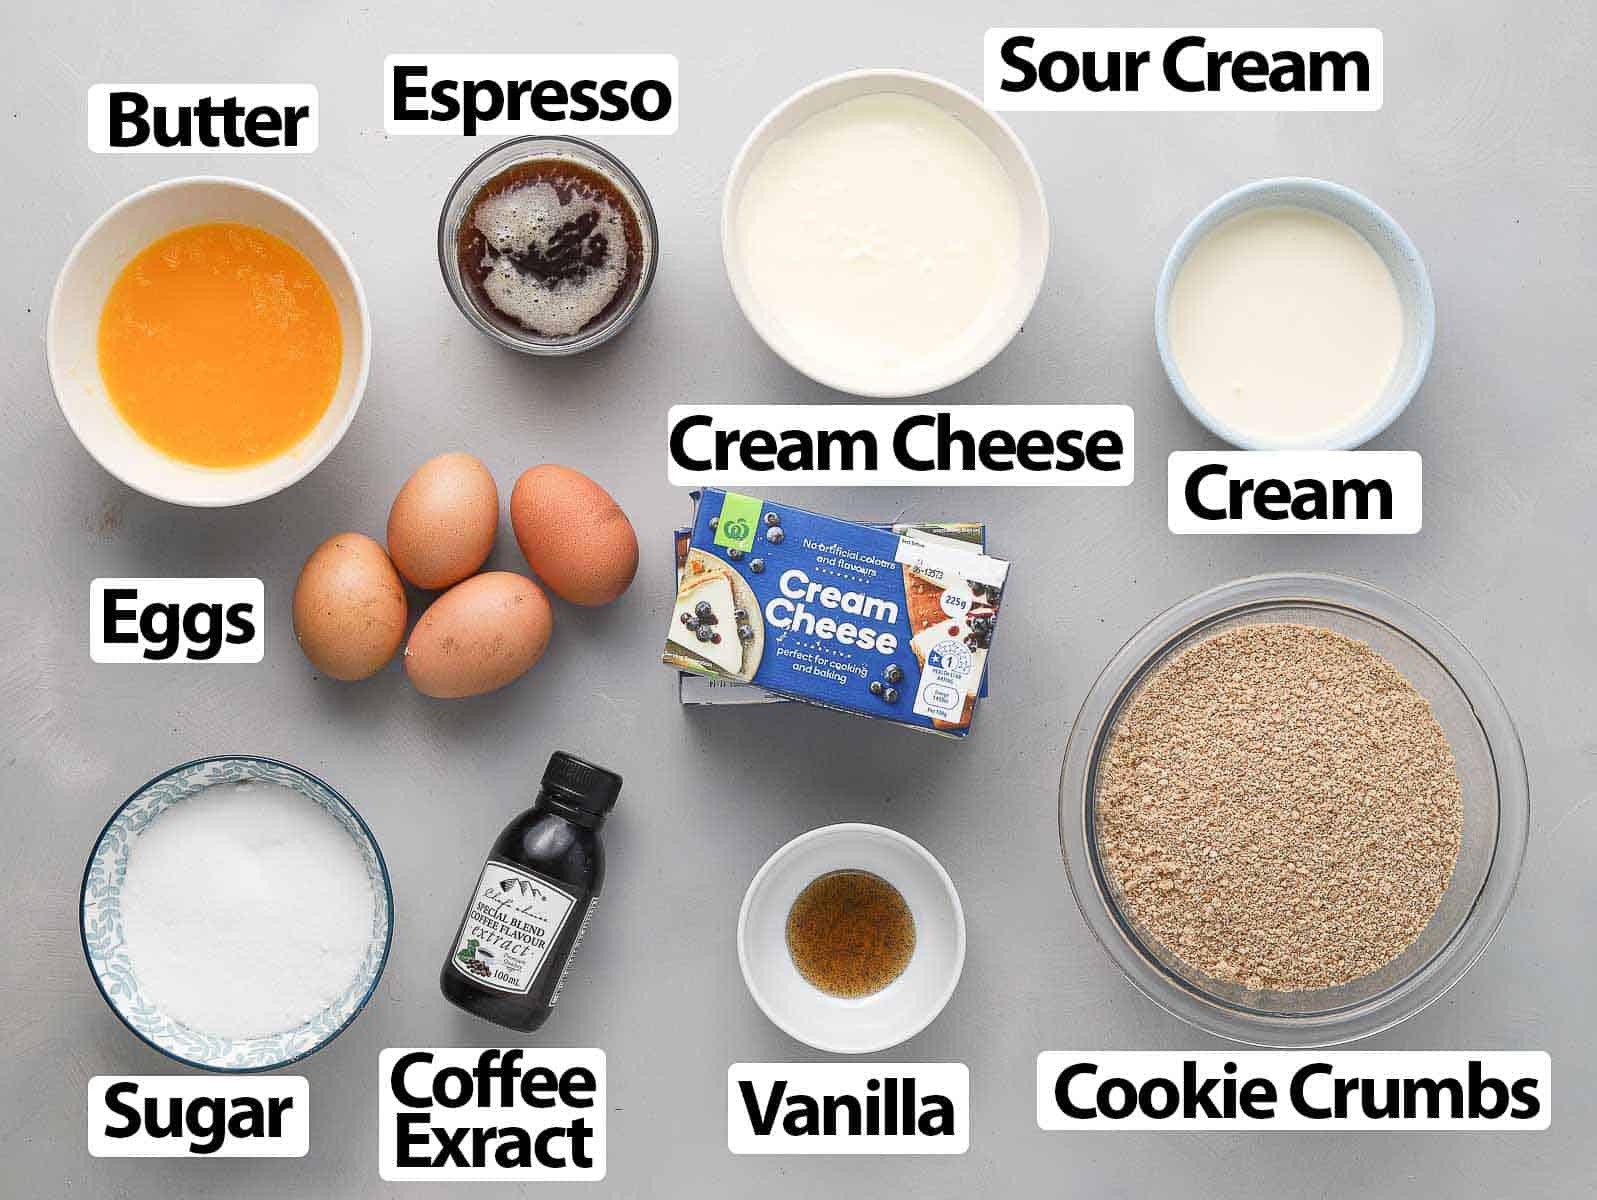
There are three different elements in this baked cheesecake: the crust, coffee cream filling and the espresso whipped cream (that is an optional topping).
Cookie Crust:
- Cookies: I used crushed Digestive Biscuits, but you could basically use any of your favourite cookies here. Since Digestive Biscuits are already sweetened, there is no need to add sugar to the crust.
- Butter: melted Unsalted Butter.
Espresso Cheesecake Filling:
- Cream Cheese: use Full-Fat Cream Cheese for the best results. It's really important for the cream cheese to be at room temperature or it will be hard to combine with the rest of the ingredients and you will get lumps.
- Sour Cream: again, it needs to be at room temperature.
- Coffee: freshly brewed Espresso. If you don't have a coffee machine, you can also make it with espresso powder or instant coffee. Use fresh, quality coffee beans if you can for the best results! Make sure to let the coffee cool down before you add it to the rest of the ingredients.
- Vanilla: I used Vanilla Paste but you can also use Vanilla Extract or Essence.
- Sugar: Caster Sugar or Fine White Sugar.
- Eggs: medium size. make sure they are at room temperature.
Coffee Whipped Cream:
It is a classic Whipped Cream made from Heavy / Thickened Cream and Caster Sugar, but with the addition of Coffee Extract. If you don't have coffee extract, you could also dissolve some espresso or instant coffee powder in warm cream, chill it then whip it with the sugar.
How to make Coffee Cheesecake
The first step is making the crust and chilling it, then the coffee cheesecake batter then lastly the coffee flavoured whipped cream that should be added just before serving.
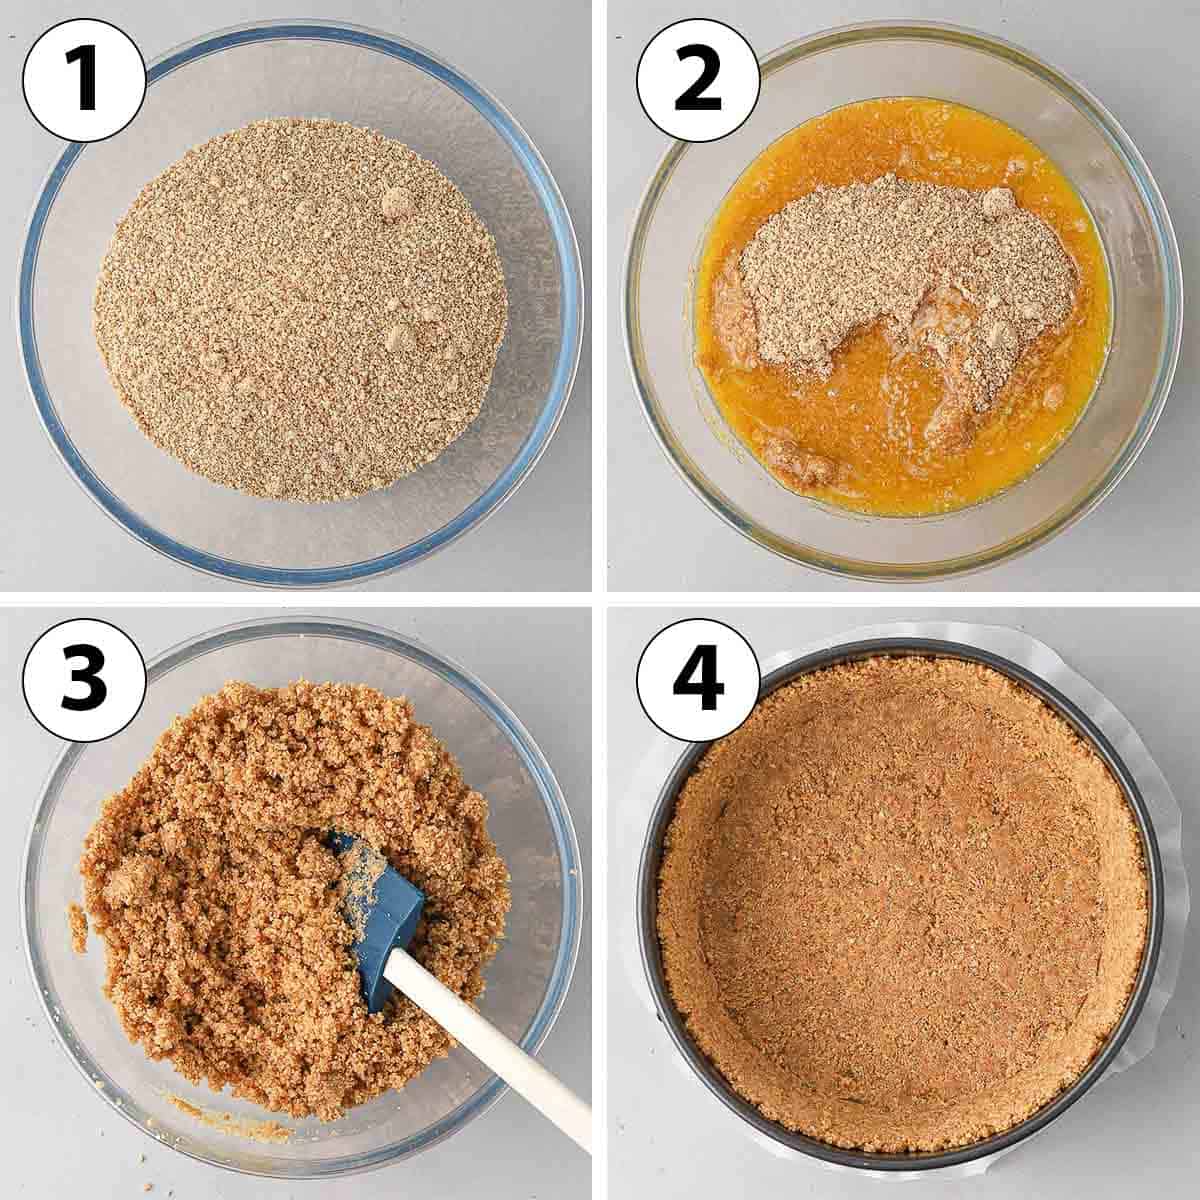
Cookie Crust
- Prepare a 22 cm / 9 inch Springform Pan by lining the bottom with Baking Paper. Set aside.
- Photo 1: Crush the Digestive Biscuit into very fine crumbs. I used the Food Processor but you can also place the cookies into a large freezing bag and crush them with a rolling pin (or other hard utensils).
If using an unsweetened cookie or graham crackers, you might want to add a little bit of sugar to the crumbs.
- Photo 2 & 3: Add the Melted Butter and mix until the mixture resembles wet sand.
- Photo 4: firmly press the crumbs into the springform pan to create the bottom and side of the cheesecake crust. Use the bottom of a cup to pack it as firmly as possible; you shouldn't have any loose crumbs.
- Place in the fridge while you prepare the cheesecake filling.
Note that I made a large amount of crust as I wanted high crust edges, but if you prefer for the crust to be just at the bottom, simply divide the quantities of cookies/butter by half.
Would you like to save this recipe?
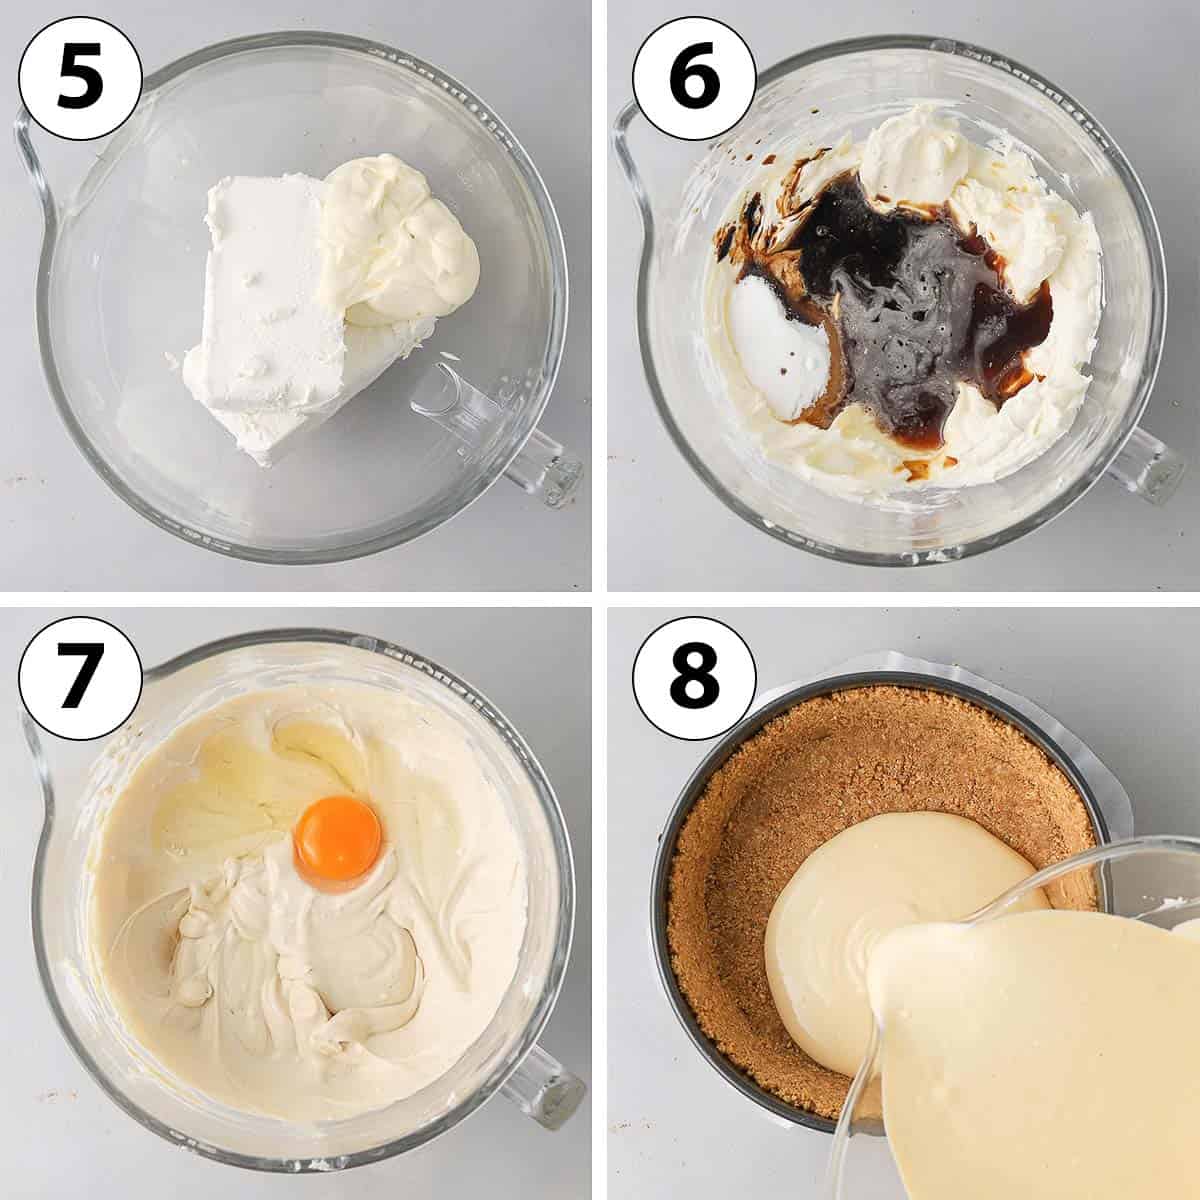
Coffee Cheesecake Filling
- Preheat your oven on 150'C/300'F with a rack set up as low as possible.
- Prepare the freshly brewed Espresso (or coffee) and set aside to cool down.
- Photo 5: Place the Cream Cheese and Sour Cream in the bowl of your stand mixer and mix with the paddle attachment on medium speed until smooth.
It is really important for the Cream Cheese and Sour Cream to be at room temperature, or it won't mix properly and you will see lumps of unmixed cream cheese. Stop mixing as soon as smooth as you want to avoid adding too much air into the batter.
- Photo 6: Add the Sugar, freshly brewed Coffee, Vanilla Paste and Coffee Extract (optional) and mix until combined. Stop to scrap the edge/bottom of the bowl if required.
- Photo 7: Add the Eggs one at the time and mix on low speed until just combined. Avoid over-mixing as adding too much into the mixture might make the cheesecake rise quickly in the oven then collapse.
- Photo 8: Pour the coffee cheesecake filling into the chilled crust. Bake for 60 to 70 minutes; the centre of the cheesecake should still jiggle very slightly when ready. Yes, no water-bath required here!
If the cheesecake looks like it's browning or burning in the oven, it is possible that your oven is too warm.
To cool down the cheesecake and avoid cracks:
- Turn off the oven, open the door slightly (use a wooden spoon to hold the door open) and leave the cheesecake to cool down inside the oven for 1 hour. Take out of the oven and leave to cool down at room temperature for 1 other hour, then in the fridge for at least one hour, or preferrably overnight.
Coffee Whipped Cream
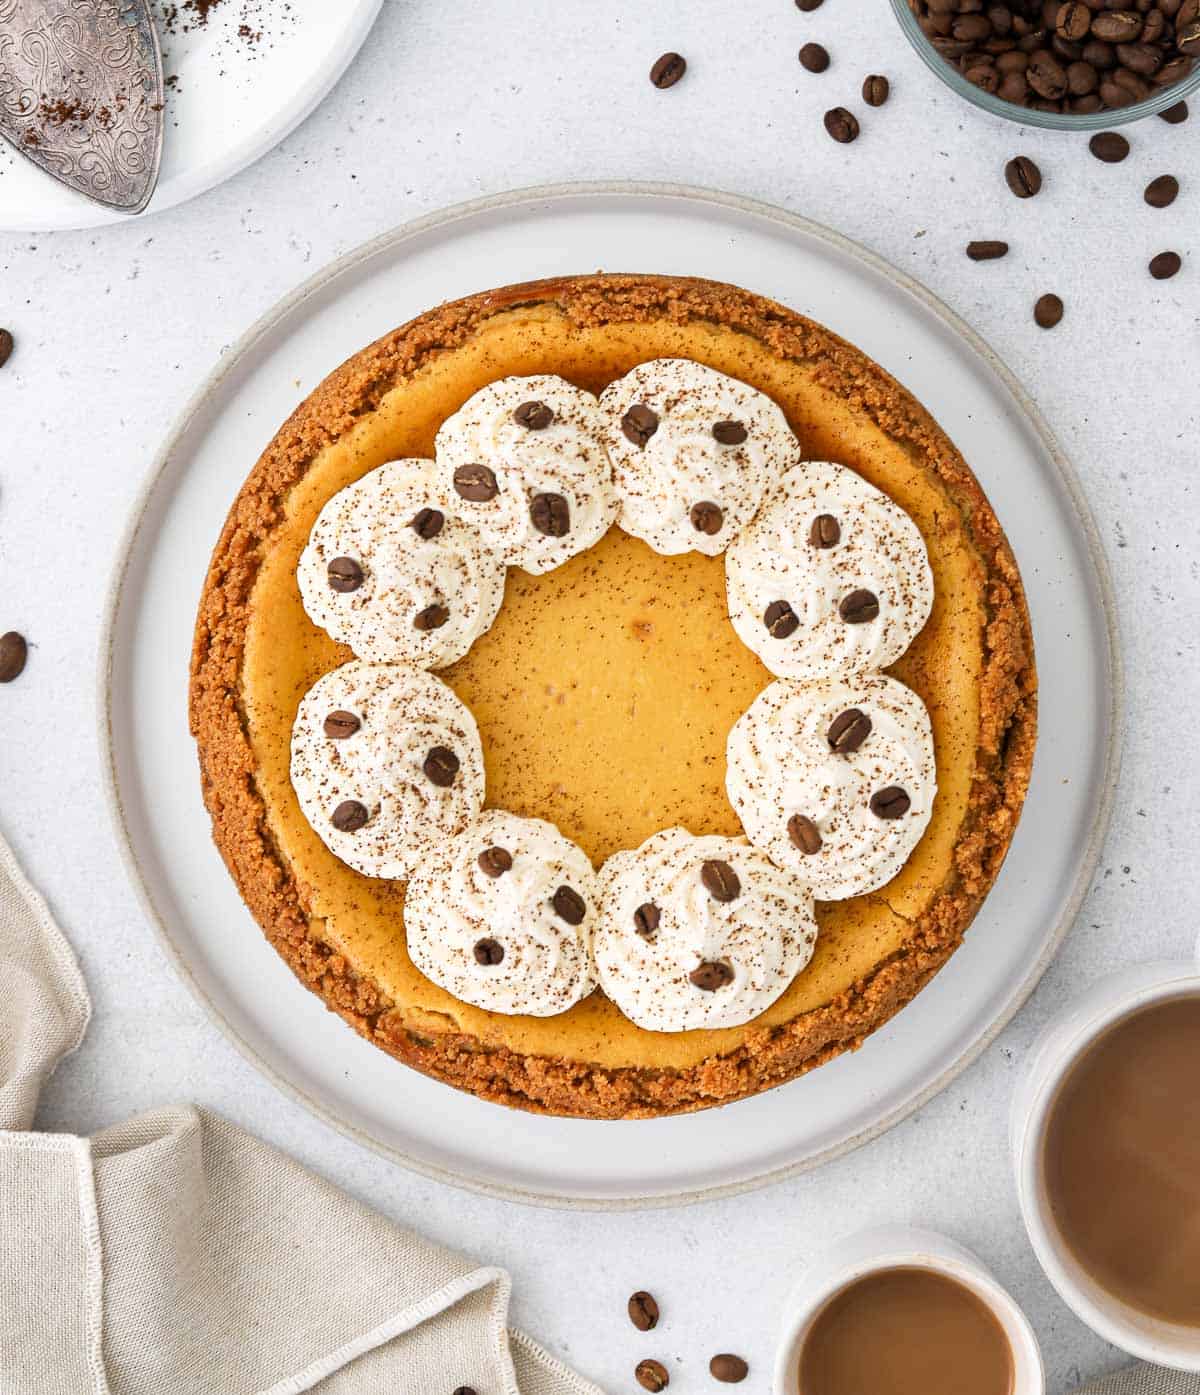
The last step of the recipe is preparing the Coffee Whipped Cream - although completely optional! It can be prepared in advance and stored in the fridge in an air-tight container, but I recommend piping it over the cheesecake just before serving.
- Place the very cold Heavy / Thickened Cream in the bowl of your mixer (or a large mixing bowl if using a hand mixer). Add the Sugar and Coffee Extract.
- Whisk on medium to high speed until you reach stiff peaks. Be careful not to overwhip the cream or it will get grainy. Once you start reaching stiff peaks, only continue to whisk for a few seconds at the time until you get the desired consistency.
- Place in a piping bag with a star shaped nozzle and pipe over the cheesecake. Optionally, dust with a little bit of espresso powder and top with a few coffee beans.
Recipe FAQs
I find that you will get the best flavours with some freshly brewed espresso - if you have a coffee / espresso machine. Using quality and fresh beans will give your cheesecake a delicious aroma and flavour.
If you don't have a coffee machine, you can use instant espresso powder or instant coffee powder/instant coffee granules with boiling water instead.
Absolutely, you can basically use any type of cookies you want like Oreos or Biscoff Cookies. You can use Graham Crackers as well, but I then recommend adding a little bit of sugar into the crust.
One of my favourite thing about this coffee cheesecake is that it is baked without a water bath! I personally find that you get the best texture from a baked cheesecake when it is made without a water bath.
Instead, bake it on the lowest rack of your oven and at a low temperature. It is also key to cool it down as slowly as possible, which is why I first cool it in the turned off oven, then at room temperature and lastly in the fridge.
I made a Coffee Whipped Cream but you could also make a simple Whipped Cream instead. It will also be delicious topped with a Chocolate Ganache or even some Whipped Ganache Frosting and a little bit of dusted cacao powder.
If you are after a sweeter finish, you could make a Coffee Buttercream too.

Tips for Success
- It is very important for all of the ingredients to be at room temperature, especially the Cream Cheese, Sour Cream and Eggs. If the cream cheese is too cold, it will remain lumpy when you mix it with the other ingredients.
- Don't over-mix the ingredients, especially the eggs. The main reason for a baked cheesecake to crack or collapse is the addition of too much air into the cheesecake mixture (which comes from over-mixing). The air expands in the oven, which makes the cheesecake rise but then crack and/or collapse as there are no ingredients to keep the structure of the cake around those air pockets.
- How to cool down the cheesecake to prevent cracks: it is very important to progressively cool down the cheesecake once baked if you want to avoid cracks. First, let it cool down in the oven (turned off) with the oven door slightly open. Secondly, cool it down at room temperature then lastly in the oven.
Storing & Freezing
This cheesecake should be kept in the fridge and will last for up to 3 days. It is actually best made in advance as it will get the best creamy texture after spending the night in the fridge.
I recommend topping the espresso cheesecake with the coffee whipped cream just before serving. The whipped cream can be prepared in advance and kept in an air-tight container in the fridge.
I do not recommend freezing this baked cheesecake.

Made this recipe?
Let us know if you liked it by leaving a comment below, and tag us on Instagram @a.baking.journey with a photo of your creation!
Recipe
Baked Coffee Cheesecake
Ingredients
Crust
- 300 gr (10 oz) Digestive Biscuits, crushed, (about 3 cups of crushed cookies)
- 150 gr (2/3 cup) Unsalted Butter, melted
Coffee Cheesecake Filling
- 120 ml (1/2 cup) Freshly brewed Espresso, or coffee
- 500 gr (18 oz) Cream Cheese, at room temperature
- 180 ml (3/4 cup) Sour Cream, at room temperature
- 120 gr (1/2 cup + 2 tablespoon) Caster Sugar, or fine white granulated sugar
- 1 teaspoon Vanilla Paste
- 1 teaspoon Coffee Extract, optional
- 3 Eggs, at room temperature
Coffee Whipped Cream
- 180 ml (3/4 cup) Heavy / Thickened Cream, or whipping cream
- 40 gr (3 tablespoon) Caster Sugar, or fine white granulated sugar
- 1/2 teaspoon Coffee Extract
Instructions
Crust
- Line the bottom of a 22 cm / 9 inch Springform Pan with Baking Paper.
- Crush the Digestive Biscuit (or your choice of cookies) into very fine crumbs. Add the Melted Butter and mix until the mixture resembles wet sand.
- Firmly press the crumbs to the bottom and sides of the Springform Pan to create the crust (see note 1). Place in the fridge while you prepare the cheesecake filling.300 gr (10 oz) Digestive Biscuits, crushed, 150 gr (2/3 cup) Unsalted Butter
Coffee Cheesecake Filling
- Preheat your oven on 150'C/300'F and prepare a rack on the lowest part of the oven.
- Prepare the Espresso / Coffee and set aside to cool down.120 ml (1/2 cup) Freshly brewed Espresso
- Place the Cream Cheese and Sour Cream in the bowl of your mixer (or a large mixing bowl if using a hand mixer). Mix with the paddle attachment on medium speed until smooth (see note 2).500 gr (18 oz) Cream Cheese, 180 ml (3/4 cup) Sour Cream
- Add the Sugar, freshly brewed Coffee, Vanilla Paste and Coffee Extract (optional) and mix until combined. Stop to scrap the edge/bottom of the bowl if required.120 gr (1/2 cup + 2 tablespoon) Caster Sugar, 1 teaspoon Vanilla Paste, 1 teaspoon Coffee Extract
- Add the Eggs one by one, mixing on low speed (see note 3). Stop as soon as combined.3 Eggs
- Pour the coffee cheesecake filling into the crust, then place in the oven (on the lowest rack) to bake for 60 to 70 minutes. The filling should still jiggle very slightly (see note 4).
- Turn off the oven, open the door slightly (use a wooden spoon to hold the door open) and leave the cheesecake to cool down inside the oven for 1 hour. Take out of the oven and leave to cool down at room temperature for 1 other hour, then in the fridge for at least one hour, or preferrably overnight. Remove from the springform pan once fully cooled.
Coffee Whipped Cream
- Place the cold Cream, Sugar and Coffee Extract (see note 5 if you don't have coffee extract) in the bowl of your mixer (or large mixing bowl if using a hand mixer) and whisk on medium to high speed until you reach stiff peaks (see note 6).
- Pipe over the cool Cheesecake just before serving. Optionally, dust with a litle bit of espresso powder and top with a few coffee beans.180 ml (3/4 cup) Heavy / Thickened Cream, 40 gr (3 tablespoon) Caster Sugar, 1/2 teaspoon Coffee Extract
Would you like to save this recipe?
Notes
- Digestive Biscuits: you can use any type of cookies you want if you cannot find digestive biscuits. If using Graham Crackers, consider adding a little bit of sugar to the crust as well.
- Freshly Brewed Espresso: this is the equivalent to 3 shots of espresso. If using Instant Coffee or Espresso Powder, dissolve about 3 to 4 teaspoons of coffee in 120 ml / 1/2 cup of boiling water. You can make it weaker or stronger to suit your taste.
- Use the back of a cup or spoon to firmly press the crumbs. There shouldn't be any loose crumbs anymore. I created a crust with quite high sides, but if you want a crust just at the bottom, divide the ingredients by two.
- It is really important for the Cream Cheese and Sour Cream to be at room temperature, or it won't mix properly and you will see lumps of unmixed cream cheese. Stop mixing as soon as smooth as you want to avoid adding too much air into the batter.
- You want to avoid adding air into the mixture when mixing in the eggs so it's important to mix on low speed and stop as soon as combined. Finish by hand with a spatula if needed.
- If the cheesecake starts to brown or burn quickly, it is possible that your oven is too hot.
- If you don't have coffee extract, you can dissolve 1 teaspoon of instant coffee or espresso powder in the warm cream then let it chill in the fridge until very before whipping it with the sugar.
- Be careful not to overwhip the cream or it will get grainy. Once you start reaching stiff peaks, only continue to whisk for a few seconds at the time until you get the desired consistency.