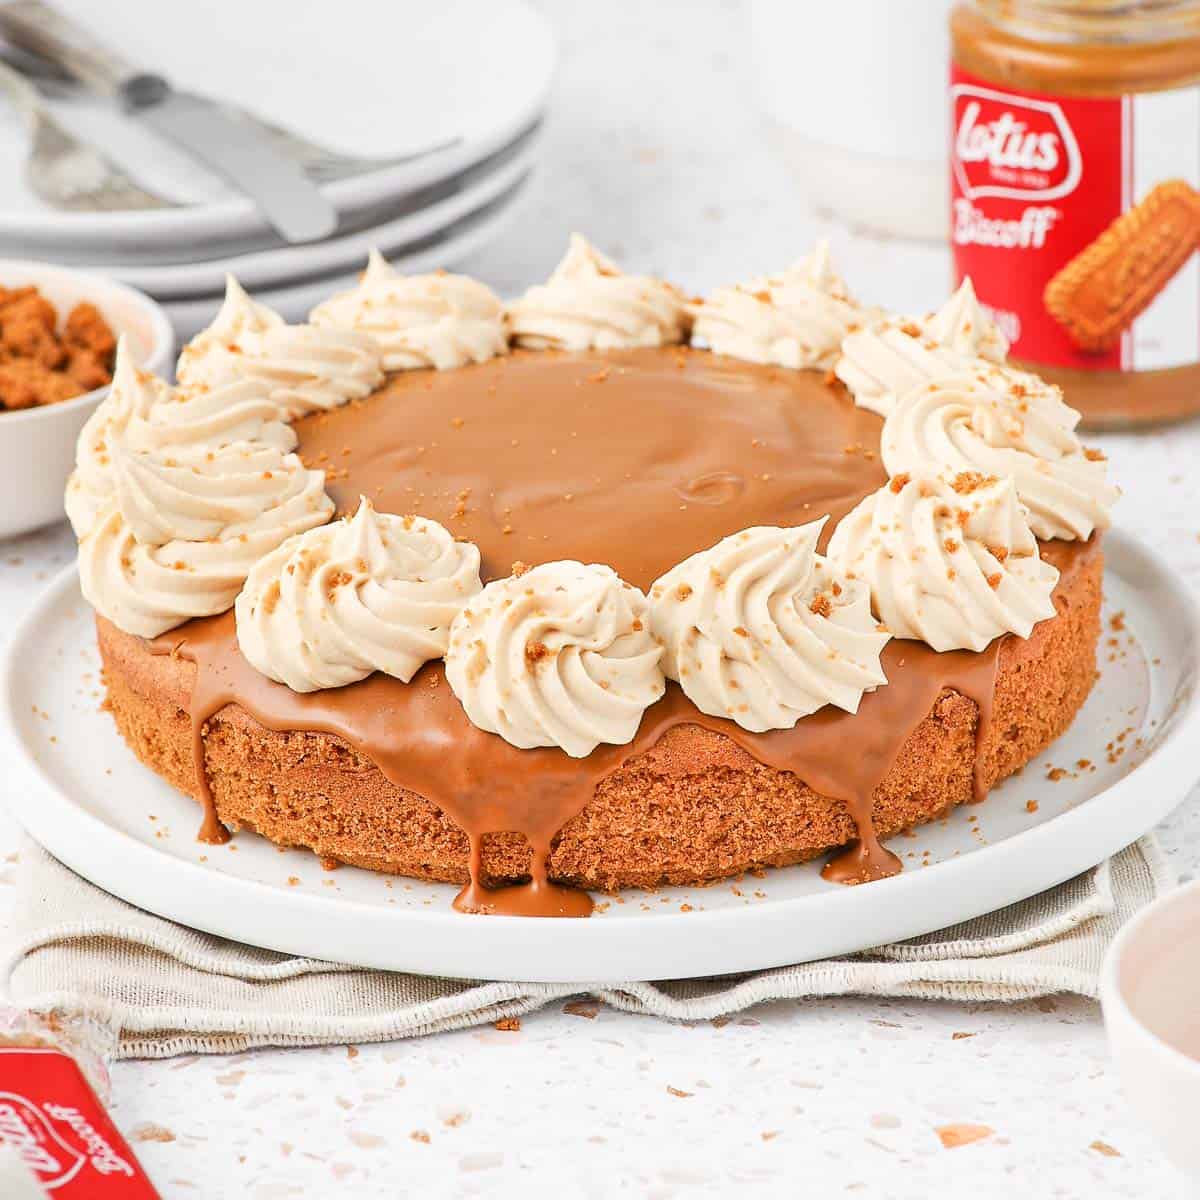
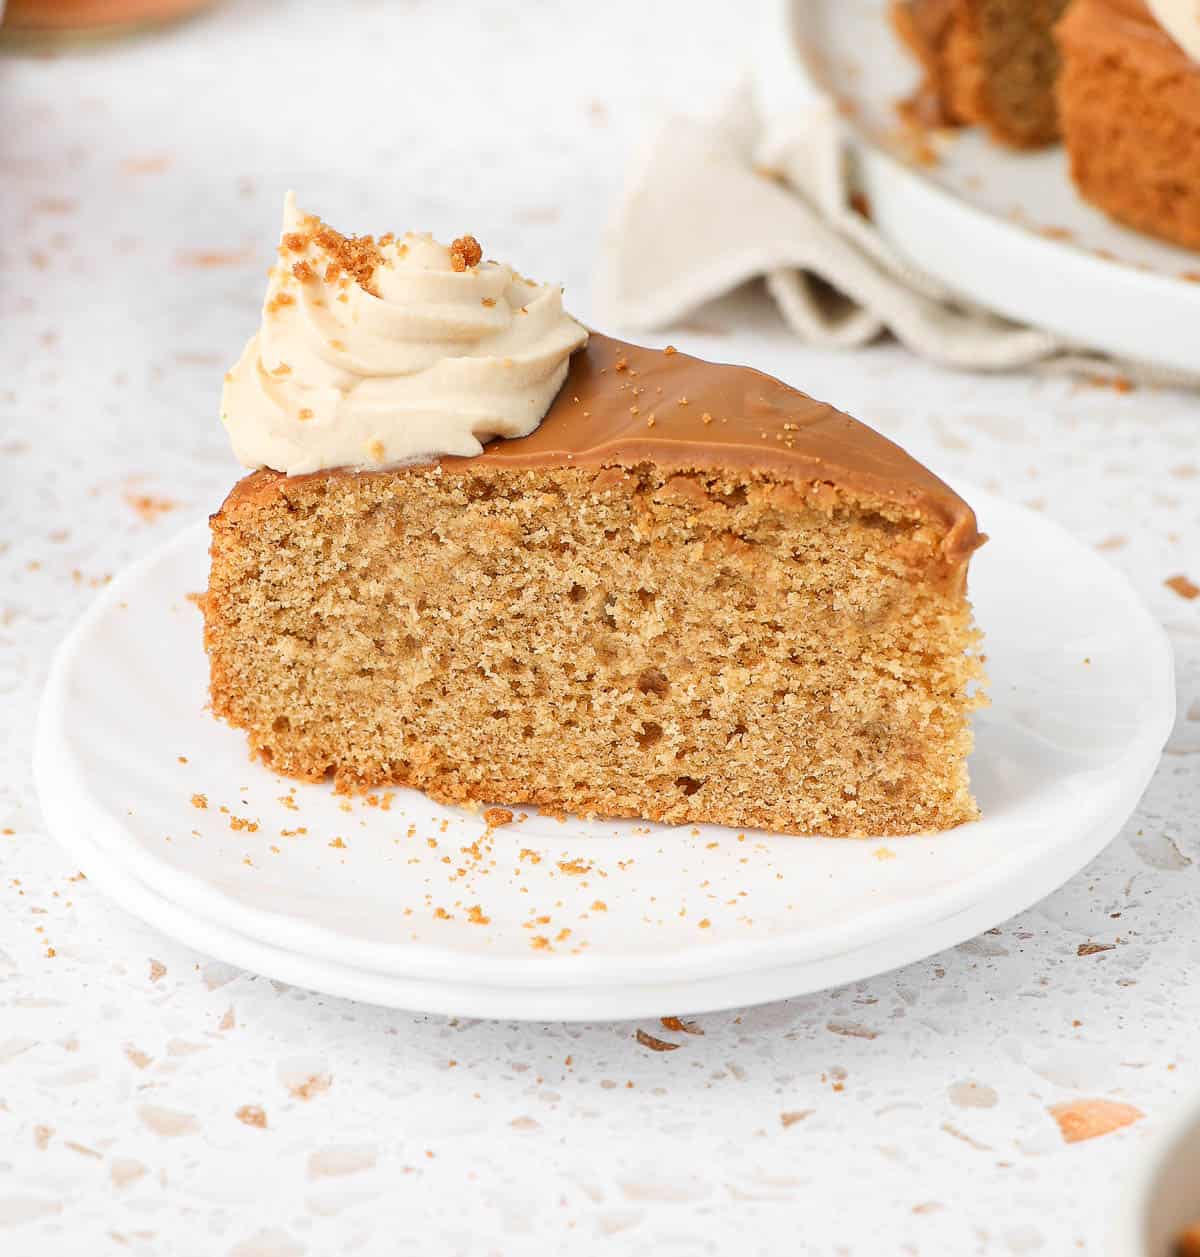
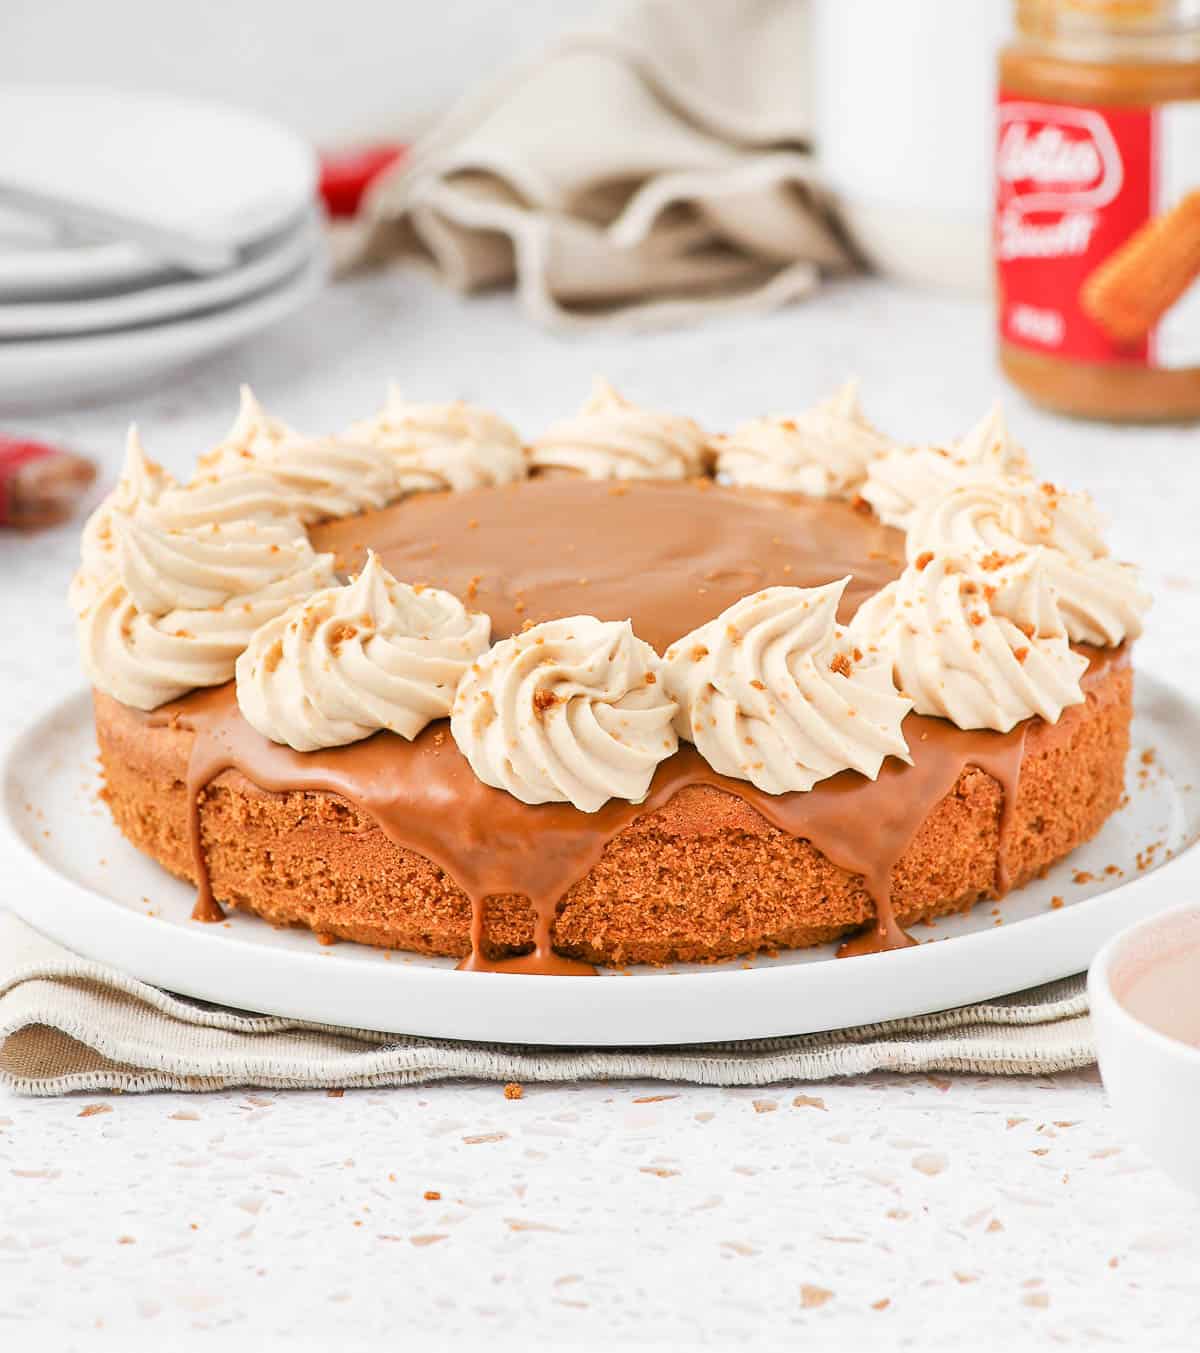
This super easy Biscoff Cake is a delicious dessert to make for a special occasion or afternoon tea. The light and airy cookie butter cake is topped with melted biscoff spread and topped with a biscoff whipped cream frosting.
Jump to:
Why we love this recipe
If you are looking for a simple way to adds LOADS of flavours to your classic vanilla butter cake, the answer is: biscoff! The cookie butter spread brings a delicious spiced taste and richness to the cake.
The one layer cake is simply packed with biscoff flavor. It is topped with a simple one ingredient biscoff glaze (think one layer biscoff drip cake!) and two ingredients biscoff whipped cream frosting.
This lotus biscoff cookie butter cake recipe creates a dessert that looks fancy enough for a special occasion; without the fuss! It is also great for afternoon tea or every day dessert.
Ingredients
For the cake:
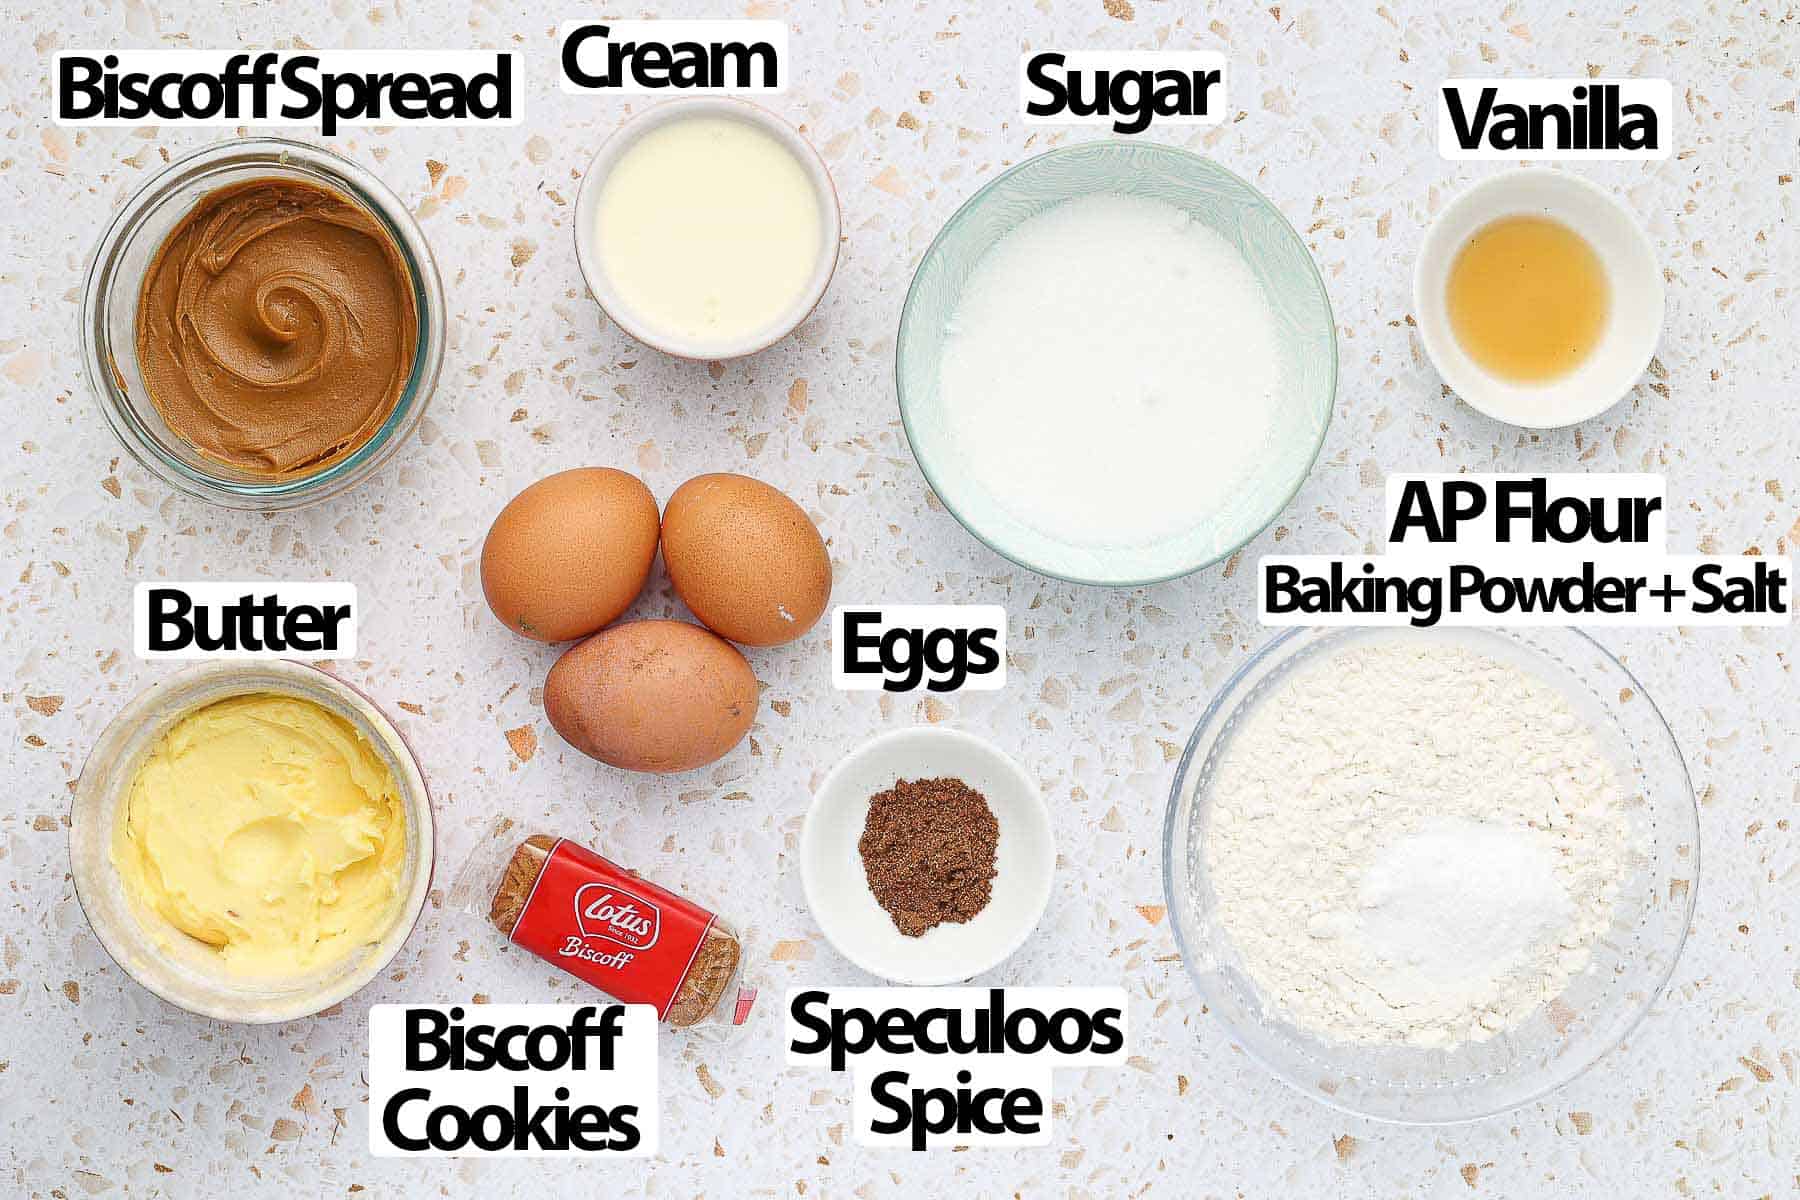
- Butter: unsalted and very soft, at room temperature.
- Sugar: I used white sugar (caster sugar) here but you could substitute it with brown sugar for a more caramelised flavour.
- Eggs: medium size and at room temperature.
- Smooth Biscoff Spread: or any brand of cookie butter spread / speculoos spread. You will need to melt it slightly in the microwave so that it mixes with the rest of the ingredients easily.
- Dry Ingredients: a mix of Plain / All Purpose Flour, Baking Powder and Salt. You can also use Self Raising Flour instead here.
- Speculoos Spice (optional): a spice mix use to make the traditional Belgian Speculoos Cookies. It will adds a lot of spicy flavours to the cake. See FAQs section below for substitute.
Optionally, you can also add some vanilla extract to the cookie butter cake.
For decorating:
- Glaze: simply some melted Biscoff Spread that is very fluid. You could also use a crunchy cookie butter spread here for more texture in the cake!
- Whipped Cream Frosting: made with Heavy / Thickened Cream (whipping cream) and a little bit of Biscoff Cookie Butter. Make sure the cream contains at least 30% fat or it will not whip properly. I also added a few crumbs of lotus biscoff biscuits to finish the cake.
The whipped cream is made with no added sugar here. For a sweeter and slightly more stable frosting, you can add a little bit of icing or powdered sugar to the cream when whipping it.
How to make Cookie Butter Cake
Biscoff Butter Cake
Let's start by making the biscoff cake layer. It is made the same way as most vanilla butter cake recipes. Step by Step Instructions:
- Preheat your oven on 160'c / 325'f. Line the bottom of a 20cm / 8-inch Springform Pan with baking paper (parchment paper) and lightly grease the sides.
I like to use a vegetable oil spray to grease the pan but you can also use butter.
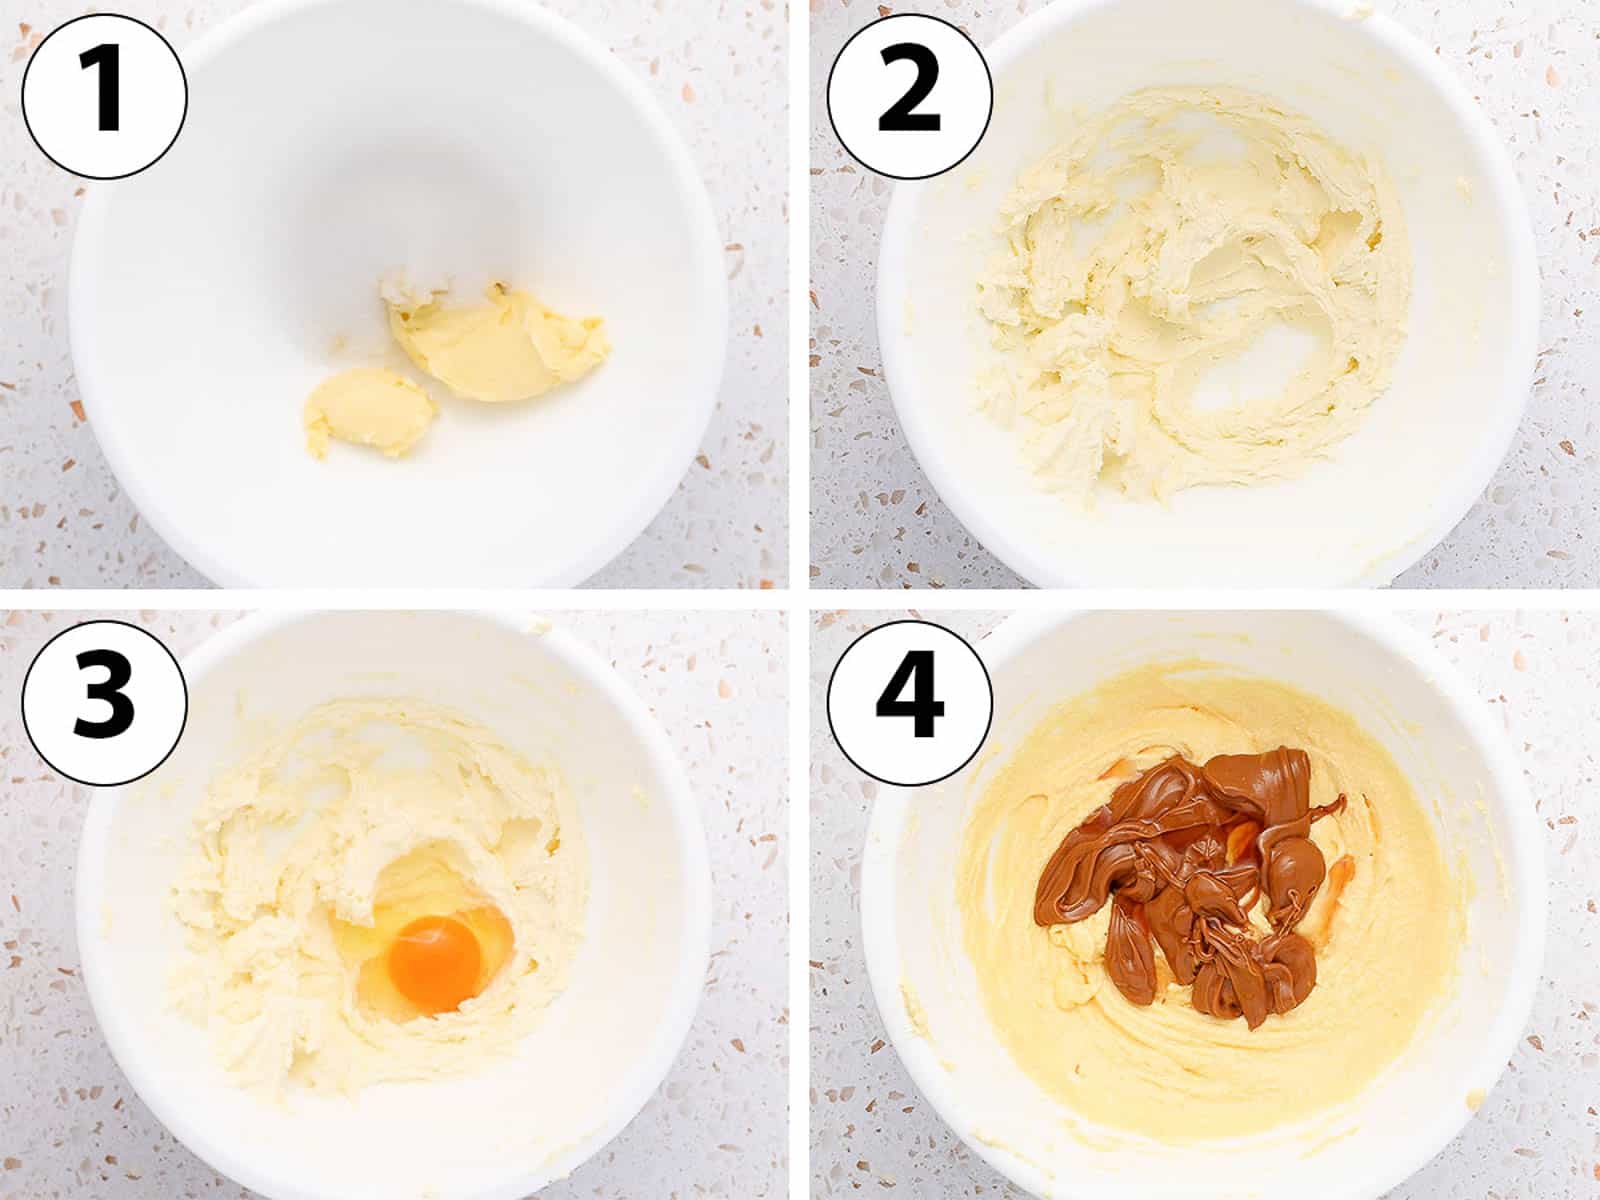
- Photo 1: Place the softened butter and sugar in a large mixing bowl (if using an electric mixer / hand mixer) or the bowl of a stand mixer.
- Photo 2: Cream the two ingredients together on medium speed for about 5 minutes, or until light and fluffy. The butter should look paler and if you rub a little bit of the mixture between your fingers, you shouldn't feel hard granules of sugar.
If using a stand mixer, use the paddle attachment.
- Photo 3: Add the Eggs one at the time. Mix on low speed in until fully incorporated before adding the next one.
Don't worry if the mixture looks like it is splitting slightly; it can happen when the butter was too cold or too warm or the sugar and butter were not creamed properly. The batter will come back together when you add the flour.
- Photo 4: add the slightly melted Biscoff Spread (make sure it is not too hot) and Vanilla.
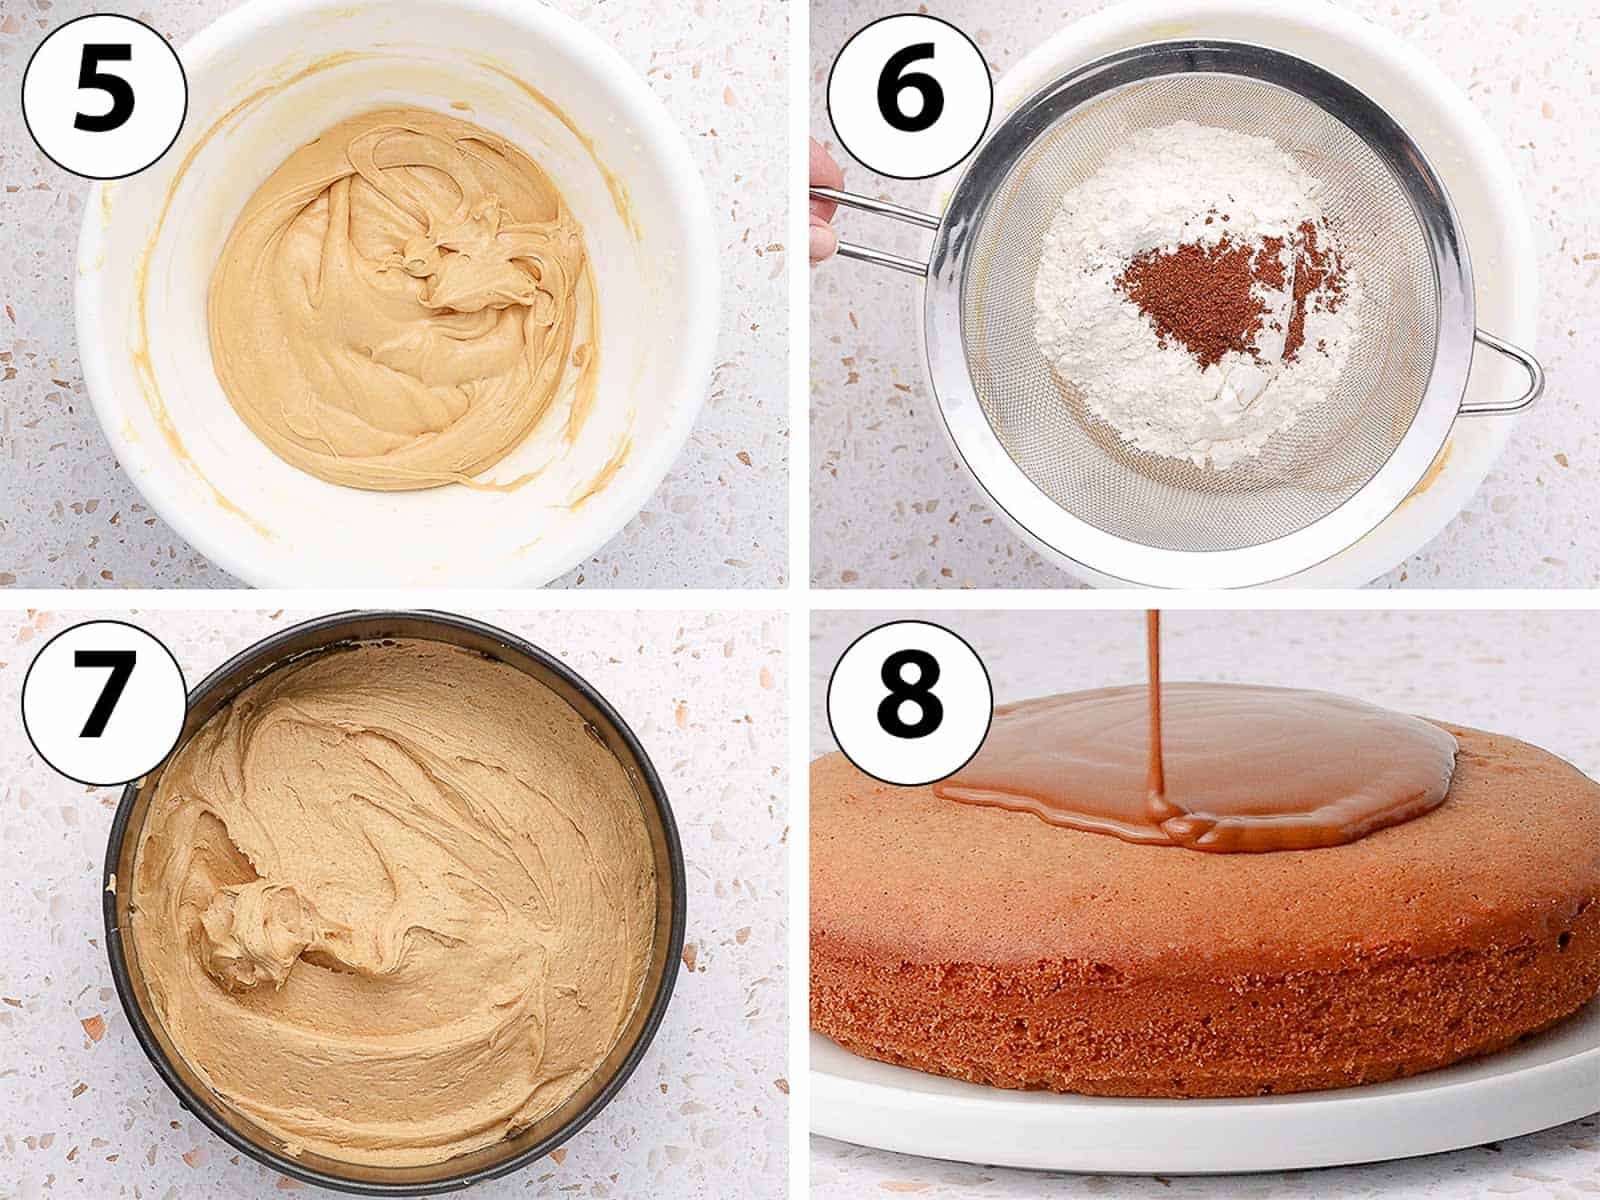
- Photo 5: mix on medium speed until just combined. If needed, stop the mixer and use a spatula to scrape the bottom and sides of the bowl.
Would you like to save this recipe?
- Photo 6: Sift in the dry ingredients (Flour, Baking Powder, Salt and optionally Speculoos Spice) over the wet ingredients. Slowly mix it in either on the lowest speed of your mixer or by hands to avoid over-mixing it.
- Photo 7: Pour the cake batter into the prepared pan. Use the back of a spoon or small offset spatula to spread it around and create a relatively even layer.
- Bake for 35 to 40 minutes or until a skewer comes out clean. Transfer onto a cooling rack and leave to cool down for at least 30 minutes.
- Carefully transfer the cake on a serving plate. If the cake still feels warm to the touch, leave it to cool down for a little bit longer or the crumb might break.
- Photo 8: for the biscoff glaze, melt the biscoff spread in the microwave for 30 seconds to 1 minutes or until very smooth and fluid.
- Pour it on top of the cake. Spread it around with the back of a spoon so that it covers the entire cake, and slightly push it over the sides of the cake to create a drip effect. Set aside to set.
Make sure the spread is very warm so you can easily spread it around. It will harden when it starts to cool down.

Biscoff Whipped Cream Topping
The whipped cream can be prepared in advance and be stored in the fridge until ready to serve. I recommend adding this topping as close to serving as possible as you don't want the cream to start melting.
Once topped with cream, the cake will also need to be kept in the fridge.
- Photo 9: Place the cold Cream and melted Biscoff Spread (cooled down) in a large mixing bowl or the bowl of your stand mixer.
- Photo 10: Whip on medium to high speed until you reach stiff peaks.
I personally like to whip it with the mixer until I reach medium peaks then finish it by hands. This helps to control how much you mix it and avoid over-whipping it, which would give a slightly grainy texture to the cream.
- Photo 11: Tranfer the cream into a piping bag fitted with a star piping tip. Pipe small dollops of whipped cream around the edge of the cake.
I piped 12 dollops of cream so that each slice of cake is topped with the same amount of cream.
- Photo 12: Sprinke the whipped cream with some crumbs of Lotus Biscoff cookies / Homemade Speculoos for and added crunch.
- Serve straight away.
Alternatively, you could use this Cookie Butter Cream Cheese Frosting instead of the Whipped Cream.

Recipe FAQs
Biscoff - aka Speculoos - are Belgian Cookies made with specific type of Brown Sugar coming from Sugar Beet ("vergeois brune") and a mix of Spices.
Speculoos Cookies have a deep spicy flavour with hints of caramel, a bit similar to gingerbread cookies.
It is a mix of spices used to make Speculoos Cookies. Although the mix can vary, it usually combines at least Cinnamon, Coriander Seed, Nutmeg, Ginger, Caraway Seed and Cloves.
It can be a bit hard to find outside of Belgium, so if you don't have it, simply discard it or swap with some Mixed Spice for a relatively similar flavour. I don't recommend using just Cinnamon as a replacement because Speculoos Spices have a much deeper, more complex flavour.
Biscoff Spread and Cookie Butter are both made from crushed Speculoos Cookie Crumbs mixed with Oil. Although the exact recipes can slightly vary from brand to brand, you can generally interchange biscoff spread and cookie butter when baking.
Yes! You can double or triple this recipe and bake them in separate cake pans to make a layered biscoff cake. But note that the whipped cream topping is quite soft and should only be used as a topping. You can use some biscoff buttercream or biscoff cream cheese frosting to fill / frost the cake.
Tips for Success
- You will get the best results by using ingredients at room temperature - especially the butter and eggs. If too cold, these ingredients will not mix properly resulting in a denser, drier crumb.
- Why did the batter split when I added the eggs: having the batter split can happen when the butter used was too cold or too warm, or if the sugar and butter were not creamed properly. In this recipe, the batter will come back together when you add the flour so it shouldn't cause much issues.
- The cake is baked at a slightly lower temperature (160'c / 325'f) than usual. This will make the cake rise more slowly and avoid creating a higher dome shape in the centre. If the cake has risen more in the middle, you could always use a serrated knife to cut off the excess.
- The Whipped Cream topping can be prepared in advance and stored in the fridge topped with plastic wrap for 24 hours. Letting it chill before piping it over the cake will actually make it more stable.
Storing & Freezing
The cookie butter cake itself can be stored at room temperature (covered with plastic wrap or in an airtight container) and is best eaten within 2 days.
The whipped cream topping can be made up to 24 hours in advance and kept in the fridge. I recommend adding the cream topping as close to serving as possible.
Once topped with the whipped cream, the cake should be kept in the fridge. It can be frozen, but without the biscoff glaze or whipped cream.
Made this recipe?
Let us know if you liked it by leaving a comment below, and tag us on Instagram @a.baking.journey with a photo of your creation!
Recipe

Easy Biscoff Cake
Ingredients
Biscoff Butter Cake
- 120 gr (1/2 cup) Unsalted Butter, soft, at room temperature
- 120 gr (1/2 cup) Caster Sugar, or fine white sugar
- 3 Eggs, medium, at room temperature
- 120 gr (1/2 cup) Biscoff Spread, or cookie butter - melted and cooled down
- 1 teaspoon Vanilla Extract
- 200 gr (1 1/3 cup) Plain / All-Purpose Flour
- 1 1/2 teaspoon Baking Powder
- 1 pinch Fine Salt
- 1 teaspoon Speculoos Spices, optional - see notes below for substitute
- 80 gr (1/3 cup) Biscoff Spread, melted, for the glaze
Biscoff Whipped Cream
- 180 ml (3/4 cup) Heavy / Thickened Cream
- 45 gr (3 tablespoons) Biscoff Spread, melted and cooled down
- 1 Biscoff Cookie, crushed
Instructions
Biscoff Butter Cake
- Preheat your oven on 160'c / 325'f. Line the bottom of a 20cm / 8-inch Springform Pan with baking paper and lightly grease the sides.
- In a stand mixer or large bowl with a hand mixer, cream the soft Butter and Sugar on medium speed for about 5 minutes, or until light and fluffy.
- Slowly add the Eggs one at the time, mixing until fully incorporated before adding the next one (see note 1). Mix in the cooled down melted Biscoff Spread and Vanilla.
- Sift in the Flour, Baking Powder, Salt and Speculoos Spice (optional). Gently mix it in until just combine, making sure to not over-work the batter.
- Pour the batter into the prepared tin and spread around with the back of a spoon or small offset spatula.
- Bake for 35 to 40 minutes or until a skewer comes out clean. Transfer onto a cooling rack and leave to cool down for at least 30 minutes. Carefully transfer the cake on a serving plate (see note 2).
- For the biscoff glaze, melt the biscoff spread in the microwave for 30 seconds to 1 minutes or until very smooth and fluid. Pour it over the cake and spread it around with the back of a spoon, letting it drip over the side of the cake. Set aside to set.
Biscoff Whipped Cream
- Place the cold Cream and cooled down melted Biscoff Spread in a large mixing bowl or the bowl of your stand mixer. Whip on medium to high speed until you reach stiff peaks (see note 3).
- Tranfer the cream into a piping bag fitted with a star piping tip. Pipe small dollops of whipped cream over the biscoff glaze around the edge of the cake (See note 4).
- Optionally, crush a biscoff cookie and sprinkle the crumbs over the whipped cream.
Video
Would you like to save this recipe?
Notes
- Don't worry if the mixture looks like it is splitting slightly; it can happen when the butter was too cold or too warm or the sugar and butter were not creamed properly. The batter will come back together when you add the flour.
- If the cake still feels warm to the touch, leave it to cool down for a little bit longer or the crumb might break.
- I personally like to whip it with the mixer until I reach medium peaks then finish it by hands. This helps to control how much you mix it and avoid over-whipping it, which would give a slightly grainy texture to the cream.
- The whipped cream can be prepared in advance and be stored in the fridge until ready to serve. I recommend adding this topping as close to serving as possible as you don't want the cream to start melting. Once topped with cream, the cake will need to be kept in the fridge.