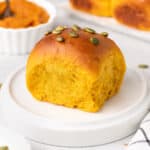
These Pumpkin Buns are incredibly soft, fluffy and flavourful. Packed with homemade Pumpkin Puree and Cinnamon, these bread buns make great dinner rolls, sandwich and burger buns or appetiser for the Holidays.

Jump to:
Why we love this recipe
If you are looking for an incredibly soft and flavourful bread bun recipe, you've found it. These Pumpkin Bread Buns have an amazing fluffy crumb and delicious sweet and slightly spicy taste thanks to the mashed pumpkin, brown sugar and cinnamon.
Just like my Sweet Potato Buns, they are perfect as bread for a sandwich, toasted for breakfast or even as burger buns. They would be especially perfect as dinner rolls for your Thanksgiving dinner!
Ingredients
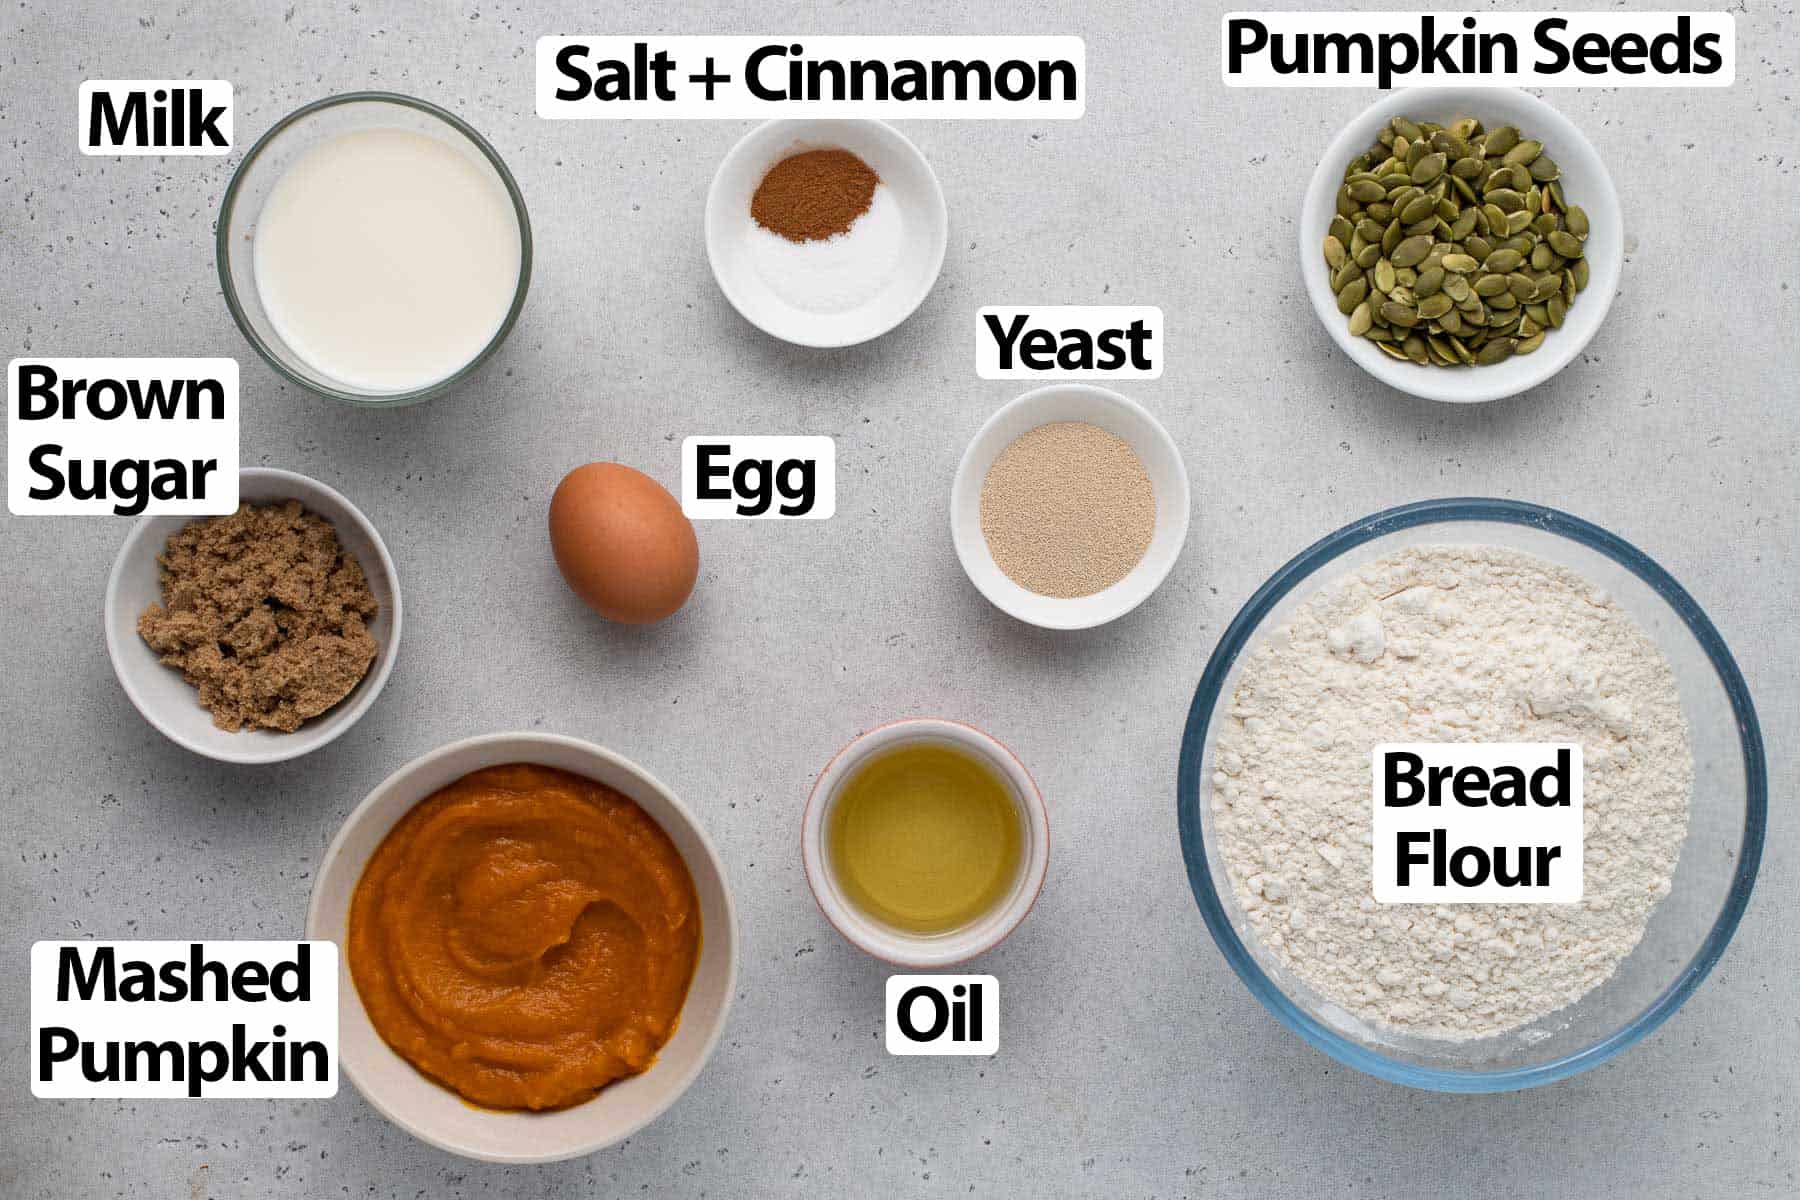
To make these pumpkin dinner rolls, you will need:
Scroll down to recipe card below for all quantities
- Mashed Pumpkin: make your own by cooking the pumpkin (I used Butternut Pumpkin) then mashing it until you get a very smooth pumpkin puree. You can either steam the pumpkin or roast it in the oven. See FAQs section below if you want to use canned pumpkin puree instead.
- Milk: use Full Cream / Whole Milk for the best flavours and textures. You could substitute the milk with water but the flavours and texture of the buns won't be as rich. Alternatively, use a Plant-Based Milk to make this recipe dairy-free.
- Yeast: I used Instant Yeast but Active Dry Yeast will work as well. Simply make sure to bloom it (rehydrate to activate) first in the lukewarm milk.
- Oil: Canola Oil or a flavour neutral Vegetable Oil. You could use melted butter instead, but the pumpkin buns will tend to dry out more quickly with butter.
- Egg: medium to large size egg, at room temperature. I have not tried this recipe with an egg replacer.
- Bread Flour: this type of flour contains a higher percentage of protein than regular plain / all-purpose flour which with create more gluten, giving the buns a super fluffy texture.
Optional Addition & Substitution
- Pumpkin Seeds: used to finish the buns but optional. You could keep them plain or top the bread rolls with sesame seeds, oats, some chopped pecans or walnuts - or any of your preferred toppings!
- Cinnamon: this spice will really bring out the pumpkin flavor. You could also use any additional spice you'd like or substitute the Cinnamon for Pumpkin Spice / Pumpkin Pie Spice.
You could also prepare some garlic or honey butter to brush over the buns when they just come out of the oven.
How to make Pumpkin Bread Rolls
Pumpkin Bread Dough

- The first step is to prepare the Mashed Pumpkin. Simply cook it in your preferred way (steam, boil or roast in the oven) then mash until very smooth once soft. You can use a hand masher or a blender if preferred. Let it cool down.
- Heat up the Milk until lukewarm, about 35 degree Celsius / 95 degree Fahrenheit.
- Photo 1: Place the lukewarm Milk in the bowl of a stand mixer and mix in the Brown Sugar and Yeast. Whisk well then leave for about 10 minutes or until small bubbles appear on the surface.
- Photo 2: Stir the Egg, Oil and Mashed Pumpkin into the yeast mixture.
- Photo 3: Add the dry ingredients (Bread Flour, Salt and Cinnamon). Mix with a stiff spatula until a rough dough comes together then fit the dough hook attachment into the stand mixer.
- Photo 4: Start kneading on low speed, slowly increasing to a high speed for about 15 minutes. Stop to scrap the sides of the bowl if required. Keep on kneading until the dough is very soft, elastic and stretchy. It should pass the "windowpane test" (see FAQs section below for more info on the windowpane test).
The pumpkin dough will still bit slightly sticky at this point, that's normal. I like to transfer the dough onto a lightly floured surface and lightly knead it by hands (a few folds) to finish the process.
- Place the dough back into the bowl of your mixer or a clean large lightly greased bowl. Cover with a tea towel or plastic wrap and leave in a warm place to proof for 1,5 to 2 hours, or until doubled in size.
Alternatively, you can place the dough in the fridge to proof overnight for the first rise (about 8 to 12 hours).
Shaping the Buns
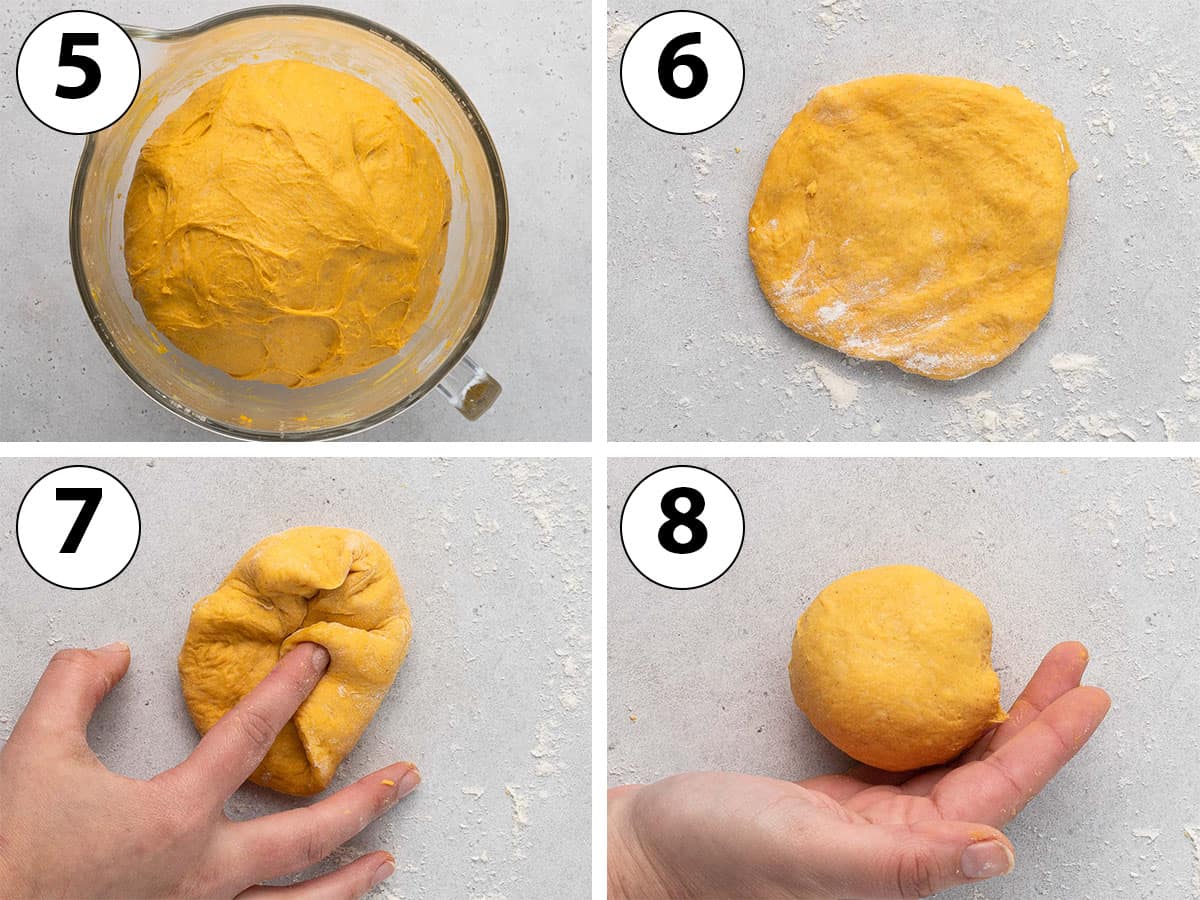
- Photo 5: Once it has doubled in size, punch the dough to deflate it and transfer over a very lightly floured surface. Cut into 12 equal pieces, using a kitchen scale to be precise. Roughly shape each piece of dough into a ball.
To shape the buns:
- Photo 6: slightly flatten each piece of dough with your fingers to get a flat disk.
- Photo 7: Fold the edges of the dough towards the centre of the disk and gently press to make the dough stick. Keep on folding until you feel tension or resistance in the dough.
Would you like to save this recipe?
- Photo 8: Turn the ball over (seams side down). Gently pull it towards you, your fingers placed on one side / bottom of the bun. Turn 90 degrees and repeat until you feel tension on the dough. Continue to shape the dough into a bun by rolling it in a circular movement under the palm or your hands.
- Repeat the process to shape each bread roll.
Try not to use any extra flour when shaping the buns. If you have excess flour over the rolls, you can brush it off with a small pastry brush.
Final Proofing
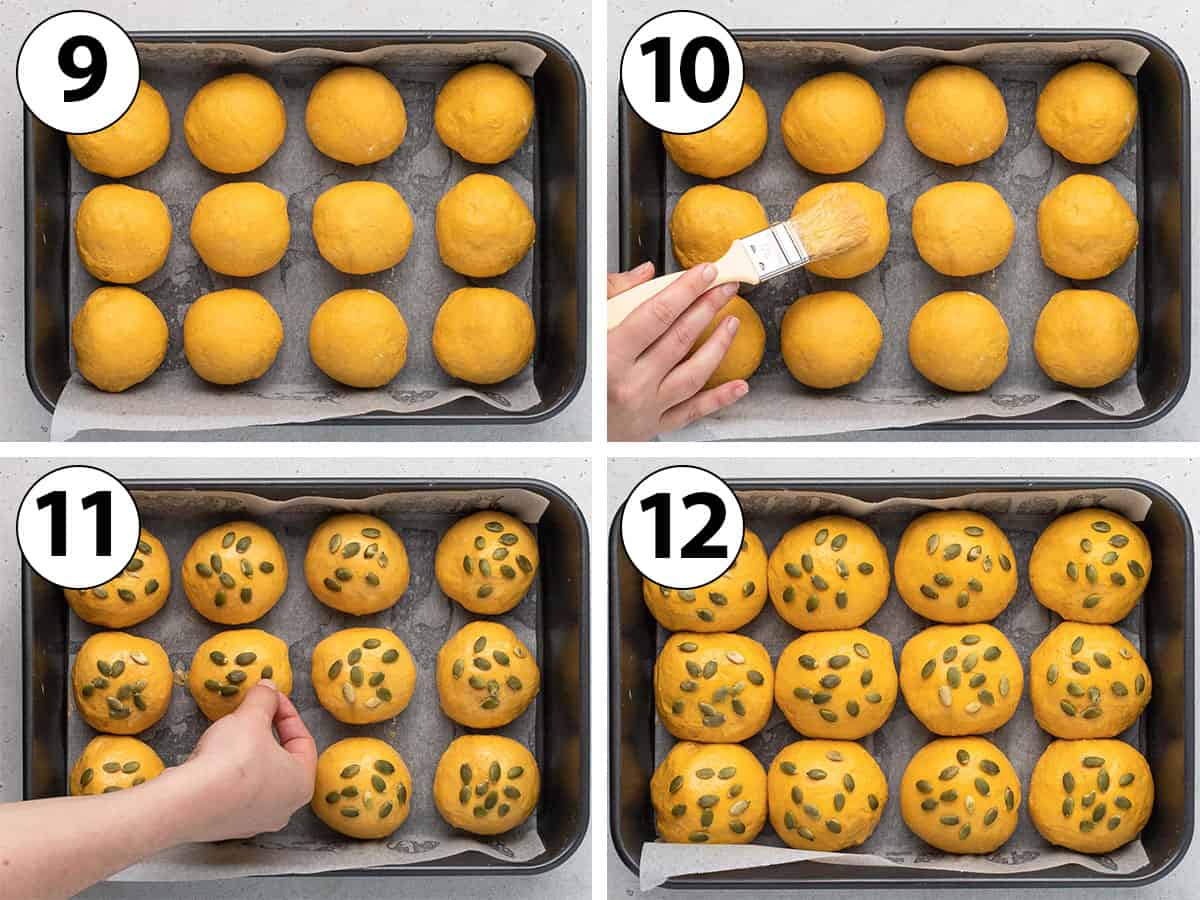
- Photo 9: Place the rolls in a large roasting pan (I used a large 28 x 40 cm / 11 x 14 inch pan) that has been lined with baking paper / parchment paper. Leave some room around each bun so that they have space to expand.
I don't recommend baking the buns over flat baking sheets as you want a baking pan with some edges to control the way the buns rise in the oven.
- Photo 10: In a small bowl, whisk the Egg and Milk for the egg wash. Brush it over each bun to give them a golden brown shine.
- Photo 11: Optionally, top each bread bun with some Pumpkin Seeds or your choice of topping.
- Photo 12: Cover the pan with a large tea towel and leave to proof in a warm spot for 45 minutes to 1 hour, or until the buns have risen again.
- Preheat your oven on 180 degree Celsius / 350 degree Fahrenheit.
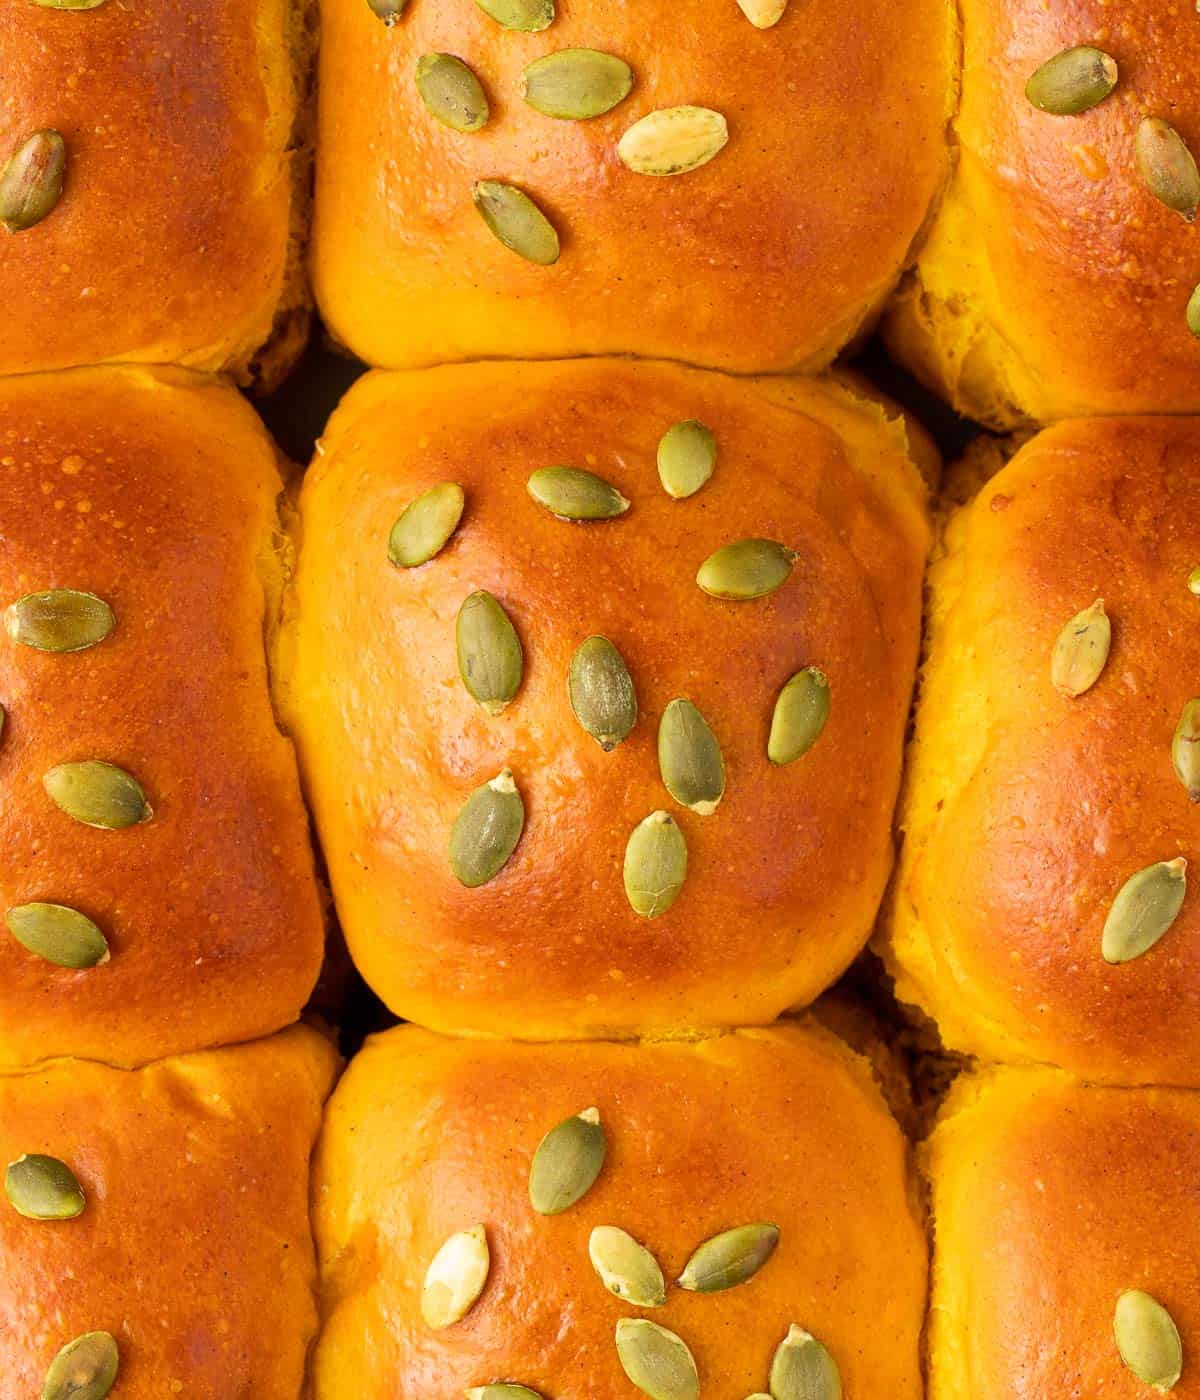
- Bake the pumpkin rolls for 20 to 22 minutes, or until they have nicely puffed and look golden brown.
- Place on a wire rack to cool down completely before removing from the pan. It is very important to let them cool down before serving as the residual heat will continue to cook the centre of the bread.

Recipe FAQs
You can either steam the pumpkin, boil it or roast it in the oven wrapped in foil until very soft. I personally peel the pumpkin, cut it into small cubes and steam it.
Once soft, use a hand masher or a blender to turn it into a smooth puree. Let it cool down before using in this recipe. It can also be prepared in advance and kept in the fridge for a couple of days, or even frozen.
I have only tried with homemade pumpkin puree, but as a general rule, you can use canned pumpkin puree as well as long as it contains 100% pumpkin, with no added ingredients such as sugar or spices.
Note that canned pumpkin puree is not the same as pumpkin pie filling, which shouldn't be used here.
This test is a simple way to check if the dough has been kneaded enough and is ready to start proofing.
To do the test, gently pull and stretch a small piece of the dough between your fingers. If the dough breaks quickly, it needs to be kneaded for longer. If it stretches easily without breaking and you can see light coming through it, it has passed the windowpane test.
You can use this recipe to create little pumpkin bread shaped buns that would look super cute for the Holidays or on your Thanksgiving table for example!
To do so, cut out 2 to 6 pieces of string (do not use plastic string, you want something like plain twine that will resist the heat of the oven). Place the middle of each string under the bun and tie it into a knot on over the top, making sure the string isn't pressing hard against the bread.
Turn 90 degrees (or 45 degrees if using four strings) and repeat the process. Place the buns on two large baking sheets and bake as recommended in the instructions. Once cool, cut out the strings with scissors or a sharp knife and gently pull them out to reveal the pumpkin shaped rolls!
Tips & Tricks
- The exact proofing time will always vary based on the exact temperature of your kitchen. A bread dough will rise more quickly in a warm environment than in a cold one. Make sure to let the dough rise until doubled in size rather than relying on the general recommended time before shaping it into buns.
- Even tough the bread dough will seem to be still a bit sticky once proofed, try not to add extra flour to it when you shape the buns. It will actually be easier to shape the rolls when they slightly stick to your work surface!
- To know that the bread dough has proofed enough, gently poke it. If it leaves a small dent that slowly springs slightly back, it is ready. If it springs right back, it needs a little bit more time to proof. If it deflates, it is over-proved.
- Brush the pumpkin buns with some melted butter flavoured with honey, garlic or parsley to add extra richness and flavours to the bread.
Storing & Freezing
The pumpkin rolls can be stored at room temperature in an air-tight container for up to three days, but are best served fresh within 24 hours.
To make in advance, simply let the buns cool down completely and freeze for later. Let them thaw for a few hours at room temperature before serving. You can slightly re-heat them just before serving too to make them nice and soft.

Made this recipe?
Let us know if you liked it by leaving a comment below, and tag us on Instagram @a.baking.journey with a photo of your creation!
Recipe
Pumpkin Buns
Ingredients
Pumpkin Buns
- 180 ml (3/4 cup) Full Cream / Whole Milk, lukewarm
- 75 gr (1/3 cup) Brown Sugar
- 9 gr (1 1/2 teaspoon) Instant Dry Yeast
- 1 Egg, medium to large size, at room temperature
- 60 ml (1/4 cup) Canola Oil
- 200 gr (7 oz) Mashed Pumpkin, or pumpkin puree
- 550 gr (3 2/3 cup) Bread Flour
- 1 1/2 teaspoon Fine Table Salt
- 1 teaspoon Ground Cinnamon, or pumpkin spice
Egg Wash & Topping
- 1 Egg
- 5 ml (1 teaspoon) Full Cream / Whole Milk
- Pumpkin Seeds, to taste, optional
Instructions
Pumpkin Buns
- Prepare the Mashed Pumpkin: peel the skink off and cook the pumpkin in your preferred way (steam, boil or roast in the oven wrapped in foil) until very soft. Mash until very smooth, either using a hand masher or in a blender. Set aside to cool down.
- Place the lukewarm Milk (about 35 degree Celsius / 95 degree Fahrenheit), Brown Sugar and Yeast in the bowl of a stand mixer. Whisk well then leave for about 10 minutes or until small bubbles appear on the surface (see note 1).
- Mix in the Egg, Oil and Mashed Pumpkin, then the Bread Flour, Salt and Cinnamon. Mix with a stiff spatula until a rough dough comes together.
- Fit the dough hook attachment on your mixer and start kneading on low speed, slowly increasing to high speed. Keep on kneading for about 15 minutes, or until the dough is very soft, elastic and passes the windowpane test (see note 2). It will still be slightly sticky.
- Cover the bowl with a tea towel (transfer into a clean large greased bowl first if preferred) and leave to proof in a warm spot for 1,5 to 2 hours or until doubled in size. Alternatively, place in the fridge to proof overnight for 8-12 hours.
- Punch the dough to deflate it and transfer over a very lightly floured surface. Cut into 12 equal pieces (see note 3) and bring each piece together into a rough ball.
- To shape the buns: slightly flatten each piece of dough and fold the edges towards the centre, gently pressing to make it stick. Continue to fold until you start feeling resistance in the dough. Turn the ball over (seams side down) and gently pull it towards you, your fingers placed on one side / bottom of the bun. Turn 90 degrees and repeat a few times. Finish to shape the dough by rolling it in a circular movement under the palm or your hands.
- Repeat the process with the 12 buns, then place them in a 28 x 40 cm (11 x 14 inch) roasting pan (or similar large baking tray) lined with baking paper. Leave some space between each bun so they have room to rise.
Egg Wash & Topping
- In a small bowl, whisk the Egg and Milk for the egg wash. Brush it over each bun then optionally top with Pumpkin Seeds, or your choice of topping.
- Cover the pan with a large tea towel and leave to proof in a warm spot for 45 minutes to 1 hour, or until the buns have risen again.
- Preheat your oven on 180 degree Celsius / 350 degree Fahrenheit then bake the buns for 20 to 22 minutes. They should have nicely puffed and look golden brown. Place on a wire rack to cool down completely before removing from the pan.
Would you like to save this recipe?
Notes
- If using Instant Yeast, this step is not technically required as the yeast will not need to be activated - but I like to do this step anyway as a way to check that the yeast is alive. If using Active Yeast, this step is mandatory to activate it.
- To do the test, gently pull and stretch a small piece of the dough between your fingers. If the dough breaks quickly, it needs to be kneaded for longer. If it stretches easily without breaking and you can see light coming through it, it has passed the windowpane test.
- To be precise and have pumpkin buns the same size, use a kitchen scale to divide the dough into 12 exact pieces. Weight the total dough, divide that number into 12 and measure each bun to be that weight.