

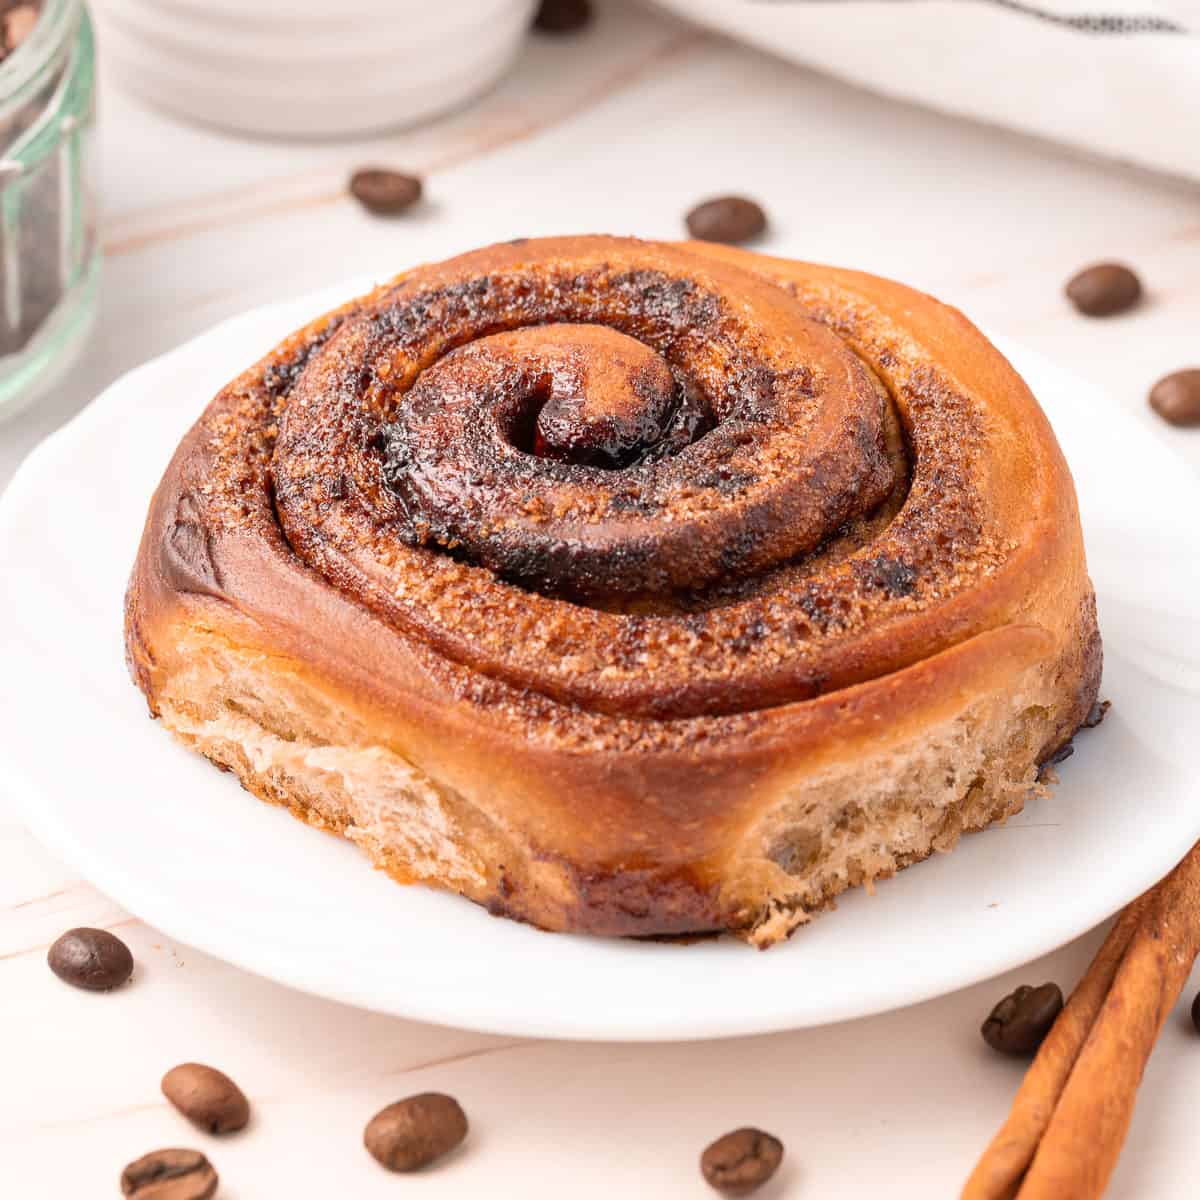
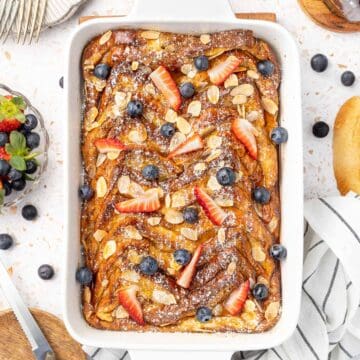
These Coffee Cinnamon Rolls make the most decadent and delicious breakfast or sweet snack. The coffee dough is filled with a coffee cinnamon filling and finished with a simple coffee icing. A coffee lover dream bake!
Jump to:
Why we love this recipe
If you love coffee flavoured baked goods and cinnamon buns are your go-to breakfast, you are in for a treat! These coffee rolls are packed with espresso aroma and delicious spicy cinnamon flavours.
The coffee dough is light and fluffy but the filling is incredibly indulgent. Enjoy them as is or finish them with a 2 ingredients Espresso Glaze if you need even more coffee flavours.
The sweet dough is proofed overnight in the fridge so it is the perfect make-ahead breakfast recipe. Simply finish the rolls in the morning, bake them and they are ready to be served!
Love cinnamon rolls? Also try my Chocolate Cinnamon Rolls, Cinnamon Scrolls and Lemon Sweet Rolls.
Ingredients
Scroll down to recipe card below for all quantities
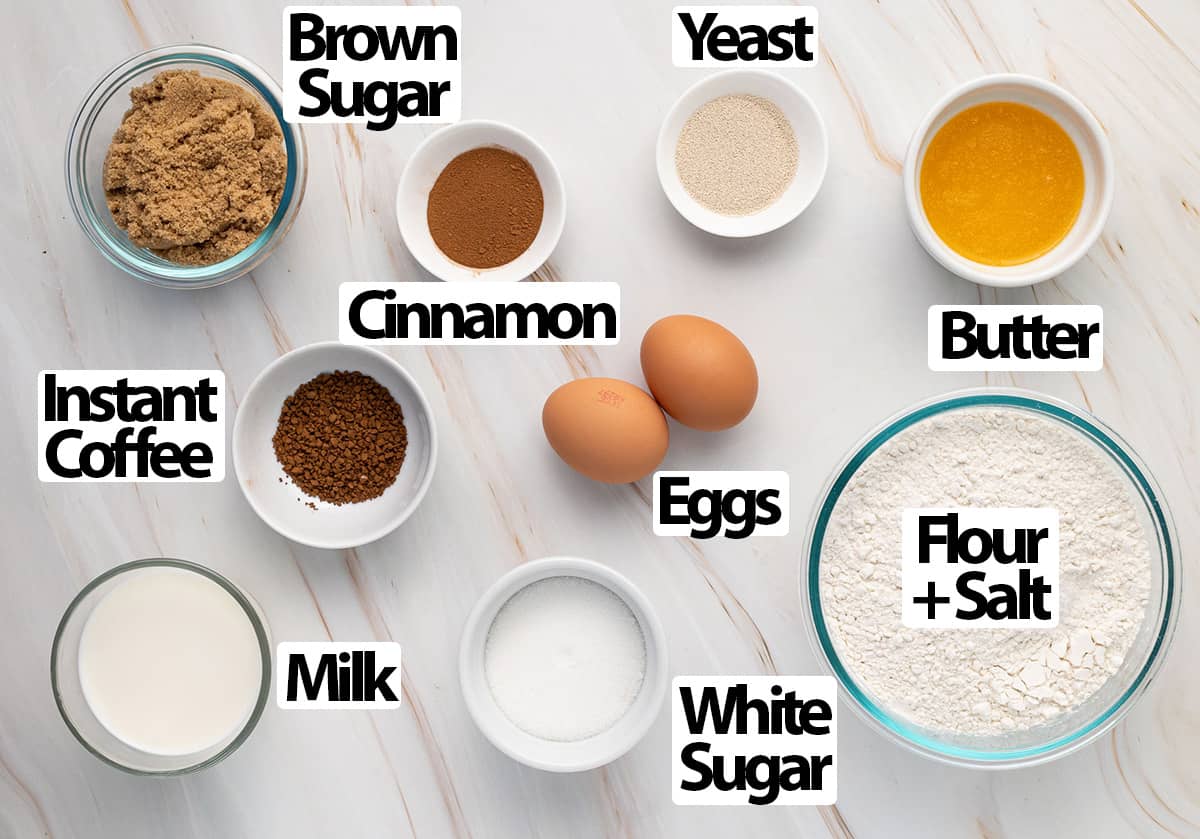
For the Coffee Bread Dough:
- Milk: Full Cream / Whole Milk for the best texture and flavours. It should be lukewarm but not too hot much or it might kill the yeast.
- Coffee: Instant Coffee Granules / Coffee Powder. For the dough, you could also use espresso powder but it will give a slightly gritty texture to the rolls as it won't dissolve like instant coffee.
- Yeast: I used Instant Yeast but Active Dry Yeast will work as well. If using Active Dry Yeast, make sure to rehydrate it well into the warm milk first.
- Eggs: Medium to large Egg, at room temperature (make sure they are not cold or straight out of the fridge).
- Butter: we are using melted butter here, which could be substituted with a neutral-flavoured oil such as canola oil.
- Flour: Plain / All-Purpose Flour. For the softest coffee rolls, you want to avoid using bread flour that will create more gluten, resulting in a spongier texture.
For the Coffee Cinnamon Filling:
A simple mix of Soft Butter, Brown Sugar, Cinnamon and Instant Coffee Granules. For extra coffee flavours, you could also add a few drops of coffee extract or vanilla extract.
For the Espresso Icing:
Made by mixing sifted Icing Sugar (powdered sugar) and a shot of freshly brewed Espresso. If you don't have a coffee machine, simply use the same quantity of boiling water with about 1 teaspoon of instant coffee (or the coffee intensity of your choice).
How to make Coffee Rolls step by step
Making the Coffee Dough
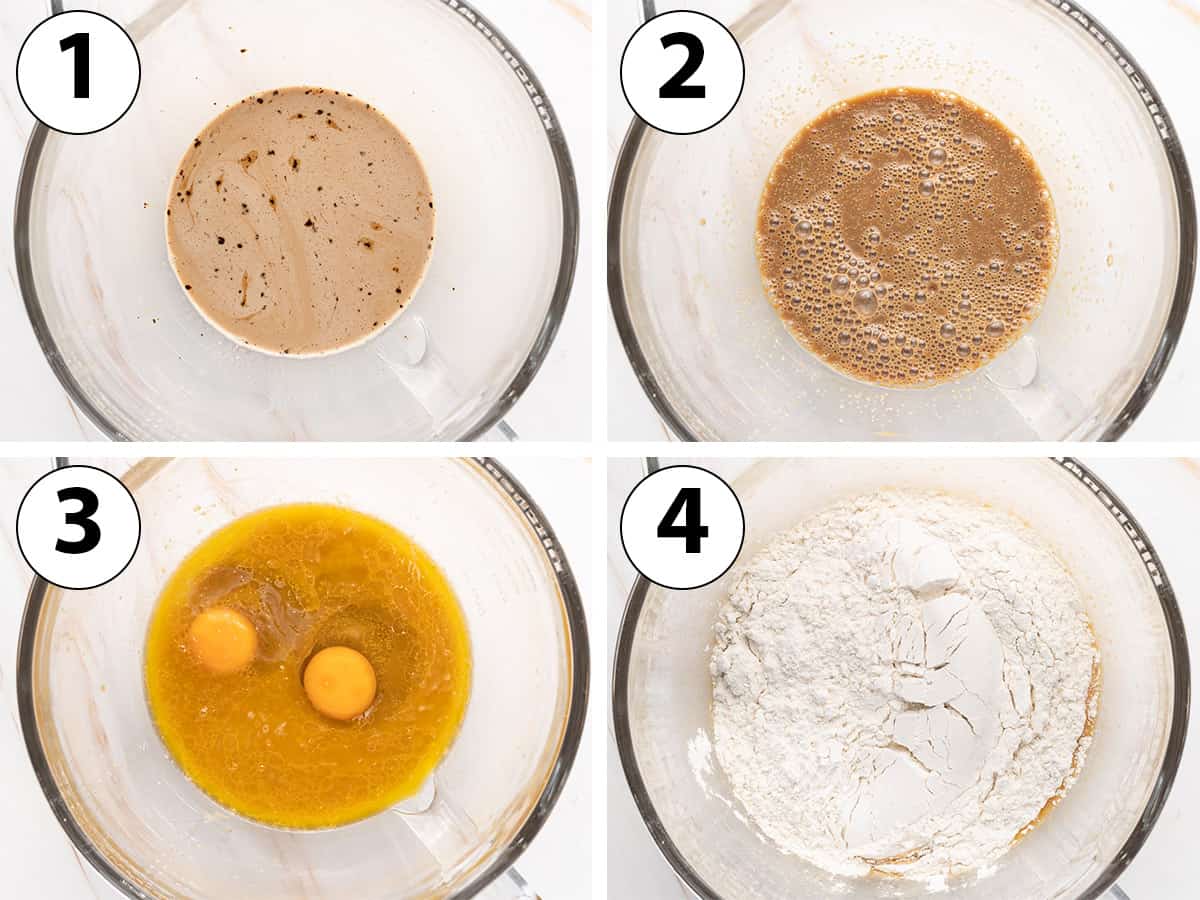
- Photo 1: Place the warm Milk in the bowl of a stand mixer and sprinkle the Instant Coffee Powder over it. Mix until the coffee granules have dissolved then leave to cool down for until the milk is lukewarm.
- Photo 2: Mix in the Sugar and Instant Yeast, then leave for about 10 minutes or until small bubbles appear on the surface. That indicates that the yeast is alive and active.
Note that "blooming" (rehydrating) the yeast is optional here as it is not required with Instant Yeast. I personally like to do this extra step as a simple way to know that the yeast is alive. If you are using Active Dry Yeast, this step is mandatory.
- Photo 3: Stir the Eggs and Melted Butter into the yeast mixture (make sure the butter isn't too hot anymore).
- Photo 4: Lastly, add the Flour and Salt.
Kneading and Proofing the dough
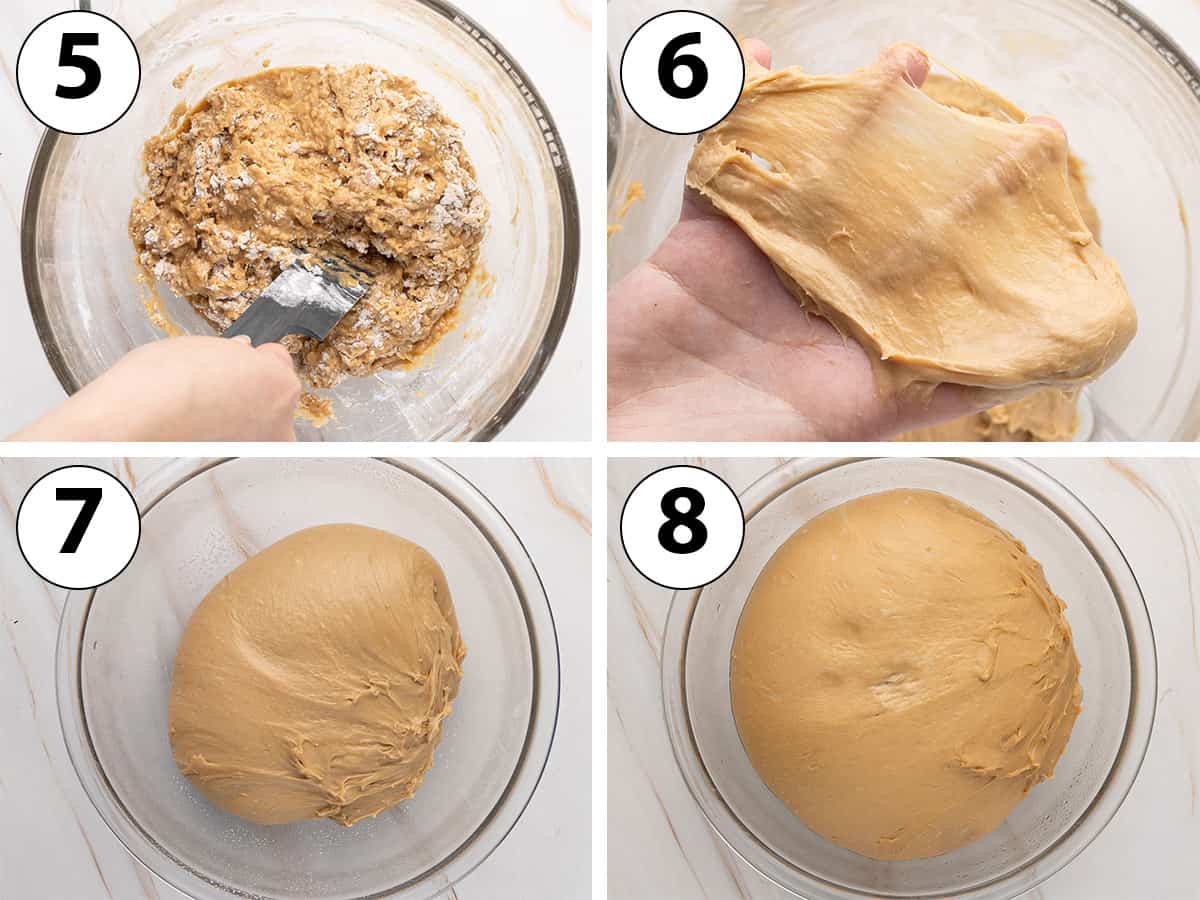
- Photo 5: Using a spatula, quickly mix the dough to lightly combine the ingredients (it does not need to look smooth). Cover the bowl and leave at room temperature for 15 minutes - or up to an hour.
This step called "autolyse" is optional, but a great way to insure that the liquids have started to hydrate the flour before you start kneading it. It will make the kneading process much easier and quicker.
- Photo 6: Fit the dough hook onto the stand mixer and start kneading at a medium speed for about 10 minutes. Increase the speed to high and keep on kneading for another 2 to 4 minutes, or until the dough is very soft, stretchy and passes the "windowpane test".
The "windowpane test" is a simple way to check if the dough has been kneaded enough and is ready to start proofing. To do the test, gently pull and stretch a small piece of the dough between your fingers.
If the dough breaks quickly, it needs to be kneaded for longer. If it stretches easily without breaking and you can see light coming through it, it has passed the windowpane test.
- Photo 7: Transfer the dough into a clean, lightly greased large bowl.
- Photo 8: Cover with a tea towel or plastic wrap and place in the refrigerator to proof for 8 to 10 hours (or overnight) until doubled in size.
Note that the coffee dough can be proofed at room temperature for about 1,5 to 2 hours, but the dough will be much softer and harder to work with.
Making the Filling and rolling the Dough
Would you like to save this recipe?
Once the coffee dough has finished proofing, start preparing the cinnamon coffee filling.
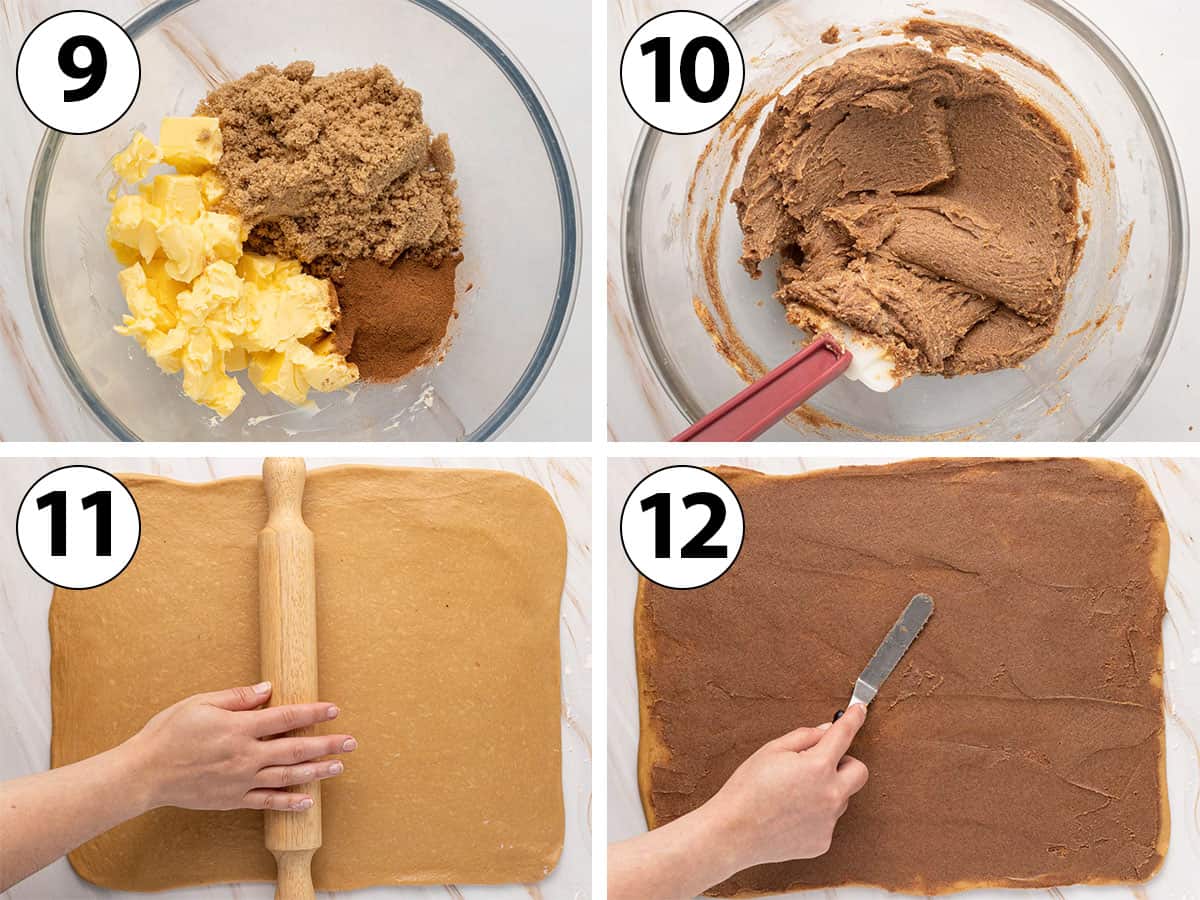
- Photo 9: Place the very soft Butter, Brown Sugar and Cinnamon in a small bowl.
- Photo 10: Using a silicone spatula, work the mixture until you get a thick paste consistency.
- Line a large baking pan with baking paper / parchment paper. I used a 26 x 38 cm (10 x 15-inch) roasting tray here.
- Photo 11: Punch the dough to deflate it and transfer it over a very lightly floured surface (try not to use too much flour). Using a rolling pin, roll it into a 30 x 40 cm rectangle (12 x 15 inch).
- Photo 12: Transfer the filling mixture over the rolled dough and gently spread it into an even layer with a small offset spatula.
Cutting out the rolls
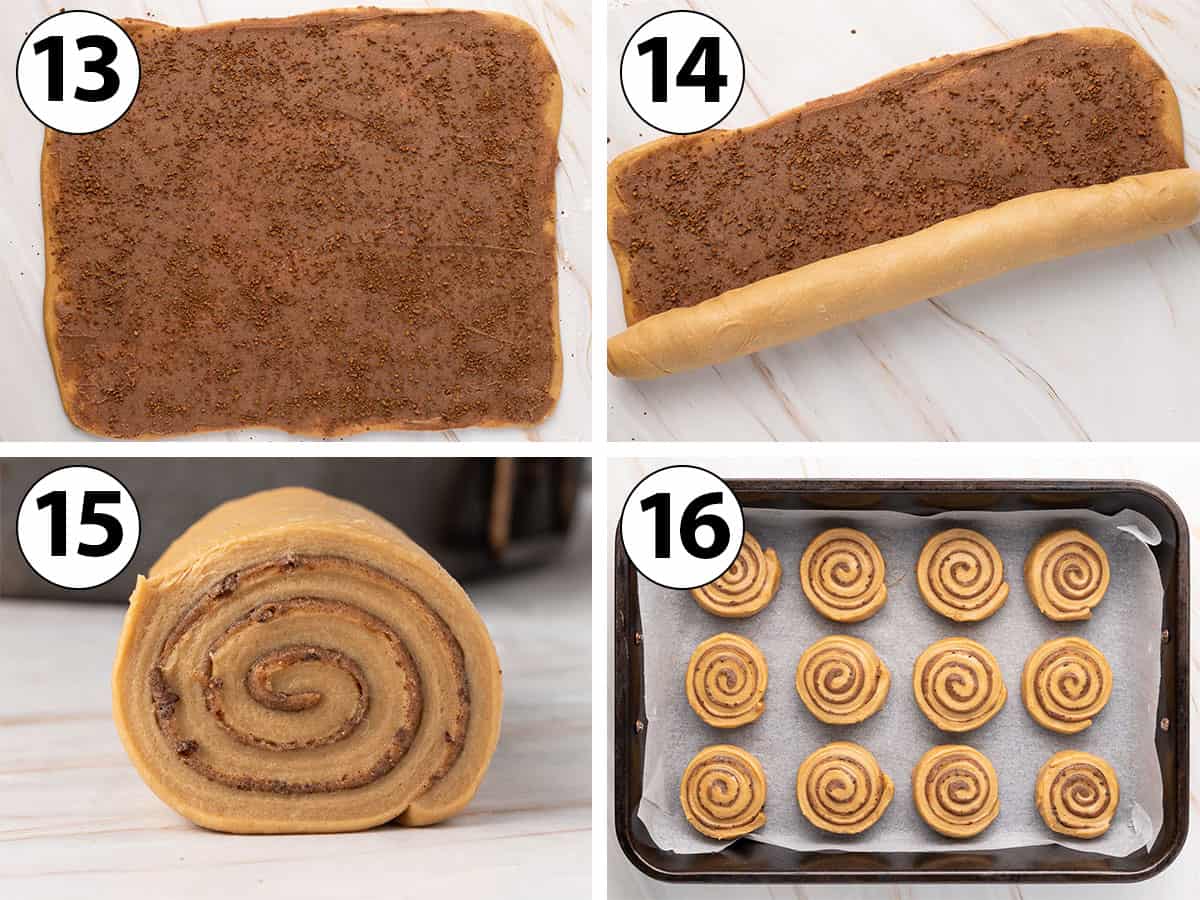
- Photo 13: Sprinkle the Coffee Granules or Instant Coffee Powder over the cinnamon filling.
- Photo 14: Tightly roll the long side of the dough to get a long log shape. Softly press the long edge onto the log to seal it.
- Photo 15: Using unflavoured floss or a bread knife, cut out 12 rolls that are about 3 cm thick each (1,2-inch).
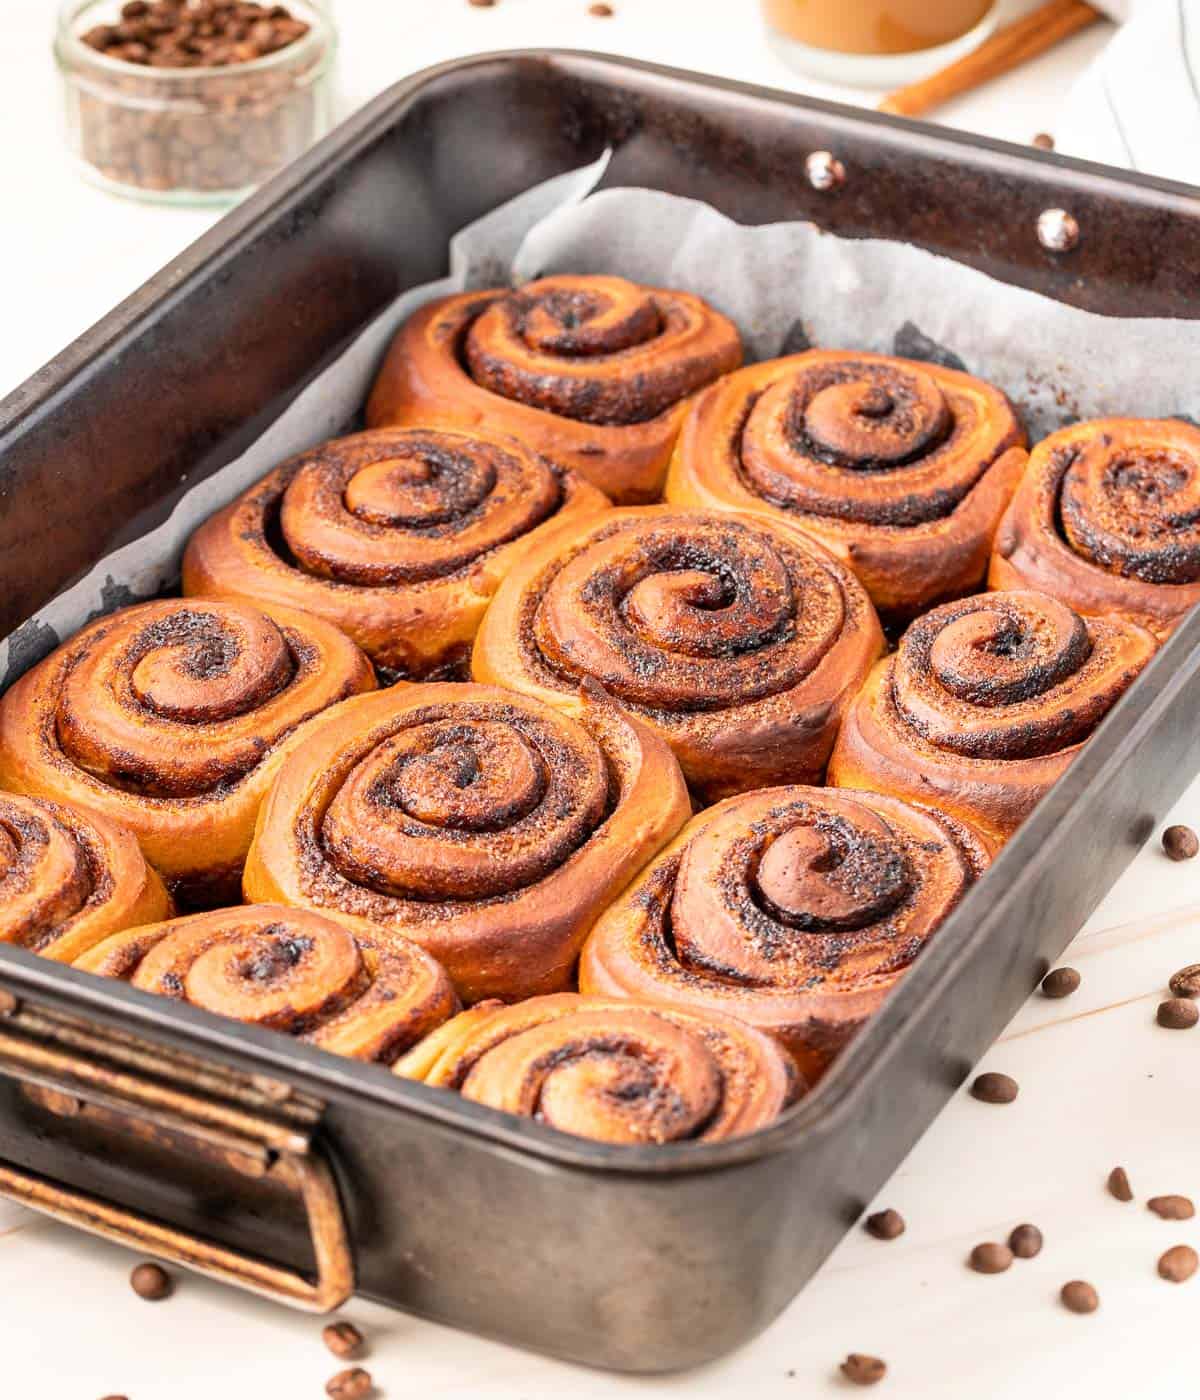
- Photo 16: Gently transfer the coffee rolls into the prepared baking dish.
Make sure to use a dish that is large enough to allow for the rolls to rise and expand. If the dish is too small, the rolls will rise more in their centres and won't have a uniform shape.
- Cover the dish with a tea towel and leave to proof at room temperature for another 30 minutes to 1 hour, or until almost doubled in size.
- Preheat your oven on 180 degrees Celsius / 350 degrees Fahrenheit. Bake the coffee rolls for 23 to 25 minutes, or until they have risen and are golden brown.
- Place on a wire rack and leave to cool down.
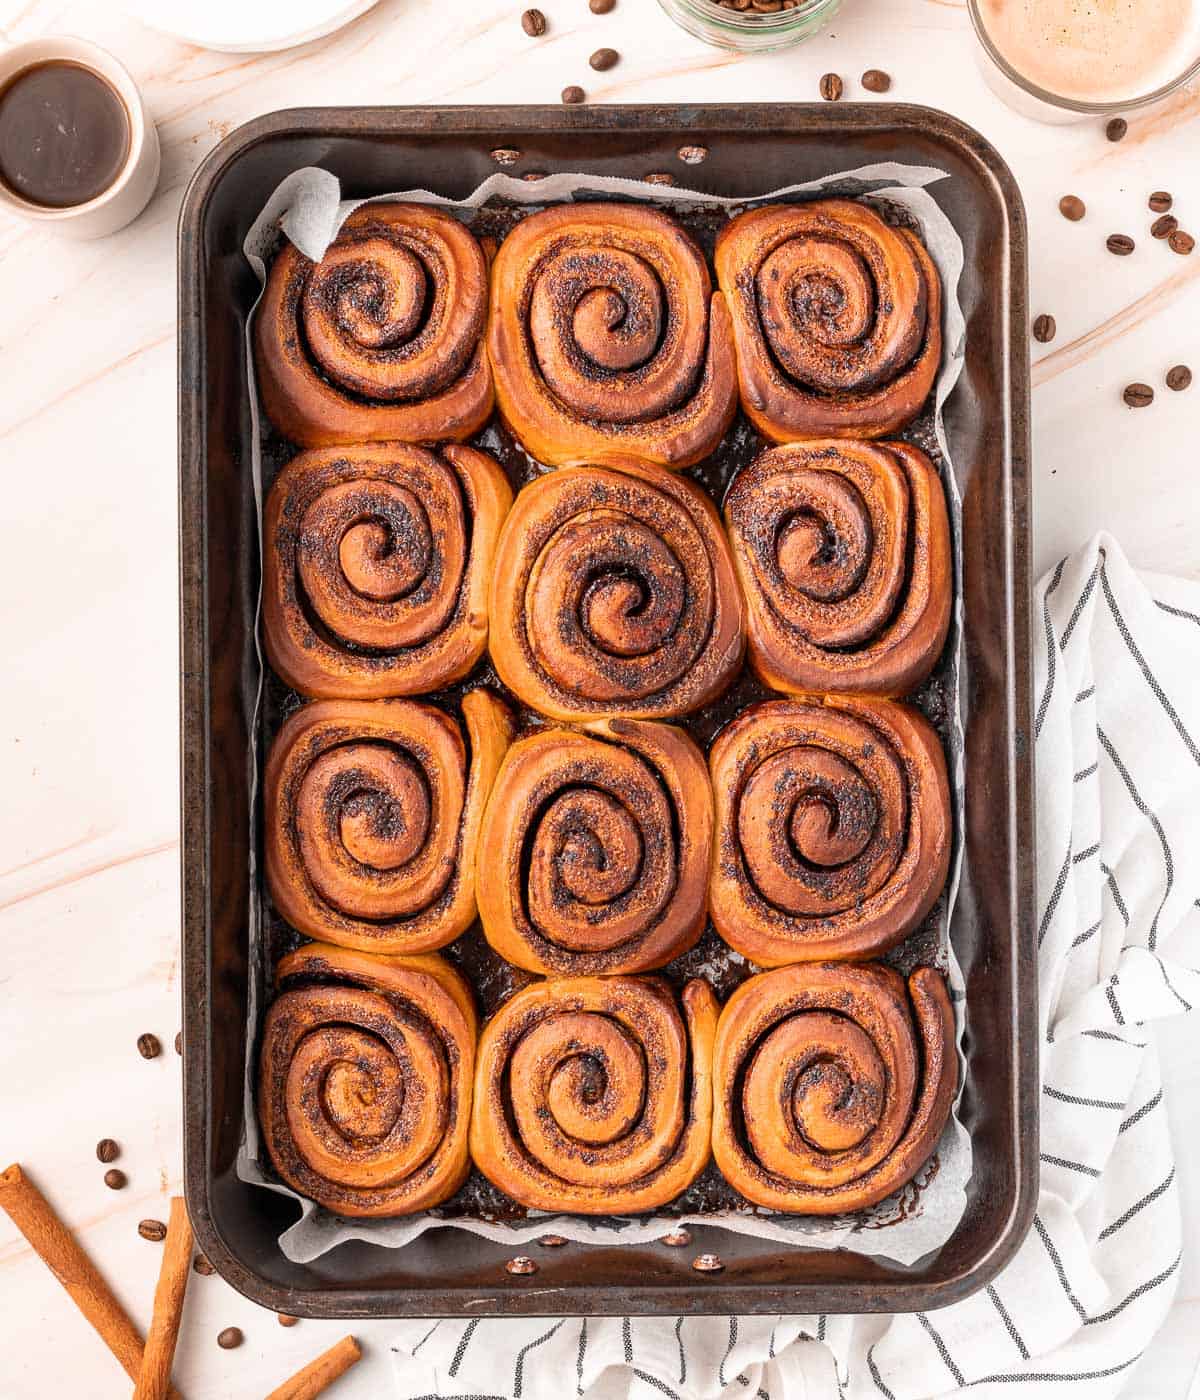
Espresso Icing
Optionally once they have cooled down, you can finish the rolls with a simple espresso icing.
- Sift the Icing Sugar into a medium bowl. Prepare the shot of espresso (or make an instant coffee with boiling water) and pour it over the sugar. Mix until completely smooth.
- Pour the icing over the rolls and serve.

Recipe FAQs
Yes, the dough can be proofed for about 1,5 to 2 hours at room temperature if preferred, but it will be much softer thus harder to work with later on.
Proofing it in the fridge overnight not only helps develop the flavours in the dough, it also makes it much easier to roll. It also means that you can make it in advance and bake the coffee rolls in the morning!
Yes, although it is a rather soft and sticky dough so it is not the easiest one to knead by hands. If you don't have a stand mixer, I recommend increasing the autolyse time to 1 hour. This will make the dough much easier to roll by hands.
I made a simple Espresso Icing (Icing Sugar + freshly brewed Espresso) but you could also finish the rolls with a classic cream cheese icing or a coffee cream cheese frosting for example!
Tips & Tricks
- The exact proofing time can vary based on the exact temperature of the proofing environment. A yeast dough will rise more quickly in a warm environment than in a cold one. Make sure to let the dough rise until doubled in size rather than relying on the general recommended time before adding the coffee cinnamon filling.
- To check that the dough is fully proofed, gently poke it with a finger. If it leaves a small dent that slowly springs slightly back, it is ready. If it springs right back, it needs a little bit more time to proof. If it deflates, it is over-proved.
- Even tough the dough might seem to be a bit sticky when you roll it, try not to too much add extra flour. It will actually be easier to shape the coffee rolls when the dough slightly stick to the work surface. Brush out any excess flour while rolling the buns.
- Once the filling has been added, make sure to roll the dough as tightly as possible. This is the best way to insure you get even rolls. If the dough gets quite soft at this point, you can also transfer it back into the fridge before cutting out the rolls.
Storing & Freezing
These coffee cinnamon rolls can be kept at room temperature, either in the covered baking dish or inside an airtight container. They will last for up to 3 days but are best eaten fresh within 24 hours. Leftover rolls can be reheated in the microwave.
Once the rolls have completely cooled down, they can be frozen if required (without the icing). Make sure to wrap them well to avoid freeze-burns. Thaw overnight in the fridge or for a few hours at room temperature
Made this recipe?
Let us know if you liked it by leaving a comment below, and tag us on Instagram @a.baking.journey with a photo of your creation!
Recipe

Coffee Cinnamon Rolls
Ingredients
Coffee Dough
- 180 ml (3/4 cup) Full Cream / Whole Milk
- 6 gr (1 1/2 tablespoon) Instant Coffee Granules
- 80 gr (1/3 cup) Caster Sugar
- 9 gr (2 teaspoon) Instant Yeast
- 2 large Eggs
- 75 gr (5 tablespoons) Unsalted Butter, melted
- 480 gr (3 cups + 4 tablespoons) Plain / All-Purpose Flour
- 1/2 teaspoon Fine Table Salt
Coffee Cinnamon Filling
- 120 gr (1/2 cup) Unsalted Butter, soft, at room temperature
- 100 gr (1/2 cup) Brown Sugar
- 1 tablespoon Ground Cinnamon
- 8 gr (2 tablespoons) Instant Coffee Granules
Espresso Icing (optional)
- 150 gr (1 cup) Icing Sugar, sifted
- 30 ml (2 tablespoons) Espresso, freshly brewed
Instructions
Coffee Dough
- Place the warm Milk and Instant Coffee Granules in the bowl of a stand mixer. Mix until the coffee granules have dissolved then leave to cool down for until the milk is lukewarm.
- Mix in the Sugar and Instant Yeast, then leave for about 10 minutes or until small bubbles appear on the surface. Stir in the Eggs and cooled down melted Butter.
- Add the Flour and Salt. Using a spatula, quickly mix the dough to lightly combine the ingredients (it does not need to look smooth). Cover the bowl and leave at room temperature for 15 minutes - or up to an hour (see note 1).
- With the dough hook, knead at a medium speed for about 10 minutes. Increase to high speed and knead for another 2 to 4 minutes, or until the dough is very soft, stretchy and passes the "windowpane test" (see note 2).
- Transfer the dough into a clean, lightly greased large bow. Cover with a tea towel or plastic wrap and place in the refrigerator to proof for 8 to 10 hours - or overnight - until doubled in size (see note 3).
Coffee Cinnamon Filling
- Line a large 26 x 38 cm (10 x 15-inch) baking pan with baking paper / parchment paper.
- Place the very soft Butter, Brown Sugar and Cinnamon in a small bowl. Using a spatula, work the mixture until you get a thick paste consistency.
- Punch the dough to deflate it and transfer it over a very lightly floured surface. Using a rolling pin, roll it into a 30 x 40 cm rectangle (12 x 15 inch).
- Spread the coffee cinnamon filling into an even layer over the rolled dough. Sprinkle the Coffee Granules or Instant Coffee Powder over the filling.
- Tightly roll the long side of the dough to get a log shape. Using unflavoured floss or a bread knife, cut out 12 rolls that are about 3 cm thick each (1,2-inch). Gently transfer the coffee rolls into the prepared baking dish (see note 4).
- Cover the dish with a tea towel and leave to proof at room temperature for another 30 minutes to 1 hour, or until almost doubled in size.
- Preheat your oven on 180 degrees Celsius / 350 degrees Fahrenheit. Bake for 23 to 25 minutes, or until they have risen and are golden brown. Place the baking dish on a wire rack to cool down.
Espresso Icing (optional)
- While the coffee rolls are cooling down, sift the Icing Sugar into a medium bowl. Prepare the espresso (or make the same quantity of instant coffee with boiling water). Pour the coffee over the icing sugar and mix until completely smooth.
- Pour the icing over the rolls once they have cooled down.
Would you like to save this recipe?
Notes
- This step called "autolyse" is optional, but a great way to insure that the liquids have started to hydrate the flour before you start kneading it. It will make the kneading process much easier and quicker.
- To do the "windowpane test": gently pull and stretch a small piece of the dough between your fingers. If the dough breaks quickly, it needs to be kneaded for longer. If it stretches easily without breaking and you can see light coming through it, it has passed the windowpane test.
- If you prefer to proof it at room temperature, leave it for 1,5 to 2 hours or until doubled in size. The dough will be harder to work with when proofed at room temperature. Proofing it in the fridge overnight not only helps develop the flavours in the dough, it also makes it much easier to roll.
- Make sure to use a dish that is large enough to allow for the rolls to rise and expand. If the dish is too small, the rolls will rise more in their centres and won't have a uniform shape.

Comments
No Comments