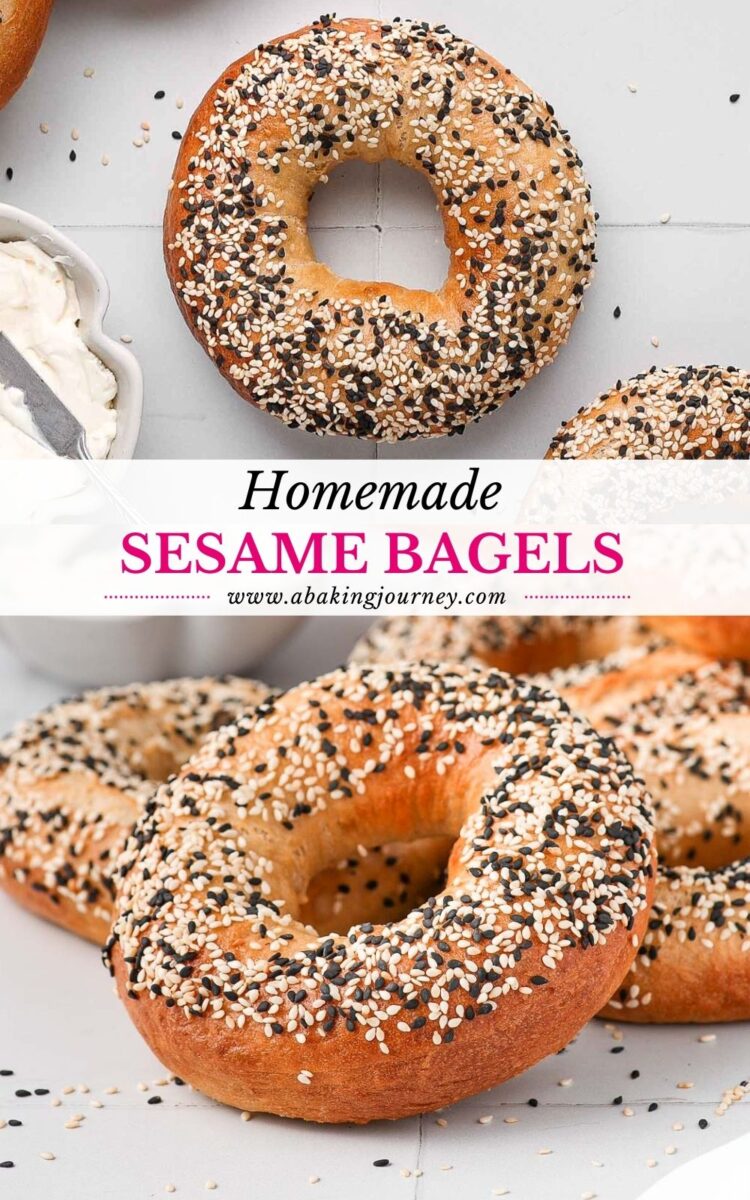
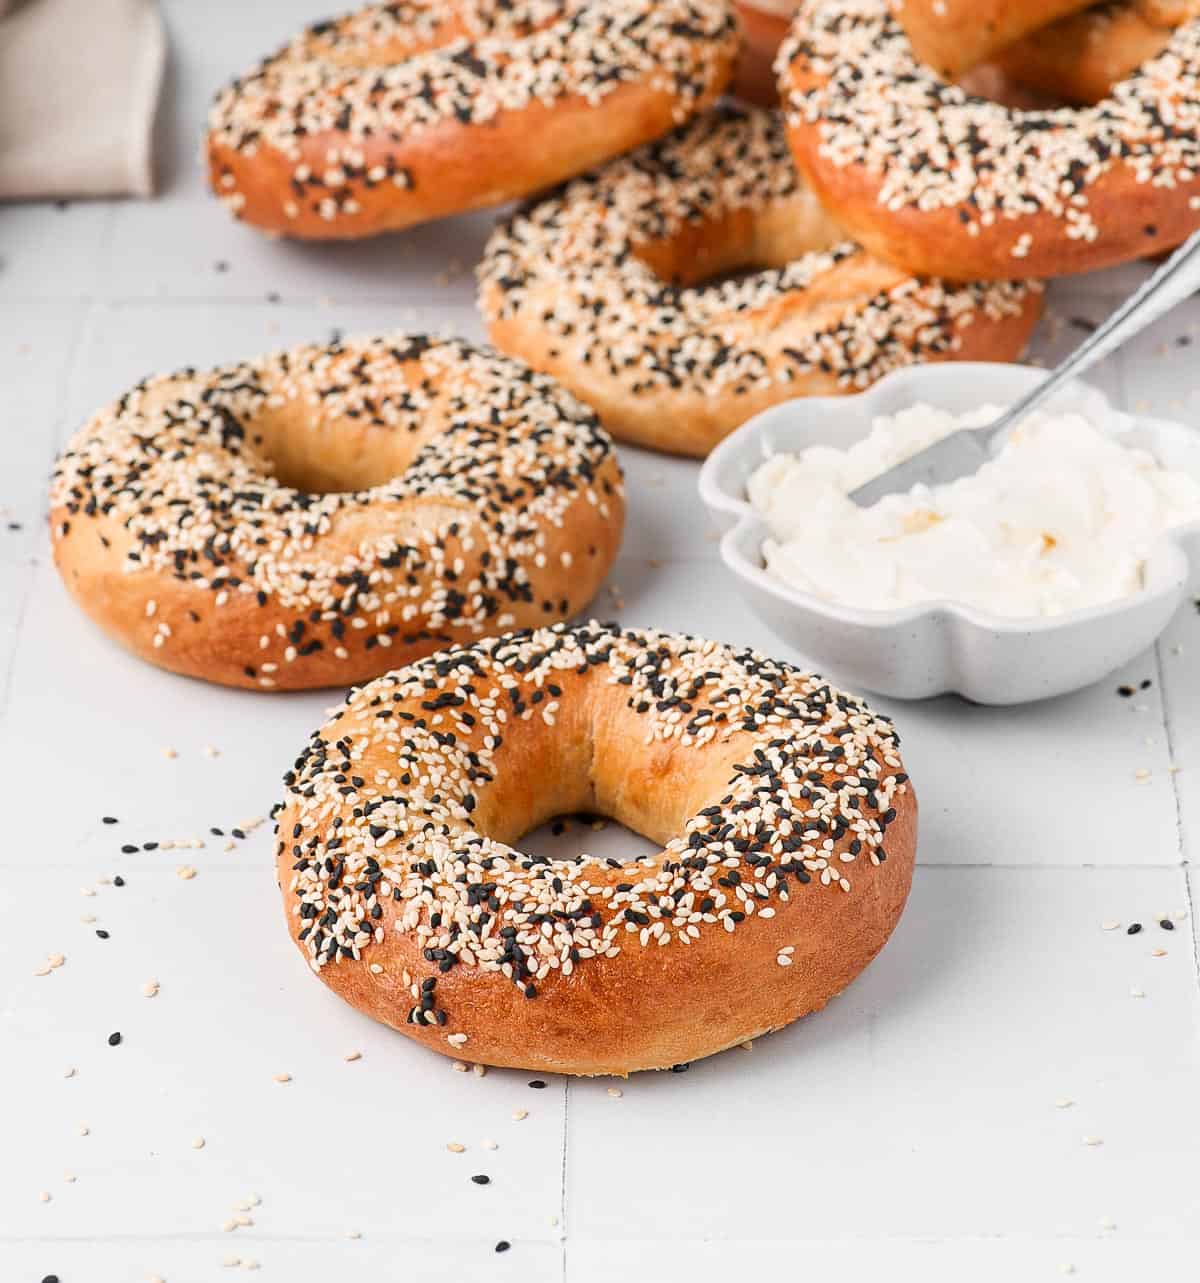
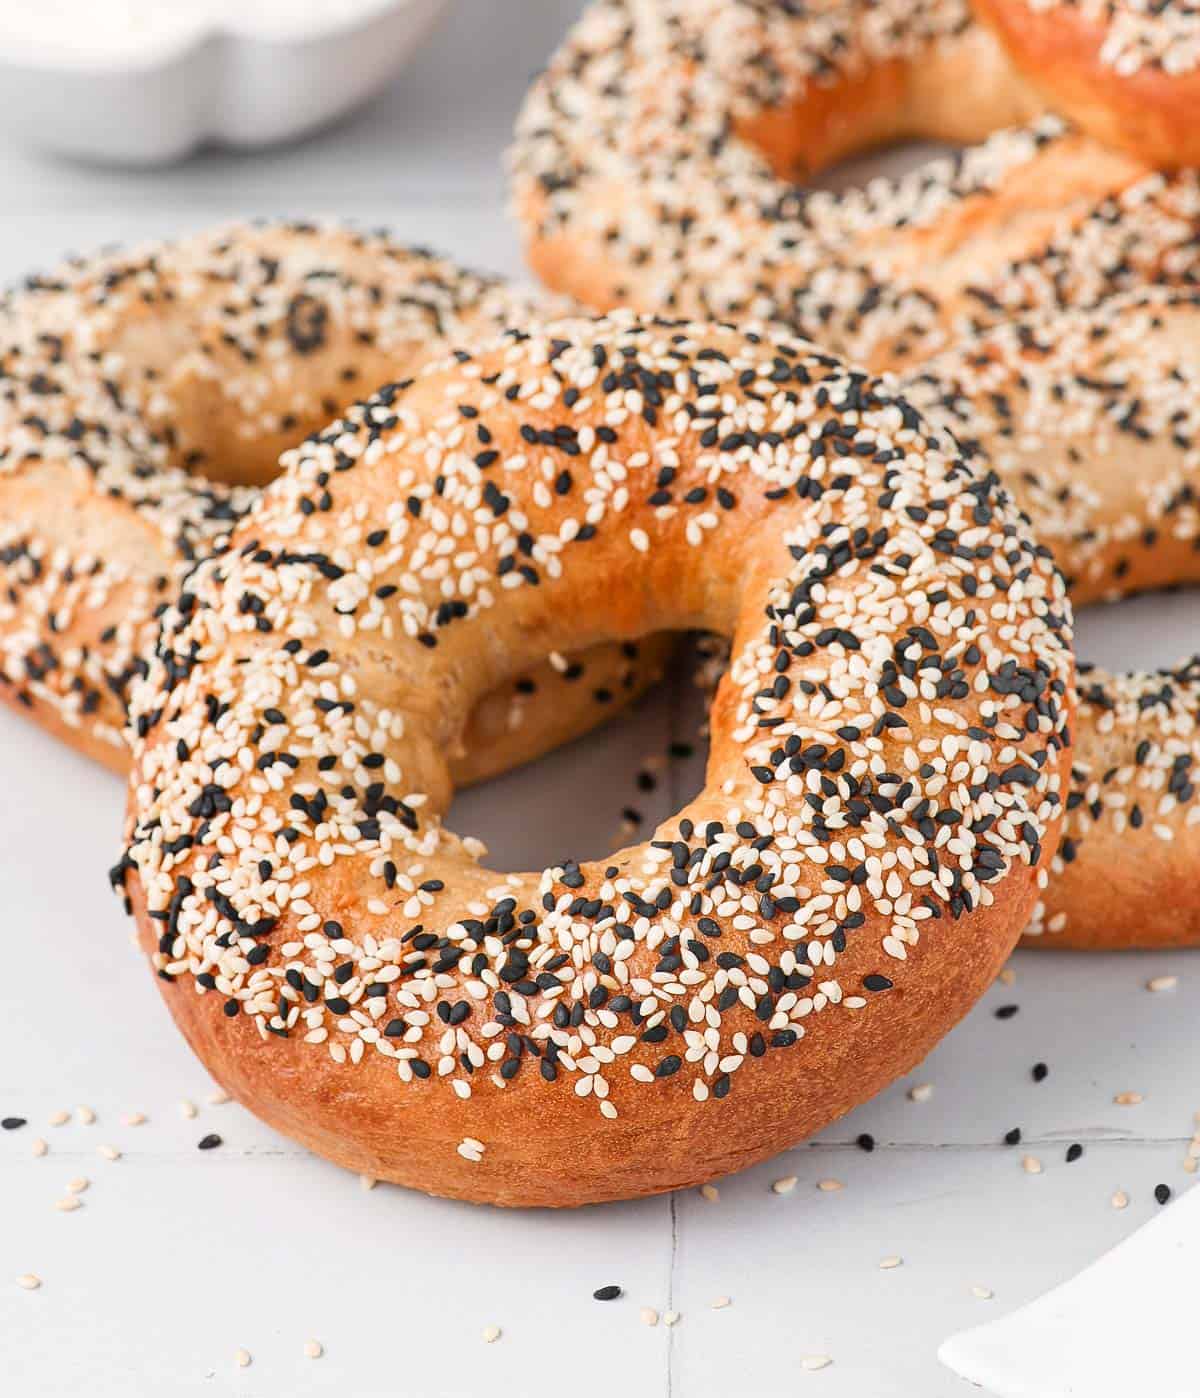
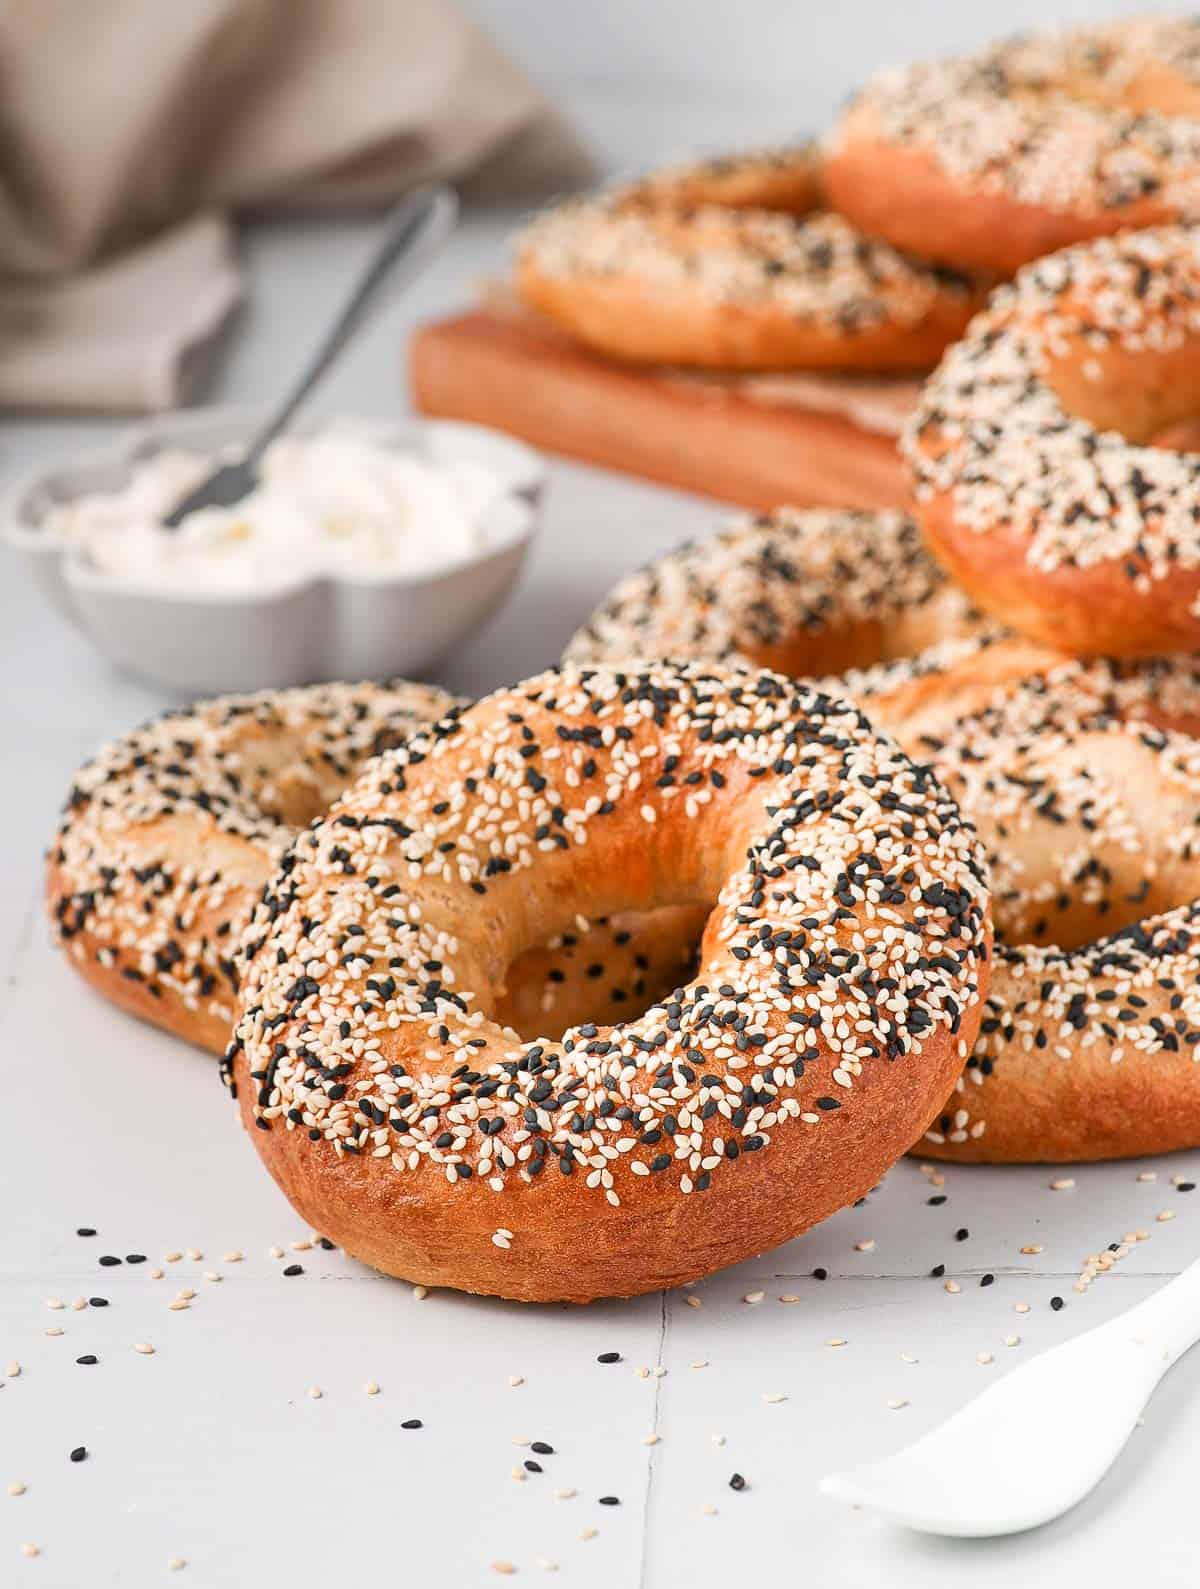
This Sesame Bagels recipe will show you exactly how to make bagels from scratch at home. These bagels are deliciously fluffy, soft and chewy with a great crunch thanks to the sesame seeds!

Jump to:
Why we love this recipe
Like most breads, you simply cannot compare supermarket bagels to homemade ones. These Sesame Seed Bagels are so chewy and airy - and they are much easier to make than you think!
These bagels will stay fresh for days and can be frozen for later as well. Trust me, you will be happy to make a big batch...
Toast them with some Cream Cheese and Smoked Salmon, make a Smashed Avo Bagel or simply enjoy with Butter and Jam, this sesame seed bagels recipe is always a winner!
Ingredients
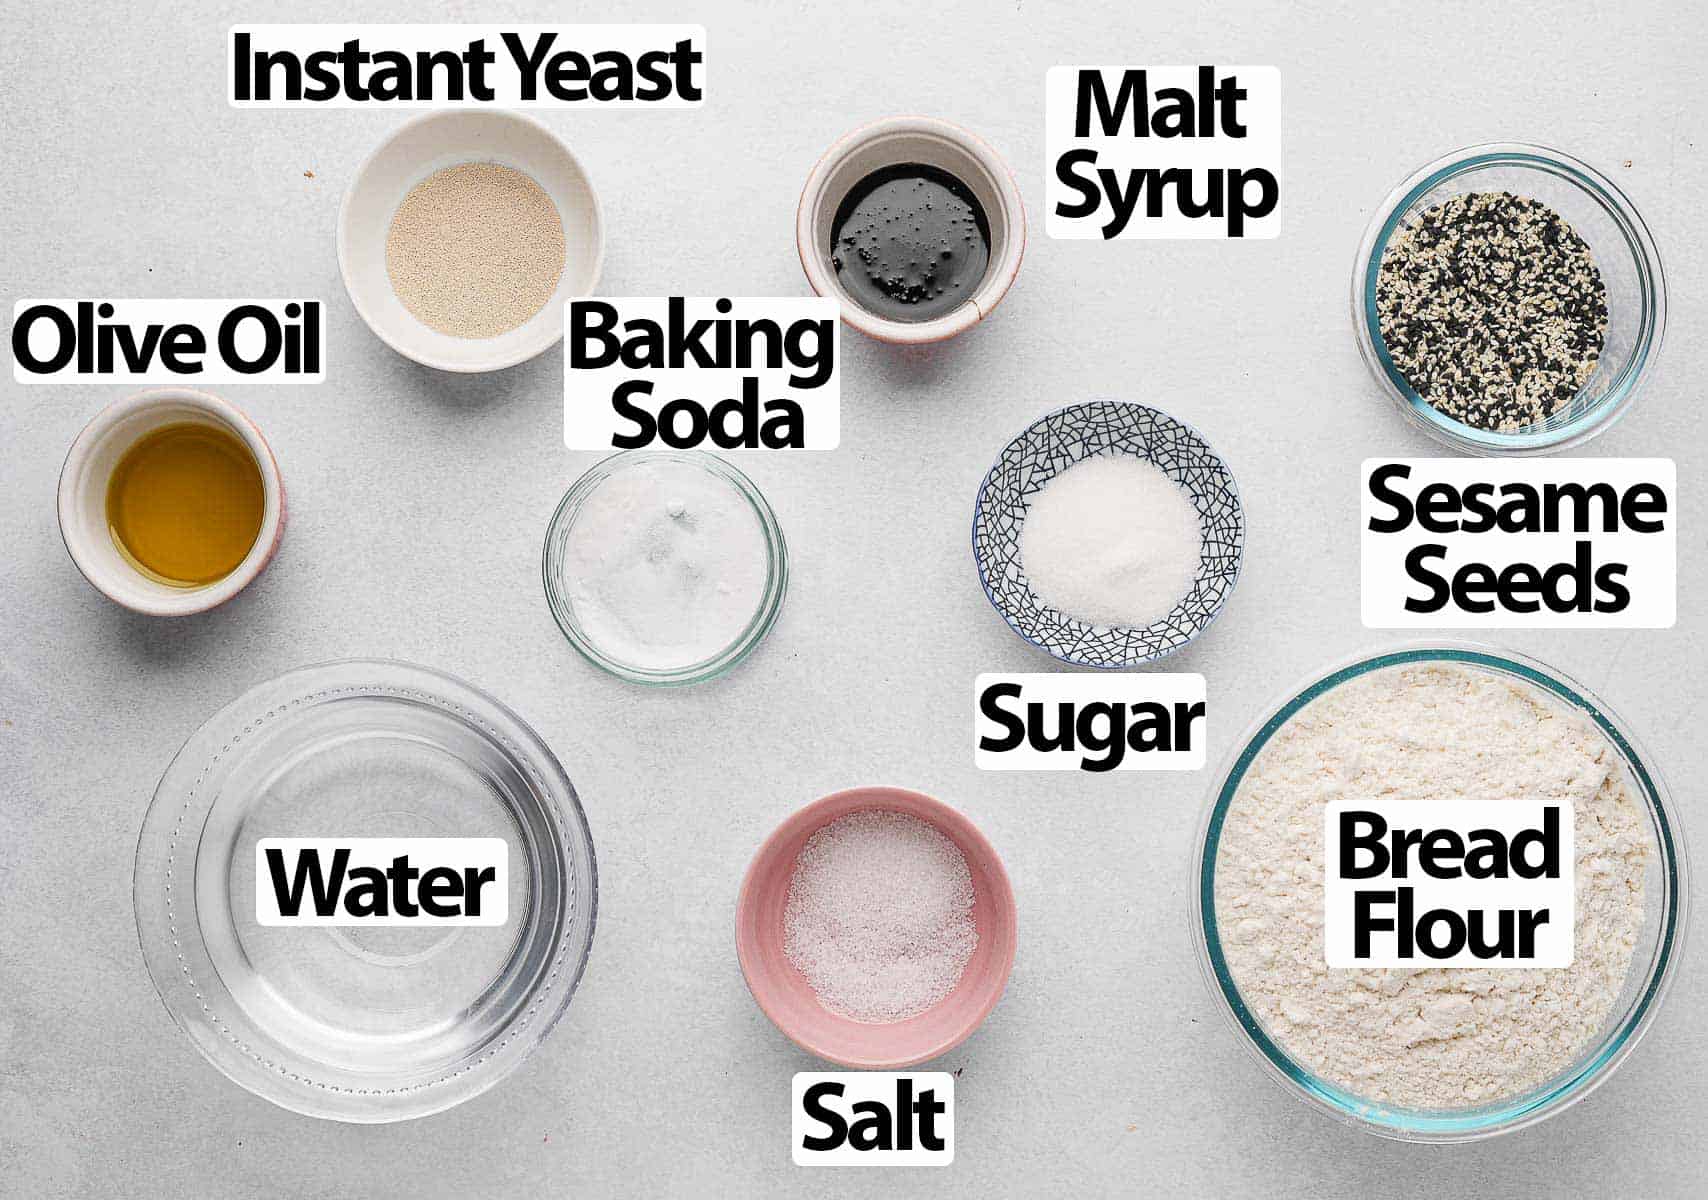
What is in a sesame bagel (scroll down to recipe card below for all quantities):
For the bagel dough
- Water: Lukewarm; not cold but not too hot or it will kill the yeast. The perfect temperature is somewhere around 35 degree celsius (95'F).
- Sugar: Caster Sugar or Fine white granulated sugar. Just a little bit to help the yeast and add a light sweetness to the bagels.
- Yeast: Instant (dry) Yeast - but active dry yeast will work too.
- Oil: I use Olive Oil for flavour, but you can substitute it with vegetable oil.
- Barley Malt Syrup: what gives the bagels their distinctive flavour! I personally like to use it inside the dough, but some people like to add some to the water bath as well. You should be able to find it at your supermarket, but it can otherwise be substituted with Molasses, Rice Malt Syrup or Honey.
- Flour: you will need Bread Flour to make bagels - not a plain / all-purpose flour that won't develop as much gluten as bread flour. I have only tried this recipe with a wheat flour.
- Salt: Fine Table Salt.
- Sesame Seeds: I used a mix of White and Black Sesame Seeds, but you can use only one if preferred.
This recipe does not contain egg or dairy - so these eggless bagels are actually vegan.
For the Water Bath
- Water + Baking Soda: the base of your water bath. The exact amount of water will depend on the size of your pan; you want at least 5 to 10 cm of water (2 to 4 inch) so that the bagel does not touch the bottom of the pan when you boil it.
- Optional: a little bit more barley malt syrup (or molasses / honey). This is if you want a deeper flavour and slightly more golden bagels.
How to make Bagels with Sesame Seeds
Making the Bread Dough
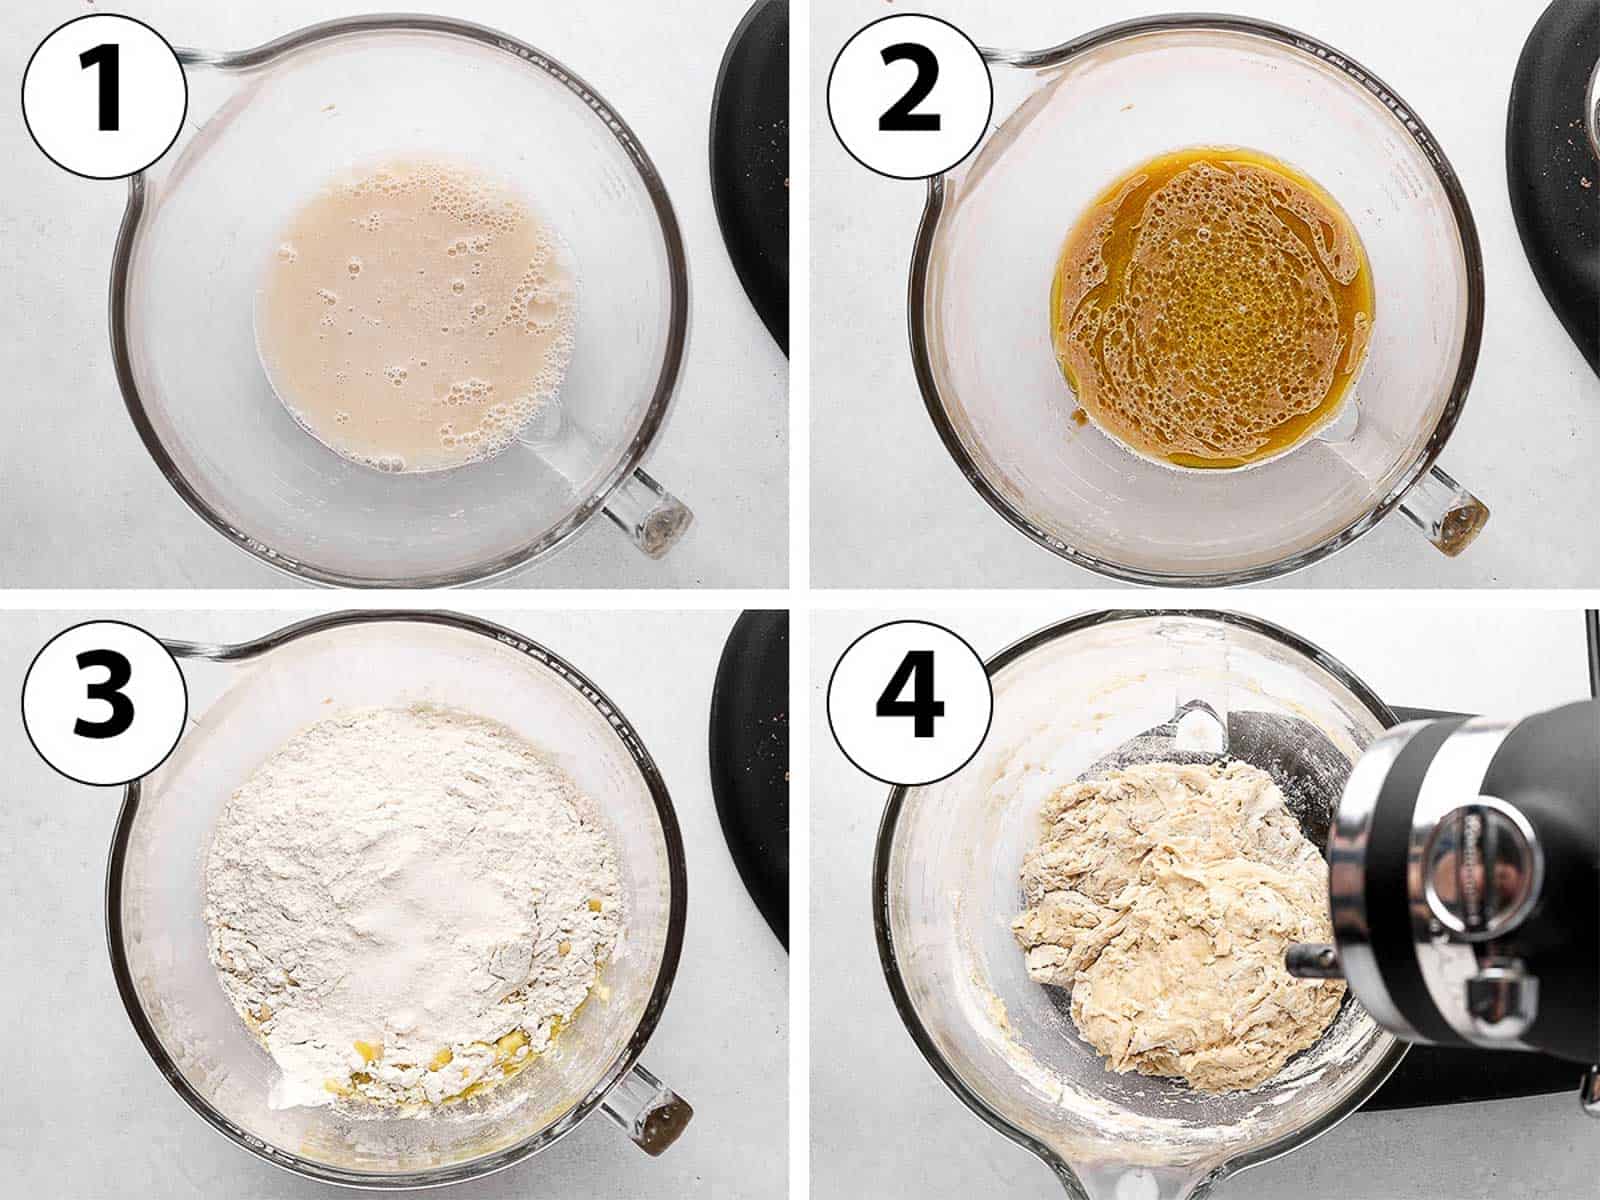
- Photo 1: Place the warm Water in the bowl of your stand mixer, and sprinkle in the Sugar and Instant Yeast. Give it a good mix then set aside for about 10 minutes or until the top looks frothy and bubbly. This means that the yeast is active.
Note that Instant Yeast does not technically requires to be rehydrated or "bloomed", but I like to do so to insure the yeast is alive before starting the recipe.
- Photo 2: Mix in the Olive Oil and Barley Malt Syrup.
- Photo 3: Add the Bread Flour and lastly the Salt.
- Photo 4: Knead the mixture with your hands for about a minute, just to get a rough dough. This is just to help the stand mixer combine all the ingredients together.
- With the dough hook attachment, turn on medium to high speed and knead for 8 to 10 minutes - or until the dough is very soft, stretchy and passes the "windowpane test".
The "windowpane test" is a way to assess whether or not the dough has been kneaded enough - and if there is enough gluten development. To do the test, gently pull and stretch a small piece of dough. If the dough breaks quickly, it needs to be kneaded for longer. If it stretches easily without breaking and you can see light coming through it, it has passed the windowpane test.
Proofing the Dough
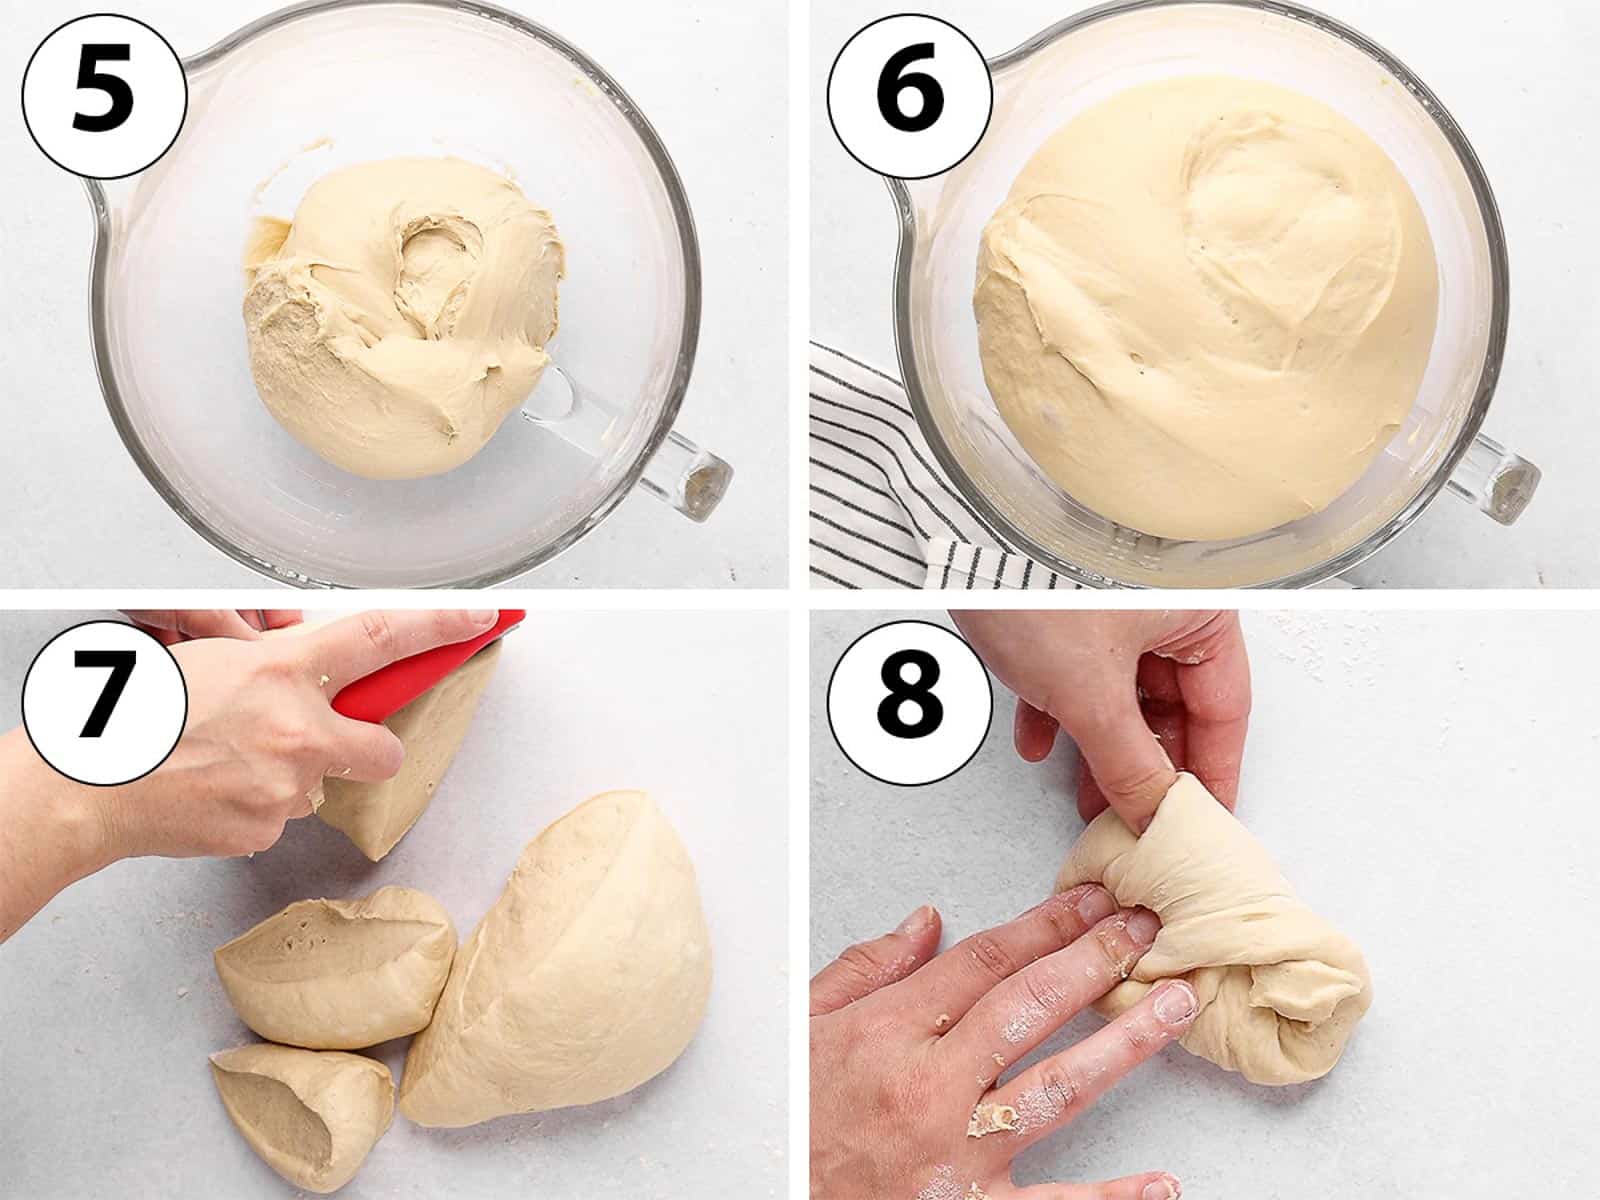
- Photo 5 & 6: Once the dough is ready, cover the bowl with a tea towel (I personally keep it in the same bowl but you can transfer it into a new clean bowl if preferred) and leave to proof in a warm spot for about 1,5 hour - or until it has doubled in size.
Alternatively, you can also proof the dough overnight in the fridge for 8 to 12 hours.
- Photo 7: Punch the dough to deflate it and transfer over a lightly floured surface. Cut it into 8 even pieces.
The best way to get regular bagels is to weight the dough with a kitchen scale for accuracy.
- Photo 8: Start shaping each piece of dough into a tight ball. First, slightly flatten each ball with your fingers then pull and fold the edges towards the centre. Flip the ball so that the seam is facing down.
Shaping the Bagels
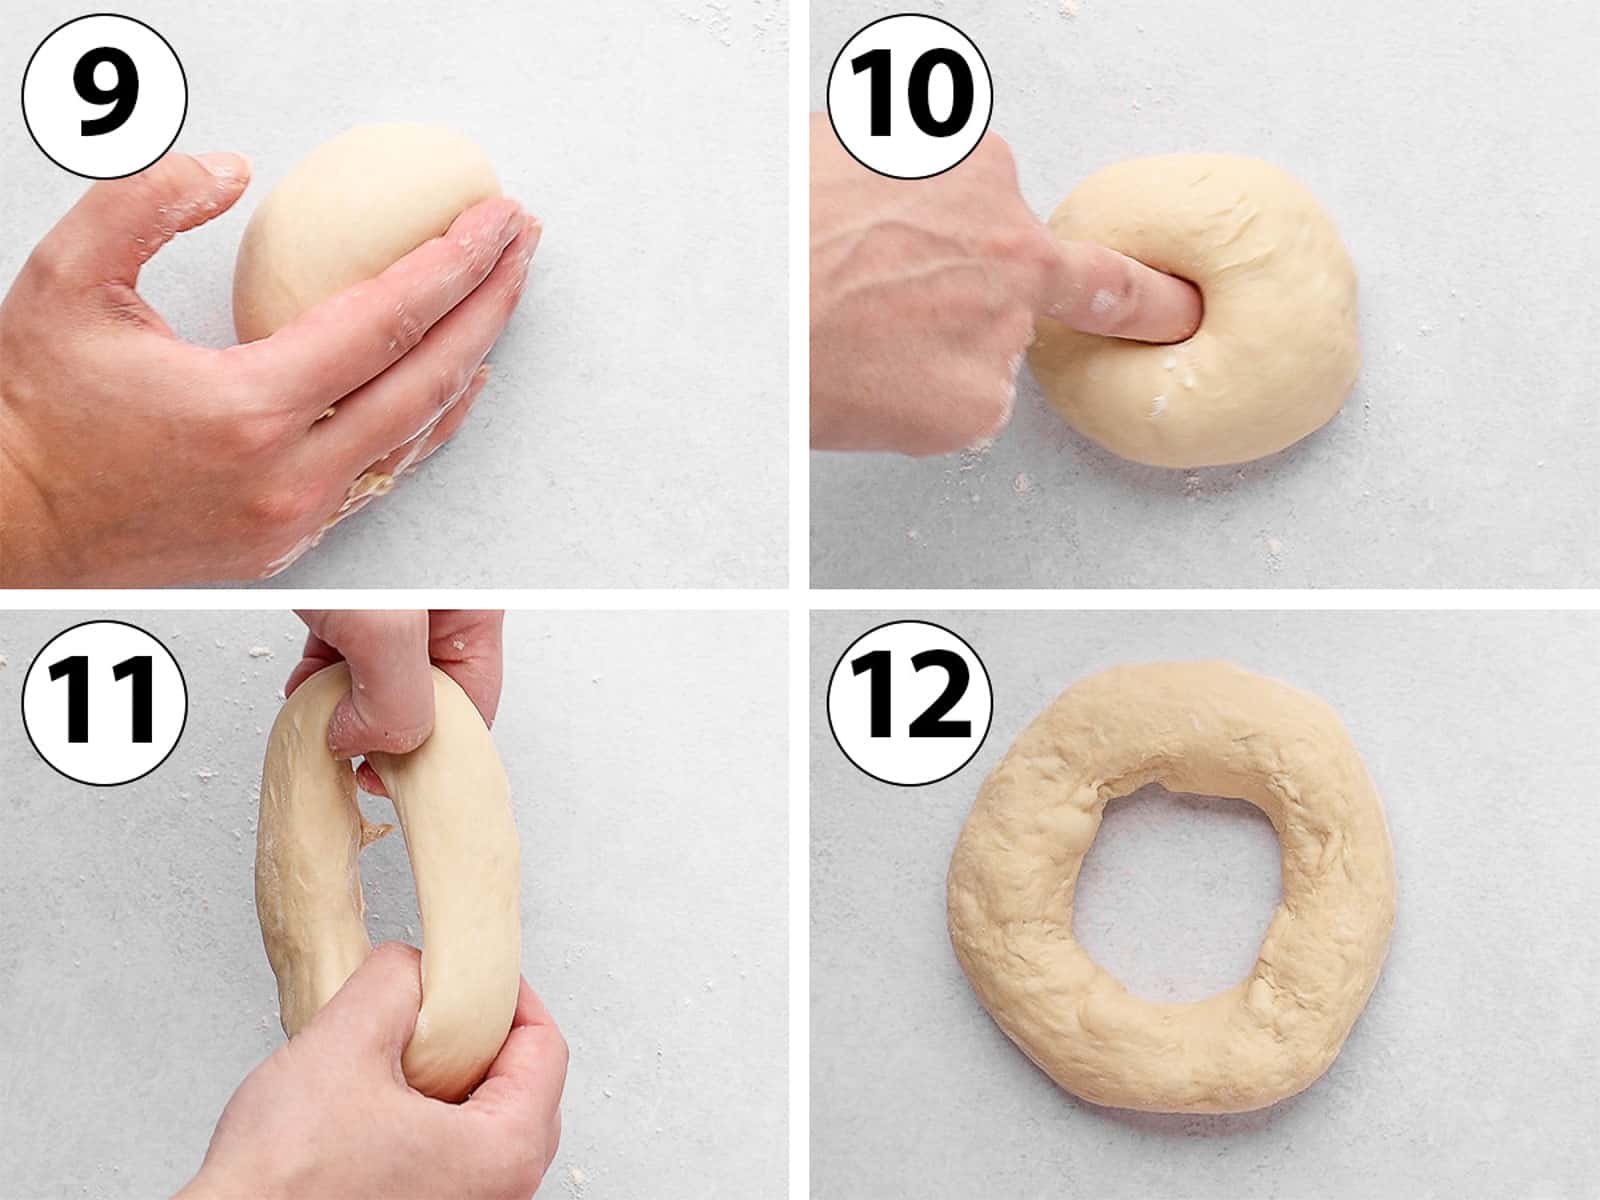
- Photo 9: Pull the ball towards you, pressing gently on the side / bottom of the dough. Turn 90 degrees and repeat the process a few times. Then place your palm over the ball and roll it between the palm of your hand and kitchen counter to get a smooth ball.
Would you like to save this recipe?
- Repeat with the 8 pieces of dough, placing each finished ball on a lightly floured surface.
- Photo 10: Dip a finger in flour then press the centre of each ball to create a hole.
If the opening seems to be sticking to your finger, add a little bit of flour.
- Photo 11 & 12: Gently stretch the hole until you get the desired shape. Repeat until all the bagels are shaped.
- Prepare two baking trays with baking sheets, parchment paper or baking mats. Place half of the batch on one of the tray and place in the fridge while you boil and bake the second batch.
How wide should the bagel hole be? That is up to you! Once they are boiled, the bagels will not rise or expand a lot - so the shape you create at this stage is basically the one you will get once the homemade sesame bagels are baked!
Boiling & Baking the bagels
- Preheat your oven on 180'c/350'f.
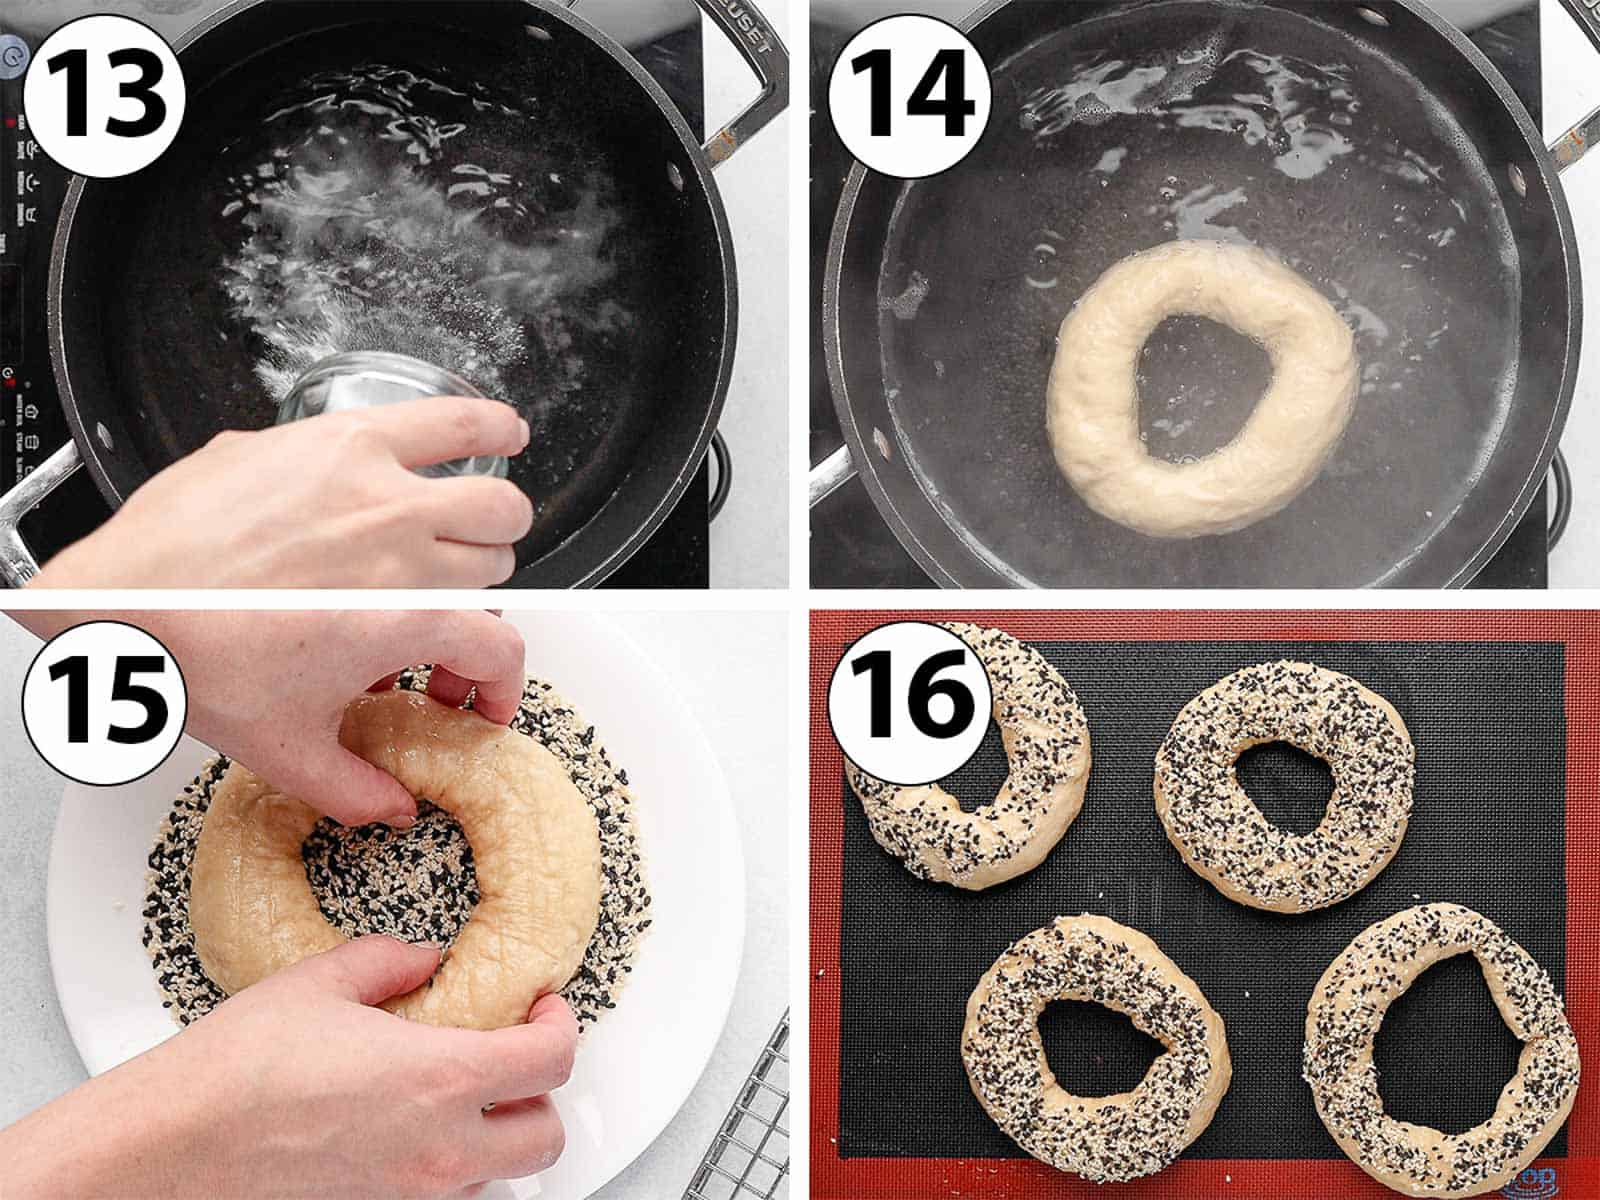
- Photo 13: Prepare a large pot with about 2 litres of water (or enough water to have at least 5 to 10cm of water at the bottom of your pot). Add the Baking Soda and optionally a little bit more barley malt syrup. Turn on medium heat and bring to a simmer / low boil.
- Photo 14: Boil each bagel for about 30 seconds to 1 minute on each side. Pick up the boiled bagel with a slotted spoon to drain the excess water and place on a cooling rack to cool down for about 1 minute.
- Photo 15: Place the Sesame Seeds in a small plate. Once the bagel has slightly cooled, place it over the sesame seeds to coat them. The seeds should easily stick to the bagel.
Alternatively if you want less sesame seeds, simply sprinkle them over each bagel and gently press them in with your finger to make sure they stick to the dough.
- Photo 16: Place on the prepared baking tray and repeat with the other 3 bagels.
- Place in the oven to bake for 20 to 22 minutes, or until golden. Take out of the oven and leave to cool down completely.
- While the first batch is in the oven, take the second batch out of the fridge and repeat the boiling, coating and baking process.
Recipe FAQs
Although the recipe will work with plain / ap flour, it is highly recommended to use bread flour (especially a high protein bread flour) for the best texture and recognisable chewy, soft crumb.
Barley Malt Syrup is traditionally used in bagels to give them flavour and help with the browning of the dough since it contains sugar (maltose to be precise). It can be used both inside the bagel dough and in the water bath for extra flavour. Although it gives your bagel their recognisable flavour, it can be omitted (or substituted) if preferred.
I have tried this recipe without boiling the bagels and yes, it will work, but the bagels will rise way more in the oven (so you will loose the distinctive donut shape) and the crust won't be as chewy.
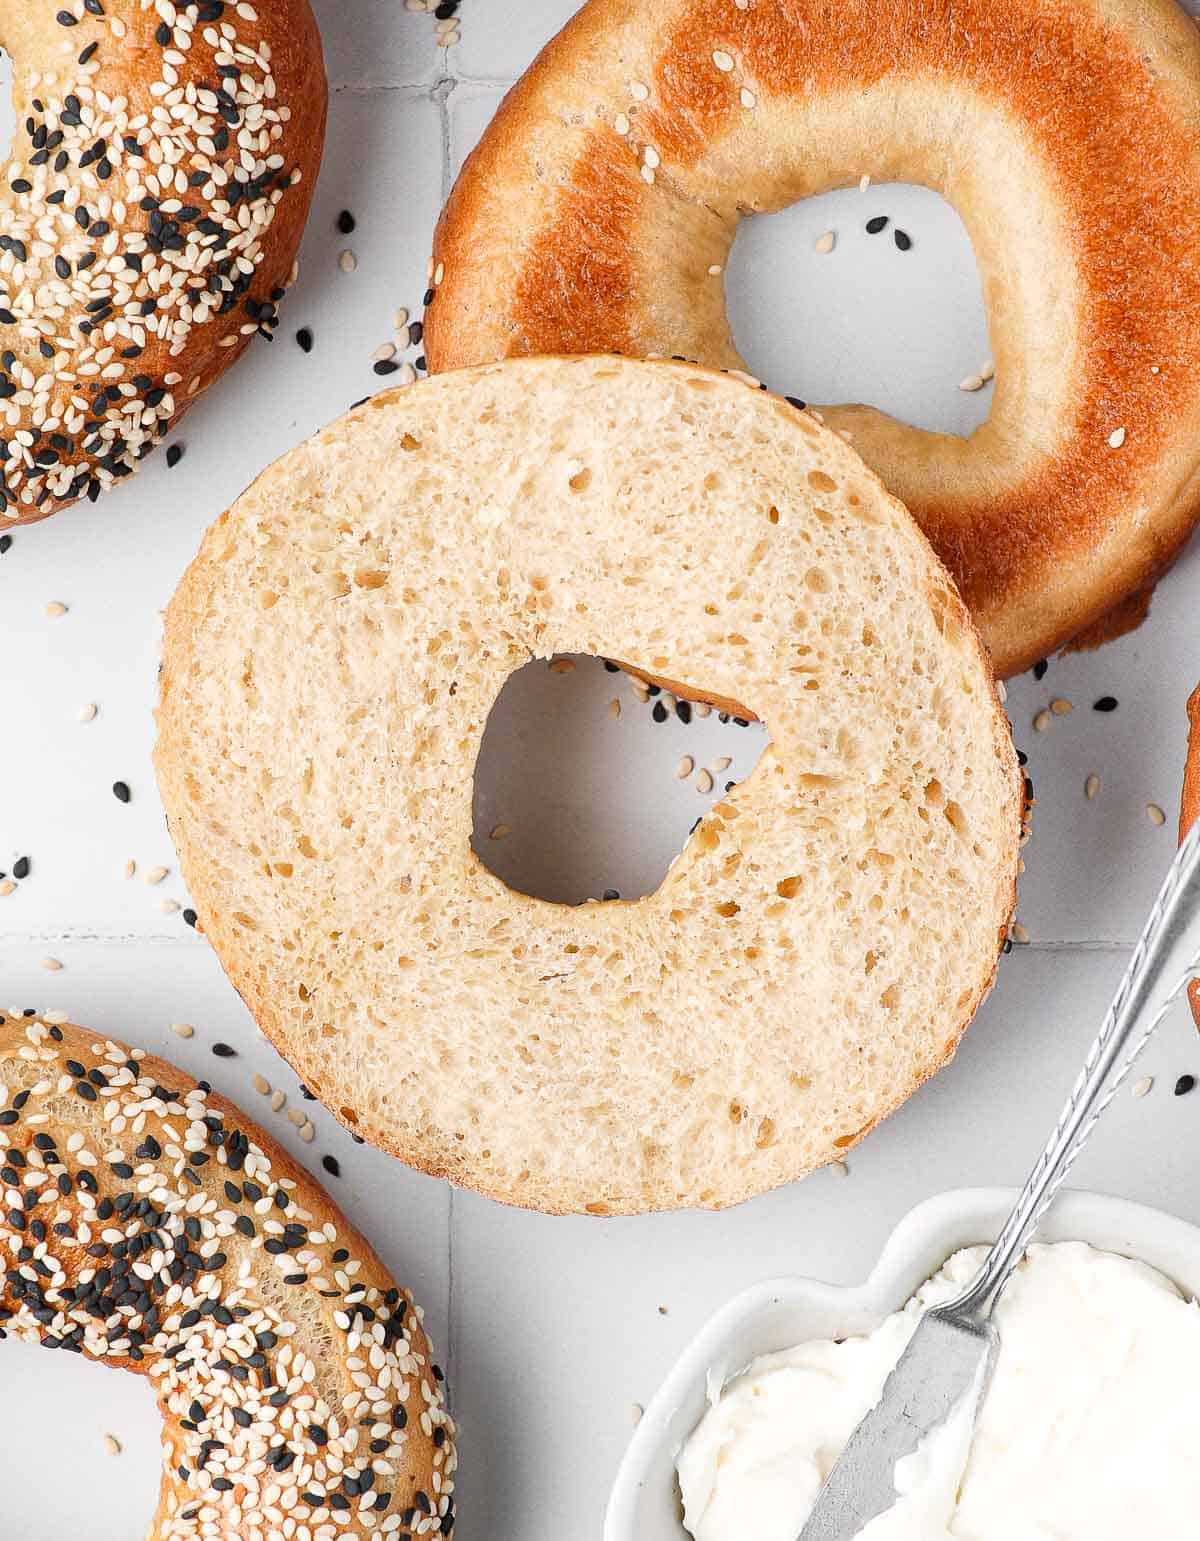
Traditionally, bagels are first boiled before being baked in order to gelatinises the wheat starch on the exterior of the dough. This creates the typical chewy exterior texture with soft interior crumb, as well as a nice shiny crust.
Baking Soda is used to give the bagels a nice golden colour once they are baked thanks to a process called the "Maillard reaction". The baking soda can be substituted with lye, barley malt syrup or barley malt extract.
Troubleshooting
- The dough didn't rise: check that the yeast is alive first (it should show small bubbles when you dissolve it in warm water). It is also possible that the spot where you proofed the dough was not warm enough. In that case, simply leave the dough to proof for longer (it will take longer to proof at a colder temperature).
- The dough is very soft / sticky: the dough will be quite soft just after you knead it, but will be easier to handle once proofed. If needed, dust with a little bit of flour when shaping the breads. Alternatively, proofing the dough in the fridge will give you a stiffer dough that is easier to handle.
- The bagels shrink back when I try to shape them: cover the balls with a tea towel and leave them for 10 to 15 minutes before trying to shape them again. This is to allow for the gluten to relax, making the dough more stretchy and elastic.
- The bagels are flat: could be a sign that the dough was under or over-proofed. If you boil the bagels for too long, that could also provide them from rising in the oven as it will create a thick barrier around the bagels. You shouldn't need to boil the bagels for more than 30 seconds to 1 minute on each side.
Serving Suggestions
The most classic sesame bagel sandwich is probably cream cheese and smoked salmon, but there are SO many delicious other toppings you can use - from savoury to sweet.
- Savoury: tuna salad, egg salad, chicken salad, cheese, cured meat like pastrami, hummus, marinated veggies or smashed avocado with poached egg. Bagels can also be used to make super fun pizza bagels or burger bagels too!
- Sweet: classic butter and jam, homemade lemon curd, peanut butter and banana, nutella or even a delicious homemade mixed berry compote.
Tips for Success
- Make sure to use a high protein Flour, which will develop a lot of gluten strands resulting in deliciously chewy bagels. Plain / AP flour will develop less gluten than a bread flour so it is not recommended here.
- Don't boil the bagels for more than 30 seconds to 1 minute, or a thick shell will create around the bagels, preventing them from rising at all in the oven.
- The size of the hole is up to you and your preferences. After boiling, the bagels will not rise a lot in the oven so the hole you create when shaping the breads is close to what you will get out of the oven!
- To avoid over-proofing the bagels, work in two batches: form the individual balls, shape them into the typical donut shape then place half of the bagels in the fridge while you boil and bake the second batch.
Storing & Freezing
These sesame bagels will stay fresh for up to three days. They should be kept at room temperature in an air-tight container, bread box or bag.
Bagels also freeze really well. I highly recommend to pre-slice them before freezing, which will allow you to thaw them directly in your toaster. Alternatively, take out of the freezer and leave at room temperature for a few hours to defrost.
Made this recipe?
Let us know if you liked it by leaving a comment below, and tag us on Instagram @a.baking.journey with a photo of your creation!
Recipe
Sesame Bagels
Ingredients
- 320 ml (1 1/3 cup) Water, lukewarm
- 10 gr (1 tablespoon) Caster Sugar, or fine white granulated sugar
- 9 gr (2 teaspoon) Instant Yeast
- 30 ml (2 tablespoons) Olive Oil, or vegetable oil
- 20 gr (1 tablespoon) Barley Malt Syrup, or molasses / honey
- 500 gr (3 1/3 cups) Bread Flour
- 8 gr (1 1/2 teaspoon) Fine Salt
- 1 teaspoon Baking Soda (for water bath), plus water to fill a pot
- Black & White Sesame Seeds, to taste
Instructions
Bagel Dough
- Mix the lukewarm Water, Sugar and Instant Yeast in the bowl of your stand mixer. Set aside for about 10 minutes or until the top looks frothy and bubbly (see note 1).
- Mix in the Olive Oil and Barley Malt Syrup, then add the Bread Flour and lastly the Salt. Quickly mix by hands or with a spatula to start combining the ingredients, then knead with the dough hook of your stand mixer for 8 to 10 minutes on a medium to medium high speed. The dough should be very soft and stretchy - and pass the "windowpane test" (see note 2).
- Cover the bowl with a tea towel and leave to proof in a warm spot for about 1,5 hour - or until it has doubled in size (see note 3).
- Punch the dough to deflate it and transfer over a lightly floured surface. Cut it into 8 even pieces - using a kitchen scale to weight the dough for accuracy.
Shaping the Bagels
- Start shaping each piece of dough into a tight ball. First, slightly flatten each ball with your fingers then pull and fold the edges towards the centre. Flip the ball so that the seam is facing down. Pull the ball towards you, pressing gently on the side / bottom of the dough. Turn 90 degrees and repeat the process a few times. Then place your palm over the ball and roll it between the palm of your hand and kitchen counter to get a smooth ball. Repeat for each of the 8 doughs.
- Cover one of your finger in flour then press the centre of each ball to create a hole. Gently stretch the hole until you get the desired shape (see note 4). Repeat until all the bagels are shaped.
- Prepare two baking trays with baking paper or mats. Put half of the bagels on one of the tray and place in the fridge while you boil and bake the second batch.
Boiling & Baking
- Preheat your oven on 180'c/350'f. Prepare a large pot with about 2 litres of water - or enough water to have at least 5 to 10cm (2 to 4 inch) of water at the bottom of your pot. Add the Baking Soda, turn on medium heat and bring to a simmer.
- Boil each bagel for about 30 seconds to 1 minute on each side. Pick up the boiled bagel with a slotted spoon to drain the excess water and place on a cooling rack to cool down for about 1 minute.
- Place the Sesame Seeds in a small plate. Once the bagel has slightly cooled, dip it into the sesame seeds to coat them. The seeds should easily stick to the bagel (see note 5).
- Place on the prepared baking tray and repeat with the other 3 bagels.
- Place in the oven to bake for 20 to 22 minutes, or until golden. Take out of the oven and leave to cool down completely. While the first batch is in the oven, take the second batch out of the fridge and repeat the boiling, coating and baking process.
Video
Would you like to save this recipe?
Notes
- Although not required when using instant yeast like here, this step is used to check that the yeast is active. The water should ideal be around 35'c (95'f).
- The "windowpane test" is a way to assess whether or not the dough has been kneaded enough - and if there is enough gluten development. To do the test, gently pull and stretch a small piece of dough. If the dough breaks quickly, it needs to be kneaded for longer. If it stretches easily without breaking and you can see light coming through it, it has passed the windowpane test.
- Alternatively, you can also proof the dough overnight in the fridge for 8 to 12 hours.
- How wide should the bagel hole be? That is up to you! Once they are boiled, the bagels will not rise or expand a lot - so the shape you create at this stage is basically the one you will get once the homemade sesame bagels are baked!
- Alternatively if you want less sesame seeds, simply sprinkle them over each bagel and gently press them in with your finger to make sure they stick to the dough.