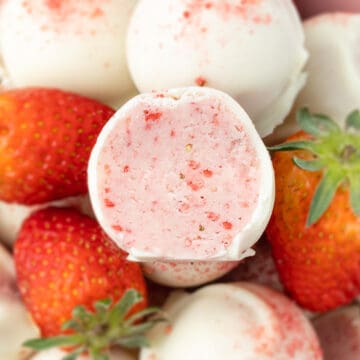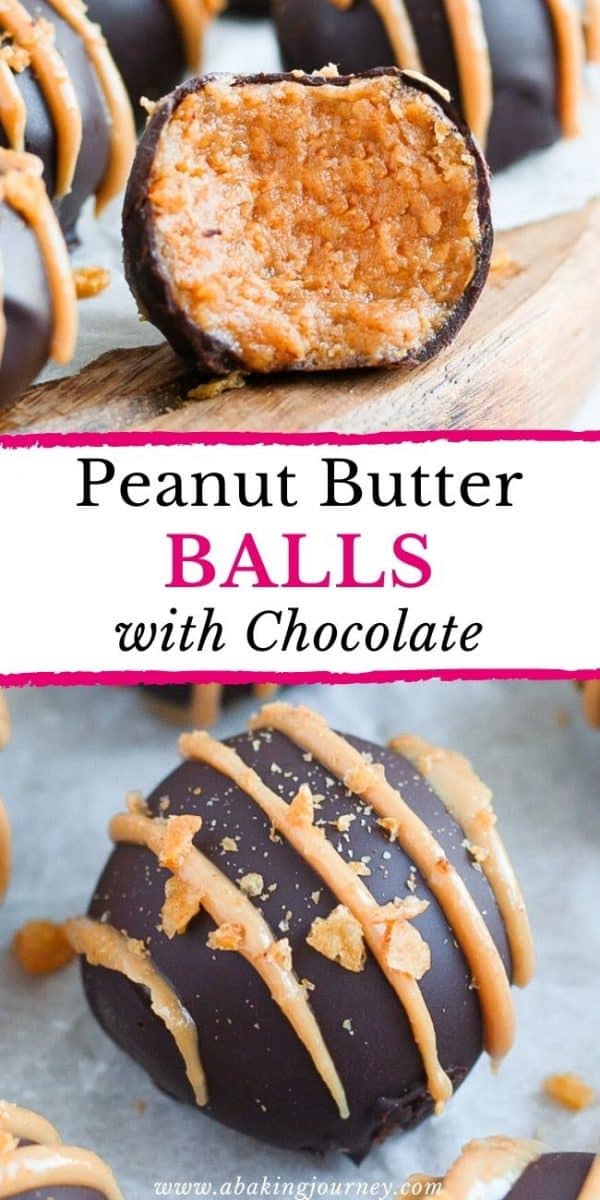
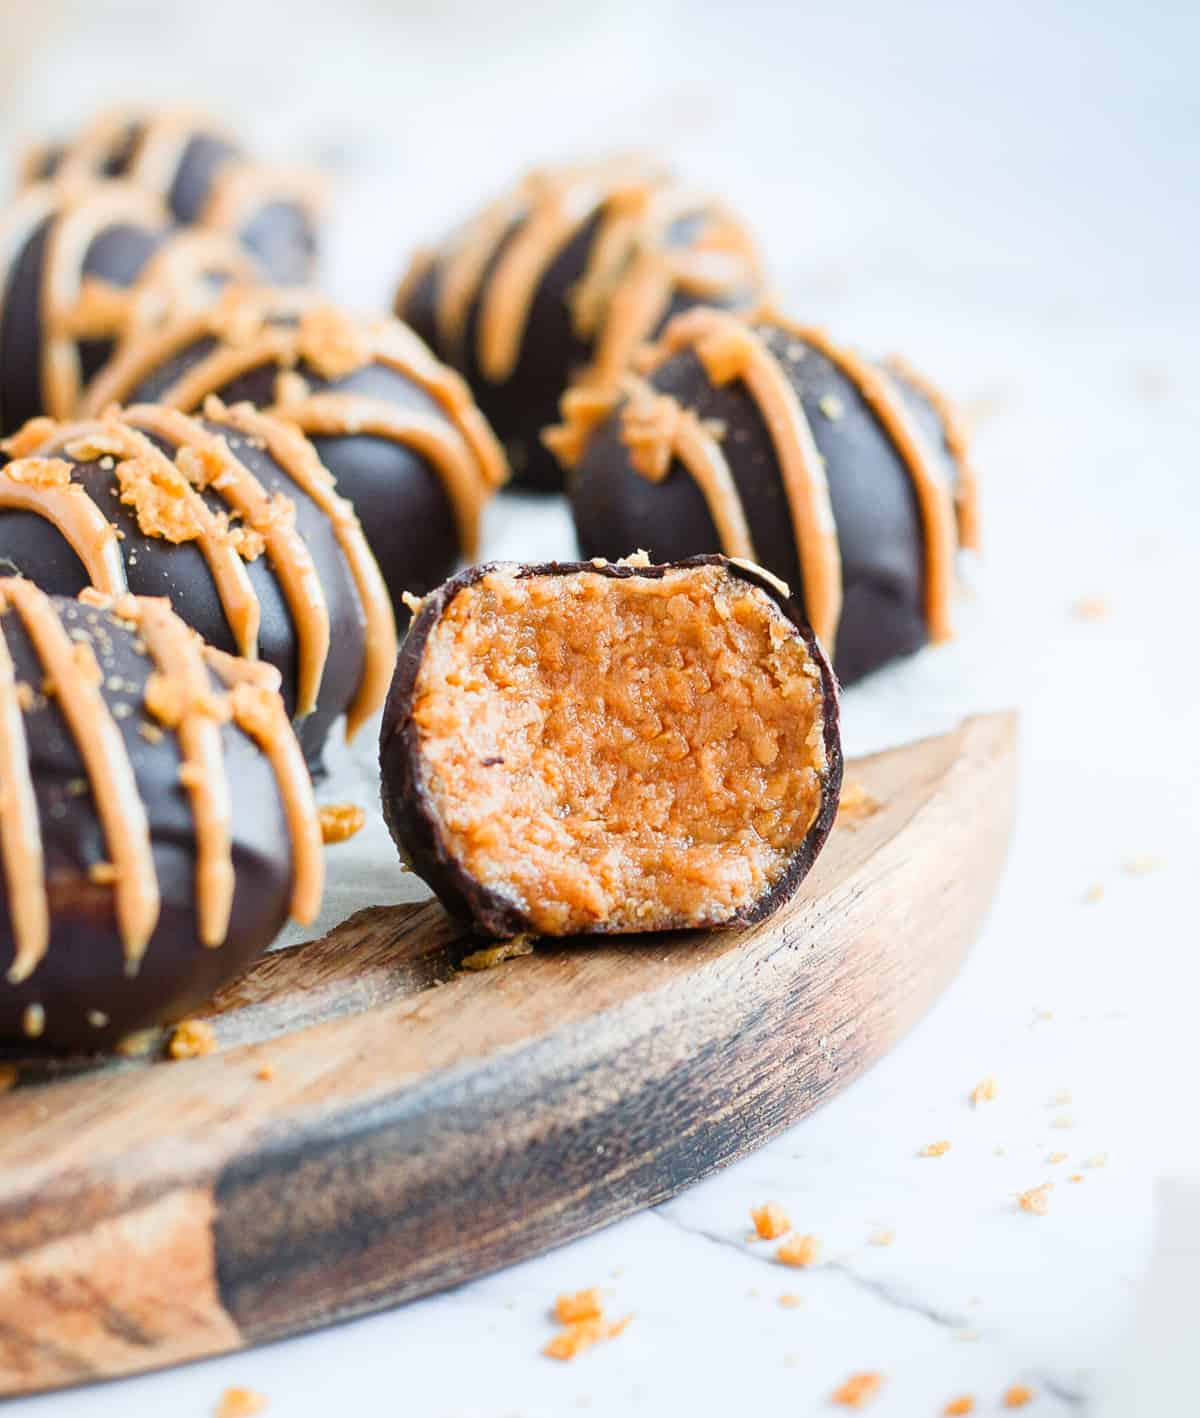
Made with 4 ingredients only, these super easy No Bake Chocolate Peanut Butter Balls are the most decadent bites you will ever try. And you would never guess that these Peanut Butter Truffles are Vegan, Gluten-Free Friendly and made with no added sugar!

Jump to:
Why we love this recipe
These Chocolate Covered Peanut Butter Balls are not only an easy no bake recipe that is simply made with 4 ingredients, they also require less than 30 minutes in prep time.
Just like these Biscoff Truffles, Raspberry Truffles and French Chocolate Truffles, these peanut butter balls make great Edible Gift for the Holidays or a simple decadent treat to put on a dessert table for a birthday or afternoon tea.
And has there ever been a better combo than Peanut Butter and Chocolate? Just like for my Chocolate Peanut Butter Muffins, the smooth and slightly savoury peanut butter works perfectly with the decadent dark chocolate.
These truffles are delicious mix between my Healthy Peanut Butter Energy Balls and these crunchy No Bake Chocolate and Peanut Butter Bars.
Ingredients
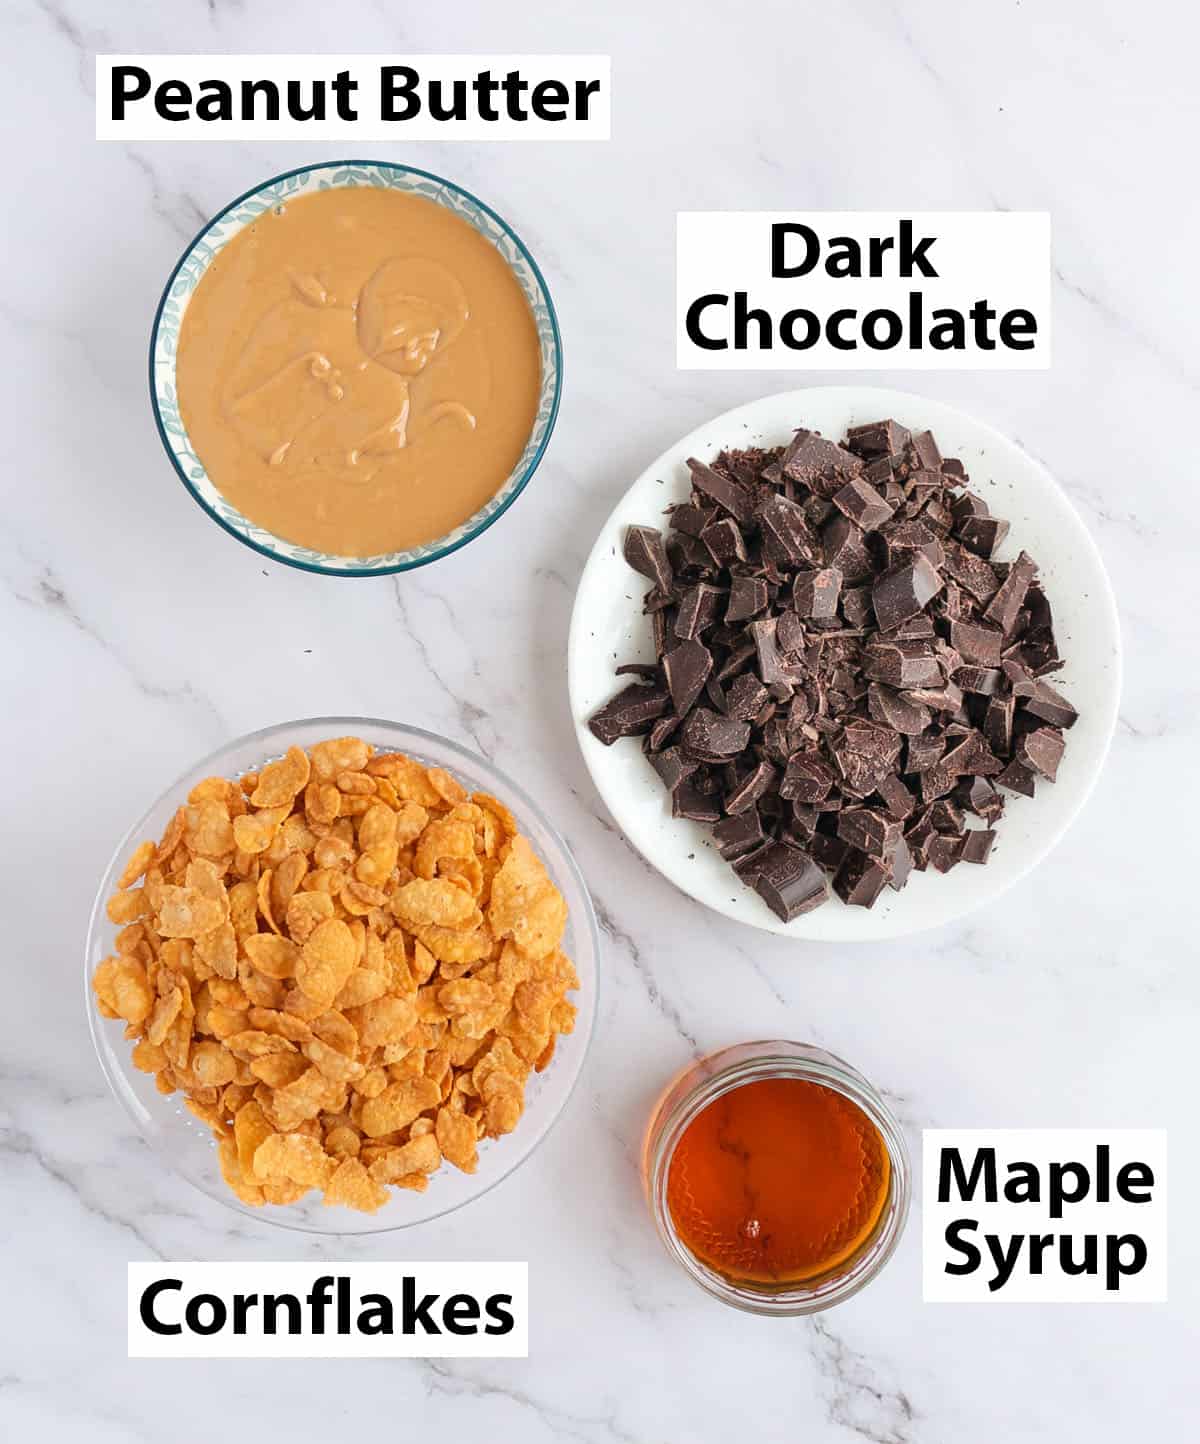
Only four ingredients are needed to make this recipe (scroll down to recipe card for all quantities):
- Peanut Butter: I recommend using Smooth Peanut Butter over a crunchy one. It is also preferable to use an all-natural peanut butter as well - without any added sugar or salt - to control the flavours of the truffles.
- Dark Chocolate: you need to make sure you are using proper Cooking Chocolate and not a classic chocolate bar or compound chocolate. Cooking Chocolate - or Couverture Chocolate - has the ability to easily melt and harden again quickly, which is what we need here.
- Cornflakes: a great crunchy ingredient that can be used to substitute biscuits or Graham Crackers - and that can be bought certified Gluten-Free if needed. Cornflakes are a great ingredient to create no-bake treats just like my Chocolate Cornflake Cakes - and give a much better crunch that Rice Krispies!
- Maple Syrup: the perfect natural sweetener that adds a mild floral taste to these peanut butter balls.
Optional: you can add a little bit of Sea Salt and Vanilla Extract to the mix as well if you want to boost the flavours.
Substitution
- Maple Syrup: you can use Agave Syrup or liquid Honey if preferred - but note that it will affect the taste of the truffles
- Dark Chocolate: can absolutely be replaced by Milk Chocolate if you want something sweeter, but again - make sure it is proper cooking chocolate and not an eating chocolate bar.
How to make Peanut Butter Balls in Chocolate
The prep itself is very simply and quick; it will take you about 20 minutes to assemble these truffles. But there is a fair bit of chilling time required to get the perfect crunchy yet smooth consistency!
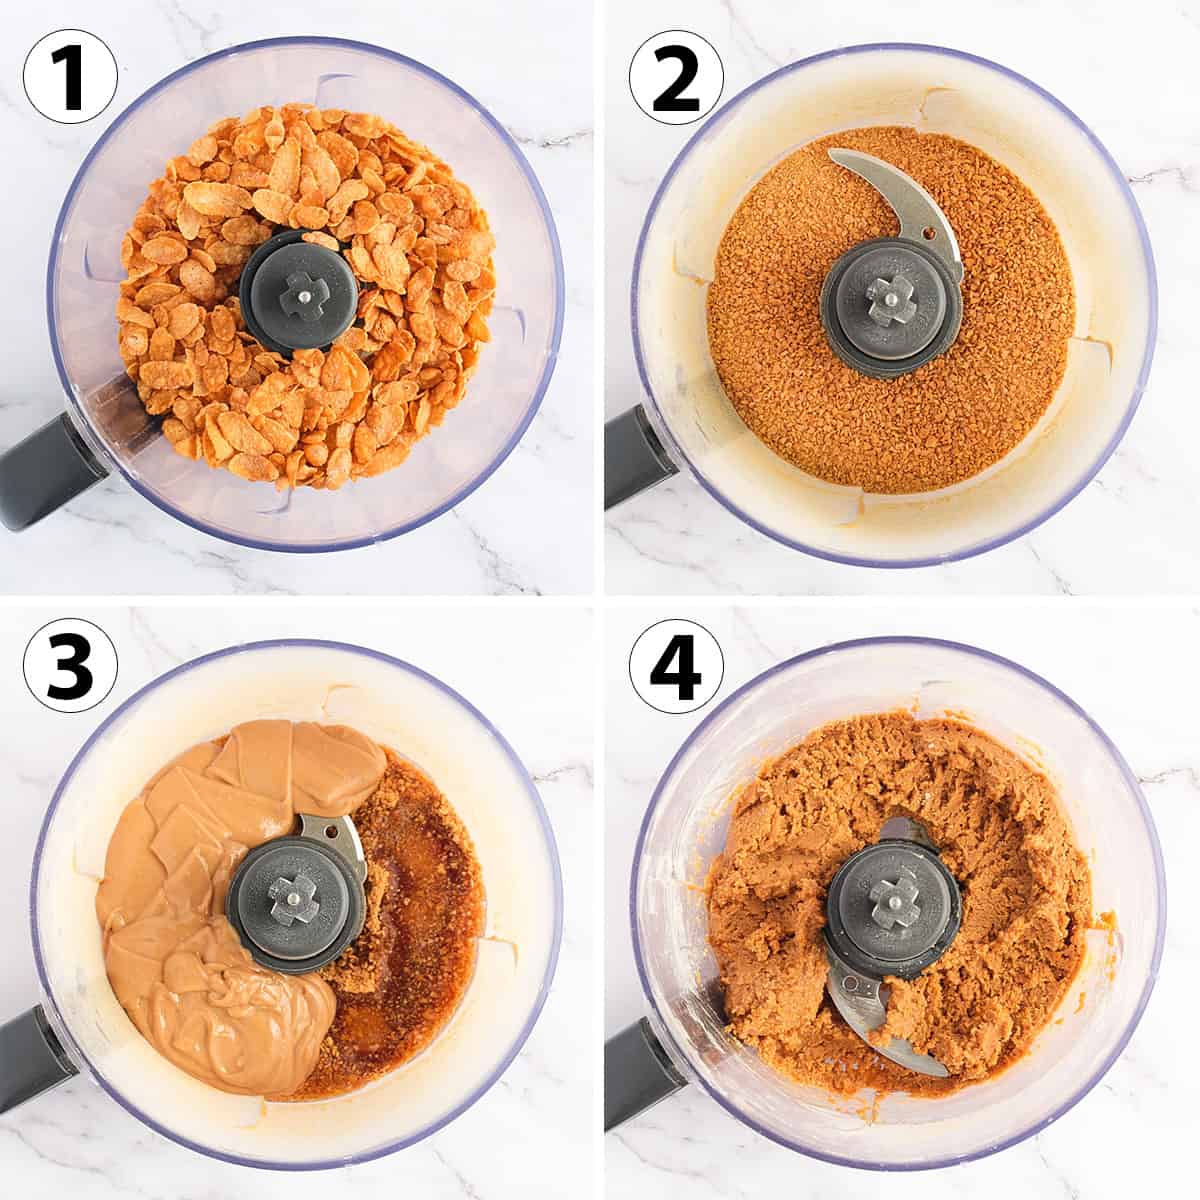
The first step is preparing the Crunchy Peanut Butter Filling;
- Photo 1 & 2: Place the Cornflakes in the bowl of your food processor and mix for a few minutes, or until you get a very thin crumb consistency. Try to avoid keeping large pieces of cornflakes or the balls will be hard to roll.
- Photo 3: Add the Smooth Peanut Butter (needs to be very fluid), Maple Syrup and optionally the Vanilla Extract and Sea Salt.
- Photo 4: Blend until combined. You should get a thick paste-like consistency. Don't worry if it looks a bit crumbly, it will come together when you roll the balls.
The second part of the recipe is to shape and coat the peanut butter truffles with chocolate:
Would you like to save this recipe?
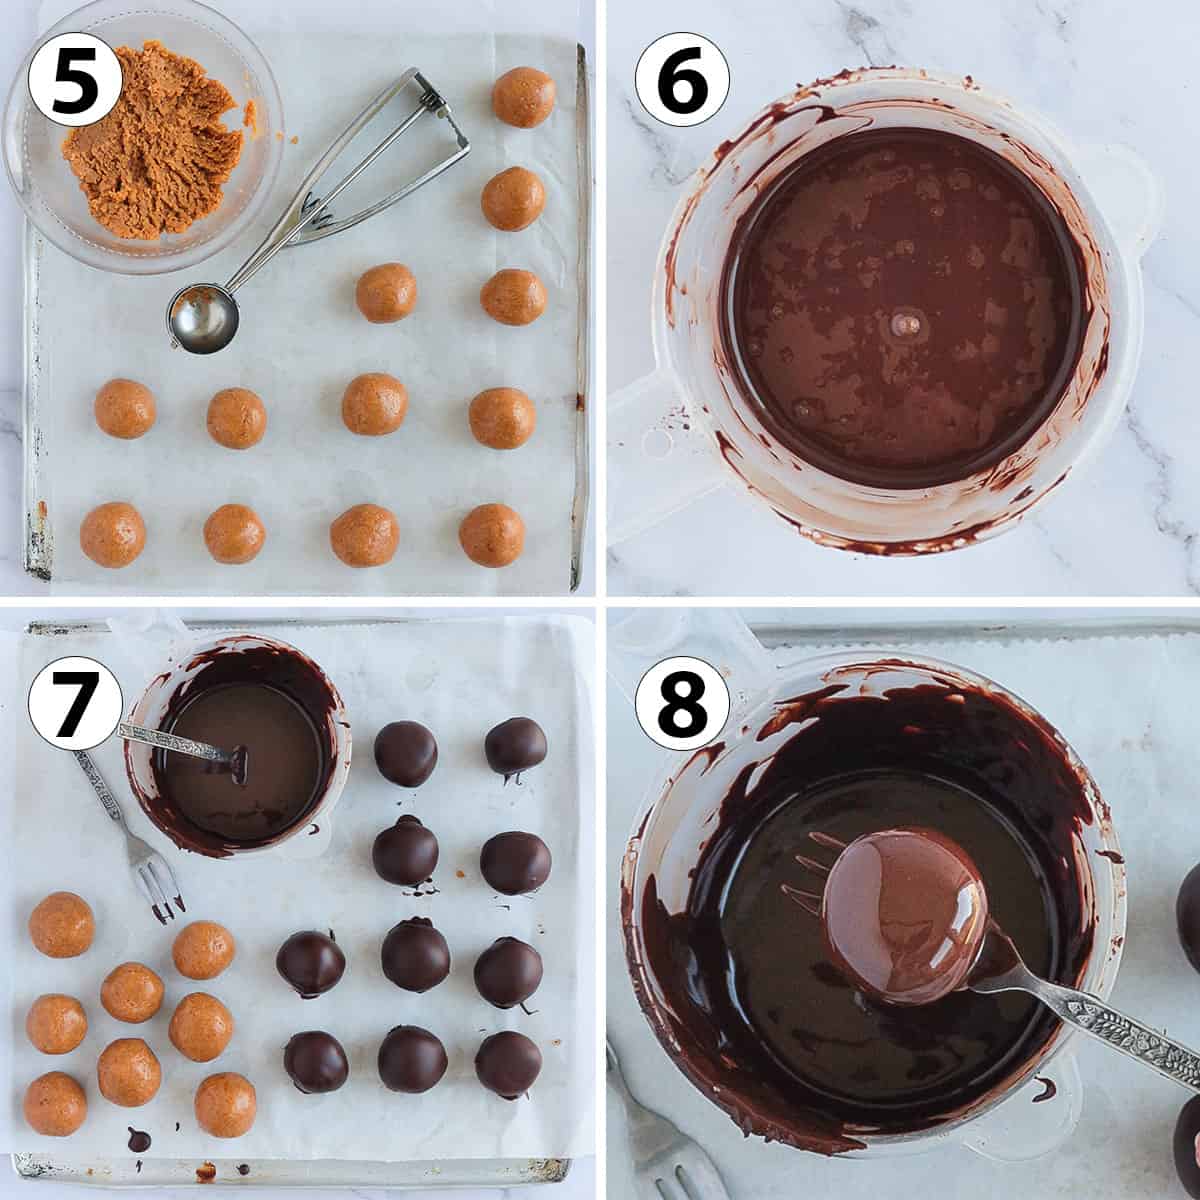
- Photo 5: Scoop out small portions of the dough and roll them between your hands (or on your kitchen bench) to create small balls. You can use a small ice cream scoop to get even quantity of batter each time.
- Photo 5: Place the Peanut Butter Filling Balls on a flat tray lined with baking paper and place in the fridge for 1 hour (or up to overnight), or the freezer for 30 minutes. The balls need to be very cold and hard before you move onto the next step
- Photo 6: Thinly chop the Cooking Chocolate and melt it until very smooth and fluid (see details on how to melt the chocolate below).
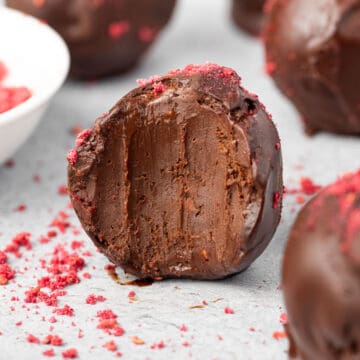
- Photo 7 & 8: Take the filling balls out of the fridge / freezer and dip them individually in the warm melted chocolate. Use a small fork to pick up each ball from under and gently tap on the side of the container to remove any excess of chocolate.
- Place each truffle back on the baking tray and place in the fridge to set for at least one hour.
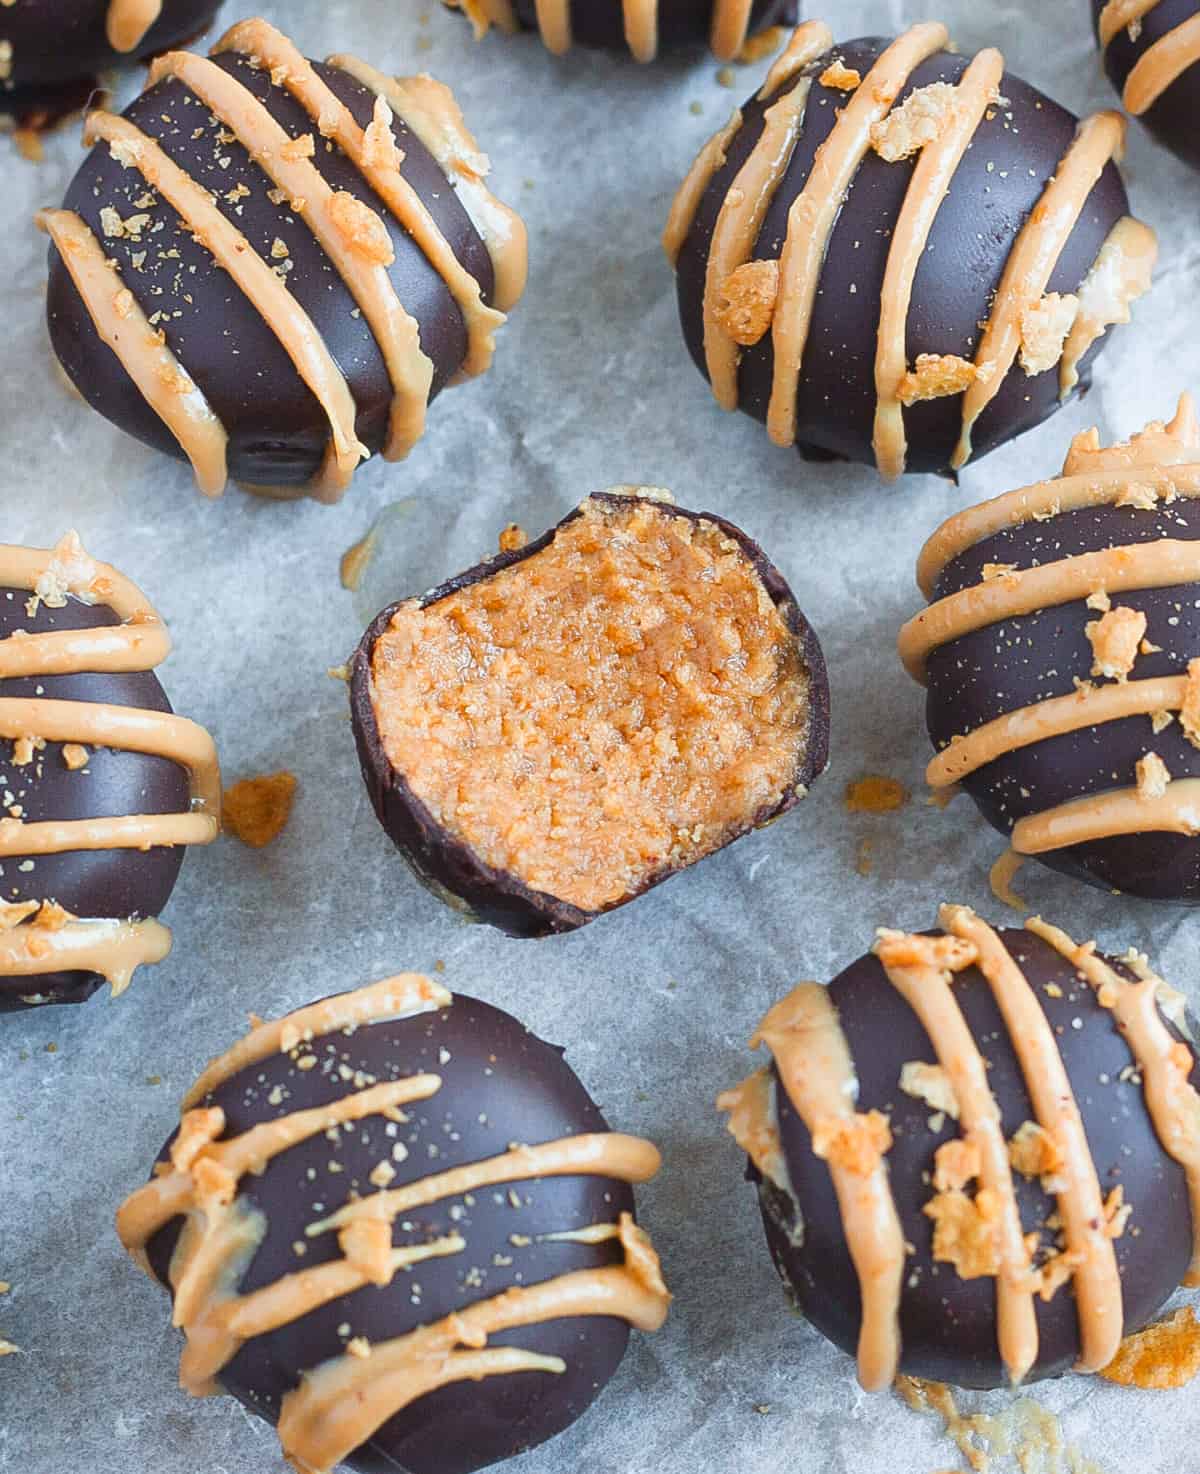
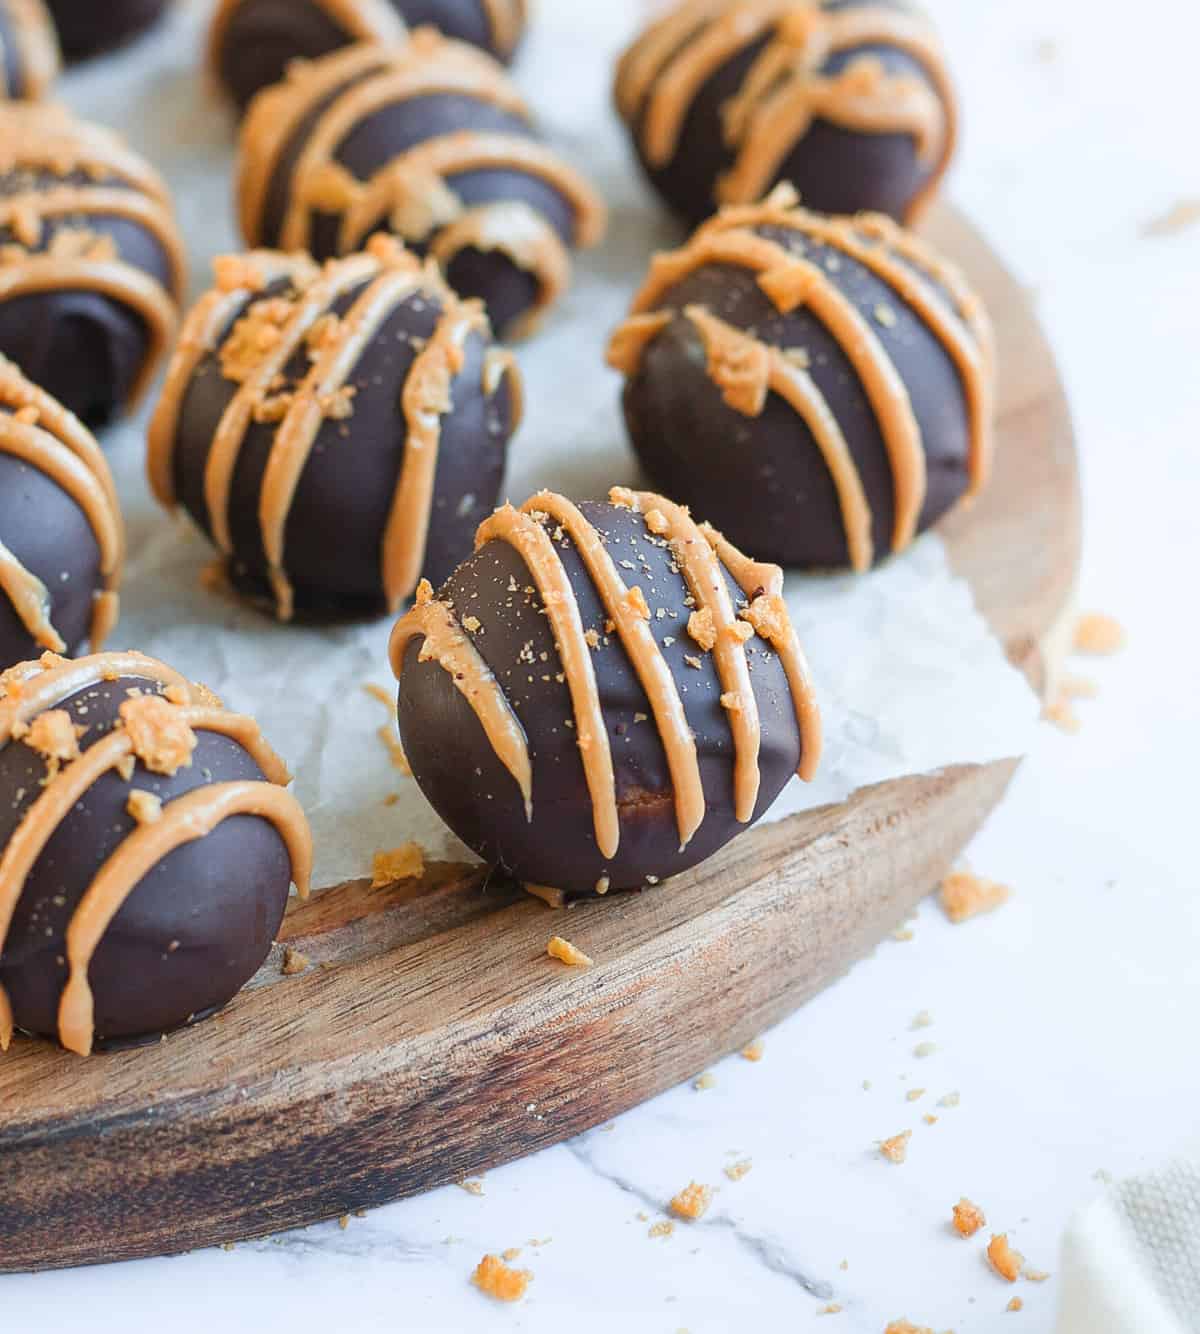
Optional: once the truffle have set, drizzle some smooth Peanut Butter over each balls and sprinkle over some crunched cornflakes to finish them. I used a Pastry Bag with a very narrow opening to have a 'clean' drizzle - but that is optional as well.
Tips to make these truffles
- Crush the Cornflakes very finely or more coarsely to play on the texture of the filling. When blended very finely, it will create a super smooth filling. Keeping some larger chunks will add a more crunchy texture to the truffles (which I personally love!)
- Melt the Peanut Butter in the microwave for a few seconds if you keep it in the fridge or if it is hard. You want the peanut butter to be very liquid to blend properly with the other ingredients.
- Play with the temperatures to create the perfect chocolate coating. The peanut butter balls need to be very cold when dipped in warm melted chocolate to create a shell that will harden straight away.
- Melt the Chocolate in a narrow but high container - like a plastic measuring jug - to easily dip in the peanut butter filling. Or transfer the melted chocolate from the melting bowl to a high container or large glass.
- If the peanut butter balls seem to be getting warm while you dip them - place them back in the freezer for a few minutes. If the chocolate seems to be hardening or be less liquid and smooth when you are coating the truffles, place it back in the microwave for a few seconds to get it fluid again.
- Make sure the chocolate shell is fully set and hard before drizzling some peanut butter over to finish them.
How to properly melt Chocolate
Using the right type of Chocolate (Cooking Chocolate or Couverture Chocolate) is just as important as properly melting it if you want to create a nice shiny and smooth shell. Chocolate tend to become a bit grainy if not properly melted - or melted at a temperature too high.
You can melt Chocolate the classic way in a Double-Boiler ("Bain-Marie") or in the Microwave. If using Cooking Chocolate in the form of a bar, always thinly chop it first to speed up the melting process.
- Double Boiler: place the chopped chocolate in a heat-proof bowl over a small pot filled with water (but make sure the water does not touch the bottom of the bowl). Heat up on low temperature and stir the chocolate until fully melted.
- Microwave: place the chopped chocolate in a microwave-safe bowl (preferably a plastic bowl) and melt in 30 seconds intervals - stopping to stirring each time until most of the chocolate has melted. Then remove from the microwave and gently stir until all the chocolate has melted.
Recipe FAQ
Yes - the only real use of the food processor is to finely crush the Cornflakes. But if you don't have one, that can be done by hands by putting the cornflakes in a plastic bag (like a freezing bag) and crunching them with a rolling pin.
These bites are best kept in the fridge or the chocolate will start to melt (unless it is cool in your kitchen). They will last for a week in your fridge if properly stored in an air-tight container.
Absolutely - these chocolate peanut butter balls will last for quite a while so they can be made in advance and kept in the fridge until you serve them or give them away - within a week!
More Sweet Treats
- Raspberry Truffles from Texanerin
- Almond Flour Peanut Butter Cookies
- Choux au Craquelin
- Chocolate Caramel Slices
- Easy Chocolate Brownie Bites
- Almond and Raspberry Madeleines
- Nut-Free Florentine Cookies
- Banana Peanut Butter Oatmeal Cookies
- Israeli Chocolate Rugelach
Made this recipe?
Let us know if you liked it by leaving a comment below, and tag us on Instagram @a.baking.journey with a photo of your creation!
Recipe

Chocolate Peanut Butter Balls
Ingredients
- 100 gr (3 cups) Cornflakes, Gluten-Free certified if required
- 250 gr (1 cup) Smooth Peanut Butter
- 90 ml (1/3 cup) Maple Syrup
- ½ teasp. Vanilla Extract, optional
- 1 pinch Sea Salt, optional
- 200 gr (7 oz) Dark Cooking Chocolate (*)
Instructions
- Place the Cornflakes in the bowl of your Food Processor and blend for a few minutes or until you get very thin crumbs (see note 1).
- Add the smooth Peanut Butter, Maple Syrup and optionally the Vanilla Extract and Sea Salt. Blend until combined.
- Scoop out small portions of the dough and roll them between your hands to create small balls. Place on a flat tray lined with baking paper and put in the fridge to set for at least 1 hour - or 30 minutes in the freezer (see note 2).
- Finely chop the Cooking Chocolate and melt on a double boiler or in the microwave, stopping every 30 seconds to stir until fully melted (see note 3).
- Dip each cold Peanut Butter Filling balls in the melted Chocolate. With a small fork, pick up each ball and gently tap on the side of the container to remove any excess chocolate (see note 4).
- Place the coated truffles back on the baking tray and put in the fridge to set for a least an hour, or until the chocolate has harden and created a shell.
- Optional: when set, drizzle each truffle with a little bit of Peanut Butter (you can use a pastry bag with a very narrow opening to do this more cleanly) and sprinkle over some crushed Cornflakes to finisht the truffles.
- Keep in the fridge in an air-tight container for up to a week.
Would you like to save this recipe?
Notes
- Blend to your desired consistency: very finely for a more smooth filling, or more coarsely if you want a more crunchy texture. Just make sure not to have large pieces of cornflakes left or it will be hard to roll.
- The balls need to have set and be quite hard and cold before you dip them in the chocolate - otherwise the chocolate coating will not stick.
- I recommend melting it directly into a narrow but high container like a measuring jug or transferring the melted chocolate into such container (could also be a tall glass). It will be easier to dip the peanut butter balls and coat them in chocolate in such a recipient.
- If the chocolate seem to be hardening while you dip the peanut butter balls in, place it in the microwave for a few seconds to melt it again. The chocolate needs to be very fluid and warm to directly stick to the cold filling.