These Orange Mousse Cups are a deliciously light, fluffy and fresh dessert. They are easy to prepare with 4 ingredients only and the perfect make-ahead dessert for a dinner party or special occasion!

Jump to:
Why we love this recipe
If you are looking for a dessert that is simple enough to prepare but looks super impressive, these creamy Orange Mousse Cups are for you!
The 4 ingredient dessert requires no baking and can be prepared in advance. It has a deliciously fluffy texture and is packed with fresh orange flavours. Simply perfect to serve at the end of a dinner party, for the Holidays or special occasion!
Want to try something a bit different? Check out my Chocolate Orange Mousse recipe!
What is a mousse
A mousse is a sweet or savoury preparation that is known for its light and airy texture. The French word "mousse" translates to "foam" in reference to the fluffy aspect of the dish.
A mousse is generally created by folding a whipped element - usually either whipped cream or whipped egg whites - into a flavoured base.
Love a mousse dessert?
Check out my 15+ delicious Mousse Recipes round-up for more inspiration!
Ingredients
Scroll down to recipe card below for all quantities
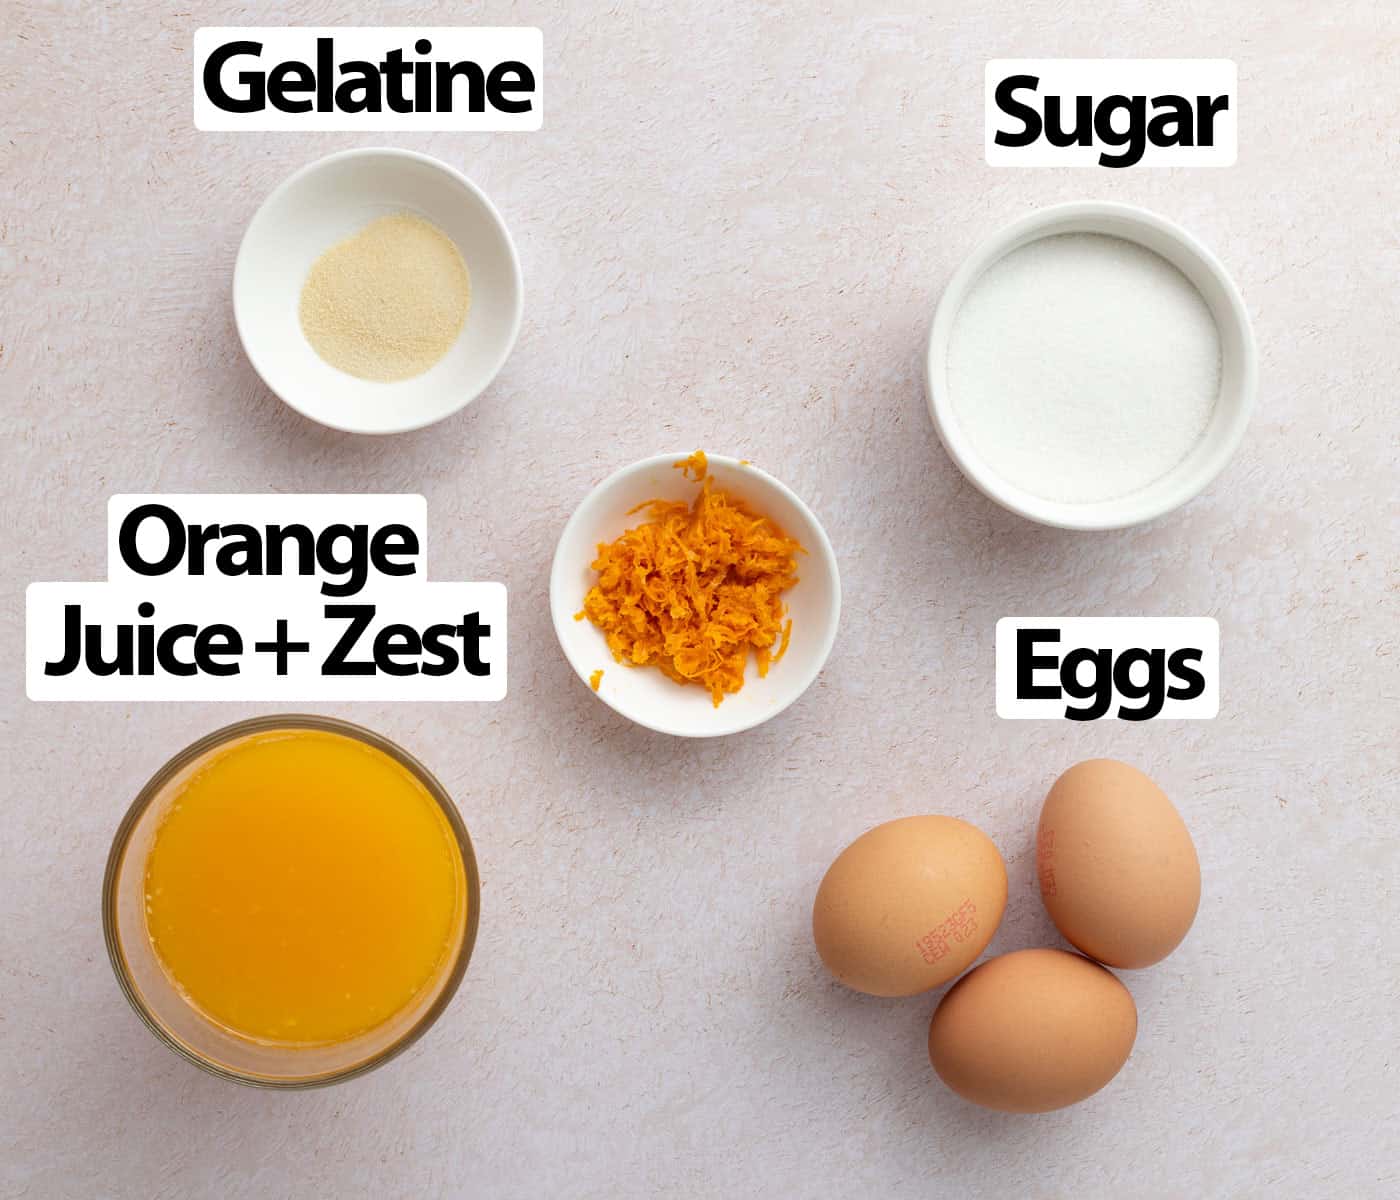
For the Orange Mousse:
- Sugar: caster sugar or superfine granulated sugar. You will use half of the sugar with the egg yolk mixture and the rest to whip the egg whites.
- Eggs: large eggs at room temperature, with egg yolks and egg whites separated. Because the egg whites are not cooked, it is highly recommended to use pasteurised eggs.
- Orange: we are using both the fresh orange juice and orange zest to add as much citrus flavour as possible. Avoid using the white part of the orange rind that will add bitterness to the dessert.
- Gelatine: I used gelatine powder rehydrated in cold water but you can use some gelatine sheets / leaves instead. See FAQs section below for substitution.
For the Orange Whipped Cream (optional):
- Thickened / Heavy Cream (heavy whipping cream): make sure to use a cream that has a at least a 30% fat content. Anything with less fat will not whip properly and won't hold its shape once whipped.
- Icing or Powdered Sugar: I used a minimal amount of sugar in this topping to balance the flavour of the dessert. If you prefer something sweeter, feel free to increase the sugar quantity.
- Orange Zest: a simple way to boost the orange flavours of the dessert.
How to make Orange Mousse step-by-step
1. Cooking the Juice & Yolk Mixture
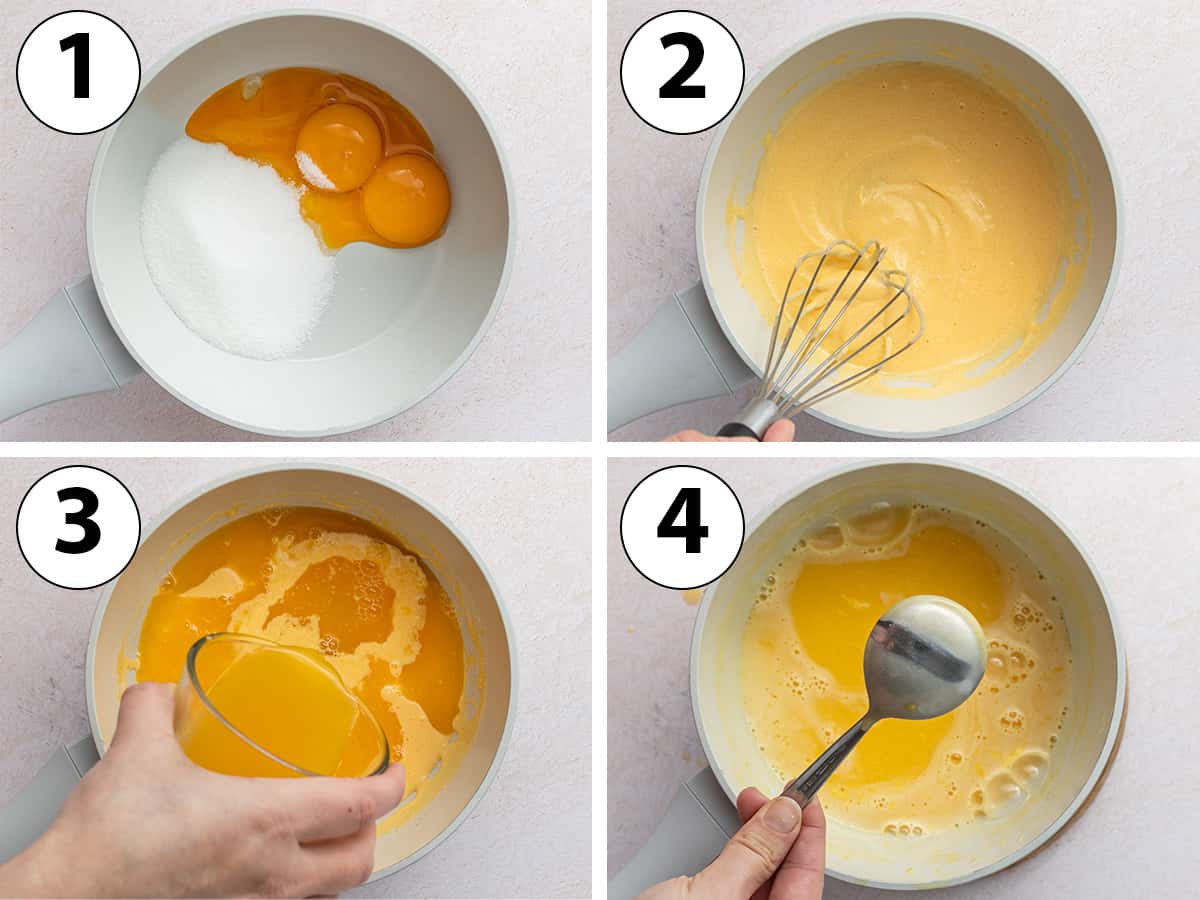
Before starting the recipe, prepare the ingredients and process them as required: zest and juice the oranges, separate the egg yolks and egg whites and rehydrate the gelatin powder in cold water.
- Photo 1: Place the egg yolks and half of the caster sugar in a small saucepan.
- Photo 2: Whisk until combined.
- Photo 3: Add the orange juice and whisk well until smooth.
- Photo 4: Turn on low heat and gently cook on the stove while continuously stirring with a heat-proof spatula. Cook for 5 to 10 minutes, or until the egg and orange mixture has slightly thickened and coats the bottom of a spoon.
Ideally, use a kitchen thermometer to cook the eggs to the right temperature: between 82 and 84 degrees Celsius (180 to 183 degrees Fahrenheit). At this temperature, the egg yolks are safely cooked but haven't started to curdle yet.
The exact cooking time can vary based on the size of your pan and stove temperature. Make sure the mixture does not boil or you risk overcooking the eggs, which will result in a chunky, curdled mixture.
We are essentially making an orange "crème anglaise" or custard base here, where the traditional milk or cream has been replaced with orange juice.
2. Adding the gelatine and zest
- If not already done, rehydrate the gelatine powder: mix the powder and very cold water in a small bowl. Stir well to break any lumps and set aside until the mixture turns into a thick paste.
Would you like to save this recipe?
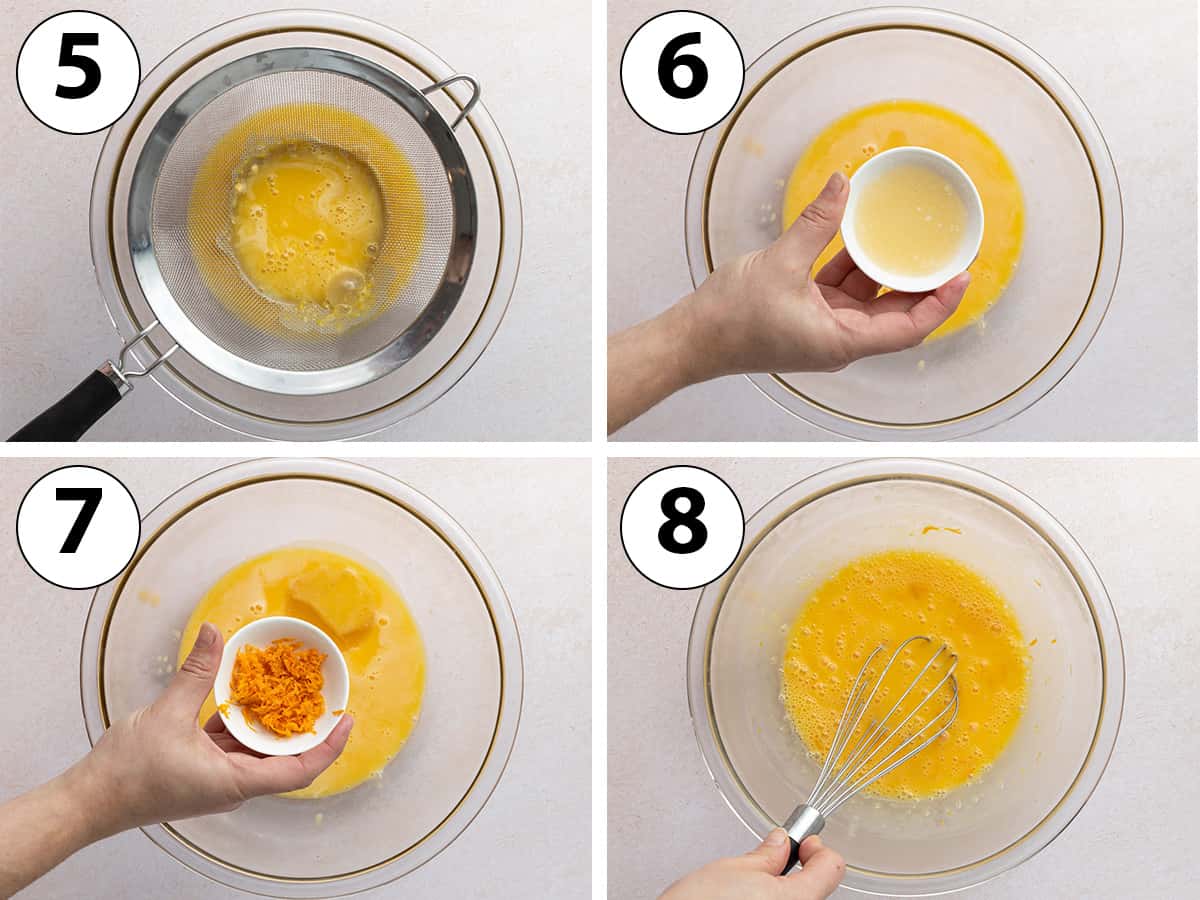
- Photo 5: Pour the mixture into a large mixing bowl through a fine mesh sieve. Discard any lumps or bits of cooked eggs that might remain in the sieve.
- Photo 6: Add the gelatine paste and whisk well into the warm orange mixture until fully dissolved.
- Photo 7: Add the orange zest.
- Photo 8: Quickly whisk to mix the zest in.
- Cover the bowl with plastic wrap touching the surface of the mixture and place in the fridge to chill for 30 minutes to 1 hour. It shouldn't feel hot to the touch anymore but shouldn't be too cold or the gelatine will start to set.
The exact time will depend on the size of the bowl and the temperature of your fridge. As a reference, gelatine will set once the temperature drops below around 40 degrees Celsius.
3. Folding in the whipped egg whites
- Once the egg yolk mixture has cooled down, start preparing the whipped egg whites.
- Place the egg whites in a very clean large bowl (if using an electric mixer / hand mixer) or in the bowl of your stand mixer fitted with the whisk attachment.
- Start whipping the egg whites on medium low to medium speed until it starts to increase in size, turn slightly white and get the consistency of light shaving cream.
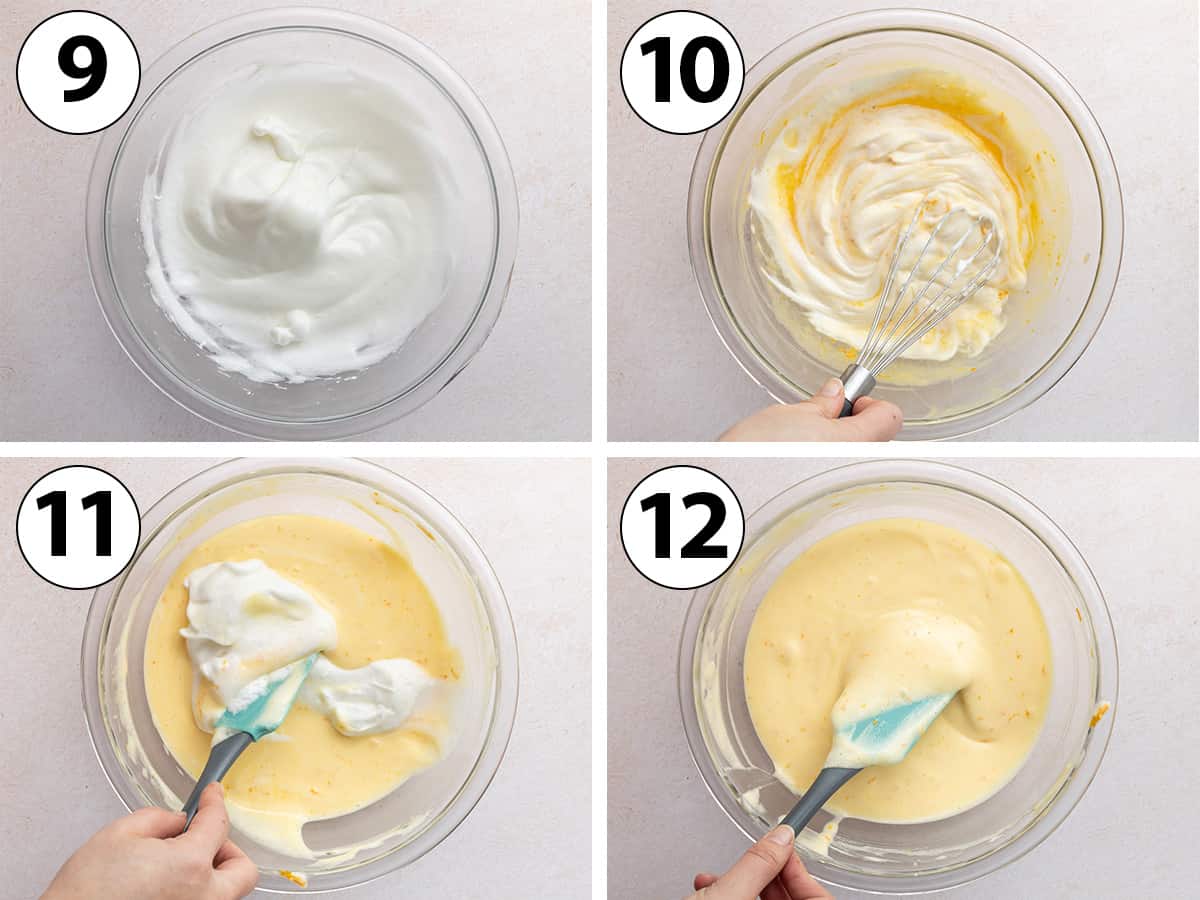
- Photo 9: While continuing to whip, slowly add the remaining of the sugar one tablespoon at the time until all integrated. Increase the speed of the mixer to medium high to high and keep on whisking until you reach stiff peaks. The egg whites should hold their shape well and look thick and glossy.
- Photo 10: Take the egg yolk mixture out of the fridge and lightly whisk to loosen it. Add about a quarter of the whipped egg whites to it and very gently mix it in using a whisk.
Using a whisk to integrate a little bit of the egg whites at first will deflate them slightly. But will help thicken the mixture and make it easier to fold in the rest of the egg whites.
- Photo 11: Switch to a spatula and gently fold in the rest of the whipped egg whites in 3 or 4 times. Stop folding as soon as you can't see any of the egg whites or you might over-mix the mousse and deflate it.
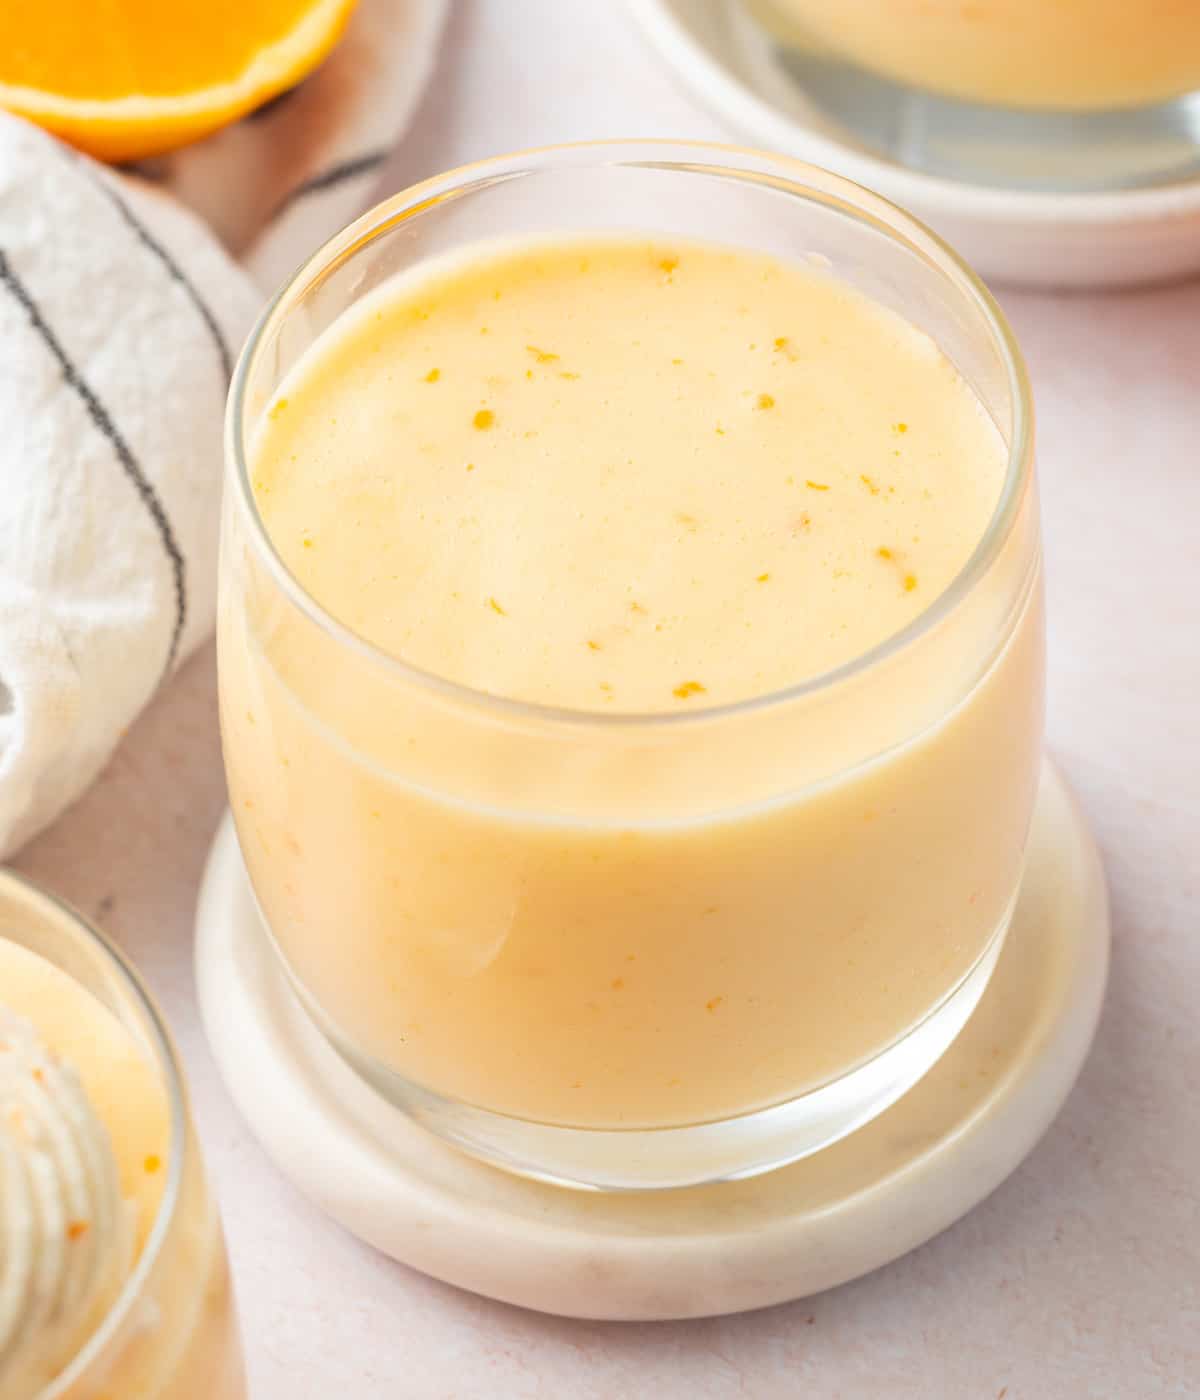
- Photo 12: Once the egg whites are all integrated, you should get a thin, light and creamy texture. It will resemble more of a custard or pudding than a mousse at this point - that's normal! The texture will change as the mousse sets in the fridge.
- Pour the orange mousse into serving cups, ramekins or a large serving dish (if you want to serve the mousse as a large dessert rather than an individual one). Place in the fridge to chill and set for at least 3 to 4 hours, preferably overnight.
- Optionally once set, prepare the orange whipped cream topping. Place the cold whipping cream in a large clean bowl and sift in the icing sugar. Using a hand mixer (or stand mixer fitted with the whisk attachment), whisk on medium to high speed until you reach stiff peaks. Gently fold in the orange zest.
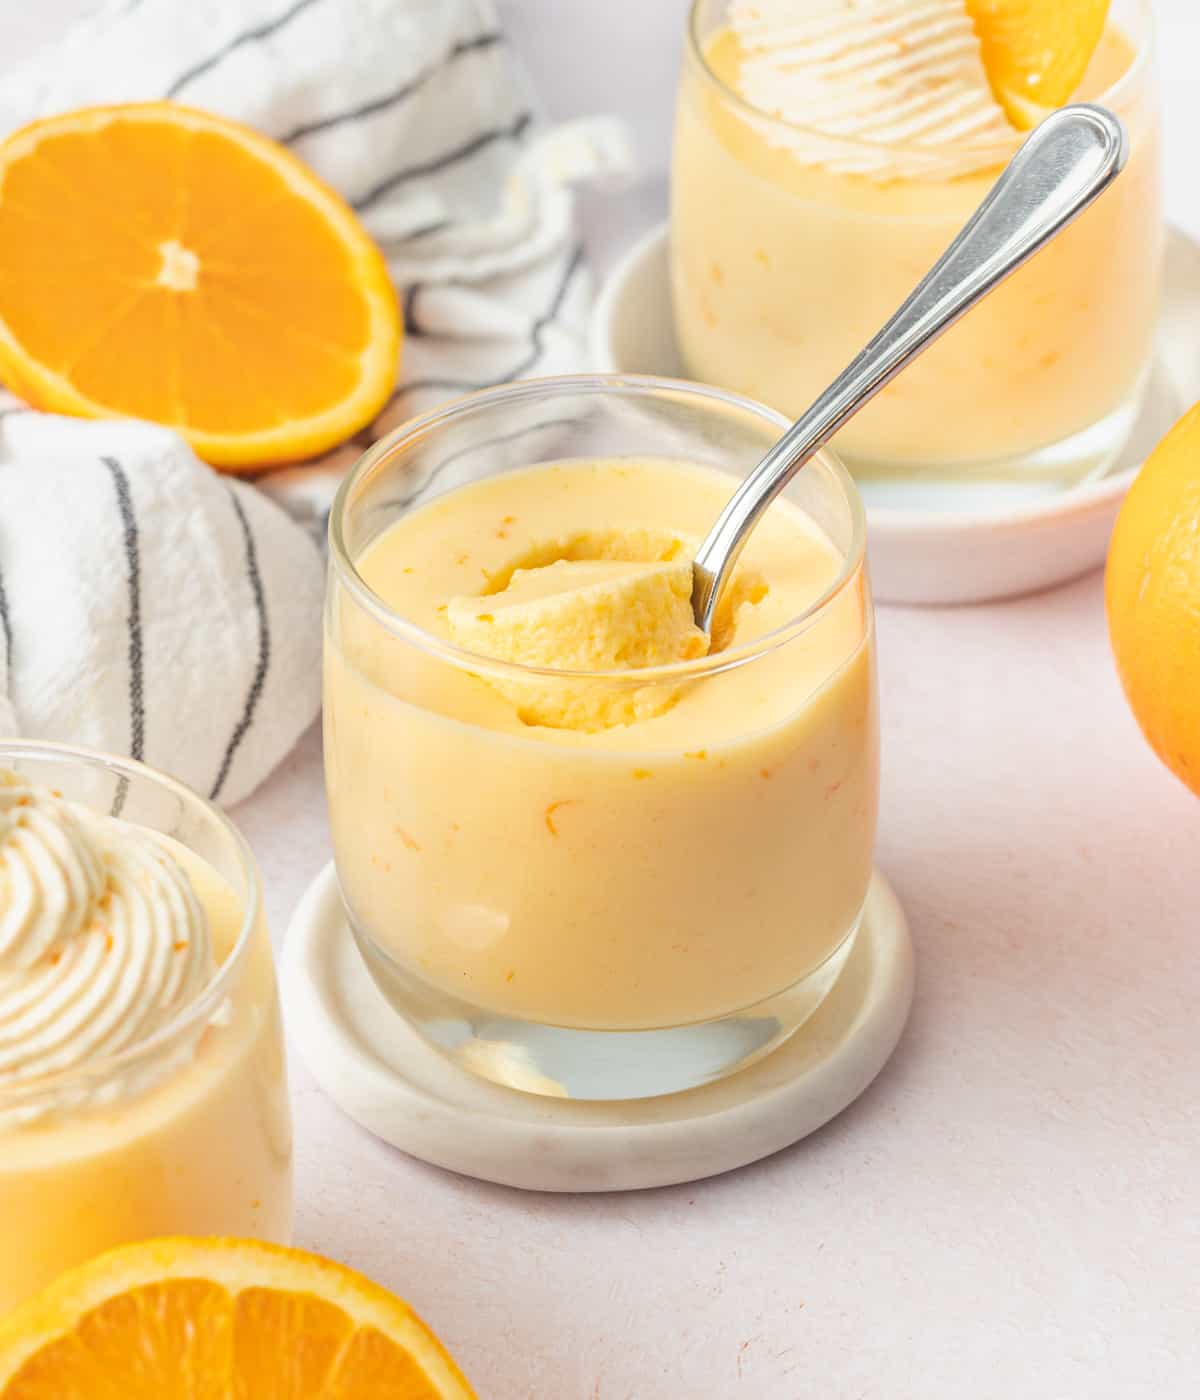
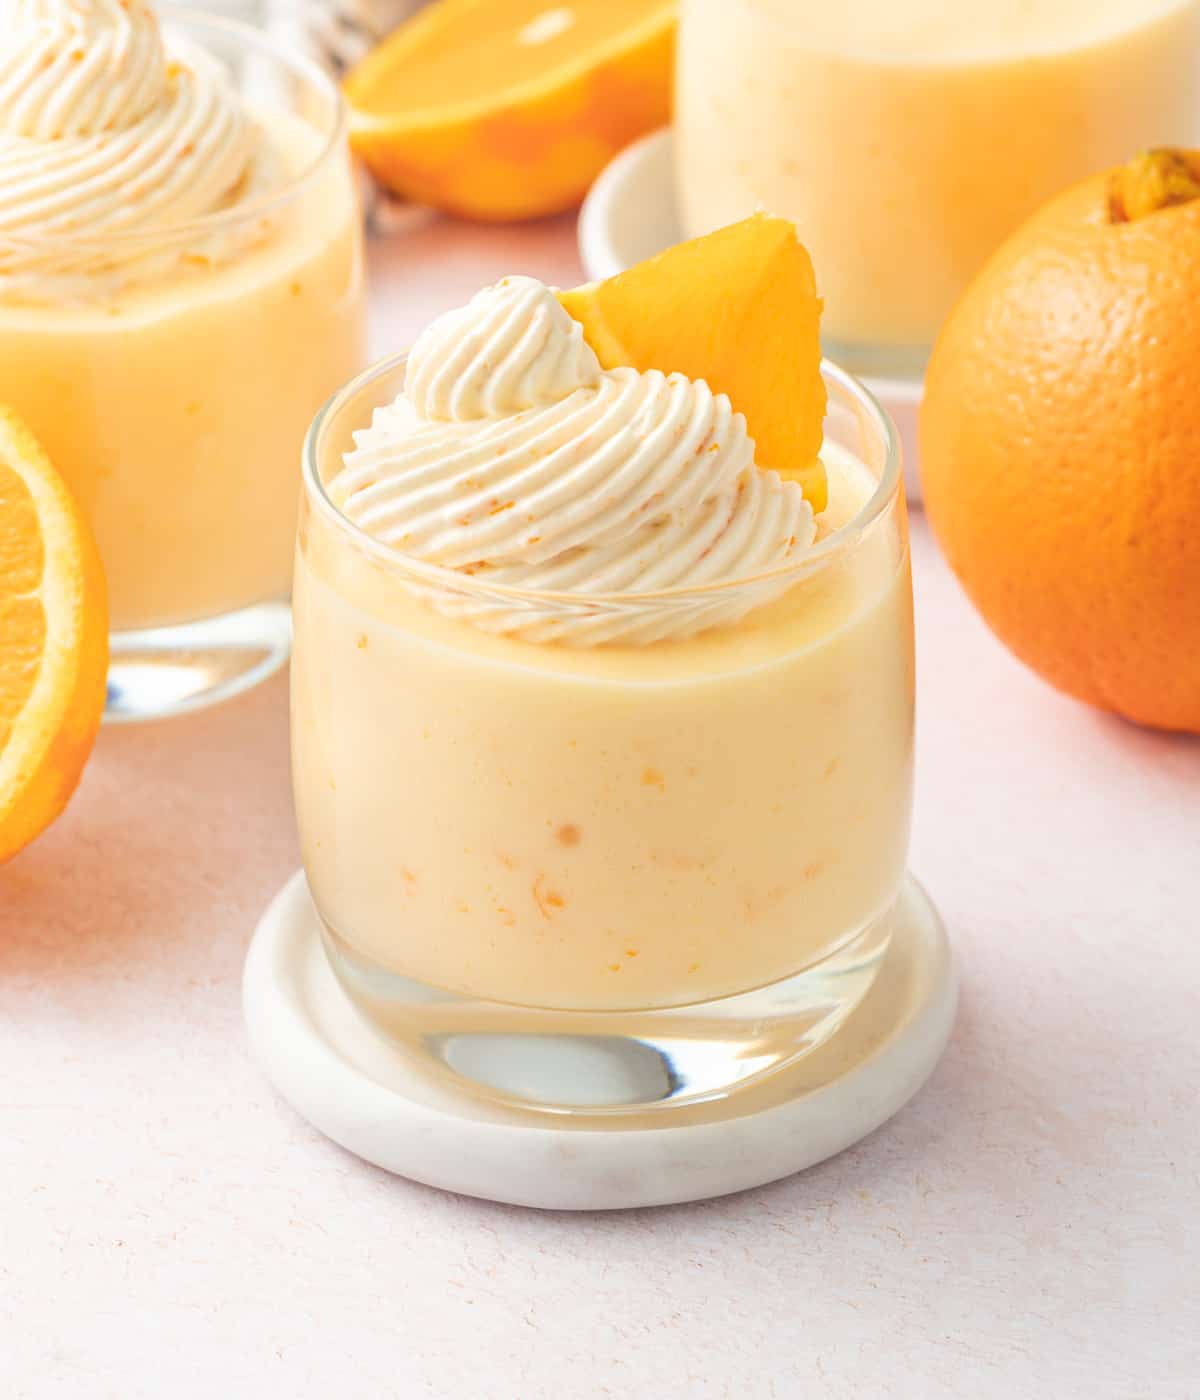
- Top the orange mousse with a generous dollop of whipped cream or use a piping bag fitted with a star-shape nozzle to pipe the cream. Finish with a quarter or slice of fresh orange. Keep in the fridge until ready to serve.
Recipe FAQs
If you can't find gelatine powder, you can also use gelatine sheets / leaves. Simply substitute the 3/4 teaspoon of gelatine powder with 1 1/2 gelatine sheets (platinum strength).
Soak the sheets in a large bowl of very cold water and leave them for 10 minutes. Press the sheets to completely drain them of water before using as directed.
The gelatine is essential to help stabilise the mousse as the mousse does not contain enough fat to hold well on its own. You can skip the gelatine if preferred but you will get a mousse that has a less fluffy and more runny consistency.
Raw eggs are safe to eat when pasteurised. Pasteurising is a process that gently heats the eggs to kill any bacteria, making them safe to eat raw.
Note that even when pasteurised, it might not be recommended to eat raw eggs in specific situation like if you are pregnant.
I have only tested this recipe with egg whites. If preferred, you can experiment with whipped cream (if you don't want to eat raw eggs for example) - but I cannot guarantee the result.
Although the recipe should work with whipped cream, the final texture and taste of the dessert will be heavier, creamier and not as light as with egg whites.
Tips & Tricks
- Make sure not to over-whip the egg whites or they will start to deflate and get a grainy texture. When you reach stiff peaks, the egg whites should look very glossy, smooth and hold their shape well on the whisk.
- The recommended cooking, chilling and resting time are key to success - don't skip them! The egg mixture needs to be warm enough (but not so hot that the egg yolks would scramble) to melt the gelatine. It then requires to be chilled before folding in the egg whites, or they will melt.
- If after spending a few hours in the fridge, the orange mousse seems dense rather than fluffy, it is usually an indication that the whipped egg whites where folded in too roughly. Make sure to very gently fold in the egg whites to keep most of the tiny air bubbles in the mixture.
- For a different finish, replace the whipped cream topping with some of my Orange Curd!
Storing & Freezing
These orange cups need to be refrigerated until ready to serve. They will be best served within 24 hours and should be eaten within 2 days. If making in advance, I recommend adding the whipped cream topping only a few hours before serving to insure freshness.
The mousses are the perfect make-ahead dessert since they require a fair bit of chilling time to get the right texture.
This dessert will not freeze well.
Made this recipe?
Let us know if you liked it by leaving a comment below, and tag us on Instagram @a.baking.journey with a photo of your creation!
Recipe

Orange Mousse Cups
Ingredients
Orange Mousse
- 3 large Eggs, pasteurized
- 80 gr Caster Sugar, divided in half
- 180 ml Orange Juice, (about 3 large oranges)
- 3/4 teaspoon Gelatine Powder (*), + 1 tablespoon cold water
- 2 teaspoon Orange Zest
Orange Whipped Cream (optional)
- 120 ml Thickened / Heavy Cream, min. 30% fat content
- 20 gr Icing Sugar
- 1 teaspoon Orange Zest
Instructions
Orange Mousse
- Before starting the recipe, prepare the ingredients and process them as required: zest and juice the oranges and separate the egg yolks from the egg whites. Rehydrate the gelatine powder by mixing the gelatine powder and very cold water in a small bowl. Stir well to break any lumps and set aside until the mixture turns into a thick paste.
- Place the egg yolks and half of the caster sugar (keep the second half for later) in a small saucepan and whisk until combined. Mix in the orange juice until smooth.
- Place on the stove on low heat and gently cook for 5 to 10 minutes while continuously stirring with a heat-proof spatula. The mixture should have slightly thickened and coat the bottom of a spoon (see note 1). Make sure the mixture does not boil or you risk overcooking the eggs, which will result in a chunky, curdled mixture.
- Pour the cooked mixture into a large mixing bowl through a fine mesh sieve. Discard any lumps or bits of cooked eggs that might remain in the sieve.
- Add the prepared gelatine paste and whisk well into the warm mixture until fully dissolved. Gently mix in the orange zest.
- Cover the bowl with plastic wrap touching the surface of the mixture and place in the fridge to chill for 30 minutes to 1 hour. It shouldn't feel hot to the touch anymore but shouldn't be too cold or the gelatine will start to set (see note 2).
- Place the egg whites in a clean large bowl (if using a hand mixer) or in the bowl of your stand mixer fitted with the whisk attachment. Start whipping the egg whites on medium low to medium speed until it starts to increase in size, turn slightly white and get the consistency of light shaving cream.
- While continuing to whip, slowly add the remaining half of the sugar one tablespoon at the time. When all incorporated, increase the speed to high and keep on whisking until you reach stiff peaks. The egg whites should look thick, glossy and hold their shape well on the whisk.
- Take the egg yolk mixture out of the fridge and lightly whisk to loosen it. Add about a quarter of the whipped egg whites to it and very gently mix it in using a whisk (see note 3).
- Switch to a spatula and gently fold in the rest of the whipped egg whites in 3 or 4 times. Stop folding as soon as you can't see any of the egg whites or you might over-mix the mousse and deflate it. You should get a thin, light and creamy texture (see note 4).
- Pour the orange mousse into serving cups and place in the fridge to chill and set for at least 3 to 4 hours, preferably overnight.
Orange whipped cream (optional)
- Place the cold whipping cream in a large clean bowl and sift in the icing sugar. Using a hand mixer (or stand mixer fitted with the whisk attachment), whisk on medium to high speed until you reach stiff peaks. Gently fold in the orange zest.
- Top the orange mousse with a generous dollop of whipped cream or use a piping bag fitted with a star-shape nozzle to pipe the cream. Finish with a small slice of fresh orange. Keep in the fridge until ready to serve.
Would you like to save this recipe?
Notes
- The exact cooking time will depend on the size of your pan and the exact temperature of your stove. Ideally, use a kitchen thermometer to cook the eggs to the required temperature - between 82 and 84 degrees Celsius (180 to 183 degrees Fahrenheit).
- The exact time will depend on the size of the bowl and the temperature of your fridge. As a reference, gelatine will set once the temperature drops below around 40 degrees Celsius so you don't want to leave the mixture in the fridge for too long or it will start to set and make it hard to incorporate the egg whites.
- Using a whisk to integrate a little bit of the egg whites at first will deflate them slightly. But will help thicken the mixture enough to make it easier to fold in the rest of the egg whites.
- The mousse will resemble look more like a custard at this point - that's normal! The texture will change as it sets in the fridge.