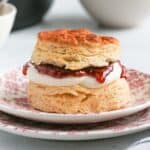
Basic Scones in the Remoska
Nothing beats Scones when it comes to morning or afternoon tea treat. These light, fluffy and flaky Scones are super easy to make with 5 ingredients only - and you don't even need an oven to bake them!
Servings: 8 scones
Calories: 321kcal
Ingredients
- 400 gr (2 cups + 2/3 cup) Self-Rising Flour
- 40 gr (3 1/2 tablesp.) Caster Sugar or fine white granulated sugar
- 120 gr (1/2 cup) Unsalted Butter very cold
- 180 ml (3/4 cup) Full Cream Milk
- 1 teasp. Vanilla Extract optional
Instructions
- Mix the Self-Rising Flour and Sugar in a large bowl. Add the very cold Butter cut into small cubes (see note 1). Cut the butter into the flour until you get very small crumbs, either using your fingers and rubbing the butter and dry ingredients together, or with a Pastry Blender (see note 2).400 gr (2 cups + 2/3 cup) Self-Rising Flour, 40 gr (3 1/2 tablesp.) Caster Sugar, 120 gr (1/2 cup) Unsalted Butter
- Make a well in the centre of the bowl and add the cold Milk and Vanilla Extract. Mix all the ingredients until combined to get a rough dough. Slowly knead the dough together until smooth, stopping as soon as combined to avoid over-working the dough (see note 3).180 ml (3/4 cup) Full Cream Milk, 1 teasp. Vanilla Extract
- Roll the dough into a large disk, about 1,5 cm (0.6 inch) thick. Cut out individual scones with a round cookie cutter (I used a 7,5cm / 3 inch wide cookie cutter) then place in the fridge to rest for at least 30 minutes.
- The dough scraps can be re-assembled into a ball and re-rolled to get more scones, but you might need to rest the dough in the fridge for 10 to 15 minutes before re-rolling it.
- Place the Remoska pot on the trivet, cover with the Baking Lid, plug it in then turn it on to pre-heat for 2 to 3 minutes (see note 4).
- Optional: brush a little bit of Heavy/Thickened Cream over the scones to give them a golden finish.
- Put half of the Scones at the bottom of the Remoska pot (be careful, the lid will be hot), optionally lined with baking paper to easily lift them out. Leave a little bit of space between each scones so they can rise (see note 5).
- Place the Baking Lid back on and bake for 20 to 22 minutes. Take the scones out (either by lifting the baking paper or using wooden or silicone tongs) and place on a cooling rack to cool down.
- Repeat the process with the the second batch of Scones and bake for 15 to 18 minutes (see note 6).
- Seve while still slightly lukewarm with your choice of fillings.
Notes
Disclaimer: I highly recommend using the measurements in grams/ml (instead of cups/spoon) for more accuracy and a better result.
Ingredients Notes:
- Flour: you can use Plain / AP Flour instead of Self-Rising Flour (in the same quantity) with the addition of 1 teasp. Baking Powder and a pinch of Salt.
- You can also use a box grater and grate the very cold butter instead of adding it in small cubes. This will make the process quicker, but might result in slightly less flaky scones.
- You should still be able to see small chunks of butter, but try to work the ingredients enough so that those chunks are pretty small and most of the flour is covered in butter.
- Try not to overwork the dough at this point to avoid developing too much gluten. If the dough feels quite tough and pulls when you handle it, place it in the fridge to rest for 10 to 15 minutes.
- This is optional, you can bake the scones in a cold Remoska (place the scones in the bowl then turn on the baking lid). Slightly pre-heating the remoska has given me the best results, but the differences weren't huge so you can absolutely skip this step if preferred.
- The scones will rise and puff quite a lot and you want to leave some space between them, so I recommend baking them in two batches. The second batch should stay in the fridge until it is ready to be baked. I used baking paper at the bottom of the pot to easily lift the scones out, but since the Remoska pot is non-stick, this is optional.
- As the Remoska will be hot a this point, the baking time will be shorter for the second batch.
Nutrition
Calories: 321kcal | Carbohydrates: 42g | Protein: 7g | Fat: 14g | Saturated Fat: 8g | Polyunsaturated Fat: 1g | Monounsaturated Fat: 3g | Trans Fat: 1g | Cholesterol: 35mg | Sodium: 12mg | Potassium: 84mg | Fiber: 1g | Sugar: 6g | Vitamin A: 412IU | Calcium: 37mg | Iron: 1mg