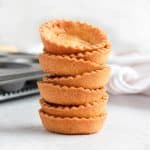
How to make Tartlet Shells
No Tartlet Tin? No problem! This easy recipe will show you how to make Tartlet Shells in a Muffin Pan. These deliciously buttery and crunchy mini pastry crusts can be garnished with any of your favourite fillings and are great for parties!
Servings: 18 tartlets
Calories: 113kcal
Ingredients
- 250 gr (1 2/3 cup) Plain / All-Purpose Flour
- 50 gr (1/2 cup) Icing Sugar or Powdered Sugar, sifted
- 1 pinch Table Salt
- 120 gr (1/2 cup) Unsalted Butter very cold
- 1 large Egg
Instructions
- Place the Flour, Icing Sugar and Salt in the bowl of your Food Processor and pulse to mix. Add the cold Butter cut into small cubes, then mix to get very small crumbs (see note 1).
- Add the whisked Egg and mix until a dough starts to come together (see note 2).
- Bring together into a ball then roll between two sheets of baking paper, about 4 mm (1/6 inch) thick (see note 3). Place on a flat tray and leave to rest in the fridge for at least 1 hour - or overnight.
- Take out of the fridge and remove the baking paper. With a round or fluted cookie cutter that is about 2 cm (0,8 inch) wider than the opening of the muffin pan, cut out disks of pastry (see note 4). Gently slide the pastries into the muffin pan until it touches the bottom. With a finger, lightly press on the bottom corners to insure the pastry is flush with the pan and no air pockets remain under the pastry.Pro tip: for the best results, use a muffin pan with perforated bottom. It will insure an ideal air flow and provide the best, evenly baked shells.
- Place the muffin pan in the fridge for at least 2 hour - preferably overnight for the best results.
- Preheat your oven on 160'C/325'F. Dock the bottom of the pastry (prick with a small fork) and place the muffin pan in the freezer while the oven is preheating.
- Line each tartlet shell with a small piece of crunched up baking paper, and cover with baking beads, beans or rice.
- Bake for 15 minutes, remove the baking weights and baking paper, then bake for an additional 12 to 15 minutes or until lightly golden and dry to the touch. Leave to cool down completely before removing from the muffin pan and adding the filling (see note 5).If your choice of filling needs to be baked, add it to the cooled down par-baked shells after removing the baking weights and use the recommended baking time for your filling.
Video
Notes
Yield: this recipe will make 12 to 30 tartlet shells, depending on how wide you cut out the pastries, how deep the shells are and how thinly you roll the pastry. I made 18 tart crusts using a regular sized muffin pan and the pastry being rolled at 4 mm (about 1/6 inch).
Instruction Notes:
- You shouldn't see any large lumps of butter anymore. Because the crusts are so small, I don't recommend making a very flaky pastry (usually pastries that have large lumps of butter in them) because they might puff up too much in the oven.
- Stop as soon as the pastry comes together to avoid overworking the dough. If you press the lumps between your hand, they should stick together. If too dry, add a little bit of very cold water. If too sticky, add a little bit more flour.
- If rolled too thinly, the crust might break because too fragile. If too thick, the ratio of pastry to filling might be off. I have found that 3 to 4 mm (1/6 to 1/8 inch) is the perfect thickness for these mini tart shells.
- The wider you cut out the circles of pastry, the deeper the tartlet shells will be. It is up to you how wide you cut them out, but I recommend having the width of the muffin pan openings as a minimum. Otherwise, the crusts will be quite flat and not deep enough for a filling.
- This baking technique is to be used if your filling does not require any baking. If the filling needs to be baked as well, consider partially blind-baking the shells before adding the filling to avoid getting a soggy crust bottom.
Nutrition
Calories: 113kcal | Carbohydrates: 13g | Protein: 2g | Fat: 6g | Saturated Fat: 4g | Trans Fat: 1g | Cholesterol: 23mg | Sodium: 7mg | Potassium: 20mg | Fiber: 1g | Sugar: 3g | Vitamin A: 180IU | Calcium: 5mg | Iron: 1mg